Before installing a new graphics card, it is recommended to remove old drivers for the Windows 10 video card. Using the example of installing the new Radeon RX580 after the HD7950, various artifacts were observed, despite the same graphics chip manufacturer. A complete uninstall and clean installation of a compatible version of the drivers completely fixed all the problems.
This article will tell you how to remove the driver for a Windows 10 video card. After each update, in addition to the latest ones, old versions of drivers are also saved on the computer. Instead of operating system uninstallation tools, you can also use, for example, the Display Driver Uninstaller program. It easily detects INTEL & AMD & NVIDIA graphics card drivers.
How to remove AMD & NVIDIA video card drivers
Settings & Control Panel
You can find video card drivers directly in Programs and Components and perform a classic update. We will use methods that allow you to completely remove the program from your Windows 10 computer.
Go to Settings > Apps > Apps & features . In the list of installed applications, find the video card driver companion program and once highlighted, click Uninstall .
- AMD - for video cards from the current manufacturer, you need to look for AMD Software in the list of installed programs. Previously (on older budget or mid-range video cards) you had to look for AMD Catalyst Install Manager.
- NVIDIA - with video cards from the current manufacturer, you need to remove all programs individually. Namely NVIDIA Graphics Driver, 3D Vision Driver, GeForce Experience and PhysX System Software.
Classic Device Manager
Device Manager allows you to track the status of all devices connected to your computer. It allows you to automatically or manually update drivers. Additionally, if necessary, you can roll back the video card drivers on Windows 10.
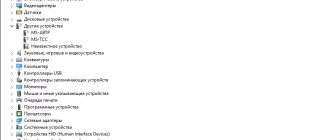
- Launch the manager by running the command devmgmt.msc in the Win+R .
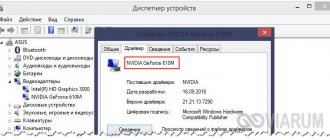
- In the list of video adapters, go to Properties of the desired video card.
- Now in the section Driver click Remove device from the system.
- Check Uninstall driver programs for this device and confirm your intention.
Display Driver Uninstaller
Using the Display Driver Uninstaller program makes the process of removing video card drivers completely automatic. For better cleaning and to avoid problems. Rebooting into safe mode is recommended. Be sure to run the program as a Windows 10 administrator.
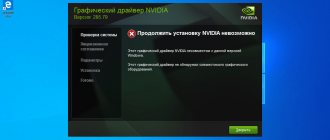
After launching the Display Driver Uninstaller program window, you can select the interface language if necessary (the system language is used by default). Now select the device type: GPU and manufacturer AMD or NVIDIA . Next, click the DELETE AND RESTART (highly recommended).
In most cases, the program will automatically create a system restore point, remove all components of the selected driver, and restart the computer. The program also allows you to REMOVE WITHOUT REBOOT (which can lead to a black screen problem) or REMOVE AND TURN OFF the computer (to install a new video card).
Using Display Driver Uninstaller
You can download Display Driver Uninstaller from the official page (download links are at the bottom of the page; in the downloaded archive you will find another self-extracting exe archive, which already contains the program). Installation on your computer is not required - just run “Display Driver Uninstaller.exe” in the folder with the unpacked files.
It is recommended to use the program by starting Windows in safe mode. It can restart the computer on its own, or you can do it manually. To do this, press Win + R, type msconfig, then on the “Boot” tab, select the current OS, install o, apply the settings and reboot. Do not forget to remove this mark after completing all actions.
After launch, you can install the Russian language of the program (it did not turn on automatically for me) at the bottom right. In the main window of the program you are offered:
- How to remove AMD, nVidia, Intel video driver - completely and completely!
- Select the video card driver you want to remove - NVIDIA, AMD, Intel.
- Select one of the actions - complete removal and reboot (recommended), removal without reboot, and removal and shutdown of the video card (to install a new one).
In most cases, it is enough to select the first option - Display Driver Uninstaller will automatically create a system restore point, remove all components of the selected driver and restart the computer. Just in case, the program also saves logs (a log of actions and results) into a text file, which can be viewed if something went wrong or you need to get information about the actions taken.
Additionally, before removing the video card drivers, you can click “Options” in the menu and configure the removal options, for example, refuse to remove NVIDIA PhysX, disable the creation of a restore point (I do not recommend) and other options.
Graphics card drivers allow these devices to enable all of their graphics processing capabilities, while requiring full compatibility with models from a specific manufacturer. If the GPU is replaced, it is likely that new software will be required. Often, before installing it, it becomes necessary to remove the old version. This is what we will talk about in this article.
How to remove old AMD & NVIDIA video card drivers
Previously, we already looked at how to remove old Windows 10 device drivers. With graphic cards, everything is much simpler, although you can also use the above methods. Even after updating drivers, old versions remain on the system disk. You can simply go to the C:\NVIDIA and C:\AMD and clear their contents.
Before installing a new video card or if any problems arise, it is recommended to completely remove the video card drivers. You will need to reinstall them later. It is not always possible to simply update your video card drivers to fix the problem. After using the system for several years, it is recommended to clean out the folder with old drivers.
If you cannot remove the NVIDIA video card driver using standard Windows tools, use the convenient Display Driver Uninstaller removal tool.
Display Driver Uninstaller will help if you have problems with completely uninstalling or reinstalling the NVIDIA driver. A common mistake is when a user cleans out the “Installer2” folder on their own or with a third-party utility. The driver cannot find the necessary files and is not removed. In these and other cases, use the Display Driver Uninstaller (DDU) program.
Removal via Control Panel
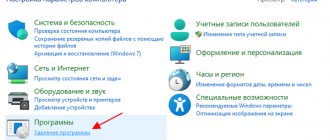
This method is suitable for PC users of any level. To do this, you need to go to the following path: Start->Control Panel->Programs and Features.
In the window that opens, you should find in the proposed list all the components related to the drivers of your video card. Next, all components are removed manually, one by one.
This article will teach you how to install drivers on Nvidia cards -
If you don’t know how to install “firewood” for an AMD video card, then our detailed instructions will help you, read on.
This method has a number of disadvantages:
- inconvenience;
- defective uninstallation;
- residual components, registry entries, etc.
Removing NVIDIA graphics card drivers
The need for this operation arises in different cases. For example, if the driver malfunctions or there are errors during its installation. If you change the graphics adapter to an AMD device, you must uninstall NVIDIA software. There are several uninstallation tools available. These can be universal or highly specialized programs, as well as system tools. Next, we will examine in detail several ways to use them.
Method 1: Specialized software
In nature, there are programs designed to remove drivers. The functionality of one of them – Display Driver Uninstaller (DDU) – is aimed exclusively at uninstalling video card software.
- Launch the downloaded archive and select a location to unpack the program. It is better to prepare a separate folder for this.
Run the Display Driver Uninstaller.exe file by double clicking.
After the start, DDU will inform us that it is better to clean it in “Safe Mode”. There is a reason for this, since most drivers do not start in this case, which allows you to delete all files, including blocked ones. If you need a complete cleaning with a guarantee, it is better to reboot your PC into this mode. Read more: How to enter safe mode in Windows 10, Windows 8, Windows 7, Windows XP Make sure that the NVIDIA video driver is selected, and then we start the removal with a reboot.
DDU will create a system restore point, after which the uninstallation process will begin, the progress of which can be observed in the log. After the reboot, you can install new drivers.
Method 2: Universal programs
Universal software that meets our requirements includes products such as Revo Uninstaller and CCleaner. There are other similar programs, but we will consider these two as the most convenient and easy to use.
Revo Uninstaller
This program is a powerful uninstallation tool with functions for subsequent cleaning of disks and the registry from “tails” - remaining files and keys.
The operating principle is quite simple:
- Download, install and run the program. We wait for the list of installed applications to load and look for items with the NVIDIA icon.
Select one of the positions, right-click on it and proceed to delete. We are waiting for Revo to create a restore point. The “native” NVIDIA installer will open, in which we click “Uninstall”. After the process is completed, click the “Restart later” button. Go back to the program window, select advanced mode and click “Scan”. Revo, as we wrote above, allows you to remove “tails”. In this case, the list of remaining files is loaded. Click “Select All” and then “Delete”. If a list of registry keys appears first, do the same.
Where is the Windows 7 Driver Store?
Windows
stores all
driver
in its
driver
(Driver Store), located in the %WINDIR%\System32\DriverStore\FileRepository directory.
In my case, on a home laptop with Windows 7
(the system was installed almost 8 years ago), the FileRepository directory occupies about 11 GB of disk space and contains >5000 files.
Interesting materials:
What is Android process Acore? What are process and thread? What is a journalistic note? What is pulse and how to measure it? What is R SIM iPhone? What is Randomized MAC Address? What is heart enlargement? What is monitor resolution? What is a recursive DNS query? What is Remote Play on TV?
Nvidia utility
Equipment from Nvidia is quite common among users, and therefore there is a special utility from the developers for carrying out various operations with “firewood”.
First of all, you will need to go to the company’s official website (nvidia.com), where you should indicate absolutely exactly the model of your video card. This will allow you to download the program installation file, which should be launched. After starting the installation, check the box next to “Custom installation” and click on the Next button. In the next window, all driver components are marked, a check mark is also placed next to the “Perform a clean installation” function and click Next again.
After this, the process of completely cleaning the computer from the old version of drivers will begin, i.e. removing them. After this, the update and installation of the current version will follow, which will be downloaded by the program directly from the manufacturer’s website.
Do you want to build an inexpensive but good PC? Then read our material, we will help you with this.
If you don’t know how to set a password on a Windows 10 computer, then our tips will come in handy -
Useful video on the topic:
Conclusion
The issue of removing drivers from a computer or laptop can be solved with the help of many programs whose work is related to “firewood”. However, most of them may be paid or have limited functionality. This phenomenon is quite common and does not contribute to a quick solution to the problem of driver removal. Thus, ordinary users are recommended to use the tips from this article to easily and quickly solve the problem in question.
device Manager
If you are wondering how to properly update your video card drivers after first uninstalling them, you can use the device manager.
Depending on the version of the operating system, this function is launched in different ways:
- For Windows 7, go to Start->Run line->enter the command “devmgmt.msc” and press ENTER.
- For Windows 8 and Windows 10, press the Win+R key combination and enter the same command.
The mentioned command will open a Device Manager window, in which you should find a column called “Video adapters”. Having selected the desired device, for example, a Geforce video card, right-click on it. Next, you need to click on the “Delete” button and the desired operation will be performed.
As mentioned above, the most effective solution to the issue of removing and subsequently updating “firewood” is the use of special programs, which will be discussed later in this article.