NVIDIA video adapters have a BIOS system that controls the operation of the device. It stores settings, manages the core, cooling and other important elements. And the performance of the graphics card depends on its firmware. You can update the BIOS software, but do this only as a last resort. If the software installation is unsuccessful, the video adapter will stop functioning. And when you turn on the computer, you will see a black screen. Firmware for an NVIDIA video card is needed if the device does not work well (simply “glitches”) or there are configuration conflicts. Or it lacks some important functions that are present in another BIOS version.
Let's figure out how to flash the BIOS of an NVIDIA video card
Some users download new Firmware to “overclock” the video adapter and independently set the frequency they need. But you shouldn't rearrange software without a reason. After all, in case of failure, you will have to take the graphics card to a service center or even buy a new one.
NVFlash, How to flash BIOS on an NVIDIA video card
Although not as widely used by the average user, changing the BIOS to GPU/GRAPHICS PROCESSOR can fix problems, improve performance, volume, or even temperature. Depending on its parameters, one or the other will be changed, but in the case of performance, as a rule, when manufacturers produce several models with the same PCB and different frequencies, we will be able to choose the best one by purchasing the smallest one with just a BIOS firmware. but how to do that? With NVFlash.
Before we start explaining everything, we need to make a disclaimer for obvious reasons. As we explain in this article, flashing the BIOS on a GPU comes with risks, just like on a GPU. motherboard. After following the steps, nothing should happen, but the number of variables in the system is equal to the number of users, so HardZone.es does not care about any problems that arise as a result of performing this technique, be it hardware or software.
Flashing via command line
The most useful ATIFlash commands are:
- atiflash.exe -i - will show a list of video cards installed on the AMD system. Useful for flashing the BIOS on a specific video card.
- atiflash.exe -p - reflash the video card with the specified BIOS number from the specified file.
- atiflash.exe -pa - flash ALL video cards with the specified BIOS file"a.
NVIDIA video adapters have a BIOS system that controls the operation of the device. It stores settings, manages the core, cooling and other important elements. And the performance of the graphics card depends on its firmware. You can update the BIOS software, but do this only as a last resort. If the software installation is unsuccessful, the video adapter will stop functioning. And when you turn on the computer, you will see a black screen. Firmware for an NVIDIA video card is needed if the device does not work well (simply “glitches”) or there are configuration conflicts. Or it lacks some important functions that are present in another BIOS version.
Some users download new Firmware to “overclock” the video adapter and independently set the frequency they need. But you shouldn't rearrange software without a reason. After all, in case of failure, you will have to take the graphics card to a service center or even buy a new one.
Flash the same or better BIOS for your NVIDIA GPU
The idea, as we said, is simple: either we need to fix any problem with the stock BIOS that led to the error, or we want to improve certain features that the new BIOS brings to our card, or the most common ones that we want to get. play.
Having said that and once again emphasizing that this is a process that carries risks if something goes wrong, let's move on to the practical part.
NVFlash, a tool for flashing BIOS in NVIDIA
Since it's not applicable in this article, we'll leave that for another one purely on how to do it, but it's always good to have a backup of the original BIOS in case you have to flash it due to a bug.
We will extract the one that matches our operating system, since if it is 64-bit, we will not extract the x86 folder and logically vice versa. Ideally, extract it to the root of your C: hard drive, since this is where Windows is typically installed.
After extracting the folder to the root of the hard drive or SSD, we will search for the BIOS that we want to flash. To do this we can go back to TechPowerUp and its database in the BIOS to boot it.
We insist on the importance of PCBs and such, you must know what you are doing, and if not, better stay put. Once we have the BIOS, we will extract it to the same root of the HDD or SSD where the NVFlash was previously extracted.
In our case we called it RTX.rom, easy and simple for the next steps. Having done this already, the next step is to go to our Device Manager, where to do this we will right-click on the Windows icon at the bottom left of the screen, after which we will see a menu drop-down and the option to click.
Once inside, we will need to disable the system GPU, as shown in the following image:
The screen will flicker and the Windows resolution may change, which is logical if you turn off whatever is outputting video to the system, so there's nothing to worry about. The next step is to right-click the Windows button again and go to “Command Prompt (Admin).”
Command line is better than PowerShell for flashing
Once this is done, we will be able to open the Command Prompt, which was previously known as CMD or MSDOS. After opening it we will have a typical graphical command interface:
Once at the root, the first thing you need to do is list the GPU. To do this we place the following command:
After which we will see that, as a rule, the GPU is indicated as the zero option:
Possible errors during firmware and how to fix them
The following errors may occur when flashing Bios:
- Firmware file from the wrong video card or a damaged version. This can happen when flashing firmware in a rig with several different video cards. If a monitor is inserted into an incorrectly flashed card, the system will not start. If the monitor is inserted into another adapter, the card simply will not be detected by the system or will be displayed as an unknown device.
- Firmware file with incorrect settings, under which the system is unstable (strong overclocking, very small timings and very strong voltage drop). This error can be easily corrected by flashing the factory BIOS.
If the video card is not detected, but it has a backup Bios, then just switch to the backup version, boot the computer from it, wait for the system to fully boot, switch the Bios to the damaged version and flash the original file.
If both Bios are damaged, or there is only one Bios, but there is another video card or a graphics core built into the processor, then it is still possible to boot into the operating system with image output to another video card.
This will allow you to restore using an algorithm similar to the firmware:
- Run the cmd command line interpreter as administrator.
- Go to the directory where the AtiFlash program is unpacked. To do this, enter the command C:\AtiwinFlash\AtiFlash (where C:\Atiflash\ is the path to the folder where the Atiflash program is located) and press enter.
- Enter the command AtiFlash -i and press enter. A table should appear with information about all AMD adapters installed in the system, even those with a corrupted BIOS.
- The test column will contain information about the initialization of video cards. If any of them did not pass the test, then this line will contain error information. You need to remember the number of the adapter (first column) that did not undergo initialization, enter the command AtiFlash -f -p 0 bios.rom (where 0 is the number of the faulty video card, and bios.rom is the file with the correct BIOS, which should be located in the same folder , same as the AtiFlash program) and press enter.
- At the end of the firmware, a success message will appear and a suggestion to restart the computer.
After the reboot, the video card should be detected by the operating system. If error 43 appears, then you need to run Atikmdag patcher, patch the drivers and restart the computer again.
If AtiFlash does not see the video card or it is not possible to even force the BIOS flash, then you may have to replace it with a programmer and solder the chip, for which you will have to contact specialists.
It's time to flash the BIOS
When the process is complete we should see something very similar to this:
We already have the GPU ready to flash the BIOS of the new invoice. The command to do this again is very simple:
It goes without saying that if two or more GPUs need to be flashed, the processes will have to be repeated GPU after GPU, so things are a little slower. Assuming everything is written well, we should see the following:
There are a few considerations to take into account before you press the "Y" key on your keyboard, as there is no going back once you do this. Firstly, EEPROM IDs may not be the same, if we changed the BIOS from another manufacturer, this is normal, but the version, model, voltage and size of the physical BIOS on the PCB are important.
If everything is correct, all you have to do is press Y and the process will begin.
After reaching 100% we will see the same as in the image above, versions have changed and more. We will be asked to restart the computer that we will be able to access. After the reboot, all that remains is to enable the GPU again from the device manager in order to be able to use the new BIOS on our computer. NVIDIA GPU.
Once the GPU is enabled, the screen will flicker and sometimes the driver may need to recognize the GPU again, which may take a few minutes, but nothing major.
Source
Booting from a flash drive into a DOS system
If you have already formatted the flash drive with Rufus, then you can start updating the BIOS, for this we will boot from the flash drive. It is recommended to always keep the BIOS file and the Nvflash utility for DOS in the same folder. Be sure to give it a name in Latin, for example, NVFL. the F8 key several times to mate. ASUS boards.
On other motherboard models, a key that will need to be pressed several times can be seen on the PC boot screen. Or you can set the boot priority from a flash drive (BOOT) in advance in the BIOS. We go into the BIOS using the Delete or DEL key, press it several times when starting the computer.
NVIDIA NVFlash 5.692
nVFlash is a utility for device manufacturers and developers that allows you to work with the BIOS of a computer video card. The program was released by NVIDIA and is designed mainly for their graphics adapters.
NVIDIA NVFlash is used to flash BIOS on Turing , Pascal and all older NVIDIA .
NVFlash supports BIOS firmware on NVIDIA video cards:
Before flashing the firmware, make a backup copy of the current BIOS of the video card using: nvflash —save backup.rom
To update the graphics processor of a video card BIOS use: BIOS.ROM
Functions and features of the nVFlash 5.692 utility:
You must find the appropriate BIOS version for flashing yourself.
What is needed for the firmware?
Before flashing an NVIDIA , find out its specifications and the installed BIOS . This can be done using the program CPU-Z . You need information from the Graphics Card .
The update is only available for video adapters with a single GPU. If there are two of them, the software installation may end badly. Usually the quantity is indicated in the model name.
Before installation:
Download NVIDIA NVFlash 5.692
Why do you need the NVFLASH program?
As mentioned above, NVFlash is used to reprogram the BIOS of supported video cards. Such a need may arise in one of the following cases:
BIOS firmware of video chips in order to eliminate various errors in previous versions. The need for flashing is usually reported by the manufacturer of the video card based on NVIDIA .
Firmware via Windows
To flash the BIOS NVIDIA video card in Windows , you will need the NVFlash Win . Different versions of the utility are designed for different chips. For example, NV4 is suitable for TNT , NV5 is suitable for TNT2 , and GeForce 4 must be updated using NVFlash . Please read the description and instructions for the application carefully before using it. It should indicate which model it fits.
You can flash an NVIDIA video card like this:
Flashing the BIOS an NVIDIA video card is also possible via DOS . This is an operating system that is interacted with using commands. To switch to it from Windows , you need a boot disk or flash drive. You can create it using the Rufus .
NVFlash , old and new Firmware to the same flash drive . The old one is needed so that it can be restored from the same media.
Firmware for NVIDIA video cards via DOS is suitable for experienced PC users. If you have never started your computer from bootable disks or drives before, it is better to use the previous method.
First, change the boot order so that the OS starts from external media.
Source
Flashing stages
I. Preparation:
1. If possible, before updating the BIOS, take care of the stability of the computer's power supply. It is advisable to connect it not directly to the mains, but through an uninterruptible power supply device. Flashing takes a few seconds, but if the power goes out during this time, the performance of the video card may be impaired.
2. Find out the model and other characteristics of the video card, as well as the current version of its BIOS. For this purpose, it is convenient to use the GPU-Z utility.
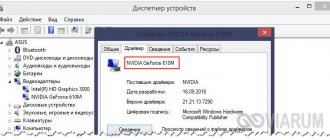
After running GPU-Z on your computer, you need to find out the following data (see image below):
• name of the video card model (Name);
• current BIOS version (BIOS Version);
• video card manufacturer (Subvendor)
• device identifier (Device />• video memory type (Memory Type);
• video memory size (Memory Size);
• video memory bus width (Bus W />• graphics core frequency (GPU Clock) and video memory (Memory Clock).
3. Make a backup copy of your current BIOS version. In the future, it can be used to return the video card to its previous state if the flashing process ends unsuccessfully (for more details, see the end of this article).
You can make a copy of the BIOS using the same GPU-Z utility mentioned in the previous paragraph. To do this, you need to launch GPU-Z and left-click once on the small icon located to the right of the field displaying the BIOS version (in the form of a chip with an arrow, see image). A menu will appear in which you need to click on the “Save to file” item.
After a short time, the “Save As” window will appear, in which you need to select a location to save, specify the name of the file into which the BIOS will be copied, and click the “Save” button.
You can specify any file name. The main thing is that it is not too long and is well remembered. For example, the file can be called oldbios.rom
. This will make it clear that this is an old BIOS version.
4. Download the new BIOS version (firmware file). It is advisable to download it from reputable sites, for example, from this one - www.techpowerup.com.
You need to select the BIOS on the specified site based on the video card parameters obtained using the GPU-Z utility (see above in paragraph 2). In this case, you need to find a BIOS designed for a video card with exactly the same identifier (Device />To find out Device />In addition to the device identifier, the type and amount of video memory must match, and the frequency of the graphics core and memory in the downloaded BIOS file does not differ much from current.
As a result of the download, you should receive a firmware file with a .rom extension. It can be called whatever you want. But if its name is difficult to remember, it is better to rename it to something simpler and more memorable, for example, newbios.rom.
If the purpose of flashing is to change the frequencies of the graphics core and/or video card memory, there is no need to download a new BIOS version from the Internet. It is better to adjust the “native” BIOS of the video card accordingly, having previously made a backup copy of it. How to save it to a firmware file was discussed in the previous paragraph.
You can correct the firmware file using special utilities. To edit the BIOS of GeForce GT400 series and higher video cards, you need the Fermi BIOS Editor program. For older GeForce models, use the NiBiTor program.
The BIOS of Radeon video cards is edited using the Radeon Bios Editor program.
For clarity, when preparing this article, we used a GeForce GTS 450 manufactured by Point of Viev (seen in the screenshots above). By flashing the BIOS, I decided to “turn” it into a GeForce GTS 450 video card manufactured by PNY with the video core and memory frequencies reduced below standard. The card almost “died” from old age and constant experiments. It was decided to depower it in order to normalize work, since it would freeze and then send the computer to the blue screen of death. It was even impossible to watch some films on it.
For this purpose, I downloaded the BIOS firmware for the GeForce GTS 450 from PNY with the appropriate parameters and then adjusted it with the Fermi BIOS Editor program. At the same time, to reduce the speed of the graphics core, I changed the frequency of the shader units from 1566 to 1200 MHz. The memory frequency has been reduced from 1804 to 1600 MHz (see image).
5. Download the utility for flashing the BIOS.
For NV video cards />For ATI/AMD (Radeon) video cards, the ATIFlash
.
It consists of one file atiflash.exe
. To download the archive with this file, click here.
6. Create a bootable USB flash drive with DOS.
Any flash drive will be suitable for this purpose, but all data on it will be destroyed. After flashing the flash drive, you can format it and use it as before.
The process of creating a bootable USB flash drive with DOS is described in detail here.
7. Copy the following files to the bootable USB flash drive:
• old BIOS version (file oldbios.rom, see above in paragraph 3).
• a new version of BIOS or a corrected old BIOS that you would like to flash instead of the one currently in use (file newbios.rom or whatever you called it, see above in paragraph 4);
• utility files for BIOS firmware. If the GeForce video card is being flashed, this is the NVFlash utility (NVFLASH.exe and CWSDPMI.EXE files), if the Radeon video card is being flashed, the ATIFlash utility (atiflash.exe file), see above in paragraph 5.
The listed files must be copied to the root directory of the flash drive (there is no need to place them in a separate folder). At the same time, do not change those files and folders that are already on the flash drive (they were created during the process of converting it from regular to bootable).
Flashing BIOS:
1. Boot the computer from the flash drive created in the previous step.
For detailed instructions on how to boot your computer from a flash drive, see here.
When the computer boots into DOS, you will not see the usual system windows or other graphical interface elements. On the screen, on a black background, several lines of white characters will be displayed. You can know that the computer has booted when a prompt appears to enter the commands “C:>” (see image).
2. Make sure that the video card is single-processor. To this end, immediately after the “C:>” prompt, you must enter one of the following commands:
• for GeForce
: nvflash --list
• for Radeon
: atiflash -i
Then press the Enter key.
After some time, the required information will be displayed on the screen and the prompt for entering the commands “C:>” will appear again (see image).
If your computer has one video card installed, but after entering the above command, the monitor displays information about the presence of two video cards, then your video card is dual-processor. You cannot reflash it using the method described below. Look for suitable instructions on the Internet.
3. In many cases, GeForce video cards need to disable BIOS tamper protection. To do this, after the “C:>” prompt, you must enter the command nvflash -protectoff , press the Enter key and wait for the “C:>” prompt to appear.
If the computer asks you to confirm your intentions, press the appropriate key (Y or Enter).
For Radeon video cards, it is usually not necessary to disable protection and you can skip this step.
4. Reflash the old BIOS, replacing it with a new one.
For this purpose, after the “C:>” prompt, you must enter one of the following commands:
• for GeForce
: nvflash -4 -5 -6 newbios.rom
• for Radeon
: atiflash –p –f 0 newbios.rom
In the specified commands, newbios.rom is the name of the file with the new BIOS. In your case, this element may be different, depending on how you named this file at the preparation stage (see above).
After entering the command, you need to press the Enter key and wait a little until the “C:>” prompt appears again. Its appearance indicates the completion of the flashing process. If the computer requires confirmation of your intentions, press the appropriate key (Y or Enter, depending on the situation).
5. After flashing, restart the computer in normal mode. To reboot, you can press the Ctrl+Alt+Delete key combination on the keyboard or the Reset button on the computer system unit.
Usually after flashing you need to reinstall the video card driver. More information on how to do this can be found here.
As a result of flashing, my experimental GeForce GTS 450 received lower graphics core and video memory frequencies (see image). With them, it “came to life” and now works stably under any load.
What is required to flash the BIOS of a video card?
It is impossible to directly flash the BIOS for video cards in laptops or built-in adapters. These devices are paired with the main BIOS, so you will have to act inside it.
Also, to flash the BIOS of a video card, you need to take care of an uninterruptible power supply. During the update, you cannot turn off the computer, and you should not rely on the electricity to work; it is better to be on the safe side.
And the last point, you will need to install the GPU-Z program. This is a very useful utility that displays all the necessary information about the video card. Speaking about how to find out the BIOS version of a video card, the program in question can help the user. It also provides other information that will be required when choosing Firmware.
Note! GPU-Z is a program that is distributed completely free of charge. In addition, its interface is not overloaded with various design features. Therefore, the installation file will not be too heavy and clog traffic. Because of this, it is better to use direct download links rather than torrents. Firstly, through them the file will be downloaded much further. And secondly, it is through torrenting that various malware is usually transmitted, which can steal any personal data, bank account or credit card numbers.
All information for selecting a video card BIOS must be transferred from this program. The convenience is that the information can be copied so as not to rewrite it manually. This is how you can find out the BIOS of the video card, as well as other data for accurately selecting the product to download.
(GeForce 256, GeForce2, GeForce3)
Introduction…
In this material I want to tell you about the procedure for changing and subsequently flashing the BIOS (from the English Basic Input-Output System) of GeForce, GeForce2 and GeForce3 video cards from NVIDIA. As you probably already know, the BIOS is one of the most important elements of the card’s functioning, so the issue of “replacing” it, in my opinion, is more than serious. We already addressed this topic when we looked at flashing the BIOS on earlier TNT2 series chips, but life makes its own adjustments, new hardware and new software appear, and it’s time to return to the topic, this time for the GeForce/GeForce2/GeForce3 family. For those who have not read the previous material, I recommend that you familiarize yourself with it - at one time it was quite famous on the Runet, but those who have read it before will also find something new for themselves (I hope J). As last time, we will consider the theoretical aspects of this issue and the tools that allow us to obtain practical results. First, I want to remind you about the existing variety of different BIOSes. Be careful when choosing a BIOS for subsequent work - pay attention to the compliance of the parameters of your video card (chip, memory type and size, BIOS. If everything is in order, then move on to the theory, not forgetting that we will be talking about the GeForce/GeForce2/GeForce3 family and its various modifications (SDR/DDR, MX, GTS, Pro, Ultra).
Why do you need to change the BIOS?
I suggest first conducting a kind of opinion poll on the topic “Why do you need to change the BIOS?” It is quite possible that you do not need this procedure. This especially applies to beginners who, having heard enough conversations from “experienced” people, also decide to take this step, poorly understanding what they are doing and why. It is they who then appear at all sorts of “hardware” conferences shouting: “I flashed the BIOS, now my computer won’t boot!” It is precisely to ensure that the percentage of such exclamations is as small as possible that we will conduct our opinion poll.
Preparing to flash the BIOS
So, the choice has been made, and it is necessary to flash the BIOS, possibly with its preliminary modification. Before you launch something and sew anything there, you need to thoroughly prepare for the procedure - the better prepared we are, the less likely it is that problems will arise in the future, believe me. By the way, when starting to flash the BIOS, stock up on pen and paper and document all your actions and everything that the computer “tells” you - this can be very useful in case of failure. Returning to preparation: it includes, strictly speaking, two stages - saving (backing up) the old BIOS and preparing the computer as a whole for flashing. Let's take a closer look at these undoubtedly important points.
Choosing the right BIOS
BIOSes from different manufacturers differ in their designations (code). For example, NVIDIA designates its BIOSes with the set “CC.cc.mm.ee.oo”, where “oo” is the OEM version, and Creative with the set “CC.cc.oo.mm.ee”. That is, the same BIOS version is designated:
- in transcription from NVIDIA - 2.10.01.04.1
- transcribed by Creative - 2.10.1.01.04
Therefore, we recommend that you make sure which BIOS and for which card you are going to flash. As practice shows, there are “craftsmen” who are trying to increase the performance of TNT2 by flashing the BIOS from GeForce. Carefully study whether the selected BIOS is suitable for you based on various parameters: chip, memory type, availability of additional functions, etc.
BIOS backup
- We take the BIOS flasher (or a similar class of program) and save the video BIOS image locally. This will be a small file, about 50 KB.
- Give the resulting file a simple name (for example, my.bin
) and place it in the root directory of the system floppy disk.
Place a copy in the root of drive C: - Now we add to this file the files missing for flashing - in fact, the flasher itself and the libraries for its operation. In the case of reference BIOS firmware from NVIDIA, this will be the corresponding nvXXflash.exe
and DOS-extender
dos4gw.exe
. - We check whether the machine boots from this system floppy disk. From my own experience, I know that floppy disks “fall out” over time, and I’m still usually too lazy to check whether the disk is working. In this case, this is a mandatory item.
- After this, we create the system files autoexec.bat
and
config.sys
in case of failure. You can download our files or prepare your own; The main thing is that after N (we set it to 10) seconds the machine automatically tries to flash the original BIOS. - We carefully check the presence of everything necessary again and proceed directly to the modification/flashing procedure.
autoexec.bat:
CLS PROMPT $p$g GOTO %CONFIG% :success GOTO end :failed nvflash my.bin GOTO End :end
config.sys:
MENUITEM = success, Bios successfully changed MENUITEM = failed, Bios change is FAILED! MENUDEFAULT = failed, 10
Checking the BIOS for compatibility
After preparing the backup, you need to check whether the selected BIOS is suitable for you according to various criteria - the corresponding ID, checksum, etc. To do this, we will use the wonderful VGABios program. This program is a dynamically loaded driver that allows you to load the BIOS from disk. VGABios rewrites the area of system RAM where the video card BIOS is cached (in the motherboard BIOS, caching of the video card BIOS in system RAM must first be enabled). In this case, the contents of the video card ROM do not change. For permanent use, you need to register the program download in autoexec.bat
(the program itself and the BIOS file must be in the same folder on the disk, preferably in the root, so as not to get confused with the paths):
C:\vgabios -fROMFile -tM
Where is ROMFile
- video bios file,
M
- TV mode (values from 0 to 5)
The same VGABios checks the functionality of the BIOS being flashed: downloaded, checked, if everything is OK, then flash. That is, if the boot fails, you should simply boot from a regular system floppy and cancel the VGABios call in autoexec.bat
.
Flashing the BIOS
Before the flashing procedure itself, I would like to make one, in my opinion, valuable remark. Often, after saving the original BIOS and comparing it with a candidate for uploading, the user is frightened by the difference in file sizes. In fact, there is nothing terrible here - just one BIOS is padded with zeros to a size that is a multiple of the machine word, while the second shows the actual size of the BIOS (and in terms of the number of occupied blocks (clusters) on the hard drive, they are the same). So don't be alarmed, the situation is under control.
Typically, the flashing procedure is performed from “clean DOS” (in Win 9X by pressing “Shift + F5”), as recommended, however, rushers can also work from an MS-DOS window under Windows... For NT and Windows 2000, most likely It's better to boot from a DOS floppy disk. It is better to give the names of the directories and files used during the firmware process as simple as possible - for convenience if you have to work with the command line... In addition, it is desirable to have an uninterruptible power supply (in case an excavator appears to repair the highway or Uncle Vasya the electrician) or at least network filter for noise immunity. If you have overclocked any component (processor, video card...) or a combination of them, then it is better to switch everything to normal operation mode, although smooth firmware is possible with an 83 MHz system bus and a decently overclocked video card... But this is from the series “how not to necessary".
Editing BIOS
To edit the BIOS, we will use the best (and only?) program in this class - GF123Bios Edit, designed for editing the BIOS of cards based on GeForce256 (SDR/DDR), GeForce2 (MX, MX100, MX200, MX400, GST, Pro, Utra) and GeForce3 . I deliberately listed all the modifications, because if I simply write “boards on GeForce chips,” then I will be inundated with questions like: “Well, you wrote about GeForce, but how can I flash my NVIDIA GeForce2 MX?” So, back to the GF123Bios Edit. The program is intended only(!) for editing the BIOS, but not for the flashing itself. You can edit: various IDs (manufacturer, model, etc.), default chip and memory frequencies, timings displayed when loading an inscription, etc. The program provides a developed graphical interface, saving us from parsing the hexadecimal numbers of the “experimental” BIOS file, so working with it is a pleasure: we downloaded the desired BIOS (current or from disk), adjusted the necessary parameters and saved it as a file on disk. After that, the flasher was launched, and the job was done.
Let's look at the program itself:
- The top block of two editable fields
is the lines displayed when the machine boots (you can write anything up to “NVIDIA GeForce4 GTS VGA BIOS”) - SubVendorID, SubVendor Model
- ID of the card and model manufacturer - NVIDIA Model
- chipset identifier (model of the chip installed on the video card) - Core Clock/Memory Clock
- core/memory frequencies, respectively - Current Clocks
- a block for setting the core frequency, memory frequency and memory timings (I strongly do not recommend changing the latter, since there is currently no information on decoding the values) - The “Common” button block
provides access to the current BIOS (“Get Current BIOS”), opening (“Open BIOS file”) and saving (“Save BIOS file”) files with the BIOS. Important note: to get started, read the current BIOS image - from memory or disk! - “Special” button block
– provides loading of fonts (“BIOS Font”) for “Russification” of the BIOS and synchronization of BIOS copies (“Sync with 1st”)
Let's take a closer look at some of the working aspects of the program. To do this, let's look at a new product from VICO - working with fonts firmware in the BIOS. This function is called using the “ BIOS Font”
»
This function allows you to replace the font code table in the video bios with any of those defined in the CPI files of the DOS kit (located for Windows 98 in the %WIN%\COMMAND\ directory). What is it for? The replacement allows you to see the correct display of Russian characters without loading the notorious display.sys
without giving it about 10 KB of RAM. For example, this may be useful when booting into Safe Mode...
To install the Russian code page on most machines it will be enough to download ega3.cpi
and select 866 encoding.
The next new feature compared to TNT Bios Edit is the synchronization of BIOS copies from NVIDIA and the card manufacturer. In theory, they should match, but some people write original values in their copy. Function called by the “ Sync with 1st”
» will help you avoid copies getting out of sync.
And the last point that I would like to draw your attention to is the BIOS file checksum mismatch. Quite often, users encounter this problem, and GF123Bios Edit successfully solves it: simply load the BIOS file into the program, and then save - the checksum will be recalculated and the image can be used.
Comment
: for the program to work, you must first install the run-time library
LabWindows/CVI Run-Time Engine
, which can be taken in the same place where you took the main program...
Directly replacing the BIOS
After preparing the BIOS image for flashing (with or without preliminary editing), the BIOS file needs to be “uploaded” to the video BIOS. For reference bios, use the program nvFlashХХ.exe
, or rather, a certain version of it.
In our case, for GeForce256 (SDR/DDR), GeForce2 (MX, MX100, MX200, MX400, GTS, Pro, Ultra) and GeForce3 this is nvflash.exe
. The format for launching the file from the command line is as follows:
From:\nvflash change.bin
Where is change.bin
- BIOS file to be flashed.
After executing this command, the BIOS will be flashed. I congratulate you on this.
What to do in case of failure?
In case of failure, there is no need to frantically press the “Power” button in the hope that “it’s not too late” and maybe “it hasn’t flashed yet.” It’s better to calmly try repeating the flashing procedure. If it doesn’t work, try restoring the backup BIOS (you can do it a second time, after booting from the system floppy disk you made). If your computer still does not boot - the card does not come to life, then you need to take an old ISA or PCI card (only non-reprogrammable - nonFlashable) and insert it into the machine. Next, we repeat the firmware procedure again. The fact is that it is the video card that turns on first in the machine, and the ISA video card is an “older” device and turns on independently, without requiring the BIOS (in computers with the Award BIOS, there is a boot-block on the motherboard that initializes the ISA card).
If, as a result of the manipulations, the video card does not come to life... Well, you need to contact a specialist or the company that sold you the video card.
What to do if the flasher does not “understand” the BIOS?
Sometimes the user, when trying to flash the firmware, receives a message like “EEPROM not found, I can’t flash the BIOS...”. There are several possible reasons for this. The first and most trivial reason: your card is not flashable, i.e. you have a non-reprogrammable BIOS chip (nowadays this is rare, but it happens). Reason two: this flashing program does not match your card (either the ID is wrong, or the type of chip is not supported). In this case, you can try to find another flasher - either from the card manufacturer, or a reference one from NVIDIA (I must say that it fits most cards). And finally, the third reason: the checksum of the BIOS file does not match. This problem can be solved simply: you need to load the file into GF123Bios Edit and save it to disk under a different name. The new file will already be appended to the machine word and the checksum will be fine.
Conclusion
Remember that by changing/reflashing the BIOS of a video card, you are thereby tampering with the “device structure”. In this case, you automatically lose the seller’s warranty on the product, even if everything went well. Here it is appropriate to point out the following: if the card stops functioning normally for some reason not related to your BIOS flashing, then no one is stopping you from flashing the “native” BIOS and telling the warranty workshop less about the procedure done. If unsuccessful, you will need to contact specialists to restore the BIOS or replace the video card.
You perform all actions from this article at your own peril and risk! The resource administration does not bear any responsibility for any problems or damage that may occur after the actions described below are performed.
This article will discuss how to flash the BIOS in AMD video cards. To flash the video card, you will need the ATI Winflash utility, which you can download.
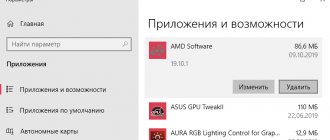
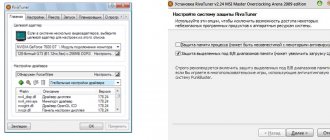
It is recommended to disable it in Windows before flashing the BIOS of the video card. To do this you need to open Device Manager
“, and in the “
Video adapters
” item, select the one you need, right-click on it and select “
Disable
”.
Firmware instructions
First, you will need to download an update for the BIOS of your NVIDIA video card. You need to find firmware on the Internet that strictly meets the following parameters:
You cannot select other update versions. Speaking of how to find out the compatibility of the BIOS and video card, it is necessary to strictly check the compliance of the presented data. If there is at least one mismatch, then the BIOS is not suitable. You cannot install firmware designed for other video cards, even if they are almost completely identical.
Note! To download BIOS updates or firmware, it is highly recommended not to use dubious and unverified sources. It is also not advisable to install amateur software. Incorrectly written BIOS code leads to incorrect operation of the video card as a whole, as well as the formation of minor errors during operation.
To flash the BIOS of a video card, it is better to download the NVFlash program, since it is fully suitable for working with the corresponding families of adapters, and is also easy to use. You can update the BIOS of an NVIDIA video card through the system, but doing so is more difficult and dangerous, especially if the work is done by an inexperienced user who has no idea what exactly he is doing, but simply follows the instructions offered on the Internet. NVFlash affects only the video card, and the command line in the OS affects all software that is used in the system.
Preparing to update your video adapter
Before you start updating the BIOS of your video card, you need to stock up on some programs that you will need for this procedure. So, to flash the video adapter firmware you will need:
- “Flasher”, with the help of which new firmware is loaded into the flash memory of the video adapter.
In addition, you need to know the model of the video card that needs to be updated. If the user does not know the device’s operating frequency, type, volume and other important characteristics, then this information can be obtained using the GPU-Z utility. You need to know the following parameters: device model, GPU, current BIOS version, memory type and memory size, memory bus width and GPU Clock. Armed with this data, you can look for the latest BIOS version and then proceed with the update.
How to flash the BIOS of a video card?
Regular users, after installing the operating system and drivers for all devices, no longer remember about their hardware, but gamers are trying in every possible way to squeeze a little extra performance out of the system. One of the computer elements that they work on is the video card. In addition to software settings and changing drivers, they sometimes update the BIOS of the video card. Next, we will look at how to flash the BIOS of a video card via Windows and via DOS.
Flashing the BIOS of a video card is not a complicated procedure, but at the same time it is very dangerous. If you update the BIOS of the video card with the wrong firmware or turn off the computer's power during the firmware, the video card will become inoperative. You can restore it, but more on that later.
You can flash the BIOS of a video card in two ways: through DOS and directly from the Windows operating system. It is preferable to change the BIOS firmware of a video card via DOS, since this causes much fewer errors.
Flashing the BIOS of a video card via DOS
To start flashing the firmware, you need to prepare and collect the necessary programs. The first step is to download the firmware program. Two programs are especially popular: nvflash for flashing Nvidia , and atiflash for flashing ATI . Next, you will need the BIOS file itself and a utility for creating a bootable USB flash drive. In a good way, if the BIOS is downloaded from a third-party resource, you will also need a program to check the downloaded file, i.e. to determine whether it is BIOS or something else. The RBE Bios Editor program is suitable for this.
When all the files are ready, write them to a bootable USB flash drive. We unpack the firmware program and write the firmware file itself into the same folder, calling it something like “newbios.rom”. We also need a current working BIOS firmware. You can get the current version using the firmware program.
Here are all the commands of the latest version of ATIFLASH v4.17 for flashing ATI video cards
Basic commands of the NVFlash program for flashing Nvidia video cards
Create a flash drive with FreeDOS
Before updating the BIOS of an NVIDIA video card, we will need to format the flash drive or MicroSD card using the Rufus program. I recommend downloading the Portable version. It is best if the capacity of the USB drive does not exceed 8Gb, but this is not particularly critical.
After downloading RUFUS, install the WinRAR or 7-ZIP utility if the archiver is not already installed, we will need it to unpack the files compressed into the archive. Now you need to run the Rufus program and select a flash drive as the boot device (the contents stored on it will be erased) and select the boot method - FreeDOS.
Download the Nvflash utility for DOS; the BIOS file can be downloaded from the manufacturer’s website or from Techpowerup. Extract the resulting programs and BIOS using WinRAR onto a DOS formatted flash drive. I recommend renaming the BIOS file, for example, to GTX1050ti.
Unsuccessful video card BIOS firmware
If you download the BIOS with slightly different parameters, for example, you do not guess the type of memory or version of the video card, then after flashing the firmware with this version, the video card most likely will not even be detected. The same thing will happen if you turn off the power during the firmware. This problem can be solved, but this will require another video card.
If there are several PCI Express slots, then the second video card can simply be installed in the adjacent slot and set boot priority to it. We boot the system and simply flash our non-working video card with the previously saved BIOS version. If there is only one connector, then the non-working video card will need to be connected to the PCI connector using an extension cable or adapter. But you need to be very careful and choose the right adapter number, otherwise you will have two non-working video cards.
Source
Possible errors and their correction
It is quite possible that problems or errors will occur after updating the firmware. There are several reasons for this:
- The firmware file does not match the version, model and type of video card. This happens in cases where two graphics cards are installed on the computer.
- Unstable firmware settings, low voltage levels.
It is also possible that due to the user’s carelessness the firmware was not installed. Then the image completely disappears from the screen. To solve this problem, you need to roll back to the previous version.
If the card is not detected, but there is a backup BIOS, then it will be enough to simply switch to it, boot the computer from it, wait until the system boots completely, switch to the damaged BIOS and roll back to the previous version.
In the case when both files are corrupted (or only one file), but there is another video card, you can boot through the second one into the operating system with image output to another graphics card.
I launch the command line as administrator. Then I open the folder into which the AtiFlash program is unpacked (the address looks something like this: C:\AtiwinFlash\AtiFlash), and press the Enter button.
I set the following command and press the Enter button again.
atiflash -i
A table should appear with information about all AMD cards installed in the computer, even with a corrupted BIOS. There will be a test column, which will display information about the initialization of video cards. If any of them did not pass the test, then this line will contain error information. I remember the number of the adapter (first column) that did not undergo initialization, and enter the following command:
atiflash -f -p 0 old.rom
0 is the number of the faulty video card, and old.rom, as we remember, is a file with old firmware, which should be located in the same folder as the AtiFlash program. Upon completion, a success message will appear and a suggestion to restart the computer, which, in fact, is what I will do.
Warnings before operation
Before you start upgrading the BIOS, you need to study the following points:
Stage 1: preparatory work
To prepare, you need to do the following things:
Use these instructions to find out the characteristics of your video card and make a BIOS backup:
Now you need to download the latest BIOS version from the manufacturer’s official website (or any other resource you can trust) and prepare it for installation. If you want to somehow change the configuration of the video card using flashing, then the edited version of the BIOS can be downloaded from various third-party sources. When downloading from such resources, be sure to check the downloaded file for viruses and the correct extension (must be ROM). It is also recommended to download only from trusted sources with a good reputation.
The downloaded file and the saved copy must be transferred to a flash drive from which the new firmware will be installed. Before using a flash drive, it is recommended to completely format it, and only then dump the ROM files.