Author of the article
Kristina Gorbunova
Higher education in the specialty “Information Systems”. In the field for more than 7 years, he develops websites on WordPress and Tilda.
Ask a Question
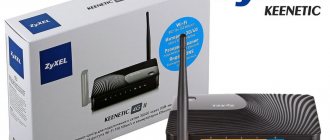
Zyxel Keenetic Lite II is one of the most inexpensive Internet centers for the home. Supports the creation of up to four wireless networks. This router can also be used in the office, as it can easily handle multiple connections and allows you to set restrictions on network access to different devices. Let's tell you more about the parameters and methods of setting up Zyxel Keenetic Lite 2.
Features and Specifications
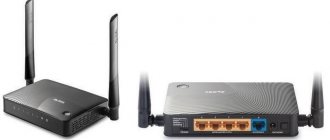
The appearance of the device has changed slightly compared to its predecessor from the first generation. Now the router is presented exclusively in black. The number of indicators and buttons has increased. There are inscriptions in Russian near the connectors and controls. The router now has a second antenna and the coverage area has increased. The router is supplied with instructions and a patch cord.
Brief characteristics of Keenetic Lite II:
- 2 external non-removable antennas;
- RAM – 64 MB;
- 4 LAN sockets for connecting network equipment;
- 1 WAN connector for connecting the provider cable.
- frequency range – 2.4 GHz;
- Max. wireless connection speed – 300 Mbit/s;
- demilitarized zone (DMZ), SPI, static routing, DHCP server, NAT, Dynamic DNS support, firewall.
The Zuxel router operates in the 2.4 GHz band. One of the unique features of Kinetic Light 2 is Link Duo technology. It provides support for two connections over one leased line.
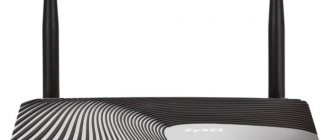
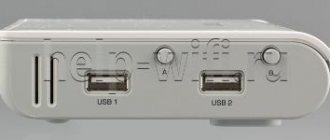
Appearance
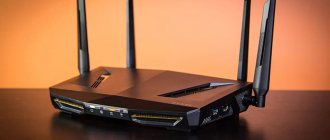
Externally, the router looks extremely presentable: a rectangular case made of black plastic, which assumes a horizontal position on the table, which is extremely convenient compared to the vertical one, in which routers, even with a slight shake of the table, often tip over with their front side on the table. There won't be such a problem here one hundred percent.
Most of the upper surface of the body is textured with matte stripes that imitate ripples on the water. Only the lower right quarter, on which the power button is located, is left glossy. On the front edge, facing directly to the user, there are light indicators for power, local network connection and Internet cable. On the reverse side there are ports for connecting cables and two symmetrically located antennas.
Connection
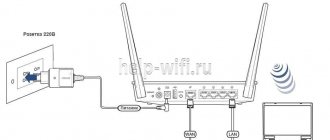
After fixing Keenetic Lite II on the table or wall, you need to connect it to the computer and to electricity. The patch cord needs to be connected to the network card and LAN socket of the router, and the cable from the provider to the WAN connector. It is not advisable to install the router on the system unit, since despite the good ventilation system, it will quickly heat up from the computer power supply.
In addition to working over a dedicated line, Keenetic Lite II supports connection via an ADSL modem. Procedure:
- Connect the ADSL modem to the splitter.
- Connect the cable to the LAN port in the ADSL modem and to the WAN port in the router.
- After connecting all the wires, press the power button on the back of the router.
Further configuration of the router is carried out through the browser.
Possible malfunctions and ways to eliminate them
Zyxel Keenetic Giga generation III router: new features of a home Internet center
Like any other device, Keenetic can freeze, slow down, there are malfunctions, sometimes there is a decrease in performance, and other problems and malfunctions, which usually appear after 2-3 years of using the Lite II. Of course, even the manufacturer will not be able to predict how the Keenetic router will behave in the future, and users are faced with an unpleasant phenomenon: breakdowns happen at the most inopportune moment. Troubleshooting the device is carried out using the debugging mode provided in the system settings of the Lite II router:
- On the home page of the Keenetic router, go to “System”.
- Go to “Diagnostics”, apply the “Start debugging” command.
An icon will immediately appear at the top of the System Monitor indicating the start and progress of the process. In order to see how the correction and debugging of problems in the operation of the Lite II router proceeds, just click on it, and then manually control the process, interrupt it, pause or start it.
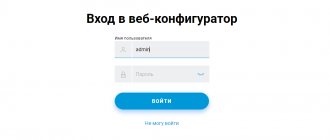
Login to router settings
In order to go into the router settings, you will need to launch the web interface. To do this, type 192.168.1.1 or my.keenetic.net into the address bar of your browser. Look at the sticker on the bottom of the device.
You will be prompted to authenticate the user. You must enter admin and 1234. For security, after entering the settings, you need to change the basic password.
Reviews
Several opinions from consumers of the Lite II router:
- “The second Keenetic is quite inexpensive, but I think its quality is excellent, it deserves attention! Lite II is installed in an apartment not exceeding 60 square meters. Surprisingly, from the far corner it distributes wi-fi perfectly and without any problems to as many as eight devices: a computer, two laptops, four smartphones and a Smart TV. There are, of course, losses in speed, but very minor. I’ve been using the Keenetic router for over a year now, naturally, I’m as happy as an elephant after a bath, especially considering the optimal price and quality. I don’t think you can find anything better than the Lite II right now.”
- “The new Keenetic is as reliable as the Belarus tractor.” Lite II is just as powerful, it justifies the money spent on it, by the way, it’s quite insignificant; it can’t even be called a waste, especially against the backdrop of its functionality and quality. Stable, most importantly, uninterrupted, Lite II produces a good signal throughout the entire apartment, does not cut speed, and does not heat up like an iron. There is no need to periodically reboot it and enable debugging mode. My Keenetic router can handle up to four devices at the same time, perhaps it’s capable of more, I don’t know, I just haven’t tried connecting more.”
- “At first I didn’t really trust the Lite II router; I was confused by the price. Thought it was Chinese junk. But a friend convinced me, he said that he had the same one, and he, they say, would not know grief with it. I believed it! "No sooner said than done. Done – it works.” The same cannot be said about my old RT-N10E, which shook my nerves every day (that’s it, no more network ones from Asus). And Keenetic is Keenetic, now I think so. Lite II works just fine, without interruptions or freezes, the GUI flies (against this background I constantly remember the sad experience with Asus), all the Lite II router settings and gadgets work properly, the signal is at a high level (incomparably better than RT- N10E). I recommend it guys, you won’t regret it!”
Automatic setup
In automatic mode, the Zyxel Keenetic Lite 2 router is configured using the NetFriend utility. It is built into the router’s web interface and is loaded automatically the first time you log in to the firmware. To launch its main functionality, you need to click on the “Quick setup” button.
If the Internet cable is already connected to the router, the utility will automatically detect the network connection.
Next, the utility will offer to copy the MAC addresses of the router or computer. It is better to choose the MAC address of your PC.
The utility proceeds to directly configure the Internet. Here you need to specify the connection type and, if necessary, fill in additional fields. This data must be in the contract with the provider.
After completing the settings, the connection parameters will appear.
Changing firmware on Zyxel keenetic lite II
To change the firmware, you first need to download it to your computer. This can be done on the page https://zyxel.ru/keenetic-lite-2. On this page, go to the "Support" section.
Then, in the “ Firmware ” table, select the most current firmware version and download the zip archive. Or unpack it in a place convenient for you.
Then go to the router interface, select the “ System Configuration item in it . In the table with the list of “Files,” select the file named “firmware” and click on it.
The file management window will open, in it click on the “Select file” button. We find our unpacked file and select it. After that, click on the “Replace” button. And we wait until the new firmware is installed.
A few minutes will pass, then enter the router configuration interface again. There will be new firmware.
Manual setting
You can configure the router yourself through the built-in OS. To do this, click on the web configurator. To configure the network, go to the “Internet” tab. A window with connection parameters will open.
When using a NAT connection, you must select to automatically obtain an IP address. If you have a static IP address, specify it in the IP settings by selecting manual entry. Also specify the subnet mask and gateway.
The L2TP connection is configured a little differently:
- Open the Internet tab. Select an already created connection.
- Check the boxes next to “Enable”, “Use to access the Internet” and WAN. Don't forget to check to automatically obtain an IP address.
- Go to the “PPPoE/VPN” tab and create an authorized connection.
- In the protocol type, specify L2TP.
- In the “Connect via” line, select “Broadband connection (ISP)”.
- Specify the server address, name, password.
- Select to automatically obtain IP settings.
- Save your changes.
To set up a PPPoE connection on a Zyxel router you need to:
- Go to the PPPoE/VPN section again and create an authorized connection.
- In the protocol type, select PPPoE.
- Check the boxes next to “Enable” and “Use to access the network.”
- Select connection via ISP.
- Specify the server address, login and password for authorization on the network.
- In the IP settings settings, you need to select automatic.
- Click on the “Apply” button.
Checking network card settings
It is best to immediately make sure that the network card settings are set correctly.
On Windows XP:
Go to “Start”, then find “Control Panel” and click on it. In the window that opens, click on the link “Switch to category view”; if there is no such inscription, then you have already switched. We look for the icon that says “Network connection” and double-click on it.
Then right-click on the “Local Area Connection” shortcut and select “Properties” from the drop-down menu. In the window that appears, select “Internet Protocols TCP/IP” from the list with check marks and click the “Properties” button. Then we check that the dots are opposite the words “Obtaining an IP address automatically” and “Obtaining a DNS server address automatically.”
On Windows 7, 8, 8.1:
In the lower right corner, you should have a "Network" icon. Right-click on the icon and select “Network and Sharing Center.”
A window will open in which we click on the link opposite the inscription “Connection:”, for me it is “Local Area Connection”
Then we carry out the same actions as shown in the figure below.
Setting up via mobile application
Zyxel has developed special My.Keenetic software for smartphone users. This application allows you to configure your router without connecting to a computer. But there are certain operating conditions for My.Keenetic:
- The router has NDMS OS version V05 to V 2.15 installed.
- The firmware is loaded with a component for remote management via the cloud and KeenDNS.
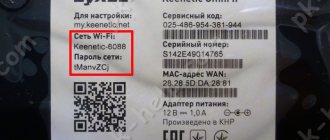
In order to configure the Zyxel Keenetic Lite 2 router using the mobile application, you will need the wireless network name and password indicated on the sticker on the bottom side of the case.
You must connect via Wi-Fi to the device you are setting up. Next, launch My.Keenetic. Immediately after opening the application, a connection check notification will appear.
After this, you need to select your connection and enter a password. You can also scan the QR code on the bottom of the router using the camera.
After authorization, you must select a provider.
Next you need to select the connection type.
Enter your account information (login and password) received from your provider.
If the required service provider is not in the list, you need to configure the connection manually by tapping on the corresponding button at the bottom of the list. The program will prompt you to select the connection type.
Next you need to enter connection parameters.
Once the setup is complete, an automatic network health check will run.
If the network is configured correctly, a notification about available updates will appear.
Connecting Zyxel keenetic lite ii (2) to a laptop via WiFi.
I’ll say right away that I do not recommend the initial setup of the router via WiFi. To avoid unexpected problems. But if you decide, then you just need to connect to the Wi-Fi router. To do this, first check whether WiFi is turned on on the router, the Wi-Fi indicator should be on, it should be located immediately after the number “4”. If it is not lit, then simply press the button on the top cover of the router, it turns it on and off.
After this, the name of the router’s WiFi network for each pile, but in any case it will begin with Zyxel, and it will be open (without a password). Next, you need to connect to it; if you don’t know how to do this, read the article “How to connect to WiFi on a laptop.”
Wi-Fi connection and settings
In the web configurator you need to go to the wireless networks section. It is indicated by a Wi-Fi icon. There, open the “Access Point” tab and check the “Enable” box. Set the network name. In the “Protection” line, select WPA2-PSK, and in the “Key” line, set a password for connecting to Wi-Fi. There is no need to change any other parameters. Don't forget to click on the "Apply" button.
Wi-Fi can be made invisible. To do this, activate the checkbox after the “Hide SSID” line. To connect to a wireless network, you will have to enter the network name and password.
Conclusion
The second version of Keenetic cannot be called the best among routers. Lite II is far from ideal: it can please the owner, but also cause him constant irritation.
But this can be said about any device similar to it. The most attractive thing about the router is its low cost. Here we can say that in terms of price and quality, Lite II is the best.
pros
Keenetic has a number of advantages:
- Lite II is easy to use and multifunctional;
- Lite II router web interface in Russian;
- Keenetic has good speed qualities and a wide reception radius;
- clear, simple settings, no difficulty in servicing Lite II;
- Keenetic rarely overheats and does not require frequent reboots;
- Lite II does not “cut” the speed when connecting to a wireless network;
- Keenetic is inexpensive, productive, reliable.
Minuses
Users also note disadvantages:
- low home network speed from Lite II;
- Keenetic has ineffective user support;
- Lite II lacks support for many options familiar to other routers;
- frequent malfunctions and breakdowns that occur after 1-2 years of using Keenetic.
Repeater mode
In repeater mode, the router is used to strengthen the signal. It connects wirelessly to the main Internet center and expands Wi-Fi coverage. In order to switch Kinetic Light 2 into repeater mode, you must:
- Open the “System” section and go to the “Mode” tab.
- Check the box next to "Amplifier".
- Click on the "Apply" button.
After starting the router in repeater mode, you need to change its default address by specifying one from the range 192.168.1.4 – 192.168.1.254.
Changing the factory password
For security reasons, it is recommended to change the factory password. Default: Login admin, password 1234. In the router interface, you need to go to the “ System ” tab, then password. In the New Password , enter a new password. It must be repeated in the next field. Next, save the settings by clicking the “ Apply ” button.
Setting up IPTV
The IGMP Proxy function must be activated in the web configurator. To do this, go to the “Home Network” section. The default settings on the IGMP Proxy tab are suitable for most providers.
Important! If there is no IGMP Proxy tab, you must download the appropriate firmware through the Components menu on the System tab.
When connecting a set-top box, you must specify the port to which it will be connected. This can be done in the “Internet” section by clicking on Broadband connection in the list of connections.
In the IPTV set-top box line, check the box under the port that will be used to connect it.
In the IP settings, you need to set automatic address acquisition.
Introduction.
If you connect to the Internet through a router, then most likely it distributes the IP address to the computer. If you have an old connection via a telephone line (ADSL), then you may have to manually assign an IP address to each computer. But this method is already outdated and is rarely used unless there is a technical possibility for a modern network connection.
Each provider has its own method of connecting (authorizing) a user to the network, here are some of them:
- Your login and password must be entered when creating a connection.
Which of these options is yours is up to you to decide, and based on this you need to decide how to configure the router. There are other ways to authorize a user, so check with your provider when connecting.
So, imagine that you have several computers that need to be connected to the Internet. The best solution is to use a router. You connect the network cable to the router, configure it, and it distributes the Internet to all your computers.
Before setting up the router, you need to configure the computer's network card, otherwise you won't succeed. I’ve already told you how to find out your IP address, so if you already know how to do this, you can skip this part; others should read it.
Firmware update
You can update the router firmware in two ways: through a special section of the web interface or by downloading a ready-made OS file to your computer and then installing it through firmware.
To update the firmware via the web interface:
- Open the "System" section.
- Go to the "Components" tab.
- Click on the “Update” button.
- Wait until all add-ons are installed.
To update via micrograms:
- Download the new firmware version from the official website.
- Open the web interface, go to the “System” section, “Firmware” tab.
- Select the saved firmware file.
- Click "Update".