To create a bootable USB flash drive, you can use proprietary Microsoft software, the already installed operating system itself, or other programs. All the methods described below assume that you already have a downloaded ISO image of the operating system on your computer, which you will write to a flash drive. So, if you haven't downloaded the OS yet, do so. You must also have suitable removable media. Its volume should be sufficient to accommodate the image you downloaded. At the same time, some files may still be stored on the drive; it is not necessary to delete them. All the same, during the recording process, all information will be irretrievably erased.
Method 1: UltraISO
Our website has a detailed overview of this program, so we will not describe how to use it. There is also a link where you can download it. To create a bootable USB flash drive using Ultra ISO, do the following:
- Open the program. Click on the "File" item in the upper right corner of its window. In the drop-down list, select “Open...”. Next, a standard file selection window will open. Choose your image there. After that, it will appear in the UltraISO window (top left).
- Now click on the “Boot” item at the top and select “Burn Hard Disk Image...” from the drop-down menu. This action will cause the menu to burn the selected image to removable media to open.
- Near the inscription “Disk drive:” select your flash drive. It will also be helpful to choose a recording method. This is done near the inscription with the corresponding name. It is best to choose neither the fastest nor the slowest available there. The fact is that the fastest recording method can lead to the loss of some data. And in the case of operating system images, absolutely all information is important. Finally, click on the “Record” button at the bottom of the open window.
- A warning will appear indicating that all information on the selected media will be deleted. Click "Yes" to continue.
- After this, all that remains is to wait until the image recording is completed. It’s convenient that you can monitor this process using a progress bar. When everything is over, you can safely use the created bootable USB flash drive.
If any problems or errors appear during recording, most likely the problem is in a damaged image. But if you downloaded the program from the official website, no difficulties should arise.
Method 2: Rufus
Another very convenient program that allows you to very quickly create bootable media. To use it, follow these steps:
- program and install it on your computer. Insert the flash drive on which the image will be recorded in the future, and launch Rufus.
- In the “Device” field, select your drive, which will become bootable in the future. In the “Format Options” block, check the box next to “Create a boot disk.” Next to it you need to select the type of operating system that will be written to the USB drive. And even more to the right is a button with an icon of the drive and disk. Click on it. The same standard image selection window will appear. Please indicate it.
- Then just click the “Start” button at the bottom of the program window. Creation will begin. To see how it's progressing, click on the "Log" button.
- Wait for the recording process to complete and use the created bootable USB flash drive.
It is worth saying that Rufus has other settings and recording options, but they can be left as they are originally. If you wish, you can check the “Check for bad blocks” checkbox and specify the number of passes. Thanks to this, after recording, the installation flash drive will be checked for damaged parts. If any are detected, the system will automatically correct them.
If you understand what MBR and GPT are, you can also indicate this feature of the future image under the inscription “Partition scheme and system interface type.” But doing all this is completely optional.
Required utilities
Active Boot Disk Suite
Active Boot Disk Suite
This is a real OS on a USB drive.
It includes a large number of tools for further work with disks:
- system recovery options
- creating backups
- password reset
- secure data deletion, etc.
Thanks to this utility, you can create images in the operating system based on the system itself and DOS shells. In addition, you can add additional elements to this image using the Bootable Disk Builder.
After all operations, the utility will write the created image to your flash drive.
Acronis Media
Acronis Media
This is a boot disk that contains a package of all the necessary programs for backing up data. It can create identical images of the hard disk and its individual fragments, and also manage partitions: merge them, split them, move them and create them.
It contains a classic boot menu, and is also a complete collection of all popular programs from Acronis.
Win7 Live by Xemom1
Win7 Live by Xemom1
This thing is an edition of Win7Live - a lightweight version of tools for reinstalling Windows OS, which will allow you to boot from a USB drive.
It has a traditional interface and supports networks and SCSI/SATA devices. But it does not have multimedia support .
Its core has a built-in ERD-Commander for restoring the operating system and a standard recovery function.
ERD Commander
ERD Commander
Microsoft Diagnostics and Recovery tools , with which you can secure the process of using your device, increase its performance, and reduce the cost of managing it.
Thanks to these tools, administrators will be able to restore failed devices, identify the cause of failures, and fix them. If the need arises, you can also restore lost information.
This set is the core component of the Desktop Optimization Pack for Software Assurance , which includes new technologies to help secure and improve device management.
AntiSMS XP for weak computers
Setting up AntiSMS on XP
This version of the program will be able to automatically eliminate all problems with the device associated with various viruses: Trojans, blockers, ransomware, etc.
With its help, even a beginner can unlock and restore the operating system if the problem concerns viruses.
When the device is started from a bootable USB flash drive, the utility will automatically take all necessary actions to disinfect the operating system.
AntiSMS Win8 for new computers
Setting AntiSMS to 7
This is the same program as the previous one, but this version is designed for newer operating systems and powerful devices.
AntiWinLocker LiveCD
AntiWinLocker LiveCD
This application will help in treating and unlocking an already blocked system if the system is infected with a specific virus - TrojanWinlock.
It is a ransomware that blocks the operation of the entire system, and unblocking will occur only after you send a message to a paid number.
Reset Windows Password
Reset Windows Password
The utility is the best of its kind. It can reset, change and recover passwords for any type of system account.
It supports all OS versions, works with both local and domain records, and restores all lost elements in a short period of time. In addition, the utility has a Russified interface.
The utility will help you if you forgot your Administrator password when logging in or if you cannot activate your account.
It launches with a Setup Wizard , so even a beginner can cope with the interface and operation of this program.
Passware Kit
Passware Kit
The application contains tools for guessing passwords for files that were created using Word, Excel, Outlook, Access, Exchange, Acrobat, PGP, WinZip, as well as many other basic system elements.
In addition, it can pick up keys in most versions of Windows OS, as well as their files and media that were encrypted using BitLocker technology.
It supports almost all methods and mechanisms for guessing passwords:
- searches through the dictionary;
- according to a given alphabet;
- uses a known part of the password;
- uses information about previously recovered data;
- combines different methods.
The process is accelerated by the processing power of graphics cards and multi-core processors.
AIDA 64
AIDA
It is a utility for diagnosing the device and checking the overall system configuration.
It checks the hardware and shows detailed data about the computer’s hardware: its video card, processor, monitor, motherboard, the operation of hard drives in general, etc.
It also displays information about the operation of the operating system, drivers, running processes and other installed and loaded programs.
Victoria HDD
Victoria
The utility is designed for diagnosing and analyzing hard drives with SATA or IDE interfaces. It is free and is often used by many specialized service centers.
But it is suitable for home use, so it is in demand among most users, since with its help you can find all the necessary errors at home.
It can determine all failures in the system, the surfaces of hard drives, identify noise levels, average access times, delete necessary data from media without further recovery, and set passwords.
Download
Memtest86+
Memtest86+
Performs a safe test of the device's RAM. The latest version of the program has the ability to support a large number of threads, accelerated speed when errors are detected, and displays data on the current processor temperature.
GoldMemory
GoldMemory
The utility conducts testing and checks RAM for the identification and presence of various types of failures. Capable of supporting almost all types of modules, as well as compatible platforms for working with different configurations.
With its help, you can analyze the available modules, check them for failures and errors, which often cause system malfunctions.
It runs on DOS-compatible operating systems, has a list of parameters for operation and has a function for generating a report on the results of the analysis.
MHDD
MHDD
The application allows you to accurately diagnose HDD drives and make minor repairs. Can work even at low level, communicates directly through IDE controller ports.
The utility performs a very accurate and fast check of all surfaces of hard drives, despite the information it receives when diagnosing the drive.
In addition, with its help you can easily and quickly eliminate soft-bad sectors.
Volkov Commander (NTFS+)
Volkov Commander (NTFS+)
This is a very popular shell for DOS.
It allows you to mark, move, copy/delete sections with all their subsections and performs the same operations as with simple files. And during copying, files can be either merged or split.
In general, it has very powerful functionality.
FixNTLDR
Dealing with the NTLDR is missing error
“NTLDR is missing” appears when booting your device , then this utility can easily fix it.
Kon-Boot Commercial
Kon-Boot Commercial
The application allows you to change the contents of the operating system kernel directly during its boot. At the same time, it bypasses the authorization stage in the system, that is, it can log into your account without entering a password.
But, at the same time, your password is not deleted or overwritten, which means that after a further reboot of the system, all the original contents of its kernel—the authorization process—is restored and occurs in the format already familiar to you.
This set of utilities will be more than enough to create a bootable USB flash drive.
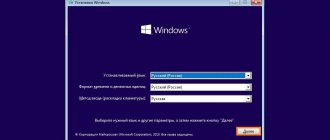
Method 3: Windows USB/DVD Download Tool
After the release of Windows 7, developers from Microsoft decided to create a special tool that allows you to make a bootable USB flash drive with an image of this operating system. This is how a program called Windows USB/DVD Download Tool was created. Over time, management decided that this utility could well provide recording for other operating systems. Today, this utility allows you to record Windows 7, Vista and XP. Therefore, for those who want to make media with Linux or another system other than Windows, this tool is not suitable.
To use it, follow these steps:
- Download the program and run it.
- Click on the “Browse” button to select the previously downloaded operating system image. The selection window already familiar to us will open, where you just need to indicate where the desired file is located. When you're done, click on "Next" in the lower right corner of the open window.
- Next, click on the “USB device” button to write the OS to removable media. The “DVD” button, respectively, is responsible for discs.
- In the next window, select your drive. If the program does not display it, click on the update button (in the form of an icon with arrows forming a ring). When the flash drive is already specified, click on the “Begin copying” button.
- After this, burning will begin, that is, recording onto the selected media. Wait for this process to complete and you can use the created USB drive to install a new operating system.
HP USB Disk Storage Format Tool
A very simple proprietary utility from HP that performs deep formatting and rids the drive of all kinds of errors. The software is a portable version and only supports English, but this is not scary, because the interface is very simple and the functionality is highly specialized. You need to run the utility as an administrator, otherwise you will see an error when you try to format the flash drive.
After launching the program, you will see a small window. In it, in the “Device” column, you need to select one of the connected drives. Then specify the type of file system you want after the recovery process. In the “Volume label” column, specify the name of the device that will be displayed in the operating system. It is advisable to perform careful formatting, leaving the “Quick Format” item empty.
After all the specified settings, click “Start”. You will see a warning indicating that all data on the drive will be erased. Therefore, copy all the files you need from the flash drive in advance.
The completion time of the operation depends on many factors and usually ranges from 5 to 40 minutes. Quick formatting (the checkbox next to the “quick format” item) speeds up the formatting process, but does not guarantee that the drive will no longer conflict with different software and hardware. The scale showing formatting progress may stop in place. Don't be alarmed and wait for the process to finish in any case. In some cases, the HP USB Disk Storage Format Tool does not save the drive from errors. Therefore, we recommend trying other utilities that are aimed at restoring the flash drive to its original state.
Method 4: Windows Installation Media Creation Tool
Microsoft specialists have also created a special tool that allows you to install on a computer or create a bootable USB flash drive with Windows 7, 8 and 10. The Windows Installation Media Creation Tool is most convenient for those who decide to record an image of one of these systems. To use the program, do the following:
- Download the tool for the desired operating system:
- Windows 7 (in this case you will have to enter the product key - yours or the OS that you have already purchased);
Windows 8.1 (no need to enter anything here, there is a single button on the download page);
- Windows 10 (same as 8.1 - no need to enter anything).
- Let's say we decide to create bootable media with version 8.1. In this case, you must specify the language, edition, and architecture. As for the latter, choose the one that is already installed on your computer. Click the "Next" button in the lower right corner of the open window.
- Next, check the box next to “USB flash memory device.” If desired, you can also select the ISO file option. Interestingly, in some cases the program may refuse to immediately write the image to the drive. Therefore, you have to first create an ISO, and only then transfer it to a flash drive.
- In the next window, select the media. If you inserted only one drive into the USB port, you do not need to select anything, just click “Next”.
- After this, a warning will appear stating that all data from the flash drive in use will be erased. Click "OK" in this window to begin the creation process.
- Actually, the recording will begin next. You just have to wait until it ends.
Launch it.
Lesson: How to create a bootable USB flash drive for Windows 8
In the same tool, but for Windows 10, this process will look slightly different. First, check the box next to “Create installation media for another computer.” Click Next.
But then everything is exactly the same as in the Windows Installation Media Creation Tool for version 8.1. As for the seventh version, the process there is no different from that shown above for 8.1.
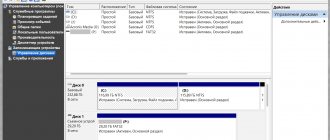
Recording a Windows 10 image by copying to media
Let's assume that a specific program image exists on the computer in a specially designated folder. To transfer it to a flash drive, you do not need to know any special rules or comply with special requirements. The entire algorithm is built on a few simple steps.
- Open the operating system image in the file.
- We format the flash drive installed in the slot using the Fat format type
- Next, open the drive.
- We place the flash drive window and the image window side by side on the desktop.
- We copy information by dragging an image from one folder to another.
- We are waiting for the duplication process to complete.
As a result, we get a fully functioning bootable USB flash drive. Now, with its help, you can not only restore the corresponding operating system, but also install it on your PC.
The transfer can be carried out either as an archive or one folder at a time. USEFUL TO KNOW!
In case there is a problem with the performance of the clipboard on your PC, it is not recommended to use this method. This may result in incorrect transfer of files and folders.
Method 5: UNetbootin
This tool is intended for those who need to create a bootable Linux USB flash drive from Windows. To use it, do this:
- program and run it. No installation is required in this case.
- Next, specify your media on which the image will be recorded. To do this, next to the “Type:” inscription, select the “USB Drive” option, and next to “Drive:” select the letter of the inserted flash drive. You can find it in the “My Computer” window (or “This Computer”, simply “Computer”, depending on the OS version).
- Check the box next to “Diskimage” and select “ISO” to the right of it. Then click on the button in the form of three dots, which is located on the right side, after the empty field, of the above inscription. A window for selecting the desired image will open.
- When all the parameters are specified, click on the “OK” button in the lower right corner of the open window. The creation process will begin. All you have to do is wait until it ends.
Method 6: Universal USB Installer
Universal USB Installer allows you to burn images of Windows, Linux and other operating systems to drives. But it is best to use this tool for Ubuntu and other similar operating systems. To use this program, do the following:
- and launch it.
- Under the inscription “Step 1: Select a Linux Distribution...”, select the type of system you will install.
- Click the "Browse" button under "Step 2: Select your...". A selection window will open, where you will have to indicate where the image intended for recording is located.
- Select your drive letter under “Step 3: Select your USB Flash...”.
- Check the box next to “We will format...”. This will mean that the flash drive will be completely formatted before the OS is written to it.
- Click the "Create" button to get started.
- Wait until the recording is finished. This usually takes very little time.
Method 7: Windows Command Prompt
Among other things, you can make bootable media using the standard command line, and specifically using its DiskPart snap-in. This method involves the following steps:
- Open Command Prompt as Administrator. To do this, open the Start menu, open All Programs, then Accessories. Right-click on Command Prompt. Select “Run as administrator” from the drop-down menu. This is relevant for Windows 7. In versions 8.1 and 10, use the search. Then you can also right-click on the found program and select the above item.
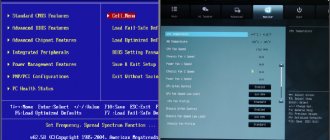
- Then in the window that opens, enter the diskpart command, thereby launching the snap-in we need. Each command is entered by pressing the “Enter” button on the keyboard.
- Next, write list disk, which will display a list of available media. In the list, select the one on which you will need to record the operating system image. You can recognize it by its size. Remember his number.
- Enter select disk [drive number]. In our example, this is disk 6, so we enter select disk 6.
- After that, write clean to completely erase the selected flash drive.
- Now issue the create partition primary command, which will create a new partition on it.
- Format your drive with the command format fs=fat32 quick (quick means quick format).
- Make the section active with active. This means that it will become available for download on your computer.
- Give the section a unique name (this happens automatically) using the assign command.
- Now look at the name that was assigned - list volume. In our example, the media is called M. This can also be recognized by the size of the volume.
- Exit here using the exit command.
- Actually, the bootable USB flash drive has been created, but now you need to reset the operating system image to it. To do this, open the downloaded ISO file using, for example, Daemon Tools. How to do this, read the lesson on mounting images in this program.
- Then open the mounted drive in My Computer so that you can see the files that are inside it. These files just need to be copied to a flash drive.
Lesson: How to mount an image in Daemon Tools
Ready! The bootable media has been created and you can install the operating system from it.
As you can see, there are quite a few ways to accomplish the above task. All of the above methods will work for most versions of Windows, although in each of them the process of creating a bootable drive will have its own characteristics.
If you can’t use one of them, just choose another one. Although, all of these utilities are quite easy to use. If you still have any problems, write about them in the comments below. We will definitely come to your aid!
We are glad that we were able to help you solve the problem. In addition to this article, there are 12,719 more instructions on the site. Add the Lumpics.ru website to your bookmarks (CTRL+D) and we will definitely be useful to you. Thank the author and share the article on social networks.
Describe what didn't work for you. Our specialists will try to answer as quickly as possible.
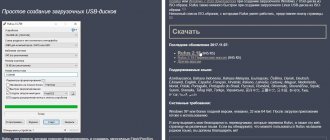
Creating a bootable USB flash drive using the UltraISO utility
The UltraISO program is extremely popular among users who often work with disk images. This program also has the function of creating bootable flash drives.
- Download UltraISO from the website ezbsystems.com, choosing the free Trial version.
Install the program, accepting the license agreement and all the marked points. Launch the program by selecting “Trial period”. - Open the disk image in the program, and also go to the “Boot” and “Burn hard disk image” items.
- In the window that opens, select the required flash drive, format it if necessary, and also press the “Burn” button.
Once the installation is complete, the bootable USB flash drive will be ready.