Nowadays, almost everyone uses a wireless network. It is present on every device: Wi-Fi on a laptop, for example, is present on all the latest models. It's so convenient. You can access the Internet anywhere: at a party, in a cafe, in an office, in a library, etc.
Many are accustomed to the fact that this process occurs by itself, automatically and does not require any effort on the part of the user. The maximum that is required is to enter a password to access the wireless network on the device. As a rule, entry occurs once, and then entry is carried out automatically.
Sometimes there may be connection difficulties. The article tells you what to do if the wireless network is disabled, how to turn it on (Windows 7 and newer versions of this OS), as well as how to turn on Wi-Fi from the keyboard, connect an external adapter, and install software. At the end there is a video with instructions on how to install a wireless network on a laptop with Windows.
Turning on Wi-Fi on a laptop using the keyboard
In most cases, you can activate wi-fi with a simple key combination, usually two at a time. Combinations may vary depending on the device manufacturer. The main Fn button is on every keyboard. The second is in the row F1-F12.
Below are the most common key combinations:
- Asus: Fn+F2;
- Lenovo: Fn+F5;
- HP: Fn+F12;
- Aser: Fn+F3;
- Samsung: Fn+F9;
- Toshiba: Fn+F12;
- Samsung: Fn + F12 or F9 (different models).
On older devices, there is a slider on the side of the case that turns on the wireless network. When everything is normal, a mark in the form of steps appears on the screen. To open it and see the settings, just click on the icon. A window will open indicating the current connection.
There may be a situation where you cannot turn on Wi-Fi using either a key combination or the power button on the case. How to enable a wireless network on a laptop in this case? The first step is to check for a problem in the settings: select “Network and Internet” on the control panel, go to the “Network Connections” tab, and diagnose the networks. The operating system will correct errors on its own.
How to connect a Wi-Fi adapter to a laptop
Let's say you're tired of getting tangled wires. This problem can be easily solved by purchasing an external wireless network adapter. This is the simplest and most affordable option.
For the best signal, you should give preference to devices with an antenna. There are adapters with two ranges. They are only relevant if home computers support the 802.11ac standard. Of course, you also need to purchase a router operating at 2.4 and 5 GHz frequencies.
You must plug the wireless network adapter into the USB port on your PC. It is better to use the 3.0 connector for the highest speed. 2.0 will do as well.
As for drivers, they are usually already in the laptop. Manual installation will be required on Windows XP. However, there are not many users of this operating system left at the moment. If you need to install drivers, a disk will be included with the adapter.
The device is configured as follows: go to the device settings (Wi-Fi adapter properties). A software update is available here. Then connect to Wi-Fi. At the bottom of the screen on the right, click the network connections icon, select the one you need from the list and click “Connect”. If necessary, enter a password. Check the presence of an Internet connection.
Advanced settings
If the “Quick Setup” of the device does not give a positive result or the user wants to spend more time setting the router parameters, you should follow a simple algorithm:
- Go to the next section of the main menu, WPS, and press the button to select whether this option for connecting to the Wi-Fi network will be used in the future.
- If so, click on the “Connect device” button and specify the pairing method: using a PIN code containing eight digits, or by pressing a physical button.
- In the “Network” section, in the WAN subsection, set the type of connection to the Global Network. In the drop-down menu, the user can select a dynamic address - in this case, no further data will have to be specified.
- Static address - you will need to indicate the permanent IP specified by the provider and other data that can be found in the contract or clarified by calling the company’s office.
- PPPoE connection - you will need to enter your username and password in the appropriate fields.
- And also determine the cable connection option: whether it should be activated by default.
- According to a schedule (at specified hours) or manually each time.
- L2TP - you will need to indicate your login, password twice and enter your IP address in the text fields, and also, if necessary, set the time for connecting and disconnecting the Internet.
- PPTP - similar to the previous one.
- Remembering to click on the “Save” button at the bottom of the page, the user can move on to the next subsection.
- "Clone MAC address." This step is needed if the provider “binds” the user to the network card address; By clicking on the “Clone” button, the owner of the router will set the device to the same address as the computer had.
- To return everything “as it was,” just use the adjacent “Restore factory MAC address” button.
- In the IPTV subsection, a client of a provider offering an Internet television service can easily enable or disable the proxy for this option.
- It will also establish the connection method - for example, by connecting a cable to the LAN connector.
- In the “Wireless Mode Settings” subsection of the “Wireless Mode” section, the owner of the router will be able to configure the signal transmission mode, width and number of channels in the order described earlier.
- By checking the “Enable WDS” checkbox, the user can easily configure his router as a “jumper” between already working wireless networks; For home use, this option is not needed in most cases - the signal from modern devices covers the entire area of the apartment.
- In the “Wireless Security” subsection, the user has the opportunity to select a data security method (WPA2 is still recommended) and set a password.
- In “Advanced settings” - set the power of the wireless signal transceiver; We recommend using the High or Medium settings.
- In the “USB Settings” section, indicate to the system how the modem should be connected correctly.
- In the "Bandwidth Control" section - set the maximum speed of data exchange with the Global Network.
- In the “Time Settings” subsection of the “System Tools” section, set the time zone for the router.
- And the rules for switching to and from daylight saving time.
- Now in the “Diagnostics” subsection you should check the quality of the connection - if such an option is provided for your router model.
- As a result, the device owner can change the default login and password required to access “Settings” by looking in the “Password” subsection.
- The router setup is complete; the user can either reboot the device using the appropriate button, or start working in a few minutes.
- After closing “Settings”, you can check the quality of Wi-Fi manually by calling the “Command Prompt” and entering in it without quotes and extra spaces ping IP , where IP is the address that was used during the connection establishment process.
- If all is well, after a few seconds the system will notify the user that there are no lost packets; if the latter are greater than zero or the signal does not pass through at all, it is recommended to contact your provider for clarification.
How to install software for a Wi-Fi adapter
A driver is a program through which the OS receives data about the type of connected equipment and its purpose. It ensures the proper functioning of a laptop, computer and other devices with an operating system.
Quite often, failures in the wireless network appear after the system is cleaned of viruses, after reinstalling the equipment or the operating system itself. At this time, settings may be deleted. If a problem is detected, the presence of a driver on the laptop is determined.
To do this proceed as follows:
- Enter “Start” and then “Computer”;
- Go to the appropriate section of “System Properties”;
- Open the “Device Manager” tab. This section contains the inscription in English “Wireless Network Adapter”. Click on it and go to “Driver”. When there is no content, install the driver on the laptop.
How to install a driver for a wi-fi adapter
There are several ways to install a driver on a laptop. This applies to other devices as well. The first, easiest option is automatic installation, when Windows OS does all the work. She independently searches for the necessary, modern, up-to-date drivers suitable for a specific system. The main disadvantage of this method is that often the OS cannot find the necessary driver. And then you have to do the installation manually.
In some cases, automatic searches are completed successfully, and the driver installation occurs correctly. Most often, at least this is how it should happen, the OS itself will try to install the driver. If this does not happen, run automatic driver installation to enable the Wi-Fi adapter on the laptop.
This is done as follows:
- Press Windows + R at the same time;
- Enter the command devmgmt.msc into the empty field that opens;
- Confirm by pressing Enter;
- Find the “Other devices” section.
For some reason, the Wi-Fi adapter ended up in the other devices category, because there is a special section for it. Very simple. The driver was not installed by the system for a specific device, or the first installation failed.
In this situation I do this:
- Find the Wi-Fi adapter in “Other devices”;
- Click with the mouse (button on the right);
- Select from the “Properties” menu presented;
- Go to “Driver” and update;
- Select “Automatically search for updated drivers.”
After selecting the last item, the OS will automatically search for suitable drivers and install them for the Wi-Fi adapter. Here it’s up to the operating system: it may install the driver, or it may not install it. If the installation does not occur, do not worry. You can perform the installation manually. Below we describe in detail how to do this. There's nothing complicated. It is enough to follow the instructions exactly.
Benefits of a wireless network
The advantages of a virtual line are presented:
- the ability to move freely around your home with any portable device, as opposed to a wired connection;
- exchange of files and other information with other equipment connected to a common line, without additional connection to the port;
- the absence of many cords on the floor or in the walls - an advantage in terms of cost and lost time for the correct installation of cables, easy addition of secondary devices due to the fact that new wires are not required;
- additional income for public places (cafes, restaurants) - a line accessible to customers increases traffic to the retail outlet;
- handling a large number of users - a wireless mesh is not limited to a certain number of ports for connection, allowing everyone to connect.
The advantage of Wi-Fi is the instant transfer of information to social networks. Once a photo is taken, it is uploaded to Facebook almost instantly thanks to modern technology.
Direct connection to laptop
Installing the Wi-Fi adapter driver manually
First, go to the official Internet portal of the device manufacturer. In our case, the adapter. Find the “Downloads” section, go into it and simply download the required driver to your PC. Installation occurs thanks to the installation package.
When installation occurs on a laptop, go to the website of the laptop manufacturer. If a problem arises with installing the driver using the downloaded installer, use the semi-automatic installation method, through the Device Manager. And indicate the address of the directory where the driver is located on the PC.
To do this you need to take several steps:
- Go to the download section of the official creator - the manufacturer of the purchased wireless network adapter or netbook.
- They download the package with drivers onto their own computer.
- Press the Windows key combination + R.
- Enter devmgmt.msc into the line that appears.
- Confirm with the Enter key.
- Find the section called “Other devices”.
- In this category, choose a wireless network adapter.
- Click on the icon with the mouse.
- Select “Properties” from the menu presented.
- Go to the “Driver” tab.
- Click to update.
- Click on “Search for drivers on this PC.”
- Click "Browse".
- Indicate the directory where already downloaded programs - drivers are located.
- Click on “Next”.
Now all you have to do is wait for the driver installation to finish.
How to enable Wi-Fi adapter on a laptop
After the drivers are installed using any of the methods described above, all that remains is to enable wireless communication on the laptop by turning on the adapter. It's simple. Press and hold the Fn key and simultaneously press the Wi-Fi button. It is marked with a special icon. Some models have a separate button. In this case, you just need to press it once.
In principle, after these steps, the wireless network should be turned on. If the connection does not occur, open the Network and Access Control Center. Check whether there is a connection or not.
To do this, find the icon at the bottom of the screen on the right and click on it. A menu will open in which you select the “Change adapter settings” category. Next, select “Wireless network connection”. If the function is disabled, the icon will be gray. To turn it on, simply right-click and click on “On”.
After the manipulations have been completed, a check is performed. That the wireless connection is established and active is indicated by a lit icon in the form of a signal level from the steps. It is marked with an asterisk. It is now obvious that the module is enabled. Can be connected to the network. To do this, click on the icon. A list of available networks will open. Select your router and click on “Connect”.
"Quick setup"
To get a stable, properly working Internet connection, it is not necessary to study every section of the router’s main menu; Most often, a user who does not have the appropriate skills and knowledge just needs to find the “Quick Settings” / Quick Settings / “Configure Now” section or similar and use the built-in “Wizard”.
To establish a Wi-Fi connection using Quick Setup, you need to:
- Go to the section of the same name by clicking on the link in the side menu.
- Read the rules for using the “Wizard” and click on the “Next” button.
- In the drop-down lists on the next page, select your country sequentially.
- City or other locality.
- Provider.
- And the type of connection - the menu can only have one or several items. In the latter case, it makes sense to immediately clarify “your” option in the contract (or call the provider’s office).
- By clicking on the “Next” button, the user will be taken to the next “Quick Settings” page. Here, in most modern router interfaces, it can enable or disable wireless data transmission (to set up home Wi-Fi, of course, you need to select the “Enable” option).
- Set the Wi-Fi network name and indicate your country of residence - this is necessary to ensure a stable Internet connection.
- Here you should choose the type of wireless signal protection. It is recommended to prefer the WPA2 option - it is suitable for both new and relatively outdated devices. In the field below you need to set the network access code - it must be no longer than 63 or 64 characters and no shorter than 8 and can contain both Latin letters and numbers - or both.
- By checking the “Additional parameters” checkbox (sometimes they are placed in a separate section), the user will be able to set the type of Internet signal transmission - it is recommended to either leave it as default, or select the menu item with the largest number of parameters.
- Channel width - it is better to choose “Auto” or set the highest value available.
- And the number of channels - here you can also either stop at the “Auto” item, or select from the parameters “5”, “7” or “9” - more, as a rule, is not required to ensure uninterrupted operation of the Wi-Fi network.
- Now click on the “Next” button.
- The user will be able to complete the quick Wi-Fi setup. All you have to do is click on the “Finish” button and wait a little - the Internet will be connected in a minute or two.
If no suitable settings are found on the first page of Quick Setup, you should:
- Mark this by checking the bottom checkbox (in some models, in this case, you will need to go to “Advanced settings” - they will be discussed in the next section), and click on the “Next” button.
- On the new page - select your type of connection to the Global Network by placing a circle next to the corresponding item.
- Next, if required, enter the username and password assigned by the operator in the text fields. They must be contained in the contract or can be obtained directly from the provider - just call or use the online support form.
- In addition, the user can, if the provider provides such an option, activate a secondary connection by specifying a dynamic (changing) or static (permanent) IP address on the same page.
- Now all that remains is to configure the additional parameters of the router, as described above.
- By clicking on the “Finish” button, the owner of the router will be able to start working on the Internet; sometimes, as indicated on the final “Quick Setup” page, you need to reboot the router.
How to turn on Wi-Fi on a Windows laptop - video
The presented method of how to connect a wireless connection on a laptop will help to simultaneously eliminate existing connection difficulties, correct the functioning of the wireless network and calmly continue working on the Internet. For a better understanding and assimilation of information, below is a video instruction on connecting Wi-Fi on the operating systems Windows 7, Windows 10 and Windows XP:
Now you know how to turn on Wi-Fi on a laptop. Models from different manufacturers have their own characteristics. They are not very different. The principle is the same everywhere. This can be done automatically or manually. To do this, the appropriate drivers must be installed on the laptop. You can connect your device to a wireless network using either an external adapter or an internal one.
Equipment selection rules
To form your own virtual line, you will need the following elements:
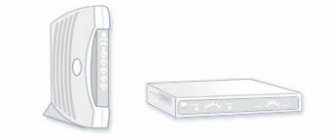
- Modem and broadband internet connection.
There are the following high-speed connection options: cable and using DSL technology. To obtain such a service, you need to contact a service provider who will provide the end user with a broadband modem.
Some companies additionally offer wireless routers; in other cases, they will have to be purchased separately in specialized computer hardware and electronics stores.
- Wi-Fi router.
The router is responsible for sending data between the Internet and the home network. Using a router allows you to connect equipment without using cables. To complete the task, separate technologies are used: 802.11 a, 802.11 b, 802.11 g, 802.11 n, 802.11 ac, 802.11 ax.
Today, preference should be given to models with support for 802.11ac or 802.11ax
- Wireless network adapter.
It refers to a device responsible for creating a connection between a router and a personal computer. Not all units are initially equipped with it; in some cases, for stationary PCs, an additional purchase is required.
To determine whether it is present in the equipment, you need to carry out a simple check: go to the main menu -> find the device manager in the list -> expand the network adapters block -> find the desired unit in it.
The specified equipment is enough to connect all the equipment in the house to Wi-Fi.
USB network adapter TP-Link TL-wn822n