Sergey Efimov
August 1, 2020
Comments (3)
192.168.1.1 – IP address used to log into the router’s personal account. If you accidentally typed the address in the search bar of your browser, follow the link: https://192.168.1.1, if problems arise, solve them using these instructions.
By typing it in the browser of the device connected to the network equipment, you will go to the control panel authorization page and then access the settings. After authorization in the router’s personal account, settings for connecting to the Internet, local network, wi-fi, rights and accesses become available.
The login address is relevant for router models from most manufacturers: Asus, TP-Link, D-Link, Zyxel Keenetic, Cisco, NetGear, ZTE, Netis, Upvel, SagemCom, Beeline Smart Box, Eltex, TelNet, Xiaomi, Microtik, TotoLink. Special routers and 4g modems from providers: Beeline, Yota, Megafon, MTS, Dom. Ru, TELE2. Routers supplied by Internet service providers, for example: Rostelecom, ByFly, Promsvyaz, DomRu InterZet.
Login and password to log into the router via 192.168.1.1
Often, a login and password pair is used to log into network equipment: admin - admin. In this article we will look at authorization issues, error correction, troubleshooting recommendations, and setup instructions. If the router is working properly, let’s go into it and make the necessary settings.
If you got here by accident, you can enter the control panel of your router by clicking the link: 192.168.1.1 (opens in a new window). You will be taken to your router’s personal account. If the problem is that you forgot your password, read the article to the end.
Instructions: how to log in to the address 192.168.1.1.
The router is configured and there is an Internet connection.
Use a device connected to the Internet or local network through this router, otherwise you will not be able to get to the authorization page, except perhaps on another device. To log in, use equipment that supports the network and works with browsers: PC or laptop on Windows, Linux, iOS; mobile phone or tablet on Android, Windows or iOS.
Open your browser and enter the address in the address bar: 192.168.1.1
Figure 1: Browser address bar with the entered address.
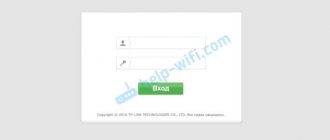
In the authorization window that appears, enter the username and password specified in the instructions for the router and on the sticker at the bottom of the device.
Mobile apps are available for modern routers and modems.
The router connects for the first time
To enter the router settings via 192.168.1.1, make sure that the preparatory steps have been completed correctly:
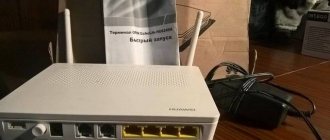
Connect the device to the power supply; Turn on the router with the “ON / OFF”, “On / Off” or similar button, the second indicator should be on;
Figure 3. Router indicators.
Login via Wi-Fi
The web configurator can be accessed via a wireless connection via WiFi using a smartphone, laptop, tablet or PC with a WiFi receiver. You can read more in the article: “Enter the router settings from your phone via WiFi.” Below are brief instructions for logging into your account.
Make sure you have activated Wi-Fi; if not, press the power button and check the indicator. The indicator is shown in Figure 3, number four;
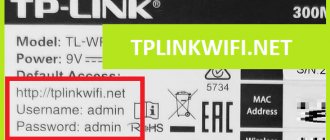
Look at the network name and password (network encryption key) on the sticker at the bottom of the router or in the instructions;
Figure 4. Beeline router sticker with the name of the Wi-Fi network and password.
Connect the device from which you log in to the address 192.168.1.1 to configure the router via Wi-Fi;
Figure 5. Logging into the router network via Wi-Fi
Open your browser and enter the address https://192.168.1.1 in the address bar as shown in Figure 1. Log in using the username and password specified in the instructions or on the sticker, for example: admin - admin.
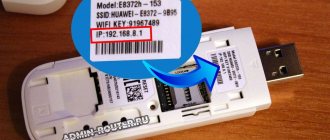
Figure 6. Router sticker indicating IP and login - password
Login to 192.168.1.1 via network connection
- Make sure that the router is connected to the computer or laptop via a Lan cable;
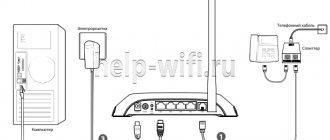
Figure 7. Router ports Lan, Internet, power and reset button. - Make sure that the connection indicator is on (second indicator in Figure 3) and the computer or laptop sees the network connection, as shown in Figure 7. Figure 8. Network connection icon in Windows 10
- Launch the browser, enter the address https://192.168.1.1 in the address bar as shown in Figure 1.
- Enter the login and password specified in the instructions, for example: admin - admin.
Login through Microsoft Windows Explorer
An easy way to log in through Windows Explorer. Open Explorer, for example: “My Computer”. In the context menu, go to the “network” tab. The network devices visible and used throughout history will open. Find the required router and right-click, and then click on the item: “View the device’s web page.”
The address that the router considers native will open in the default browser. In the example, this is Microsoft Edge on the Windows 10 operating system.
What features does the router interface provide?
How to set up a TP-Link Wi-Fi router - step-by-step instructions
To configure the router, you need to know the purpose of the main tabs:
- "Wireless". This section is responsible for setting up a wireless network. It has several subsections that can be adjusted at your own discretion. Here the user will need to come up with a name for his access point, enable security and come up with a strong password to avoid unauthorized access;
- "Quick setup". This menu allows you to configure your router in the shortest possible time. You must follow the instructions and prompts of the assistant, clicking the “Next” button after performing a certain action. At the final stage, the user will need to select the “Static IP address” item in order to always specify a password when connecting to the Internet. After completing the quick configuration of the router parameters, you will have to reboot to apply the changes;
- "Net". This tab specifies the basic parameters of the Internet connection, which can be changed if necessary. For example, the user will have to change the values in the “DNS server” field, and also change the “WAN connection type”;
- "System Tools" This section presents several additional parameters, the activation of which may be useful in solving a particular problem. There are several subsections, each of which is responsible for the implementation of a particular function. You can reset the router settings, diagnose problems, reboot the device, update the software and view the system log.
“Wireless” tab in the menu of TP-Link routers
Important! After resetting the router settings to factory settings, the user will have to reconfigure the transmitter.
Doesn't go into router settings at 192.168.1.1
Let's figure out why the router's website may not open. The router may not access the address 192.168.1.1, 192.168.0.1, another gray IP or Hostname for two reasons. The first and most common is an error when entering an address. The second reason why the browser is not included in the router menu is an error on the software side of the device from which you are logging in. You may also not be able to log in due to faulty hardware or router, but we won’t touch on this topic.
Solution to problem 1: the Internet works, but the router settings page does not open
Step 1: Make sure the router address is 192.168.1.1, router manufacturers change the entry addresses of models. The correct one is indicated in the documentation and the sticker at the bottom of the device; and that the address is typed correctly. People make mistakes in spelling addresses, making mistakes in spelling, for example:
- 192,168,1,1 - indicate commas instead of periods;
- 192.168.1.l - instead of the number 1, indicate the letter “l”;
- 192.168.11 - skip one to three dots between numbers;
- 192.168.1.2 - numbers are confused;
- 192.168.0.1.1 - indicate an extra address element;
- 168.192.1.1 - the first digits are swapped;
- 192 168 1 1 - indicate spaces instead of dots;
- 192yu168yu1yu1 - do not change the keyboard language layout;
- 198.162.1.1, 198.168.1.1, 198.162.1.1 - confuse numbers and endings;
- http 198.168.1.1 - skip the gap between the protocol and the address;
- 192.168.0.0 - indicate the network address instead of the device address;
- https://192.168.l. l - indicate secure mode using the http 2 protocol (https)
Correctly enter the address: https://192.168.1.1, https://192.168.1.1, https://www.192.168.1.1, https://www.192.168.1.1, www.192.168.1.1, 192.168.1.1
If this does not help, use steps 1-4 from the next paragraph.
Solution to problem 2: the Internet and the login to your personal account do not open:
Step 2. Make sure that the computer is connected by a LAN cable to the router, check the icon shown in Figure 8.
If there is no icon, make sure that you have connected the cable to the correct Lan port and not the Ethernet port. Internet - port for connecting the Internet via the provider's wire. If the cable is connected correctly, change the connection port to another one and replace the cable. The RJ45 wire or connector may be damaged. When connecting via Wi-Fi it is easier; if the network is visible, then there is a connection to the modem. The Lan indicator is shown in Figure 3 under the first number.
Step 3. The router address is blocked by a computer or mobile device security program. Try disabling the Windows firewall, firewall, antiviruses, for example: Nod32, Kaspersky, Avast.
Step 4. Possible problem with the browser. First, try opening the address https://192.168.1.1 with another browser: Firefox, Chrome, EDGE, Enternet Explorer, Opera, Safari. If this does not work, make sure that a proxy is not involved in the browser. Go to the Windows Control Panel and from there to Internet Options. If the proxy is active, disable it and try again.
Step 5. Device diagnostics. The router may be ok. Try connecting to the modem from another device. If you succeed in connecting and logging into your router’s personal account, enter login and password: admin - admin (another login - password pair) and understand that the problem is in the hardware or software. Then we move on to the steps that are aimed at solving the problem with Windows XP, Windows 7, Windows 8, Windows 10 software.
Step 6. Check for viruses. A virus may be blocking access to the router. Run diagnostics on your computer, preferably in safe mode.
Step 7. Checking the health of the network card. We check the serviceability of the network card. To do this, go to the “Control Panel” of Windows OS - “network connections” or press the key combination Win + R and write the command in the command line: ncpa. cpl. The connection has three states: gray - inactive. Right-click on the network connection - “activate”, normal - the network card is working, the red cross means the cable is not connected. If you are sure that you connected the router correctly, then the problem is in the connection, network card or device. It is better to diagnose by changing each part separately.
Step 8. Try to log into the router using the hostname. Hostname is synonymous with logging in via IP; manufacturers often implement a hostname to make it easy to remember the address for logging into your personal account. Hostname table:
- TP-Link
: tplinklogin.net, tplinkwifi.net, tplinkmodem.net - NetGear
: routerlogin.net - Zyxel
: my.keenetic.net - Netis
: netis.cc - Netgear : routerlogin.net
Step 9. Checking the router's availability via IP 192.168.1.1
Open the command line by pressing the key combination “Win + R” or in another way, execute the command: “ping 192.168.1.1”. If the response is “the timeout interval for the request has been exceeded” or “the node could not be found,” we change the Lan connection port on the router; if the router shows a ping to the address, we configure the network connection.
Step 10. Network settings for access to IP 192.168.1.1
Open network connections through the context menu of the taskbar, command line or control panel. Click “change adapter settings”; in Windows 10, in Windows xp, 7, Vista, 8 the menu is called “adapter settings settings”.
Right-click on our network connection and go to properties.
Double-click on “IP version 4 TCP IPv4”. Strict indication of connection data is not required in modern routers and providers (unless the contract states otherwise), we look at the filled fields and if they contain numbers, then write the numbers in a notepad or take a screenshot and switch to: “get IP addresses automatically" and "get DNS server automatically". If the settings are already the same, we’ll write down the connection addresses manually.
Switch the option to “use the following IP address” and “use the following DNS server addresses.” We specify the following parameters:
- IP address - 192.168.0.3
- mask - 255.255.255.0
- Gateway - 192.168.0.1
- DNS - 192.168.0.1
We check access to the router control panel at 192.168.0.1; if there is still no access, then there are two options left:
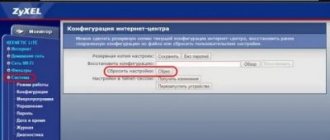
Way 1: Do a “Hard-reset” by resetting the router settings to factory settings. In this case, information with provider settings, Wi-Fi passwords and other changes will be lost. If the data is different from the factory firmware, save it or get it from your provider, otherwise you may be left without Internet access.
Way 2: call a technician or take the router to a service center for diagnostics. Of course, the ideal is to find a provider that provides equipment and technical support.
What to do at the very beginning...
Buy a router...