If you want to change your name or email address in Gmail, we'll show you how to do it easily. There are many possible reasons why you might want to change your email address or name in Gmail. Perhaps you created your email address in your early teens and gave it a ridiculous name. On the other hand, maybe you just want a change. Whatever your specific reason, this article will help you through the process.
Email name and email username
Most people assume that the email name and email username are the same. However, this is not the case. Your email name is the sender name that appears when you send an email. Your email username, on the other hand, is your email address. Your Gmail username is also your default Google username.
You can easily access this information in Gmail by clicking or hovering over your profile picture. Changing your Gmail name is fairly easy, but changing your username/email address can be a little tricky.
If you decide to change your email address, we recommend using a new password. There are even special strong password generators
.
Editing not available?
Have you tried to figure out how to change your email in your Google account, but couldn't because the options weren't available to you? Don't be upset! You can try workarounds and use alternative methods. Don't forget to read how to clear Google Drive in the easiest way here
First, specify the desired mailbox as an additional one.
- Let's return to the settings and again enter the “Personal Information” section;
- In the “Email” block, find the “Additional...” tab;
- Specify one or more addresses that will be used to log into your profile;
- Don’t forget to confirm the binding - to do this, just enter the code that you will receive by email in the window that opens.
The second option is to create a completely new profile with the Gmail address you need. Then you won’t have to think about how to change your name in Google mail!
How to Change Just Your Gmail Name
You can't change your email name in the Gmail mobile app, so this guide will walk you through the process on the site.
- Sign in to your Google account by entering your username and password.
- Click the gear icon in the top right corner of the screen and select View all settings.
- Go to the Accounts and Import tab.
- Right under the "Send Email as Header" heading, click the "Edit Information" button.
- Enter the new name you want to display in emails, select the button next to it, and click Save Changes.
Recommendations for other email services
If you use another email service (for which there are no instructions in this article), try following the algorithm described above. Review your account settings, you may be able to set up forwarding, connect additional e-mails, or use the attached phone number as a login.
Replacing the mailbox address can be done by using the settings for interaction of the profile with other e-mails. The task can be completed even if there is no direct access to editing the email login. No special knowledge is required, just confidently navigate the account menu and clearly understand the direction of forwarding (from which e-mail the letters are sent to, which address is indicated when sending).
How to change your Google account name
Changing your Google account name will change your Gmail name. This will also change your name in all other Google apps. If you want to continue, here's how:
- Log in to your Google account.
- Go to the Personal Information tab on the left sidebar.
- On the Basic Information tab, click the Name tab showing the name you want to change.
- You can change your first name, last name, or both. Then click the Save button.
Setting up forwarding
For example: 1. You have box A, in which you want, but cannot change your login, and box B - new or previously registered, in which you are satisfied with everything (in particular, the address).
2. With a tool called “forwarding” in your hands, you can:
- Scheme No. 1: in box B, set up receiving letters from box A.
- Scheme No. 2: in box A, enable forwarding to box B.
- Scheme No. 3: in box A when sending a letter, indicate the address of box B.
Perhaps now you have already asked the question: “What about the addressees (senders) of letters with whom you correspond? They don’t know the new address.”
The advantage of using forwarding in the context of this task is that you will “smoothly” switch to a new mailbox without losing contacts existing in the old one. And you don’t have to, as they say, notify all recipients in one sitting about the login change.
Having understood this concept, let's try to apply it in practice - in accounts of popular email services.
Gmail
In the Google service, you can use redirection scheme No. 3 (see above):
1. In your profile, click the “Gear” icon.
2. In the panel, select “Settings”.
3. Click the “Accounts and Import” tab.
4. In the “Send letters as” column, click “Add your other address...”.
6. Enter your password and click the “Add account” option.
Note. For secure data exchange, select the SSL connection type.
7. Log in to the connected mailbox in a new tab. Wait for an email from Gmail. Then copy the verification code in its text.
8. In the additional Gmail panel, enter the received code and click “Confirm”.
9. Return to the Accounts and Import tab. Here you can make additional sending settings:
- from the address to which the letter was sent;
- from the default address.
10. Save the settings (button at the bottom of the page).
11. Now, when sending a message, you can specify the address of the attached account rather than the main one:
- click “Write”;
- in the “From” column, select another login from the list;
- complete and send the message.
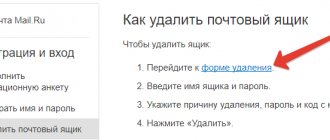
Mail.ru
1. Log in to the service. Go to the page - https://e.mail.ru/settings/filters.
2. Click “Add correspondence”.
3. Enter the address of the mailbox to which received correspondence should be sent.
Yandex
1. In your account, click “Add Box”. It is located in the panel on the left side of the list of letters.
3. Click Enable Collector.
4. Create a label for letters coming from the attached mailbox. For example, from “Mail.ru”:
- click the “assign... label” box (the first option in the list);
- specify the name and select a color from the tiled palette;
- Click “Create Label”.
5. If necessary, use additional options: “... mark old letters”, “copy addresses …”.
6. To complete the collector setup, click Save Changes.
Stay always connected with your new login!
How to Import Email to a New Address
- Create a new Google account and sign in.
- Click the gear icon in the top right corner of the screen, then select View all settings.
- Go to the Accounts and Import tab.
- Then, under Import Mail and Contacts, click the Import Mail and Contacts button.
- A new window will appear. Enter your old email username and click Continue.
- A new window will ask you to sign in to your old account. Log in, then click the Continue button.
- A new window will appear asking you to select an account to continue the ShuttleCloud migration. Select your old account. Gmail ShuttleCloud Migration will ask you for permission to access it. Click Allow and close the window.
- Go to the first pop-up window and select the import options for your old account. You can import contacts, mail, and all new mail for the next 30 days from the old account to the new one.
- When the process is completed, a message will appear. Click OK, go to your new Gmail account, refresh the page and that's it! Now you can see your old account email in the folder with your old account name.
Mail.ru
The mail.ru postal service has fewer options for changing addresses than Yandex. You can do this:
1. Create a new mailbox on the service.
2. And in order not to lose contacts, correspondence from the old mailbox, set up forwarding (two methods to choose from). That is, all letters will be redirected from the old e-mail to the new one.
Method 1: in the profile settings of the old mailbox, in the “Filtering Rules” section, in the “Forward all letters to...” line, enter a new e-mail → click “Save”.
Method 2: in the new e-mail, open the “Mail from other mailboxes” setting → enter the login and password of the old mail → click “Add...”.
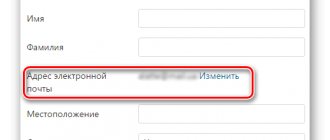
Change of personal data
The following functionality does not change the login or domain of the email box, but allows you to edit the data that will be displayed to the message recipient. To do this you will need Yandex.Passport:
- Open your email again and click on the account name in the top corner. Select “Account Management” from the menu.
- In the list of settings, click on the “Change personal information” link.
- In the field with first and last name, enter new information and save the settings.
Now the changed first and last name will appear in the information column about the sender of the document or letter, but the name of the mailbox will remain the same.
Using a mobile number as a login
Is it possible to change the login in Yandex mail, for example, to a mobile phone number? The service provides such a chance for its users. To do this, just link your email to your number and make the appropriate settings in your account. At the same time, you can send correspondence to this address by dialing the number in any format via +7/7/8. The previous address is also saved. Thus, the mailbox has two addresses.
Sources used:
- https://lumpics.ru/how-to-change-email-address/
- https://ybez.ru/resheniya/kak-izmenit-elektronnyj-adres.html
- https://erfa.ru/kak-izmenit-adres-elektronnoi-pochty-kak-v-pochte-yandeksa-izmenit-login.html
- https://fb.ru/article/236637/kak-v-pochte-yandeksa-izmenit-login-vozmojno-li-eto
- https://msch71.ru/kak-pomenjat-adres-jelektronnoj-pochty-v-jandekse/
- https://www.syl.ru/article/290781/kak-v-pochte-yandeksa-izmenit-login-prostyie-rekomendatsii
- https://pasmr21.ru/kak-pomenjat-adres-jelektronnoj-pochty/
Binding an additional address
You can attach an additional email address to your Yandex account. To do this, follow the instructions:
- Log in to your main account. Open its settings.
- Under the item “Send emails from an address”, click “Edit”.
- Enter additional email in the “Adding recovery address” line.
- Click "Add Address".
- Log in to the additional mailbox. Open a letter from Yandex in it. Follow the link to confirm account linking.
Note: It is most convenient to link an additional account from different browsers.
How to change account in another application
The following procedure will help you delete an account in a specific application and log in with a different account.
Instructions:
Open your phone settings.
Next is the “Accounts” section.
In this case, there is an added Skype account. Select an entry.
In the next window, click on the button with three dots.
In the context menu that appears, select “Delete account.”
Confirm the action if the system asks for confirmation.
Then return to the “Accounts” section, where you can click on the “Add account” button. And then add a new account for Skype.
Mobile number instead of the usual e-mail
In the e-mail settings, you can change the standard address to a phone number that is linked to your current account. In the selected section, find a block with a suitable name and activate the option.
Confirm your mobile phone number by entering the code from the SMS message in the appropriate line
After completing these settings, after sending emails, their recipients will not see your real email address. Instead, the selected mobile number will be displayed in the “Sender” line. However, the main email address will remain the same.
Adding a new account
As mentioned above, a smartphone or tablet that is not linked to a Google account cannot fully perform all the preinstalled functions. To link a new account, you don't have to perform complicated steps. Just follow the instructions:
- Enter the same smartphone settings item – Accounts.
- In the top line there will be an inscription Add account, click on it.
- The system will offer several options to choose from, we need a Google account.
- Enter a password or pattern to protect your data.
- Now you need to specify your email address on the gmail service. It is important that it has not been previously used to link a Google account.
- Next step: enter your email password.
- Please confirm that you have read the privacy policy and accept the terms of use.
- The system will prompt you to enter payment information for contactless card payment. You can skip this step.
- Done, a new account has been created.