The video card is one of the most important components of a computer and is directly responsible for displaying images on the screen. Like any component, it has its own resource; over time, the video card may begin to work incorrectly. Most often, such incorrect operation refers to video card artifacts that appear on the computer or laptop screen.
What are artifacts
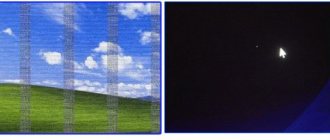
This is the name for distortions on the monitor that appear for seemingly no apparent reason. They can appear not only in games, but in the browser, on the desktop, and even when loading Windows. Artifacts can look different:
- Alien elements randomly scattered across the screen that do not fit into the overall picture;
- Absence of image (as if it had not loaded) along vertical or horizontal stripes;
- Lights that resemble glare.
Sometimes artifacts are confused with dead pixels, but this is not entirely correct. These elements appear on the monitor matrix and can be black, green or white. They are motionless and do not disappear, regardless of the computer operating mode.
Artifacts can appear suddenly and disappear just as unexpectedly.
A frightening picture of technological reality
I can’t say exactly when I began to notice the presence of graphic artifacts in myself. They appeared gradually and not on such a large scale as in the images above. And much worse options are possible, believe me!
One day, when I spent the evening reading publications from
livejournal,
the image began to flicker unusually and everything began to resemble a green chessboard.
I was confused and didn't know what to do. I spent several days searching for the right answer to solve the problem. I wouldn’t say that I’m a novice when it comes to dealing with computers, but this is the first time I’ve encountered such a problem.
I won’t tell you how much effort and time I spent to resolve the problem with the artifacts. I don't wish this on anyone. I needed to fix graphic errors as quickly as possible, because my work is computer-related, and due to artifacts, programs such as Photoshop
CC
or
Adobe After Effects CC
would simply freeze and eventually my PC would turn off.
I solved my problem by replacing the video card. The previous video card was purchased around 2014. For 4 years, I only took it out a couple of times to clean it from dust and never changed the thermal paste on the chipset. My actions led me to what I got as a result. Due to negligence in maintenance, my video card simply failed
. Even after thoroughly removing dust and changing the thermal paste on the chip and warming it up, artifacts were still present when generating an image on the monitor.
Overclocking video cards with a weak cooling system
Some video cards allow you to greatly increase the voltage on both the GPU and memory. If the CO is weak and cannot cope, this can cause failure of the chip, memory and even the power system.
Solution You need to understand how much you will increase the power consumption of the video card during overclocking and whether its cooling system and power supply system can cope with this. If you are a beginner overclocker, overclock your video card moderately, without increasing the voltage, and read guides and reviews on forums about your model before starting serious overclocking.
We hope this guide will help you with your upgrade. The main thing is to remember how fragile video cards are and be careful.
Reasons for appearance
In fact, there may be many reasons for this malfunction, but for convenience, I suggest dividing them into just a few groups:
- Software . This could be due to incorrect board settings, an old or unstable version of drivers, or it could be the game or application itself.
- Hardware . When the problem is on the device side. This could be a broken video chip, swollen capacitors, etc.
Let's take a closer look at each group and try to repair the video card ourselves.
Know the enemy by sight; We determine the source of the problem and find the right solution
1) Equipment malfunction
Many pieces of hardware must function correctly to generate images without errors, but there are three main sources of problems:
the video memory on your video card (Figure 1.1; 1.2)
,
the GPU (Figure 2.1; 2.2),
which is the main chip on the video card that makes the drawing, and
a bus interface
, which transfers data between your video card and the motherboard. You can often get an idea of what's causing the problem by looking closely at the artifacts.
In any case, I recommend not repairing your video card, but purchasing a new one
. If you start to see artifacts, most likely your equipment has become unusable. Often, repairing components is more expensive, and new ones will be more reliable than old ones received from repair. __________________________________________________________________________________________
2)Drivers
If you see artifacts during the loading screen before loading the operating system, know that it has nothing to do with your graphics card drivers. So far the system has not booted; the drivers were simply not used.
If visual artifacts only appear in one program, this indicates software problems with that program. But if visual artifacts appear in many applications and programs, you may have a problem with drivers or bad software
. If you only see artifacts after loading the operating system, then the first thing you need to do is the standard "update your drivers" exercise: update your motherboard's chipset drivers and uninstall your display drivers, then reinstall the latest display drivers.
Updating your drivers can sometimes fix your problems, and you should always do it even if you think the problem is with your hardware. Try to exhaust simple solutions before being convinced that the equipment is faulty and spending money on a new one. __________________________________________________________________________________________
3) Overheating
It's also a good idea to open up your computer and make sure all the fans are working. Overheating is a common cause of artifacts, so you should check that any fans on your graphics card are spinning.
The temperature of your video card depends on what program you are using
. Most graphics cards are relatively cool in temperature when you run 2D programs. The graphics card temperature increases when running 3D programs such as games. If your artifacts appear only after a few minutes of playing, then the cause is overheating.
The silicon chips on your graphics card run slower at higher temperatures. Hotter chips get more problems, which they still have at standard clock speeds. You can verify that it's an overheating issue by running your computer with the case open and pointing a desk fan at the graphics card. If the artifacts disappear, know that you have an overheating problem.
If you are a lazy user like me, I suggest you download free programs for regulating all coolers in your computer for a test. Even without artifacts, you can use this software to configure the cooling of your components. __________________________________________________________________________________________
4) Underclocking
Another thing you can try to get rid of artifacts is
underclocking
your video card.
Underclocking lowers the clock speeds of your GPU or video memory. Reducing clock speeds reduces chip temperatures and often allows weak chips to function properly. If you overclocked your this may
also cause artifacts.
Excessive overclocking can raise the temperature enough to cause cumulative damage. While no signs of damage will initially appear, artifacts may appear weeks or months after the chips have been damaged. It is because of this that I am skeptical about overclocking . Probably, this feature of some cards was designed specifically for gullible users, so that their expensive video cards would become unusable as quickly as possible. In this way, the manufacturer will be able to gain maximum benefit for himself, because his product will increase in demand in the market. __________________________________________________________________________________________
5)Monitor malfunction
Perhaps your problem is not artifacts at all, but a broken monitor.
If you have another monitor, connect it to your computer. If there is no other monitor, you can take a screenshot of the screen. Which will be much easier, however. To do this, press the print screen key (by default - Print Screen
), and then go to an image editing program (for example,
Paint )
and paste an image from the clipboard using the key combination
Ctrl + V. If there are no graphic artifacts in the image, then there is a problem with your monitor.
Monitor matrix failure
Determining the problem with the video card
Power supply via 12 volt line
Sometimes this “buddy” is not satisfied with the power that is supplied to him via the 12 volt line - this is a 6 or 8-pin connector marked PCI-E, consisting of black (ground) and yellow (12v) wires.
In this case, the symptoms are frequent crashes in all demanding games, as well as serious drops in FPS (frame rate) when the computer meets the recommended requirements and graphics settings are acceptable for the power of your PC. But in the early stages, in the later stages, the video card suddenly “gives the screw a turn” and refuses to work as it should, constantly going into defense and forcing the computer to reboot spontaneously, and even shows us various glitches in the form of artifacts!
Therefore, I note the particular importance of high-quality nutrition for prisoners in the lower compartments of the video card. I recommend powering the computer from a normal power supply that has a certificate of 80+ efficiency (Coefficient of Performance) and changing the power supply, ideally, once every 3-4 years.
Failed BIOS firmware
If the video card was unsuccessfully flashed with the wrong BIOS, on the monitor screen we see various artifacts spreading out, which can either completely cover the screen or partially.
To eliminate such distortions, you should strain your memory and try to remember what exactly happened before their appearance and whether our valiant guardians of the light, the power engineers, turned off the lights again!
Finding a fault in the monitor
Usually the monitor has problems with display when it is washed or dropped, as well as from old age and too frequent use (always on). When working around the clock, especially on hot days, sometimes bad things begin to happen to him. The image on the screen begins to fade or flicker excessively, then we notice a picture when the image on the monitor disappears and a black screen simply appears, and from time to time it may turn on again.
If the symptoms are similar, then our culprits are probably the capacitors of the power supply or the matrix cable, although this may be a more complex problem that will not be solved without contacting the service center. Okay, let's try to figure it out.
Image distortion when using a computer or laptop
Image distortions during operation (ripples, stripes, various defects) can be caused by hardware or software problems and indicate a loss of performance of the monitor or video card. Determination of the damaged component can be carried out after functional diagnostics.
If the image is distorted exclusively while the operating system is running, that is, when the computer starts, information from the BIOS is displayed on the screen and the boot animation of Windows (well, or another OS), ripples, stripes or other defects are not observed, the problem is most likely in the video card or its software provision. On the contrary, if distortion is visible even on the basic I/O system setup screen, then this most likely indicates problems with the monitor matrix.
It is also advisable to determine whether these problems are temporary or permanent. If distortion does not appear immediately after starting the PC, but after a few minutes or even hours of operation, the problem is caused by the video card or other graphics accelerator installed in the system. Otherwise (defects are visible immediately after startup), damage to the matrix is observed during operation.
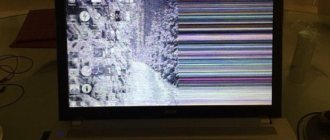
Video card artifacts
These are distortions on the monitor of various types, for example, the image is chaotically scattered across the monitor or is accompanied by the appearance of various stripes on the monitor.
In simple words, the video card cannot process the image properly and sends a distorted image to the monitor. As a result, we see a floating picture.
Do not confuse video card artifacts with dead monitor pixels . Dead pixels are stationary dots on the monitor that are clearly white, green, or any other color. With artifacts, the picture is distorted and floats across the monitor.
Video card artifacts arise for various reasons; they can be divided into two groups - hardware and software . Let's start with the hardware:
Hardware
Most often, with hardware problems, the video card falls into artifacts for the following reasons:
- Overheat. Check the functionality of the cooler. It often happens that the cooling system becomes clogged and begins to work poorly. Therefore, it must be cleaned periodically. Also remove the cooler from the board and check if the thermal paste underneath has dried out. Replace it if necessary.
- Physical damage. Some of them are quite easy to diagnose; just visually inspect the board. For example, capacitors may simply swell. In such cases they need to be replaced.
- Also, the video card artifacts when there is insufficient power. Carefully inspect it for the presence of an additional power connector and connect the appropriate cable to it.
- Lack of power from the power supply. If your power supply is not powerful enough, it may simply not be enough.
- If artifacts appear on the built-in video card, then the reason may be a malfunction of the motherboard or processor.
If none of the recommendations helped you, then most likely the problem is a faulty video chip or memory modules. The right decision would be to contact a service center.
Correction
In most cases, only a service can help in this situation, since special skills are required to resolve it. For example, a common cause of such a breakdown is chip detachment. Fixing this on your own and without special equipment is beyond the power of not only an ordinary user, but also a fairly advanced one.
This problem is characterized by the periodic appearance of artifacts. This is due to the fact that the chip is not always peeled off; sometimes it is in normal contact with the board. At this moment the distortion disappears.
However, any breakdown, even timely repaired by service, shortens the life of the device, in this case, the video card. Therefore, it is easier to replace it in a timely manner, since after repair it will still function normally for no longer than one year.
Software
It is easy to distinguish this type of problem. They occur exclusively in 3D games or even in one specific game. This is due to the fact that the load on the video card is very high and it cannot correctly process or transmit a complex and quickly updated image to the screen.
Correction
There are several ways to solve this problem. But it’s worth starting, in any case, with cooling the system. It is recommended to clean or replace the cooler, as well as replace the thermal paste at the service center.
The second step is to reset the settings and frequencies of the problematic game to the “default” setting. Often the problem disappears at this stage. But in order to play comfortably enough, do the following:
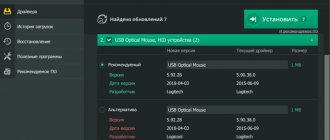
- Update the memory card drivers by following the path Device Manager - Video adapters - Memory card;
Driver Update
- Update Direct X, especially if errors occur in a specific game;
Direct X update
- Overclock your video card using its driver, a utility from the manufacturer, or a special utility;
- Gradually increase the frequencies and test the game (using this process it will become clear at what maximum frequency you can play without problems, this especially depends on the GPU parameter);
- Once the maximum allowable frequency for comfortable operation is found, restart the computer.
Overclocking MSI
However, if you have an old video card with a small amount of memory installed on your PC, then troubleshooting will be impossible in any case.
Software
These kinds of artifacts occur exclusively in games or resource-intensive applications that primarily use 3D graphics.
Such programs create a heavy load on the video card, and it can no longer correctly process the transmitted information and display a complex and quickly updated image on the screen.
What to do and how to correct the situation:
- If you have an old video card, in order to remove artifacts, just lower the graphics quality in the game settings. If this does not help, then you need to replace the graphics card with a newer one.
- Game glitch. The image may be distorted due to the game itself. As a rule, this happens to almost all users without exception. To check this, just install the same game on another computer, laptop, or read reviews, forums or blogs about the game. They can also suggest a solution to the problem.
- Update the board drivers to the latest version, install the latest updates for the game, update DirectX, Visual C++ and .Net Framework libraries. Sometimes it helps to install an old driver that was released at the same time as the board. Updating the video card software must be done correctly, first remove the old one and only then install the new one.
- Very often artifacts appear after installing fresh drivers. But this already indicates a hardware failure. Read about it below.
- Reduce the operating frequency of the video card. Some cards are produced with factory overclocking and have the prefix (Ti) in their name. Usually in such cases, artifacts appear when the computer first starts and never disappear. In this article I told you how to overclock a graphics card, do the same thing, only in reverse.
- The problem can also occur with older cards with a small amount of memory and support for version 2 shaders.
Incorrect overclocking
The reason may be improper overclocking of the video card - if you raise the operating frequencies above the recommended ones, as a rule, artifacts appear even on the desktop. When you launch a 3D application in this case, it usually glitches for a short time and then closes with an error as the graphics driver is being installed.
If you use utilities such as MSI Afterburner or Riva Tuner, you should overclock your video card gradually: raise the frequencies a little and put a load on the graphics chip.
To do this, you can use the built-in benchmarks or the special furmark program designed to stress test the device.
As soon as artifacts appear during rendering, stop increasing the operating frequencies. Reduce them back to a value where image distortion does not occur.
Misalignment in PCI-E slot
Misalignment in the PCI-E slot can occur when inserting or removing a video card, as well as when the mounting bolts are not screwed tightly. As a result, the PCI-E pins may be damaged. It is highly not recommended to leave the video card working in an open stand without fixing it.
It happens that the user forgets about the PCI-E latch and pulls the video card, breaking out the slot or damaging the contacts. Another type of slot damage is possible when installing a very heavy video card with a massive cooling system. She can simply break the slot. Excessive tension on the power cables, which begin to pull on the video card, is also dangerous.
Solution
We do all manipulations with the video card and PCI-E slot very carefully, without distortions. Lighting in the workplace must be sufficient. Do not assemble the PC squatting on the floor. Find a large enough table for this.
Don’t forget about the PCI-E latch; look in advance in which direction to press it. If you have a very massive video card, choose motherboards with reinforced PCI-E slots. Power cables must fit with minimal interference.
How to fix frequent video card breakdowns with your own hands
One of the most common computer breakdowns is a faulty video card or its malfunction. It usually manifests itself in stripes on the screen, color distortion and other artifacts. Sometimes the problem may be in the cable between the graphics adapter and the monitor, in which case it needs to be replaced. But when it comes to the video card itself, there can be many reasons for its incorrect operation, but often repairs can be done with your own hands.
Chip dump
Due to long-term operation at high temperatures, the BGA chip may fall off. There is a violation of the electrical contact of the BGA balls with the printed circuit board of the video card. Typically, element failure occurs due to cold (i.e. unreliable) soldering.
But sometimes this is not even a manufacturer's defect . The connection between the chip and the board may be disrupted due to prolonged overheating of the video card. This should under no circumstances be allowed.
Pollution
The discrete graphics adapter can become dirty over time and, as a result, one day fail.
Dried thermal paste
A common problem that renders the adapter unusable is dried out thermal conductive paste . It is located between the video chip and the heatsink.
However, in some cases, it is impossible to restore a video card not only with your own hands, but also in service centers. For example, replacing a chip is not always advisable or possible at all, since the functionality of the card in this case is not guaranteed.
Hardware
Such artifacts always appear. That is, they are present both in 2D images, for example, when loading, and in 3D. They do not depend in any way on the load on the card at the moment, and can be present either constantly or periodically disappearing.
A characteristic feature of such problems is that they increase over time, as the negative processes in the map develop further. As a result, a breakdown may lead to the computer not booting at all or quickly freezing.
In this case, we can say that there is a direct physical breakdown in the card itself. Some series and brands are less susceptible to such breakdowns, others more so.
Another type of hardware problem is changes in the operation of the computer that negatively affect the operation of the card. This could be overheating, lack of RAM, etc. In this case, artifacts mainly appear in 3D and are absent in 2D.
Video card
Correction
In most cases, only a service can help in this situation, since special skills are required to resolve it. For example, a common cause of such a breakdown is chip detachment. Fixing this on your own and without special equipment is beyond the power of not only an ordinary user, but also a fairly advanced one.
This problem is characterized by the periodic appearance of artifacts. This is due to the fact that the chip is not always peeled off; sometimes it is in normal contact with the board. At this moment the distortion disappears.
However, any breakdown, even timely repaired by service, shortens the life of the device, in this case, the video card. Therefore, it is easier to replace it in a timely manner, since after repair it will still function normally for no longer than one year.
Hardware error
Repair
Attention! The user carries out any actions described below at his own peril and risk. Self-repair does not guarantee restoration of performance, and in some cases can lead to permanent failure of the video card! If the user does not have experience in such actions, it is better to contact a specialist!
What to do if the chip falls off
If the chip still falls off, you can try to solve the problem yourself. Required: syringe, flux, screwdriver, soldering iron and hair dryer. Let's start repairing the video card with our own hands:
- It is necessary all plastic plugs and stickers from the top side of the board At the place where the chip is located under the board, all this can melt. This usually doesn't happen, but it's better not to risk it.
- The second thing to do is remove the cooler using a screwdriver. Unscrew the bolts that hold the cooler in place and remove the metal gasket.
- Remove the graphics video chip cooling radiator. Sometimes it is difficult to remove due to dried thermal conductive paste. It will glue the chip and the heatsink together so that it will be almost impossible to tear them apart. You cannot try to separate them by force . You need to take a hairdryer and heat the dried thermal paste with hot air until it begins to soften (this will take no more than 10 seconds). And after that, you should loosen the radiator to the right and left (continuing to warm up the mounting location with a hairdryer) until it moves away. Don’t forget to clean the surfaces of the heatsink and video chip from old thermal paste with a rag or cotton swab.
- Next, you need to start repairing the chip itself. It is important to note that between video chip crystal and substrate There are the same BGA balls as between the chip and the board.
repair the video chip yourself only if the contact between the chip and the card is broken. If the problem is inside the video chip, that is, the crystal has fallen off the substrate, then you cannot solve this problem yourself. - Place a cube of flux into a syringe. Place a needle at the junction of the substrate and the card and gradually squeeze it out, tilting the card so that the substance spreads evenly. Don't forget to wash the syringe, otherwise the flux will dry out.
- Take a soldering iron and start heating the substrate . It is important not to touch the crystal itself.
- Clean any remaining rosin from the card and reassemble all components.
How to clean a video card
To clean and restore the functionality of the video card, you will first need a soft brush:
- First you need to unscrew the screws on the side of the system unit.
- the side housing cover back . If it has a fan, turn off the power.
- Next, you need to disconnect all wires from the card (if any).
- Unscrew the bolts that hold the video adapter.
- Unscrew the card lock latch.
- Carefully remove the graphics adapter .
- Take a soft brush and clean the video card. It is better not to remove the cooler, although if there is serious contamination, this will have to be done. In this case it is necessary clean carefully cooler blades so as not to break them. When disassembling the cooler you will need thermal paste.
- After cleaning, you need to make sure that the integrity of the video adapter is not damaged, all screws are in place and the cooler wire is connected to the board. Insert the card back into the system unit.
Replacing thermal paste
First you need to buy thermal paste. It costs about 300-400 rubles. You will also need a screwdriver, a napkin and a syringe, as well as a plastic card for evenly applying the paste. It is also advisable to have a vacuum cleaner to clear away all the dust. Let's get started:
- First you need to remove the card from the system unit. Repeat steps 1-6 from the instructions above.
- Remove the radiator by unscrewing all screws.
- Take a napkin with alcohol and wipe off any remaining dried paste from the surface of the video chip. A regular eraser may also work.
- Take a syringe and squeeze out a small a drop of paste.
- Spread evenly over the surface of the crystal.
- After replacing the thermal conductive paste, reinstall the radiator and tighten all screws tightly.
- Insert the video card back into the system unit.
Sagging and bending of PCB in heavy and long video cards
Even a well-fixed heavy video card can sag over time, bending the PCB and causing breaks in the conductive tracks or “dumping” of BGA soldering.
Solution
It’s easy to avoid this; just support the video card using any support, such as a felt-tip pen. But a special stop looks more reliable and beautiful, for example:
Repair methods
In case the problem cannot be identified, there are universal ways to repair a video card.
Warming up the chip
To warm up the video card chip, a soldering station is required . You need to warm up the video card at a temperature of about 450 degrees:
- First you need to remove the video card from the unit.
- Remove the radiator and cooler .
- Start warming up. Five minutes is usually enough.
- Replace thermal paste.
- Reassemble the card and return it to the system unit.
We accelerate the video card for maximum performance in games
In principle, you can warm up the video card and chip with an ordinary hairdryer, but in this case there is no guarantee that this will help.
Chip replacement
To replace a video adapter chip, you will need serious equipment, such as a soldering station and the video chip itself. If you cannot restore the functionality of the video chip, and the only option left is its complete replacement , it is better to contact a workshop.
As you can see, in most cases you can fix your video card at home. Most breakdowns occur precisely due to overheating of the video adapter chip. So to prevent subsequent repairs, it is better to avoid this.
Poor ventilation in the housing
Modern mid-level video cards generate a decent amount of heat - 100-180 watts, which must be quickly removed from the case. The situation gets worse if the video card is clogged with dust. Some inexpensive cases are sold without an exhaust fan installed, and the heat is blown out only by the power supply.
As a result, the components begin to heat each other, bringing the temperature inside the case to 50 degrees or more. In such conditions, the video card begins to heat up to critical values. And if overheating of the video chip is somehow eliminated by throttling, then strong heating of memory chips can lead to their degradation and “failure” - damage to the BGA solder contacts.
Solution
ATX or MicroATX case requires at least one 120-140 mm fan for exhaust and one or two of the same for intake. Make sure they are spinning fast enough by going into the BIOS and looking at their RPMs.
Fans at 1000-1200 rpm will be optimal in terms of performance and noise ratio, for example:
The case and the video card itself must be regularly cleaned of dust, taking all precautions.
Warming up a video card at home
Warming up the video card allows you to solder the “fallen off” elements back, thereby bringing the device back to life. This process is carried out with a special soldering station, with the replacement of some components, but it is almost impossible to do this at home. Therefore, let's take a closer look at heating using a hair dryer or iron.
How can I determine which chip I should heat?
The most effective option is to google it. Most likely, several articles or videos about its malfunctions have already been published about your model. Usually there are already answers to this question on the forums.
Graphics chip:
- The OS loads to the end, but it works very slowly, the image “crashes”
- The image displayed on the screen has visible distortions and multi-colored stripes (artifacts).
- The screen begins to flicker or becomes filled with a white “veil”
Southbridge chip:
- The optical drive and/or hard drive is not detected in the laptop
- The keyboard freezes or doesn't work at all.
- Laptop turns on but gets stuck on manufacturer screen
- The laptop gets noticeably hotter in the southbridge area
Northbridge chip:
- Defects, artifacts on the monitor, no image.
- Freezes and turns off when playing games or watching HD videos
- The driver for the video chipset is not installed
Can this be done at home?
You can and even need to do this at home. Firstly, you don’t need any special tools for this - everything you need can be bought in regular stores and placed on a regular kitchen table. Secondly, this is a significant saving of money and money - diagnosing this kind of faults in the service costs about 1000 rubles. At the same time, it is no secret that most craftsmen charge for it as for a full-fledged repair, and this is already as much as 3-5 thousand rubles. A qualified specialist knows and informs his clients that such an operation is only suitable for diagnosis.
It is worth considering that warming up the chip will still require minimal skills and some experience. If you have disassembled a laptop yourself at least once, you can get down to business, this will be enough. But keep in mind that this kind of diagnosis can completely destroy your motherboard.
What kind of hair dryer can you buy?
We can recommend the Kolner KHG 2000W model. There are several objective reasons for this:
- Price: This is a budget option. Cost in stores ~ 1000-1200 rubles.
- Attachments: Various attachments are included.
- Temperature adjustment: This model has temperature adjustment
What temperature should you set the hair dryer?
A lot has been written on the Internet about what temperature a hair dryer should be set to.
The optimal temperature is still considered to be 250 degrees.
Do not forget to remove any remaining thermal paste from the video chip crystal before starting the procedure.
How long does it take to heat the chip with a hairdryer?
On thematic forums, as always, the spread is simply enormous. Some diagnosticians manage to heat the chip for 2-3 minutes. There are also “record holders” who manage to fry a chip for 10 or even 15 minutes. If you are doing this procedure for the first time, it is better to limit yourself to 20-40 seconds. Remember - it is better to “underheat” than to overheat
At what distance should you keep the hair dryer?
If we use a temperature of 250 degrees, it is better to start from a distance of at least 7-8 cm - do not sharply “fry” the chipset. Hold at this distance for 15-20 seconds . Then we gradually bring the hair dryer closer to the board and move it at a distance of 2-3 cm for about 10-15 seconds
Do you need foil to heat the chip?
To warm up the chip, in addition to a hair dryer, we need foil - it will protect the rest of the board. Many masters heat on the go, without bothering with additional protection - there are many such videos on Youtube. We still recommend hiding the remaining elements:
How long will a warmed-up chip last?
From 5 minutes to one year . Such a large scatter is due to the quality of the work done, the model of the north (south) bridge, and the number of microcracks between the chip and the crystal.
9. The image did not appear. Why didn't warming up the chip help?
It is worth noting that this operation does not at all guarantee the restoration of the motherboard’s functionality. Why might the warm-up not work?:
- We finally burned the chip (overexposed the hair dryer)
- The problem is not in the video chip (check the cable, ring the connector)
- Incorrect assembly after warming up (RAM sticks installed incorrectly, BIOS reset required, remove battery)
Is it possible to heat the chip with a lighter?
Under no circumstances should you do this - the temperature of the lighter flame starts at 800 degrees. This way, burning the chip will be as easy as shelling pears.
Warranties and Disclaimer
If you decide to repeat the procedure, please note: you do all this at your own peril and risk. In addition, it is quite possible that my method is imperfect in some places (or even contraindicated and prohibited). I'm not saying that this is the best way to fix a video card at home. But in my case it worked. That's all.
If it helped you, please write in the comments. If it doesn’t help, write too.
A little like and repost is better than a big thank you in the comments. For this reason, comments are turned off, and repost buttons are waiting for you. Please use it