02/17/2018 windows | for beginners
Whatever version of the Microsoft OS we are talking about, one of the most common questions is how to make it faster. In this guide, we'll talk about why Windows 10 slows down and how to speed it up, what can affect its performance and what actions can improve it in certain situations.
We will not talk about increasing the performance of your computer by changing any hardware characteristics (this is discussed in the article How to speed up your computer), but only about what most often causes Windows 10 to slow down and how this can be fixed, thereby speeding up the OS. .
In my other articles on a similar topic, there are often comments like “I use such and such a program to speed up my computer and it’s fast.” My opinion on this matter: automatic “accelerators” are not particularly useful (especially those hanging in autoload), and when using them in manual mode, you should still understand what exactly they do and how.
AMD Power Saving
If your laptop has an AMD graphics card, there is one more step you can try. To do this, you need to open the Registry Editor.
Step 1. Right-click on the “Start” icon and left-click on “Run”.
Step 2. In the window that appears, type regedit and click OK.
Step 3. In the “Registry Editor” window that opens, select “Edit” – “Find” with the mouse. Enter EnableULPS into the search box and click “Find Next”. After a short search, EnableULPS will become visible in the list of registry settings.
Step 4: Double click it and change the value from 1 to 0 in Value Data by clicking OK.
This will disable the power saving feature, which turns off the dedicated graphics card when it's not needed. As a result, the laptop will consume more battery power, so it is necessary to do this only if the laptop is connected to a 220V network for a longer period of time.
Special effects
In “Settings”, open the “About” section, click the link:
Further:
Go to:
Check the box:
The method will significantly speed up work on a weak laptop.
How to solve the problem with PC slowdown on Windows 10
Solving any problem in a Windows system always begins with searching for viruses and malware and ends with optimizing the system. Possible deceleration and braking is no exception.
Checking with antivirus programs and disinfecting the system
A high-quality scan of the system for viruses should be carried out with two or three different anti-virus programs in order to cover a wider range of possible threats. It is also necessary to scan the system for malware; for this you need to use not anti-virus programs, but special utilities such as the Microsoft Malicious Software Removal Tool or AdwCleaner.
Next, you need to restore system files, even if the defender programs did not find any threats.
- Press the Win+x key combination and select “Command Prompt (Administrator)” from the drop-down menu.
Press the Win+x key combination and select “Command Prompt (Administrator)” from the drop-down menu - In the command line console, enter and run the command sfc /scannow. Be sure to wait until the scanning and recovery utility finishes its work, and then restart the computer.
In the command line console, enter and run the command sfc /scannow
Startup optimization
Startup is a Windows component that allows programs to start along with the operating system so that the user does not waste time on applications. However, sometimes utilities that are not needed by the user end up in startup and only load the RAM while they are in the system kernel. In this case, it is recommended to disable some programs.
- Right-click on the taskbar (the strip at the bottom of the screen on which windows are displayed) and select “Task Manager”.
Right-click on the taskbar and select “Task Manager” - In the window that opens, go to the “Startup” tab, select the questionable process, right-click on it and click on “Disable”. After this, the process will not start when the system boots.
In the “Startup” tab, right-click on the program and click on “Disable”
Driver Update
Drivers are universal programs for communicating between the operating system and individual PC components. It is very important that these applications are up to date and not stock versions from Windows servers.
All developers build websites according to the same principle: select a device (a separate part or maybe a laptop), select an operating system and download the necessary drivers. It is important not to confuse the official site with any other, since downloading software from unknown reliable sources is very fraught. Instead of updating, you can get a virus or a hidden miner application.
On the developer’s website, carefully select the data and download the results.
Required drivers for download:
- chipset;
- display and video cards;
- devices - buses;
- network adapters.
In most cases, Microsoft also provides up-to-date device drivers with system updates, but I have noticed more than once that programs downloaded from the official website provide much better performance than those downloaded by the system. This is especially true for the bus driver and video card. Therefore, it is very important to use the products of the developers.
Cleaning the hard drive
In cases where the hard drive is very cluttered, it is much more difficult for the operating system to read files, which means that work in general becomes more difficult. There may be several reasons: a system update, too many application logs, and user actions that one way or another can clutter up the hard drive. There is especially a lot of garbage from browser caches. The size of such files can amount to gigabytes. Therefore, it is very important to clean your hard drive from time to time.
- In Explorer or any other file manager, open the computer environment, right-click on the C drive and select “Properties”.
In Explorer, right-click on drive C and select “Properties” - In the window that opens, go to the “General” tab and click “Disk Cleanup”.
In the window that opens, go to the “General” tab and click “Disk Cleanup” - We wait until the wizard generates the files for cleaning, then click OK.
We wait until the wizard generates files for cleaning, then we launch it with the OK button
Defragmentation
File fragmentation is a method of writing data to a disk, in which information is written successively to free areas of the hard drive. In this case, situations often arise when the file is divided into fragments and written not in one place, but in several sectors. In this case, the system’s access to the file is difficult, because instead of reading, Windows must first “glue” the file together and only then read it. Defragmentation can correct the situation. This is a process that overwrites all the files of a partition in a concatenated form in a row.
- Open the disk properties as shown above. Go to the “Service” section and click the “Optimize” button.
In the disk properties, click on “Optimize” - In the defragmentation wizard that opens, click “Optimize.” And we wait until the program completes its work. Then we reboot the computer so that the system boots with the updated files.
It is important to remember that a computer that runs on an SSD drive does not need defragmentation; this process greatly consumes its resource. In operating systems that are installed on a solid-state drive, it is recommended to disable or remove the defragmentation service - this will extend the life of the disk.
Disabling visual effects
The operating system's visuals are embellishments and some of the amenities that Windows offers. For example, in Explorer you can see stills from a movie. Also, windows are minimized with certain effects, there are shadows for icons and much more. All this consumes RAM resources and sometimes video card resources. If you value performance more and prefer it to beauty, it is recommended to disable visual effects.
- Right-click on the “This PC” icon and select “Properties”.
Right-click on the “This PC” icon and select “Properties” - Next, in the left column, click “Advanced system settings.”
In the left column, click “Advanced system settings” - Then in the “Advanced” tab, in the “Performance” column, click on “Options”. In the “Advanced” tab, in the “Performance” column, click on “Options”
- In the window that opens, in the “Visual Effects” tab, move the toggle switch to “Ensure the best performance.” Then save the changes with the OK button.
In the “Visual Effects” tab, move the toggle switch to “Ensure the best performance” and click OK
Video: How to turn off visual effects
Increasing the swap file
The paging file is a universal ability of the operating system to “increase” the computer’s RAM. However, this is not the only purpose: backup data is also stored in the paging file, as well as often the OS kernel. Increasing the paging file is a kind of salvation for computers with a small amount of RAM. But this is a double-edged sword: by loading the hard drive you can free up some RAM, but the hard drive will work harder, overheat and exhaust its resource faster. This will also affect game performance. The hard drive will have to read both a large amount of graphics data and the swap file.
- Open “Advanced system settings”, then click on “Settings” in the “Performance” column, as shown above. Go to the “Advanced” tab and click “Change”.
Go to the “Advanced” tab and click “Change” - In the “Virtual Memory” window, uncheck “Automatically select paging file size”, put the toggle switch opposite “Specify size” and set the initial and maximum paging size. It is recommended not to set a value greater than 5 thousand MB. Save the changes using the “Set” buttons, then OK.
Uncheck the box and set the paging file size
For the changes to take effect, you must restart the computer.
The author does not recommend interfering or setting your own values for the swap file. If you make it too small, the system may not be able to handle complex processes such as games. If you set it too large, too many tasks will be performed by the hard drive.
Video: how to change the page file
https://youtube.com/watch?v=3r02AN4hNgA
Disabling unnecessary services
Services are applications that run in the background and enable interaction between devices and components with the operating system. However, some services simply burn through the computer's RAM. For example, the Bluetooth service (assuming you are not using this device) or Fax. It is recommended to disable this type of service.
- In the Windows search, enter “Services” and select the best match.
In the Windows search, enter “Services” and select the best match - In the window that opens, double-click on the service and call up its properties. Then change the “Startup Type” filter to “Disabled” and save the changes with the OK button.
In the service properties, change the “Startup type” filter to “Disabled” and save the changes with the OK button
We carry out a similar operation for all unnecessary services, and then reboot the computer.
List of services that can be safely disabled for the system:
- "Fax machine";
- NVIDIA Stereoscopic 3D Driver Service (for NVidia graphics cards if you are not using 3D stereo imaging);
- “Net.Tcp Port Sharing Service”;
- "Working folders";
- "AllJoyn Router Service";
- "Application Identity";
- "BitLocker Drive Encryption Service";
- "Bluetooth Help" (if you don't use Bluetooth);
- “Client License Service” (ClipSVC, after disabling, Windows 10 Store applications may not work properly);
- "Computer Browser";
- Dmwappushservice;
- Geographic Location Service;
- "Data Exchange Service (Hyper-V)";
- "Guest Shutdown Service (Hyper-V)";
- "Pulse Service (Hyper-V)";
- "Hyper-V Virtual Machine Session Service";
- "Hyper-V Time Synchronization Service";
- "Data Exchange Service (Hyper-V)";
- “Hyper-V Remote Desktop Virtualization Service”;
- "Sensor Monitoring Service";
- "Sensor Data Service";
- "Sensor Service";
- “Functionality for connected users and telemetry” (this is one of the options to disable Windows 10 “tracking” of the user);
- “Internet Sharing (ICS)” (provided that you do not use Internet sharing functions, for example, to distribute Wi-Fi from a laptop);
- "Xbox Live Network Service";
- Superfetch (assuming you are using an SSD);
- "Print Manager" (if you don't use printing features, including Windows 10's built-in printing to PDF files);
- "Windows Biometric Service";
- "Remote registry";
- "Secondary login" (assuming you are not using it).
Start Menu Apps
Immediately after installing or upgrading to Windows 10, you will find a set of live application tiles in the Start menu. They also use system resources (although usually only slightly) to update and display information. Do you use them?
If not, a reasonable step would be to at least remove them from the start menu or disable live tiles (right click - unpin from the start screen) or even delete them (see How to remove built-in Windows 10 applications).
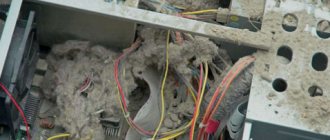
Hardware problems
It is possible that the brakes occurred due to problems with the computer hardware. Recommended:
- If you have a PC, then disassemble the system units and clean it of dust.
- Lubricate the processor with thermal paste and clean all coolers.
- Test the hard drive with the Victoria and the RAM with the Memtest86+ . If there are errors, these components should be replaced, especially the RAM.
- Check the motherboard, it may have swollen capacitors, which causes Windows to not work correctly.
Transparency
Developers, to make the appearance of the OS more pleasant, add effects and animation. They consume system resources. To disable, press “Win + I” go to:
Open:
Use this method to speed up Windows 10 on your laptop.
If the solutions listed do not work
If none of the above solutions work, you can try resetting Windows 10 to its original state by deleting all files and programs. The advantage of this solution over reinstalling the OS is the ability to save personal files.
Step 1: Open the Start menu and click on the Settings button.
Step 2. In the window that appears, select “Updates and Security”.
Step 3. In the next pop-up window, select “Recovery”. In the “Restore the computer to its original state” subsection, click the “Start” button.
Step 4. A prompt will appear to save personal files or delete them. Select the desired option.
Step 5. In the next window, click “Reset”.
The “Reset” of Windows 10 will begin. The PC will reboot (possibly several times), and after completing the procedure you will get a “clean” OS.
In the case of the Dell Inspiron 17 laptop, a complete “Reset” of the OS was the only way to solve the problem with the slow loading of Windows 10. The boot problems persist, but while fast startup is disabled, the black screen is no longer visible.
Drivers
Another reason why Windows 10 is slow, and for more users than you might think, is the lack of original hardware drivers. This especially often applies to video card drivers, but can also apply to SATA drivers, chipset drivers in general, and other devices.
Despite the fact that the new OS seems to have “learned” to automatically install a large number of original hardware drivers, it would be a good idea to go to the device manager (by right-clicking on the “Start” button) and look into the properties of key devices (video cards in the first place) to the "Driver" tab. If Microsoft is listed as the supplier, download and install drivers from the official website of the manufacturer of your laptop or computer, and if we are talking about a video card, then from the NVidia, AMD or Intel websites, depending on the model.
Free up disk space
The speed of operation depends on the availability of free space on the HDD. This is usually drive C. The PC runs slower if there is little physical memory.
On the system disk, leave 15 percent of the free space of the total HDD size.
Move the data to another disk partition, flash drive, external HDD. For example, if you often download files from the network, they are placed in the “Downloads” directory by default. These software are located in the “Documents” folder. Check them out. Delete or move unnecessary data.
Personalization
Go to the “Start” section, deactivate unnecessary items.
Scroll down the window, click the link: Disable all directories.
Open the “Taskbar”, disable unnecessary items.
Open the “Notification Area”, then:
Disable unused ones. Go to:
Disable unused options:
Open the “Settings” application, how to do this was discussed above.” Go to:
Further:
Click on the link:
Deactivate the item:
Disable:
Enter the section:
Open the section:
Disable its use.
Lack of RAM
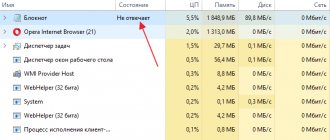
When a user runs many demanding tasks, even the RAM of a new laptop sometimes leads to slowdowns. To check the influence of RAM on its operation, you need to launch the “Task Manager” using the key combination “CTRL” + “ALT” + “DEL”. Next, pay attention to the “Memory” column in the “Processes” tab or the “Memory” section in the second tab called “Performance”. If the percentage indicator is constantly loaded at one hundred percent, this will mean that the installed amount of RAM is small and needs to be replaced with a larger one.
Some manufacturers of laptop computers leave the opportunity to expand the amount of RAM by installing another stick of RAM in an additional slot.
You should also pay attention to other indicators in the “Performance” tab:
- Central Processing Unit (CPU) – this item shows the percentage load on the graphics (separately at the bottom) and CPU. An indicator of one hundred percent indicates a full processor load, but sometimes this happens without a good reason. To solve this problem, you need to go to the “Processes” tab, find the process that is loading it so much and stop it.
- Disk – respectively, the percentage of load on the active hard drive. Maximum loading is sometimes caused by viruses or modern browsers.
Step 4: Setting up the Superfetch service
In the top ten, Microsoft has slightly changed the principle of working with paging files, for which the Superfetch service is responsible. The original goal is to make the OS and programs run smoother on devices with minimal RAM at the expense of constantly accessing the hard drive, and in most situations this service does its job well. However, in some cases, an active swap file, on the contrary, can slow down the system, and of course, in this case Superfetch must be disabled. Follow the links below for instructions.
Read more: What is Superfetch and how to turn it off
Step 3: Disabling tracking trackers
Windows 10 is notorious for its persistence in obtaining user data: Microsoft collects significant amounts of information for advertising or diagnostic purposes, which, of course, consumes the device’s hardware. Leaving aside the ethical aspect of this problem, let’s focus on the practical one: the constant activity of trackers can significantly affect performance, so it’s worth disabling the tracking software at least for this reason. Our website already has detailed instructions on how to disable such services - follow the link below and follow the steps described in it.
Read more: How to disable tracking in Windows 10
Step 7: Uninstall problematic updates
Often the brakes appear as if out of the blue: yesterday the laptop was working properly, but today it’s already slow. But if you look at the log, you can see that just when the OS was turned off, it installed the next update. Alas, no one is immune from errors, and sometimes some updates come out with bugs. Usually they are fixed quite quickly, and you just need to wait a while, but if there is no time, the solution to the situation is to remove the problematic component.
Read more: How to remove updates in Windows 10
Why might your Windows 10 PC slow down?
In fact, there are a huge number of reasons why a Windows 10 computer can slow down. First of all, the user must think and answer the question: when did the computer start to slow down? If immediately after installing “Ten”, and before that there was another operating system, and everything worked with a bang, then most likely the new OS is not suitable for a PC. It is worth noting that Windows 10 is one of the most demanding operating systems at the moment, requiring up to two GB of RAM for normal operation. For comparison, Windows XP needed 128 MB.
Is Windows 10 suitable for weak PCs?
In general, a fully functioning Windows 10 OS is not intended for weak and old PCs. The “Ten” is aimed at “middle class” computers, relatively new ones that are no older than three or four years. As mentioned above, the system consumes a lot of computer resources, especially in terms of RAM.
On the other hand, “trimmed” assemblies are created by the authors of distribution kits, as well as by Microsoft Corporation. For example, there is a separate edition of Windows 10 LTSB, with a greatly reduced software composition, in which there is no Windows Store, a standard set of programs, and much more that takes up RAM. In fact, such OSs represent only a working core, a shell that can be filled by the user himself. The LTSB edition can easily work even on a weak computer, especially if you do a little optimization of the system.
Other possible causes of PC slowness
If your computer starts to slow down “suddenly” or gradually, there can be a lot of reasons:
- viruses and malware;
- equipment malfunction;
- cluttered hard drive;
- corruption of system files.
- outdated drivers and more.
Each of the above problems can be solved in just a few clicks. But if optimization and troubleshooting does not help get rid of slowdowns and freezes, it may be worth reinstalling Windows, an extreme but very effective measure.