Hello comrades! I'm glad that you were able to look at your favorite IT blog Pyatilistnik.org again. Last time we looked at the net framework removal mechanism so that there would be no unnecessary garbage left behind. In today’s post, I would like to talk about this thing: recently, on one of the servers and a client workstation, I came across an inscription in the corner of the desktop that the Windows 10 operating system has “test mode” enabled . Visually, all OS functions worked normally, but the inscription itself was a little annoying. Today I will show you how to remove this test mode in Windows 10 and any other Windows.
What is Test Mode?
What is the work of Windows 10 and others in test mode? As the name suggests, this is a special debugging mode that Microsoft introduced for developers who could install programs or drivers in Windows when, for some reason, they are not digitally signed, or self-signed certificates so to speak. The test mode is also called the operating system test signing mode (https://support.microsoft.com/ru-ru/help/2509241/how-to-disable-the-test-mode-message-that-is-displayed-in- windows)
This is not the only watermark that this OS has. So, if you install an application whose drivers are not digitally signed by Microsoft, and if they are still in the testing phase, then you may see Test Mode.
Remember, I told you how to disable digital signature verification in Windows 10, where we did this so that it would be possible to install an unsigned printer driver, after which a watermark could easily appear. Of the watermarks, the most popular is Windows Activation.
The essence of the problem
Why did these three lines appear above the notification area? Most likely, you accidentally disabled the need to check the digital signature of drivers in your system settings. Or the situation “got out of control” after the next Windows update.
As a result, test use mode is automatically activated. It does not pose any dangers; you continue to work as before. It’s just that the message is constantly distracting.
How to check the current mode of operation with digital signatures
Before I show you methods that allow you to remove the test mode of Windows 10, Windows Server, I would like to show where it comes from. You need to open the command line and enter this command:
bcdedit /enum
You will see the output of the boot area “Boot Windows”, here you will find the testsigning mode, when you see the inscription “Windows 10 Test Mode”, then this parameter is set to Yes.
identifier {current} device partition=C: path \Windows\system32\winload.exe description Windows 10 locale ru-RU inherit {bootloadersettings} recoverysequence {805ad852-cd43-11e8-94bd-85d8fa04d907} displaymessageoverride Recovery recoveryenabled Yes testsigning Yes allowedinmemorysettings 0x15000075 osdevi ce partition=C: systemroot \Windows resumeobject {805ad850-cd43-11e8-94bd-85d8fa04d907} nx OptIn bootmenupolicy Standard
Solution
We learned what Windows 10 test mode means, now it’s time to figure out how to disable it. There are only two of them. You can completely deactivate Test Mode, or hide the inscription from the screen. However, the situation “behind the scenes” will not change. We will simply change the appearance, so to speak, disguise the problem.
If some of your equipment uses unsigned drivers (usually the system issues a warning during their installation), then after turning off the “Test” mode, problems with these devices may occur. You will have to undo the changes made according to the following instructions and proceed to using special software (second method).
How to remove Test Mode in Windows 10 in CMD
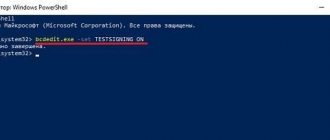
As they say, theory without practice is dead, open the command line as an administrator and write the command:
bcdedit.exe -set TESTSIGNING OFF
bcdedit.exe is a command line utility that allows you to interact with the Windows boot loader. The OFF key disables the TESTSIGNING mode. When the command is completed successfully, you need to restart your computer. This command helped you exit Windows 10 test mode. If there is an error when executing the command, then you most likely have Secure Boot enabled, which will need to be disabled.
In order to enable test mode in Windows 10, you need to run the command:
bcdedit.exe -set TESTSIGNING ON
After successful execution, you will also need to restart your computer.
Disconnection methods
If necessary, you can remove the notification from the screen; this does not require a high level of computer skills and does not require installing additional software into the system. There are two ways to complete the task, which involve using the Command Line.
Ways to launch Command Line
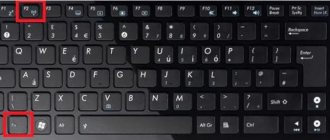
The first thing you need to do is run the console with administrator rights. There are several ways, starting with the standard:
- Expand “Start”, go to the “All Programs” section.
- Open the “Standard” folder in the list.
- Right-click on “Command Prompt” and select the “Run as administrator” option.
To simplify actions, you can use the system search. To do this you need:
- Open “Start” and enter “command line” into the search bar.
- In the results, right-click on the element of the same name and select the required option.
As an alternative, you can use the console executable file, which is located on the system drive in the Windows → System32 folder. In the list of files in the directory, you need to find the cmd.exe element and run it as an administrator through the context menu.
Changing the boot configuration
You can disable test mode in Windows 7 via the console by executing a special command. For this you will need:
- Type bcdedit /set testsigning off.
- Press Enter.
- Restart your computer.
The login notification field in the corner of the monitor will disappear, indicating the successful completion of the task.
Enable digital signature verification
If the method suggested above does not help, you will need to activate the program signature verification option. Step by step guide:
- Launch a console window using one of the previously suggested methods.
- Run bcdedit.exe -set loadoptions ENABLE_INTEGRITY_CHECKS, press Enter.
- Enter the statement bcdedit /set testsigning off and press Enter.
If the operation is successful, you will need to restart your personal computer. When you subsequently start the operating system, there will be no inscription on the desktop. In the future, you should carefully monitor the selected options in application installers so as not to accidentally enter Test Mod again.
How to remove Test Mode using Universal Watermark Disabler
For those who for some reason cannot execute a command in cmd, there is a free utility called “Universal Watermark Disabler” for you. Universal Watermark Disabler removes the Windows 10 test mode inscription using the same method, but hidden to the user's eyes, veiling it all behind a regular button press.
After unpacking the archive, you run the uwd.exe file, you will see the interface of the Universal Watermark Disabler utility, you need to click the “Install” button
We agree with the implementation.
Everything is ready, now for the Windows test mode sign to disappear, you just need to reboot.
That’s all for me, I’m sure that you have mastered the skill of removing a watermark in the form of a test mode in operating systems of the Windows family, and Ivan Semin, the author and creator of the IT portal Pyatilistnik.org, was with you.
How to remove the Test Mode watermark
If the watermark indicating the launch of the mode annoys the user, it can be removed using third-party programs.
This cannot be done using the built-in operating system tools.
Conveniently, some of these programs are portable and take up minimal space in PC memory.
Let's look at some of these applications.
Universal Watermark Disabler
One of the most popular programs among users. After its successful installation, you need to restart your PC.
The program can be found on the Internet, but after downloading from third-party sites, it is recommended to check the file for potential maliciousness.
Re-Loader Activator
This is a portable program that does not need to be installed on your PC. It works with any version of the system, starting from 10th. The utility is downloaded and installed on your computer.
The application is designed to eliminate difficulties with activating the operating system and MS Office. Its side effect is the removal of the test mode activation message.
My WCP Watermark Editor
Its effectiveness has also been tested by many users. To work, you just need to launch the program; a classic installation is not required. After launch, a pop-up window will appear where you need to check the box to remove all watermarks, including the message and operation of the mode in question.
After the utility finishes, the system is rebooted by the user.
System failure, or how to remove the “Test mode” notification on the “Desktop”
It is not uncommon for a notification about “Test Mode” to appear unexpectedly on the “Desktop”, even if you have not activated it. The reason may be either a system failure or automatic activation of “Test Mode” after downloading and installing OS update files . If deactivating “Test Mode” via the “Command Line” does not help and the corresponding notification continues to be displayed, then you should use other methods to resolve the problem.
In case of such a failure, the warning line also most often contains information about the build version of your OS
Disabling notifications using the Task Bar
In order to get rid of an unexpectedly appeared alert, you just need to follow a couple of steps:
- Open the “Task Bar” by pressing WIN+R and enter: “bcdedit /set testsigning off”, click “OK”. When entering the command, be sure to follow the spaces
- Then start the process of rebooting the PC by entering the value in the “Task Bar”: “shutdown /r”. Be sure to restart your PC through the “Task Bar” and not through the “Start” menu (otherwise the settings may not be saved)
- Your OS will automatically reboot, after which the notification about the enabled “Test Mode” will no longer bother you.
Removing watermarks using Universal Watermark Disabler
Universal Watermark Disabler is an auxiliary utility for Windows OS that allows you to remove any “watermarks” from the “Desktop”.
Due to the fact that the official website of the program developer is no longer operational, you will have to use a search engine and download (at your own risk) the utility from any “software site” that can offer such an opportunity.
After downloading Universal Watermark Disabler, you need to:
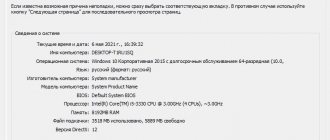
- Launch the utility and click “Install”. The installer start window also contains information about your system.
- An installation confirmation window will appear, accept the agreement by clicking “Yes”. After confirmation, installation will begin automatically
- Upon completion of the utility installation, close the corresponding notification and reboot. After installing the utility, be sure to restart your PC