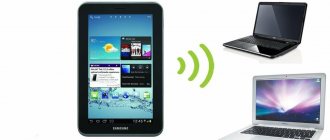
Wireless networks are one of the most convenient technologies. Connecting to the Internet from a cafe, while traveling and generally outside the home - all this is possible thanks to Wi-Fi. The question of how to connect to Wi-Fi in a public place or, for example, distribute the Internet yourself is quite relevant. Therefore, this article focuses on how to enable an access point (Access Point or AP) on a Windows laptop.
It is worth saying that this feature is built-in only on laptops, that is, for desktop PCs you need to buy an external adapter. It is a USB flash drive or expansion card with antennas like a router.
Let's look at different options for events. In general there are only two of them. We are talking about an existing wireless network or about creating your own access point to connect other clients. There are few ways to achieve any of these goals, but they are not difficult in themselves, so all the instructions fit into this article.
You will learn how to make a Wi-Fi access point from a laptop without third-party programs in the following video:
Windows 7 laptop - setting up an access point
How to make a Wi-Fi hotspot? Configuring a Wi-Fi access point on Windows 7 begins by looking for this icon, which resembles a computer with a plug. Use the right mouse button (RMB) to get to the Network Sharing Center. Through it you can control the functions of the network card and more.
Select “Set up a new connection” (this line is located approximately in the middle), then “PC-to-PC Network” (sometimes it may be written “computer”).
Set the parameters for the connection that you will later distribute to other users:
- “Network name” is its name; it will be visible to connecting clients and simply devices that have a wireless connection adapter.
- “Security type” is the method of encrypting data transmission. WPA and its various variations are now the most reliable method.
- “Security key” is a parameter that defines a password. This is what those connecting need to know in order to establish a connection with the access point.
Now, if you LMB click on the icon you are familiar with (the one on the bottom right), you will see several different connections. Right-click on the adapter you created to get into properties, and in one of the submenus find “Allow other users...” (at the top of the window). It is thanks to this option that you will be able to share your Internet. Feel free to click on the flag.
You have created a connection with unique parameters and the ability to distribute Internet access. The main thing is to maintain a wired Internet connection (and remember to tell other users the password for your network). This is how everything will work.
Via hotspot
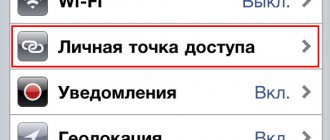
Mobile hotspot in Windows 10 makes it easier to distribute Wi-Fi from a laptop.
To enable and configure this feature you need to:
- Open the Start menu and click on Settings (shown as a gear).
- In the new window, select “Network and Internet”.
- Then select “Mobile hotspot” on the left.
- To turn on the distribution, you need to turn the top switch “Allow ...” to the “On” state. .
- To change your username or password, click Change. You also need to select the connection through which the Internet reaches your computer in the “Sharing” line.
Now you can use the Internet on mobile devices.
Method with cmd (command line)
This set of Wi-Fi configuration commands is universal for seven and ten. Command line is launched through the combination and R, then type “cmd” and press Enter.
You will see a black terminal where you need to enter
netsh wlan set hostednetwork mode=allow ssid=New Name key=New Pass keyUsage=persistent.
Let's go through the values of each Wi-Fi setting:
- The name is set using “SSID” (let me remind you that this is the visible name of your connection).
- The “key” field is intended for a password (at least eight characters).
- “keyUsage” is an attribute of persistent (“persistent”) password use, that is, the set password will be saved for subsequent connections.
- The “mode” parameter allows (“allow”) the inclusion and further use of the network by users (the reverse command is the “dissalow” value).
To disable the point, it is not very convenient to enter all this every time, changing only “mode”, so shorter and more intuitive lines are given below. You can start the access point using the command “ netsh wlan start hostednetwork ”. To disable, you need to replace “ start ” with “ stop ”.
Thanks to the last two commands, you will not have to re-enter the parameters if you want to turn off the Internet distribution.
MyPublicWiFi program
If you don’t want to turn on the computer, open the command line and enter commands into it, there is an alternative method. There are a huge number of special utilities that allow you to create an access point on your laptop.
All these applications differ very little in their capabilities, so there is no point in considering them all. This guide describes how to use the My Public WiFi utility. If you want to use some other program, the setup algorithm will be approximately the same.
- First, you will need to download the program. Go to the official developer website https://www.mypublicwifi.com/publicwifi/en/index.html.
- Click on the FreeDownload button on the right side of the screen.
- Run the installer downloaded to your laptop.
- Install the application following the instructions in the Windows Install Wizard.
- Launch the utility installed on your laptop.
- Now you need to configure the future connection. In the “SSID” column you must specify the name for the access point to be created.
- “Network Key” is the password for accessing the network. It must be at least 8 characters.
- Check the box next to “Enable Internet Sharing” to configure the distribution of not only the local network, but also the Internet.
- Click on the “Set up and Start” button.
Using a script
After turning off the laptop, your Wi-Fi point will stop working, but will not start automatically when turned on. Therefore, it makes sense to create a so-called script (or script) that will enable Access Point in just a couple of clicks. This will save you from unnecessary actions with the Command line.
Open Notepad and enter the line you already know: netsh wlan start hostednetwork . You need to save it in .bat format, not .txt. To make sure your actions are correct, you need to look at the label of the saved file. If it's a pair of gears and not a piece of notebook paper, then everything is done correctly. By running this script as an administrator, you will be able to include your dot without re-typing the text into the command line.
The script for disabling the point differs only in one word - “start” must be replaced with “stop”, further actions are repeated. Now you have two scripts that allow you to avoid unnecessary stuff and easily manage your AP.
Common problems and ways to solve them
While following the instructions, various errors may occur. Either there is no Internet on the receiving gadgets, or the access point does not turn on, the network cannot be started, or other unpleasant messages. Their decision comes down to several points:
- Make sure you follow the instructions at the end of method 2 exactly.
- See if you have access to the network on the distributing PC.
- Update the Wi-Fi driver. This must be done for the computer to accept WiFi and share the network. Download it from the website of the PC brand or Wi-Fi module brand.
- If you have an error in the “Mobile hotspot” menu on Windows 10, then use the command line from methods 3 and 4.
- Disable your antivirus - it may block your attempts.
These methods help in 95% of cases. Now you can constantly be in touch on all gadgets as long as your PC has access to the Internet. Portable Wi-Fi is always with you.
What to do if it doesn't work?
When I wrote the article, I checked all three methods on my computer. My laptop shared the Internet via Wi-Fi with other devices without any problems. It must be admitted that the virtual wireless network function itself does not always work reliably. And in general, it doesn’t always work. As practice shows, this is all due to problems with the wireless adapter, incorrect settings, or an antivirus that blocks connections.
There are several most popular problems and errors that people often encounter. I did not consider them in this article, but described the solutions in separate instructions, links to which I provided above. Be sure to check out these articles, all the information you need is there.
You can leave your questions, tips and feedback in the comments below. I read everything, respond and try to help with advice as much as possible.
Network is not created
- update the wireless adapter driver to a newer one - run the console as administrator
The network has been created, but does not start
- perhaps restarting the computer and starting the network as administrator will help
The network has been created and started, but it is impossible to connect to it
— check the password — manually enter the network settings in the TCP/IP connection properties on the “server” and client. For example, for the server: ip - 192.168.137.1, mask - 255.255.255.0 and for the client: ip - 192.168.137.2, mask - 255.255.255.0, gateway - 192.168.137.1, dns - 192.168.137.1
Connected to the network, but can’t access the Internet
— make sure that you have shared it (see “Connecting the Internet”) — try to go not by domain name, but by IP address. If it does, then it’s time to think about adding a DNS server to the client or server settings.
Sources
- https://besprovodnik.ru/kak-sdelat-wi-fi-na-komputere/
- https://habr.com/ru/post/130271/
- https://BezProvodoff.com/wi-fi/nastrojka-wi-fi/virtualnaya-tochka-dostupa-wifi-v-windows-7.html
- https://FB.ru/article/415597/kak-sdelat-kompyuter-tochkoy-dostupa-wi-fi
- https://help-wifi.com/nastrojka-virtualnoj-wi-fi-seti/kak-razdat-wi-fi-s-kompyutera-ili-noutbuka-bez-routera/
- https://CompConfig.ru/net/internet-na-kompyutere-cherez-telefon.html
- https://wirelesscover.ru/wifi/connection-from-smartfone
Connecting to a Wi-Fi point
How to find an existing access point? You'll need the network connection icon at the bottom right again, but now click on it with the LMB. You will see a list with available connections and Wi-Fi networks (if you have a PC with a wireless adapter or a laptop). Just select the network you need (or the one for which you know the password). There are also hidden networks (usually displayed at the bottom of the list). Then to connect you will also need to know the exact name (ssid).
This method is suitable for the latest releases of the Windows OS family, but only if the machine has a Wi-Fi adapter (in laptops it is built-in, for desktop PCs you need to buy it separately).
Software configuration of the access point
How to create an access point programmatically? The best program for these purposes is Connectify Hot Spot PRO . The settings are intuitive and simple.
“HotSpot Name” in the “Settings” submenu is the ssid (name) of your wireless network, “Password” is the password, respectively. In the “Internet to Share” item, you must select the adapter that has a wired connection to the Internet.
MyPublicWiFi is suitable for Windows users of any version older than seven. The interface looks even simpler, and the settings have not become more complicated.
Switch Virtual Router is also not complicated - the same parameters and intuitive settings, and besides, it is in Russian.
See also the video tutorial on creating an access point on a laptop using the Switch Virtual Router program:
Access point connection errors
Sometimes users have problems connecting to someone's hotspot. If you are sure that there are no errors in the settings, it is worth checking your firewall - or firewall, built into all versions of Windows OS.
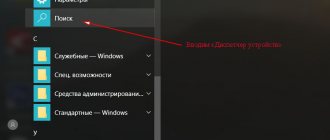
Find the firewall settings on your device (for example, type in the search), and then in the “Firewall with advanced security” item, find the “Properties” sub-item just below.
In the window that opens, allow incoming connections at least on the general profile. You can open connections in all tabs, but it is better not to make your system too vulnerable. Moreover, you should not disable the firewall completely.
Each of the methods describing how to create an access point is quite convenient and easy to connect. The settings are virtually the same everywhere, and can also be easily set by the “owner” of the connection.
As for the security parameters of the point you created, you should not enable your AP again. The less prying eyes see your device, the better. Although modern encryption methods help protect against attackers, this does not always save you from password hacking.