Methods for deleting a virtual disk
Both to create a virtual disk in Windows 7 and to delete it, you can use two groups of methods:
- operating system tools;
- third-party programs for working with disk drives.
We'll talk about both of these options in more detail below.
Method 1: Using third-party software
First, let's explore the possibility of deleting a virtual disk using third-party applications. The algorithm of actions will be described using the example of the most popular program for processing disk drives - DAEMON Tools Ultra.
- Launch DAEMON Tools and click “Save” in the main window.
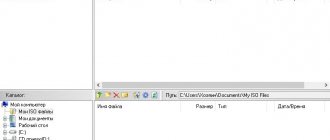
If the window that opens does not display the object that you want to delete, right-click in it and select “Add images...” from the list that opens, or simply use the Ctrl+I key combination.
The file open shell will start. In it, move to the directory where the virtual disk with the standard VHD extension is located, mark it and click “Open”.
The disk image will appear in the DAEMON Tools interface.
In the “Image Types” block of the new window, click “Mark All”.
All names of image types will be marked. Then click "Uncheck All".
All marks will be removed. Now check the box next to “vhd” only (this is the virtual disk extension) and click “Scan”.
The image search procedure will be launched, which may take quite a long time. The scanning progress is displayed using a graphical indicator.
After the scan is completed, a list of all virtual disks that are on the PC will be displayed in the DAEMON Tools window. Right-click on the item from this list that you want to erase and select the “Delete” option or press the Del key.
In the dialog box that appears, check the “Remove from Image and PC Catalog” checkbox, and then click “OK”.
After this, the virtual disk will be removed not only from the program interface, but also completely from the computer.
Method 2: Disk Management
Virtual media can also be deleted without using third-party software, using only the “native” Windows 7 snap-in called “Disk Management”.
- Click “Start” and go to “Control Panel”.
Go to System and Security.
In the list, find the name of the “Computer Management” snap-in and click on it.
On the left side of the window that opens, click “Disk Management.”
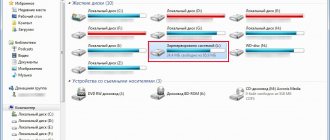
A list of hard drive partitions will open. Find the name of the virtual media you want to delete. Objects of this type are highlighted in turquoise. Right-click on it and select “Delete Volume...”.
A window will open, which will display information that if the procedure continues, the data located inside the object will be destroyed. To start the removal process, confirm your decision by clicking “Yes”.
After this, the name of the virtual media will disappear from the top of the snap-in window. Then go down to the bottom area of the interface. Find the entry that belongs to the deleted volume. If you don't know which element you need, you can use the size as a guide. Also to the right of this object there will be a status: “Not distributed”. Right-click on the name of this media and select the “Disconnect...” option.
In the window that appears, check the box next to “Delete...” and click “OK”.
The virtual media will be completely and permanently deleted.
A previously created virtual drive in Windows 7 can be deleted through the interface of third-party programs for working with disk media or using the built-in Disk Management snap-in. The user can choose a more convenient deletion option.
Source: https://lumpics.ru/how-remove-virtual-disk-in-windows-7/
Step #2. Launch the program and specify the desired option
The main menu of “Disk Studio” will open in front of you, where you need to select and specify the operations that the program should perform. The application allows you to work with both CDs and DVDs. You can quickly figure out how to clear a DVD disc of old files, and then burn songs, videos or any other data onto the selected media. To delete information from a disk, click on the “Copy and erase” tab and select “Erase disk”.
Removing a virtual drive in Windows
Information technologies are developing rapidly, presenting many unexpected ideas, which, unfortunately, for many, due to such excessive numbers, remain unfamiliar and unused.
Quite often, after installing new games or software on a PC, a virtual disk drive is detected. Of course, an inexperienced user is completely unable to explain where he came from, and even more so he does not understand how to remove a virtual drive in Windows.
To remove a virtual drive, you need to perform several steps
How to restart the ultra iso program?
How to restart
program on the computer. Turn off and on is perfect, for example for
ultraiso
. But restarting the explorer in the usual way will not work. You will need to press three keys simultaneously: Ctrl+Alt+Del and click on the line: “log out.”
Interesting materials:
How to make a dark theme on Instagram on iPhone 6? How to make a dark theme on Instagram on iOS 12? How to make a dark theme in YouTube on PC? How to make a dark theme in messenger? How to make a dark theme in settings? How to make a dark theme in Opera GX? How to make a dark theme on Snapchat? How to make a dark theme in Telegram? How to make a dark theme in Telegram on PC? How to make a dark theme in Tik Tok on iPhone?
Removal using DVD drive emulators
A virtual disk drive for Windows is needed to create an image of any disk or read an existing image. Quite often, real gamers who are completely immersed in the gaming world face this need. Some games do not launch without additional binding to the image via a virtual drive.
Programs specially created for this purpose help to open a “non-existent” disk drive. These are DVD drive emulators. They also help remove virtual disk drives that a person simply no longer needs.
Application of Alcohol 120%
To take advantage of useful utilities that allow you to remove a virtual disk drive, it is useful to perform a “revision” of previously installed software in Windows. This will allow you to understand whether you can immediately use the necessary utilities or whether you will have to first download them, install them, and only after that begin to eliminate the problems that have arisen.
Alcohol 120% is considered an interesting utility, which will allow you to easily remove a virtual drive. Having launched Alcohol 120%, you need to go to “Settings”, then on the left side of the open context menu you need to find the “Virtual disk” sub-item. By clicking on it, a dialog box will open that will offer you to independently adjust the number of such disks. To delete one that is open unnecessarily, just select a position equal to zero.
All that remains is to agree with the changes that were made according to the instructions by clicking “Ok”. As a result of such actions, the virtual disk drive will disappear and will not “irritate” the user the next time Windows starts.
Application of DAEMON Tools Lite
DAEMON Tools Lite is a fairly popular utility that is easy to use, and therefore everyone uses it, regardless of their PC level.
If it is already installed, you should click on the shortcut to launch it. In the window that opens, you need to right-click on the bottom field, calling up the context menu. In the menu that opens, the program will offer several actions, among which there is the option to either add or delete a conditional drive.
In cases where the user does not need any conditional drive, the “Delete all” option should be selected. This will allow you to simultaneously say goodbye to all conditional disks previously installed in Windows. Practice shows that due to inexperience, several such drives can be opened at once.
Application of UltraISO
The principle of working with the UltraISO utility is very similar to Alcohol 120%. After launching the software, you need to go to the “Settings” section.
In the horizontal menu located at the top, select the “Virtual drive” submenu, after clicking on which a new window will open. In it, the user can specify the number of drives he needs.
By selecting “No”, all open drives in Windows will immediately disappear; all that remains is to confirm the correctness of the actions by clicking “Ok”, and the problem will be solved.
If the PC owner does not need the above software at all, which often acts as the culprit for installing “non-existent” drives in Windows, it is enough to uninstall this software. Upon completion, all unnecessary programs will disappear from Windows, and along with them all drives opened by them.
Removal using service commands
In some cases, drives may not be opened at the time of installation of DVD drive emulators, but during the execution of certain Windows commands. As a result, it is possible to delete them in the same way, using the same service commands.
Using the "Subst" command
Using the "Subst" command is not accompanied by any problems. The whole process is quite clear and easy to implement for every PC owner.
To call the command, you need to click “Start”, enter “Subst” in the search bar and press “Enter”. When the command task completes, the disk disappears.
However, it also happens that after the next start of Windows, the “unreal” drive suddenly turns out to be open again. This “illogical behavior” can be explained. Some builds of Windows contain certain startup files that specify the automatic opening of such a drive after the next start of the operating system.
To solve this problem, it is important to run another service command shell:startup. The command will open a dialog box indicating the directory where the startup file is located.
By clicking on the batch file, a message will open in text format, which will indicate the path to the file from the startup directory. Having followed the specified path, all that remains is to delete the file there. Now the disk drive will not appear even after a reboot.
So, there are a sufficient number of ways to remove virtual drives. Everyone can choose the one that is absolutely clear to them and will be accompanied by fewer difficulties. It is really necessary to get rid of an unnecessary virtual drive; this will ensure not only comfortable work on the computer, but also make it easier for the operating system.
Source: https://nastroyvse.ru/opersys/win/udalenie-virtualnogo-diskovoda.html
Disabling virtual disks using DVD drive emulators
Now there are a sufficient number of software products that can create a virtual DVD drive. In our review we will describe the most popular disk emulation programs. If you don’t have the utility in question on your PC, then you shouldn’t get upset prematurely, since the principle of operation of other programs is as close as possible to them. The first utility is called Alcohol 120% . If you have this particular utility installed on your system, then feel free to launch it from the shortcut on the Desktop. After launch, we will be taken to the main program window.
In this window, you need to find the “ Settings ” menu block and select the “ Virtual disk ” item in it. These actions will take us to a new window. To disable all virtual drives created by Alcohol 120% , set the number of drives to position zero, as shown in the figure.
After this, confirm your actions by clicking OK. Now if you go to Explorer, you will no longer see the virtual disks in the system that were created by the Alcohol 120% . It is also worth noting that if you have installed the Alcohol 52% from the same developer, then the procedure for removing drives is the same.
The second utility in question is called Virtual CloneDrive . To remove drives in Virtual CloneDrive, you need to find the icon displayed in the Taskbar and go to its options.
In the context menu of options, you need to select the “ Settings ” item, which will take us to the Virtual CloneDrive . In this menu, you need to find the text block “ Number of disks ” and indicate in it that there are no virtual drives, as shown in the image below.
Now confirm your actions by clicking OK. After these steps we will also get rid of virtual DVD drives.
The next quite popular utility is called DAEMON Tools Lite . Launch it from a shortcut on the Desktop.
To remove a drive in DAEMON Tools Lite , right-click at the bottom of the program and select “ Delete all ”, as shown in the image below.
In the message that appears, we confirm our actions.
This completes the removal of DVD drives from DAEMON Tools Lite . The removal principle in older versions of the utility is similar.
The fourth program in our review is called UltraISO . If the virtual drive was created using UltraISO , then launch it from a shortcut on the Desktop to go to the main utility window.
In order to remove the UltraISO , you need to go to its settings. open the Settings in the “ Options . In the window that opens, go to the “ Virtual drive ”
In the " Number of Devices " text block, enter the value " None " as shown in the image above. Once you have completed these steps, confirm them with the OK button. After this, all drives created in UltraISO will be removed from Windows.
It is also worth noting that if you uninstall the applications discussed above, their virtual drives will be deleted along with them.
Working with the program
At the very beginning of working with the program, the user needs to create a virtual drive, which will subsequently be used to mount the ISO image. To perform this action in the utility, you need to follow the instructions below:
- Run ultraiso.exe as Admin. To do this, right-click on the program icon and tap on the “Run as administrator” option.
- From the main menu, go to the “Options” section. Select the context menu sub-item “Settings”.
- In the dialog box that opens, go to the “Virtual Drive” tab.
- In the “Number of devices” section, set the parameter equal to the number of virtual drives to be created (the default parameter is “1”), then tap on the “OK” button.
- After completing this operation, the “CD drive” drive will be displayed in Windows Explorer. By default, it will be assigned the letter “E” - “ISO Drive (E:)”. You can change the name of the emulated drive in the “Settings” menu (tab “Virtual drive” - “Change letter ...”).
To quickly remove a virtual drive in UltraISO, the following method will help:
- Open the application and enter the fourth item of the main toolbar - “Options”.
- In the drop-down list, select the “Settings...” menu item.
- In the “Settings” dialog box that appears, go to the third tab from the left – “Virtual Drive”.
- In the “Number of devices” field, set the parameter to “None”.
- Click on the “OK” button.
- The drive in UltraISO will be deleted.
Sometimes, when mounting a virtual drive, errors like “virtual drive not found” may appear. To fix the error, the user will need to do the following:
- Open the utility – run as Administrator.
- On the top built-in toolbar, select the “Options” section and go to the “Settings...” subsection.
- Make sure that in the fourth tab on the left in the “Number of devices” column there is the number “1” and not the parameter “No”. If necessary, specify the required number.
- Try to mount the disk again by pressing the “F6” hotkey, and then click “Mount”. If the error continues to appear on the screen, you need to reinstall UltraISO, having first cleared the system of residual software components.
After the virtual drive has been created, the user can begin mounting UltraISO disk images: creating an ISO file in the specified utility takes a couple of minutes, and deleting it is not difficult even for a novice user. Subsequently, you can work with images by analogy with traditional disks.
The easiest way to mount an ISO is to use a special tool built into the context menu. In order to use it, you will need to click on the created “CD drive” drive - in the list that opens, click on “UltraISO” and select the “Mount” option. To remove an UltraISO virtual disk, just right-click on the CD in Explorer and select the “Eject” or “Unmount” option.
Note! Windows 10 version provides the ability to create virtual drives without using additional software. To open an ISO image, you need to right-click on it, and in the menu that opens, select the “Open with” option - select “Explorer”.
How to remove virtual disks created by the “Subst” command
If you have virtual disks enabled in your system using the “ Subst ” command, then removing them from the system is quite simple. When you run the " Subst " command, a mounted hard drive appears from a specific directory on the system, but after rebooting, this drive disappears.
Then a logical question arises: where do the virtual hard disks come from after rebooting Windows? The answer to this question is quite simple - a batch file is installed in Windows startup that executes the “ Subst ” commands when the system starts. Typically, these virtual disks appear when installing local web development servers such as Denver. To enter startup, for example, in Windows 10, just open the “ Run ” program and use the shell:startup command in it
This command will open the startup directory.
As you can see in the image above, this directory contains the batch file “ Virtual Hard Disk.cmd ”. If you look at the contents of this file, it will become clear from which directory the hard drive was created in the system.
To remove this hard drive, just delete this file from the startup directory and restart the computer .
Managing VHDs with DISKPART
The DISKPART disk utility allows you to do all of the above and a little more. This is necessary to install Windows 7 and/or Windows 8 on virtual disks.
To start, use the search from the Start menu. We write “diskpart” on the found program, right-click and select Run as administrator
To create a fixed virtual disk 2.vhd in the root of partition E with a capacity of 1500 MB, write create vdisk file=E:2.vhd type=fixed maximum=1500 and press Enter
Select the created disk for further manipulation with the command select vdisk file=E:2.vhd
Attach the selected disk attach vdisk
the list disk command we look at what we got. * - denotes our selected VHD.
Create a primary partition on the disk create partition primary
Since we are in a Windows 7 environment, we are prompted to immediately format the disk.
Since we are studying the DISKPART utility, we will format from the command line
the list partition command to view partitions. * — the selected section is indicated. format command, we perform formatting with default parameters. If you want to set your own parameters, see the help - help format
The virtual disk has been created and is ready for use.
To disconnect the disk, run the command detach vdisk
Also, using the DISKPART utility, we can expand the virtual disk we need. You can, of course, delete and create a new disk with a larger capacity, but then you will have to copy information to it again, install programs and/or the operating system.
To increase the size of the virtual disk, select the desired VHD select vdisk file=C:1.vhd
Set a new volume for the selected disk expand vdisk maximum=2000
Connecting an enlarged virtual disk attach vdisk
What we got in Disk Management utility
Now let's expand the partition to the entire size of the virtual disk.
We look through the list of disks - list disk . If * is not on the desired disk, select the required VHD select disk 1
We look through the list of partitions - list partition and select the one we need - select partition 1
extend command
Result in Disk Management
In this way, you can manage virtual and real disks using the DISKPART utility. If something is not clear, then refer to the help - help or help “command name”.
Here is an interesting video Managing VHD in Windows 7 which will help us understand this topic better
Let's sum it up
For the examples discussed in the article, the Windows 10 . If you have an older operating system, then you will see virtually no difference in the utilities discussed and in deleting a batch file, since the principle of operation is the same .
We hope our material will help our readers clear the system of all virtual devices in the Windows operating system and answer the question of disabling a virtual disk.
Instructions for creation
There are two ways to achieve your goal in the “seven”. One of them is somewhat more complicated, as it involves using the command line. However, it provides the user with slightly more options.
Via Disk Management
First you need to go to the main menu of the “Start” operating system and enter the word “controls” in the search bar. After the operation is completed , a window will appear in which you need to click on “Computer Management”. By opening the “Storage Device” drop-down menu, select the “Disk Management” option. The central part of the window will display all the logical drives into which the hard drive is divided.
To create a virtual disk on Windows 7, you should go to the “Action” tab located on the top panel. After that, select the appropriate item in the pop-up menu. A new window will appear in which you need to configure the parameters of the future disk - the user must specify the file location, size and name. When performing these actions, you need to follow two simple rules:
- The name should not use the word Windows.
- The virtual disk cannot be located in the folder with the installed operating system.
When choosing a format, you should prefer “Fixed”, which will allow the partition to immediately take up all the free space allocated to it and thereby reduce the load on the system . If you use a dynamic disk, its size will gradually increase as new information is added. As a result, when the physical partition is full, problems with the computer's performance may occur.
When all the necessary settings are completed, all you have to do is click OK. It will take some time to create the Windows disc. When it appears in the central part of the window, you need to right-click and select “Initialize”. Again there are a few settings to make , and the first will be to select the type of main boot area. If its size is less than 2 TB, then you can give preference to MBR. If desired, the user can quickly convert it to GPT while there is no data on the disk.
After initialization, the new disk will not have an allocated area, and this situation must be corrected. Right-click and select “Create simple volume”. This will launch the Volume Creation Wizard and the user must again set several parameters:
- Confirm size.
- Set a letter.
- Format.
After completing all operations, click on “Finish”, and the disk can be used. If the virtual disk is no longer needed, then removing it is easy - just right-click and select the appropriate item. Oh, it will not only be disabled, but also deleted along with all the information it contains. You can delete a virtual disk in Windows 10 in a similar way.
DISKPART utility
It not only allows you to create a hard drive, but also offers several more features compared to the first method. First, you need to find the utility through the Start menu by typing diskpart in the search bar. On the line with the found utility, you need to right-click and run it as administrator.
To create a virtual partition 1. vhd of a fixed size (2000 MB) in the root of the logical D partition, you must enter the following command - create vdisk file= D :1.vhd type=fixed maximum=2000. After this you need to press Enter. To select the created disk, the command must be entered - select vdisk file = D:1. vhd. Then a few more commands are written:
- Attach vdisk - attaching a virtual partition.
- List disk - view the results of previous operations.
- Create partition primary - creates a primary partition.
After this, Windows will prompt you to format the disk. This can be done from the command line or use the appropriate operating system wizard. This completes the process of creating a virtual disk in Windows 7 and you can start using it, for example, installing a second OS from a flash drive.
Useful tips for Windows 7. Virtualization. Part 1
Working with virtual hard disks (VHD files) in Windows 7.
VHD (Virtual Hard Disk) is a file format used by virtual machines to emulate a hard drive.
You can create a virtual disk for yourself and use it to store virtual operating systems, programs and other files in one image file that can be opened by various virtualization programs or virtual machines. Virtual hard disks allow multiple operating systems to run on the same computer at the same time. Option 1. Working with virtual disks using a graphical interface.
Creating a virtual hard disk.
1) Open the Start menu. 2) In the search bar, or in the Run dialog menu (you can just press Win + R) enter diskmgmt.msc and press Enter. 3) The “Disk Management” snap-in will open. In the menu bar, select Action and click on Create virtual hard disk
4) In the window that opens, specify:
4.1) File name and location. You can either write this manually or by clicking on the Browse button and using the Browse virtual disk files 4.2) Virtual disk size. Next to the text field in which you need to enter the disk size, there is a drop-down list where you can select the size of the hard disk. Available values are megabytes, gigabytes and terabytes. Create a size of at least 20 GB. 4.3) Virtual disk type. dynamically expanding disk image provides the amount of space needed to store data. The VHD file is small in size when the disk is created, but grows as data is added to the disk. Data distribution is carried out in blocks. Deleting data from a virtual hard disk does not automatically reduce the size of the VHD file. Fixed size creates a VHD file whose size is set when the virtual hard disk is created. The size of the VHD file remains constant regardless of the amount of data stored. 5) Click on the "OK" button.
In order for the local disk manager to be able to access the virtual disk you created, it must be initialized and a simple volume created on it. The Disk Management snap-in is also used for this.
Initializing the virtual hard disk.
1) Find your virtual disk and right-click on it 2) Click on Initialize disk
3) Select partition style – MBR and click OK
Create a simple volume on a virtual hard disk.
After you have initialized your virtual disk, you need to create a simple volume on it.
1) Find your virtual disk and click on the unallocated area to the right of it 2) Click on Create simple volume
3) In the first dialog of the Simple Volume Creation Wizard, click on the Next 4) In the dialog for specifying the volume size, specify the size of the future volume in megabytes and click on the Next
5) In the Assign a drive letter or path , specify the letter for the future drive and click Next
6) In the Format Partition , specify the desired file system, cluster size, disk name and check the box next to the Quick format so that the disk is immediately formatted. Then click on the Next
7) To accept all configured parameters in the Completing the Create Simple Volume Wizard , click the Finish . The virtual disk will appear in the disk table. In Disk Management, the virtual disk icon is visually different from the physical disk icons. In Windows Explorer, virtual disks look the same as physical disks.
Attaching a virtual hard disk.
If you already have a virtual hard disk created, you can also attach it in Disk Management.
1) Open the Start menu. 2) In the search bar, or in the Run dialog menu (you can just press Win + R) enter diskmgmt.msc and press Enter. 3) In the menu bar, select Action and click on Attach virtual hard disk
4) Specify the location for the virtual hard disk on your computer and click OK. You can specify the location either by entering a value manually or by clicking the Browse and using the Browse Virtual Disk Files . If you do not need to write data to disk, then in this dialog you can select the Read-only
Creating a virtual drive
Often there is a need to create a virtual disk drive. Today, many users share ISO images on the Internet. To use the information contained in them, it is convenient to create a virtual drive. There are a large number of programs that allow you to solve this problem.
Gizmo Drive
A good program for creating a virtual disk that supports not only ISO, but also other popular formats. You can easily install an image into the created drive, and its contents will be displayed in Windows Explorer or another file manager. The application can also create images and write them to optical or flash drives.
It should be noted that the program has its own file manager. The utility has become popular thanks to its simple interface. The developers offer PC users to create images in Gdrive format. With its help, you can simulate the operation of a physical hard drive with the ability to compress and encrypt. When working with a virtual DVD drive, system memory is used, which significantly increases data transfer speed.
DAEMON Tools Lite
The program has been very popular among PC users for many years and is one of the leaders in its class. With its help you can create a maximum of four drives . It should be noted that many competitors offer broader capabilities in this regard. Daemon Tools is intended for ordinary users, for whom the number of disks proposed by the developer should be enough.
Particular attention should be paid to the application interface, which is simplified as much as possible. With its help, you can quickly open the desired image and mount it. In some similar programs, the virtual drive may disappear after a reboot . A similar problem is not observed in Daemon Tool. If the functionality of the free utility is not enough for the user, you can purchase a paid one. The only drawback of the program can be considered the presence of advertising in the latest versions.
There are much more programs for emulating optical drives, for example, the same UltraISO. However, it is paid, and this is definitely a serious drawback.
Originally posted 2018-04-30 05:05:19.
Source: https://kompy.guru/windows/virtualnyiy-disk-na-windows-7
View on topic
Good advertisementQuestion about UltraISO
FAQ (80)Characteristics asked 05/01/2018 22:40 How to remove a virtual drive in UltraISO? How to delete a virtual disk? 05/09/2018 16:49 UltraISO is primarily used for extracting iso files, creating a virtual hard disk, etc. However, it can also delete the virtual drive, and, very importantly, the Portable Ultraiso folder is not deleted. This is done simply. So, we launch this program, but be sure to use it as an administrator, that is, right-click on the program icon and select “run as administrator.” Then go to “options”, then to “settings” and click on “virtual drive”. Next, select “no” next to “number of devices” and click “ok”. 05/07/2019 11:01
Other questions from visitors from section B “Utilities and Services of UltraISOВ”:
Guest
: How to burn an image to disk using UltraISO? How to make a disk image?
Guest
: Which version of UltraISO is better? What's the latest version?
Guest
: Why doesn’t the UltraISO firmware bin open?
Guest
: Why are drivers 0 in UltraISO?
Guest
: Why does UltraISO format the flash drive in fat32?
Guest
: Why doesn’t the UltraISO firmware bin open?
Guest
: What does it mean to mount an image using UltraISO?
Guest
: How to burn files to DVD using UltraISO?
Guest
: Where does UltraISO save images?
Guest
: Where does UltraISO save images?
Guest
: What do you mean the device cannot be opened in UltraISO?
Guest
: What does it mean to mount an image using UltraISO?
Guest
: How long is the trial period for UltraISO?
Guest
: Which version of UltraISO is better? What's the latest version?
Guest
: What files does UltraISO open?
Guest
: Why does UltraISO format the flash drive in fat32?
Author: · 02/11/2019
The UltraISO software solution is designed specifically for creating and editing CD images: it is perhaps one of the best utilities in its segment. Using UltraISO, the user can easily mount and delete an ISO image of a disk or flash drive, write data to a blank, and perform many other useful operations with HDD, DVD and CD.
How to remove a virtual disk and drive in Windows
Removing virtual hard disks and drives is not the last item on the list of Windows cleaning activities. And of course you shouldn’t ignore it. Why clutter up the operating system, and indeed the entire computer, with unnecessary images and partitions? And beginners may even get confused in searching for useful information among such “pile-ups.”
From these step-by-step instructions you will learn how to delete a virtual disk created using standard tools and drive emulators (UltraISO, Alcohol 120%, Daemon Tools).
Installing Windows 7/8 on a virtual disk
And the most interesting part of this article is about how to install Windows 7/Windows 8 on a virtual disk. Installing the system on a virtual disk will not affect the installed, real operating system in any way. Therefore, if you want to test the OS or some program in Windows 7 or Windows 8, it is better to install it on VHD.
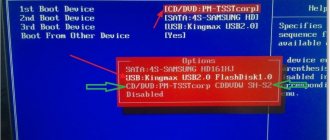
First, you need to prepare a disk or flash drive for installing Windows. That is, you do the same as with a simple installation of Windows 7 or Windows 8. Boot from the prepared flash drive or disk and go to settings and selecting a partition for installation
Here press Shift+F10 - the command line will open
Launch the DISKPART by typing its name
We create a virtual disk for installation using the command create vdisk file=”E:Win7.vhd” type=fixed maximum=30000
Select it with the command select vdisk file="E:Win7.vhd"
Connect the selected virtual disk attach vdisk
Then close the command line window and click Update
A new unallocated partition will appear - our VHD. Select it and, ignoring the warning, click Next
How I installed Windows 7 on a virtual disk can be seen below
Removing a virtual partition
Method #1: Using the Disk Management option
1. Click Start.
2. In the panel that opens, right-click the “Computer” section.
3. Select “Management” from the drop-down list of options.
4. In the window that appears, in the left block, click “Disk Management”.
5. Right-click on the virtual partition that you want to remove.
6. In the contextual list that opens, select “Delete volume...”.
7. Confirm running the command: in the “Delete simple volume” window, click “Yes”.
Method #2: Using the Command Line
1. Press the “Win” and “R” keys together.
2. In the open line type - cmd.
3. Press “Enter” or click “OK”.
4. In the command line console window, enter the command:
For example, subst X: /D (delete section X).
How to delete a virtual disk in Windows 10 and 7 through Computer Management
If a virtual disk was installed on a computer with the Windows operating system through Computer Management, then you need to uninstall it in the same way.
Virtual drives in Windows 10
Instructions on how to delete a disk image in Windows 10 are as follows:
- To call the context menu, the user can use the hotkey combination “Win” + “X” or right-click on the “Start” button. From the drop-down list, select the “Disk Management” option.
- Information about the virtual disk will be displayed at the bottom of the window. You need to right-click on it and select the “Disable”/“Detach” option from the drop-down list of the context menu.
- To confirm your intentions to disable the virtual drive, in the new window that opens you will need to specify the full path to the disk file. Be sure to click on the “OK” button.
- After completing all of the above steps, the drive will simply disappear from the Computer Management interface. To remove the drive, you will need to go to the directory and find the file with the .vhd extension, then uninstall it using any of the available methods.
Disable a virtual disk on a computer running Windows 10
Note! Before you remove the drive, you need to make sure that it does not contain the necessary information. Deleting it will definitely lead to irreversible loss of user data.
To completely rid your RAM of residual files, it is additionally recommended to empty the Recycle Bin.
Uninstalling the program
To completely remove UltraISO from your computer, you will need:
- Check that the program is closed. To do this, hold down the combination Ctrl + Alt + Delete and go to the “Task Manager”.
- In the “Processes” tab, find the executable file with the utility, call the context menu and select the “End task” option.
- Exclude "ultraiso.exe" from autostart. To do this, go to the “Startup” tab, right-click on the exe to be deleted and select the “Disable” option.
- Now you can proceed directly to the uninstallation process. To do this, click on the gear icon located in the “Start” menu.
- In the settings window, select “Applications”.
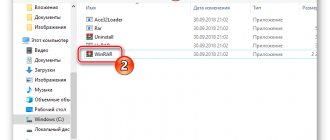
- Find “ultraiso.exe” in the list of installed utilities - you can use the built-in search engine or sort the list by name.
- Right-click on the specified element and initiate deletion.
- Follow the prompts on the screen and restart your PC.
- Go to the “Explorer” window by holding down the Win + E combination. Enter the “C:Program filesUltraISO” directory and empty the specified folder: select the folder and press the Shift + Delete combination.
- Hold Win + R - in the “Run” window, enter the command “%appdata%” and tap “Enter”.
- Check that there are no files related to the software being uninstalled in the “Roamings” folder.
- Repeat the same action with the ProgramData folder located on the local drive (C). If “Program Data” does not appear on the system drive, then you need to configure the display of hidden files and folders. To do this, enter the code word “hidden” in the search bar on the toolbar and click on the resulting search result with the left mouse button.
- Go to “View”, scroll down to the inscription “Hidden files...” and activate the “Show...” function.
- Tap on “Apply” - “OK”.
- Return to “ProgramData” and find the folder with the uninstalled application. If available, right-click on the folder and click “Delete”.
- Restart your PC.
You can remove the specified software through the interface of a third-party uninstaller. The following specialized programs are suitable:
- RevoUninstaller;
- CCleaner;
- Uninstall Tool.
So, to uninstall an application in CCleaner you will need:
- Go to the “Cleaning” section, select the “Applications” tab on the main screen - check all the items in the menu that opens and click on the “Analysis” button. After displaying the results of the PC scan, click on the interactive “Cleaning” button (the element is located in the lower corner of CCleaner).
- Click on the briefcase icon on the left side of the active Cleaner window and go to the top section “Remove programs”. Select the object by right-clicking the mouse and initiate “Uninstallation” (the button is located in the upper right corner of the display).
- Upon completion, go to the “Registry” section, click on “Search for problems”.
- After completing the registry check process in CCleaner, a list of faults will be displayed - click on the “Fix…” button and follow the instructions on the monitor.
- Restart your PC.
In Revo Uninstaller, the mechanism of action is as follows:
- Go to the “Uninstaller” section and in the “All applications” tab find “ultraiso.exe”.
- Click on the specified exe file with the left mouse button - a folder icon with a cross and the inscription “Delete” will appear on the top toolbar of the application - click on it with the mouse and follow the prompts on the screen.
- After uninstalling the UltraISO components, the utility will offer to analyze the system - check the box next to the “Moderate mode” column and click “Scan”.
- After a few moments, a list of faults in the registry will be displayed on the screen - select all found objects with a checkmark, click “Select all”, click “Delete” and tap on “Next”.
- In the dialog box that opens, click “Finish”.
- Restart your PC.
You can additionally check the presence of keys for the uninstalled object using the standard “Registry Edit” tool. For this:
- Launch Command Prompt as administrator.
- Enter the code “regedit” and press “Enter”.
- In the Registry Editor window, hold down the Win + R combination: enter the name of the just liquidated object in the search engine and click Find Next.
- To exclude the found folders and files associated with UltraISO from the registry, you will need to right-click on the displayed object and select the “Delete” option.
- Restart.
Note! Inexperienced users are recommended to use the Reg Organizer application, which will help clean the system of “garbage” using the “Automatic Registry Cleanup” option. The organizer has a simple and intuitive interface. The software is supplied in hardware and portable versions.
Burning files to disk is a proven way to store important information in a safe place. True, there is one “but”: not always and everyone has a “blank” suitable for recording at hand. And if you are now faced with such a problem, do not rush to get upset ahead of time! After all, you can use absolutely any old scratch disk that you have to record data.
“Disc Studio” is a multifunctional disc burning program that will help you capture the folders you need from your computer and individual files onto any media, or erase unnecessary information from already full discs. Read the article and you will learn how to clean up the disk in this application.
Uninstalling a disk on Windows 7, 10 using the command line
Another way to remove a virtual drive is to uninstall it via the command line, which in the tenth version of the operating system has almost unlimited capabilities. The step-by-step instructions are as follows:
- Using the search bar located in the Start context menu, find the command line.
- You must run the built-in utility as an administrator. To do this, right-click on the command line and select “Run as administrator” from the context menu drop-down list.
- Allow the tool built into the operating system to make changes to it.
- A full command prompt window will appear on the screen. The user will need to enter the “subst” command there; to run it, be sure to press “Enter”. The screen will display a list of available virtual hard disks, as well as the full path to their location.
- In the next step, the user's task will be to find the virtual drive letter.
- Next, enter “subst X: /D”, where X is the name of the disk that needs to be “removed” from the computer.
- To check, you will need to run the “subst” command. The list should no longer show a drive with a letter that was previously deleted.
If the test result is positive, the command line can be closed.
Deactivating a virtual disk and deleting files
For your information! One of the main advantages of the built-in program is that it not only temporarily disables the drive, but also clears all information from it.
Creating a bootable USB flash drive
To make a bootable USB drive, which is most often required by users to install the Windows operating system in UltraISO, you must perform the following operations:
- Find a USB drive that does not contain the necessary information - subsequently the bootable USB flash drive will be formatted in UltraISO, and all data contained on it will be deleted.
- Launch the utility, in the main application menu go to the “File” section - click on the “Open” option and in the file path line indicate the directory where the operating system image is located, select the ISO file by pressing the left mouse button and click on the “Open” button.
- After adding the image to the program, the main menu will display data from the image.
- Click on the top toolbar item “Bootstrapping”. In the drop-down menu, select the “Burn hard disk image” tool (the command may differ depending on the software version, but the essence of this operation is clear).
- In the empty “Disk Drive” field in the “Write Disk Image” window, indicate the directory of the flash drive to be written. You need to format the removable USB drive in the same dialog box by pressing the “Format” button.
- Set the default recording settings - the standard “USB-HDD+” method will be used, after which you will need to click on the “Record” button.
- A prompt will appear on the screen: “All information on the FlashDisk will be erased!” - tap on the “Yes” button. The automatic process of writing ISO to the USB flash drive will start, which will take some time.
- Upon completion of UltraISO, the user will receive a full bootable USB flash drive with the selected operating system, with which you can install or remove Windows from your computer.
How to remove unnecessary virtual drives in Windows
Virtual drives can be created in various programs. The three most popular third-party products are Alcohol 120%, Ultra ISO and Daemon Tools. Uninstalling unnecessary virtual drives in each program has its own characteristics.
Uninstalling a drive created in UltraISO
During the installation process of this third-party program, a CD drive is automatically created on the computer. If necessary, the user can create several of them simultaneously.
To delete a virtual disk created in UltraISO, you will need to perform the following steps:
- Run this software component as an administrator (this is one of the prerequisites that must be met).
- When the program window starts, you will need to go to the “Options” tab, a drop-down list will be displayed where you need to click on the “Settings” parameter.
- In the next step, the user will need to go to the “Virtual Drive” tab.
- Next, the “Number of devices” value must be set to “No”. To save the changes, be sure to click “OK”.
Uninstalling a drive created in UltraISO
If all of the above actions were performed by the user, the drive will no longer be displayed in Windows Explorer.
Removing a drive created in Daemon Tools
As practice shows, the vast majority of users use the free version of this product called Daemon Tools Lite. In this application, the user has the ability to create up to four drives simultaneously.
If you need to deactivate them in the program, then you need to adhere to the following principle:
- Launch Daemon Tools Lite on your computer. Virtual drives are located in the lower toolbar.
- You will need to move the mouse cursor to a specific drive, and then click on the red cross to deactivate the directory.
Removing a drive created in Daemon Tools
As soon as the new settings are applied, the previously active element will no longer be available in Explorer.
How to remove a drive created in the Alcohol 120% program
To create virtual drives, the paid program Alcohol 120% or its free analogue with a reduced set of built-in tools, called Alcohol 56%, is also used. Using this product, the user can create virtual BD-ROM drives on any computer.
Instructions for deactivating a drive on a computer with the Windows 10 operating system are as follows:
- Launch the program and immediately go to the “Settings” tab, which is located on the right side of the window.
- Then select the “Virtual Disk” option.
- A new window will appear on the screen with available tools. Here the “Number of virtual disks” parameter will need to be set to “0”.
- To apply the settings, you must save them by clicking on the “OK” button.
How to remove a drive in the Alcohol 120% program
Now there is no virtual disk drive in the operating system explorer.
There are many ways to create and delete virtual disks on desktop PCs and laptops. If you strictly follow the described instructions, no difficulties should arise even for beginners.
Source: https://mirinfo.ru/pk-i-noutbuki/kak-udalit-virtualniy-disk-v-windows-10.html
Program features
Using this utility, the user can:
- Edit different formats of DVD or CD images. The application supports more than thirty popular file formats, including iso, bin, ccd, cue, ima, img, nrg, mdf, mds and sub.
- Create optical drive emulation to run ISO even on computers without a built-in DVD drive (image size limit is 25 to 50 GB).
- Burn data to DVD and CD.
- Burn ISO from removable USB media, including flash drives and HDD, delete images using tools integrated into the UltraISO interface.
- Optimize ISO structure to save disk space.
- Extract boot-sectors from HDDs and floppy disks.
- Create USB drives in USB-ZIP and USB-HDD mode.
- Create bootable disks.
The utility weighs only 4 MB, is perfect for Windows OS from versions XP to 10, and does not conflict with Alcohol 120% and Daemon Tools. The program interface is easy to use and intuitive due to the fact that its structure resembles Windows Explorer. Perfect for all categories of users.
The popularity of UltraISO is evidenced by the fact that this utility has been translated into 42 languages. The application uses an original file format abbreviated "ISZ" (short for "SO Zipped"), which is not identical to a traditional zip archive. ISZ uses ZLIB or BZIP2 for data compression, and also supports the AES encryption method. The "ISZ" format is recognized by most proprietary utilities, including the well-known emulator program Daemon Tools. A special feature of this software is that UltraISO does not work with activated DEP.