In the previous article, we talked about how to create and configure a network folder in Windows 10. If the network folder is not detected or does not open, go through all the steps again. Important:
- configure shared access for all network users;
- make the correct security settings;
- create a new firewall rule.
On "tens" problems arise due to updates. There are two options: either shared folders and files are not displayed, or they are visible, but cannot be opened.
Solving the problem with accessing network folders in Windows 10
Before you proceed to familiarize yourself with all the possible methods for solving the problem that has arisen, we recommend that you once again make sure that the local network and home group were configured correctly and are now functioning correctly. Our other articles will help you deal with this issue; you can read them by clicking on the following links.
In addition, we advise you to make sure that the “Server” setting is in working order. It is checked and configured like this:
Why not subscribe?
Distribution of new, sometimes interesting and useful, materials from the site remontka.pro. No advertising and free computer help for subscribers from the author. Other subscription methods (VK, Odnoklassniki, Telegram, Facebook, Twitter, Youtube, Yandex.Zen)
04/19/2020 at 11:45
I also had a problem with the folder. But it turned out that I just had to exit the application completely.
08.10.2020 at 10:33
There was an error. hurried:
icacls “path_to_folder” /grant Administrators:F /t (we get full rights for all subfolders and files).
icacls D: /grant Administrators:F /t (we get full rights for all subfolders and files)
Reinstalling drivers
Go to the “Task Manager” (Win+R= devmgmt.msc). Find your network adapter and remove it. After rebooting, the drivers should be installed again.
NOTE! If something goes wrong, you can download the driver from the Internet - for this, see the instructions here.
This is a protocol that works together with the Network Browser service. It is disabled by default on new versions of Windows, as it is quite leaky in terms of security. Also, when activating it, it should be enabled only on one computer, and on the second it should be disabled. You have two options:
First , if you have a computer on the network with Windows 7, 8 or some version of Server, then you shouldn’t turn it on, but it’s better to even go in and turn it off completely. On the “seven” and “eight” it is turned on automatically, so there is no need to change anything there.
The second is that if “ten” is installed on all computers, then you only need to enable it on one, then this computer will be the master, and the rest will be the slaves.
To disable or enable the function, you need to go to “Components” - which is located in the “Programs and Features” section (in the “Control Panel”). Find the folder that mentions SMB and enable all three checkboxes.
ATTENTION! I repeat once again that you need to enable this function only on one computer, and disable them on the rest.
"Can't access network folder" in Windows 10
For more convenient file sharing within a local network, users create special directories called network folders. With their help, you can exchange data between computers and other devices, for example, printers connected to the network. Unfortunately, there are cases when access to certain folders within the local network is limited. Restrictions can be set either by the operating system or by a third-party user.
- How to fix problem accessing network folder in Windows 10
- Option 1: Checking that the server settings are correct
- Option 2: Grant access
- Option 3: Component Service
System error 1231: causes
As a rule, system error 1231 occurs due to:
- — technical problems on the provider’s side;
- — problems on the line between the server and the subscriber;
- — malfunction of the computer’s network card;
- — incorrect operation of the network card driver;
- — VPN connection blocking by the computer security system;
- — disabled or incorrectly configured “local network connection”;
- — infection of the computer OS with virus programs.
Windows can't access a computer on the local network
Friends, welcome to another article-instructions for resolving your network problems on WiFi Guide. Botan is in touch. Today's error has many faces - it appears on both Windows 10 and Windows 7, it can have different names, its manifestation is often based on the weather (just a joke, but sometimes you think so), and most importantly, it is associated with network access problems in operating systems Windows. Let's move on to the problem.
If you have anything to add or if you have left behind the scenes a funny story related to this error, feel free to write in the comments. Help other readers with the same problem.
- Manifestations of the error
- Solutions to the problem
- Strange decision from me
- The quick way is the registry
- Step 1 – Checking sharing settings
- Step 2 – Launch Services
- Step 3 – Network Card
- Step 4 – Device Manager
- Step 5 - Impersonation
- Step 6 – SMB1
Enabling SMB2
First let's check the SMBv2 status. To do this, open “PowerShell” with administrator rights by right-clicking on the “Start” button.
Get-SmbServerConfiguration | Select EnableSMB2Protocol
If you see the value “True”, then the protocol is working. If the value is “False”, then you can also enable the parameter using the command:
NOTE! You can turn SMB1 on or off in the same way - just replace one digit in the command (2 by 1).
Next, click on “Y” and “Enter” to confirm your actions. If you want to disable SMB2, then instead of “true” we set it to “false”. At the end, don’t forget to reboot the system.
Manifestations of the error
I already said above that the error appears on all versions of Windows - and more than often on modern Windows 7, Windows 8, Windows 8.1, Windows 10.
It may have essentially different names with the same meaning. Network error:
And the most ingenious thing is that if everything worked perfectly yesterday, it’s not a fact that it will be the same in the morning. This is precisely the situation in which most readers of this article find themselves - everything seems to be configured correctly, but in fact nothing works and there is no access to the network folder.
For reference: typical error codes are 0x800070035, 0x80004005 or 0x800704cf.
Friends, if you don’t see any folders at all, I recommend reading THIS ARTICLE FROM A BEARDED MAN. There you can also look at other ways to resolve network problems, all these errors are very similar, there is no universal one way, so you have to write so much mostly useless text.
Fixing network errors 0x800070035 and 0x80004005
The reasons why Windows 7 or 10 can access a network folder or files almost always lie in incorrectly configured system settings rather than in any errors. For similar reasons, there may be no access to another computer on the local network, and the system will display the error “The connection could not be established. Network path not found." with similar codes. Most problems can be easily fixed with simple settings changes.
If Windows cannot access a network folder and displays errors 0x800070035 or 0x80004005, you need to:
Checking sharing settings
Errors when accessing a network folder often occur in Windows due to incorrect access settings. If a disk, folder, file or computer is not shared, other participants on the local network will not be able to establish a connection.
After this, you need to click on the “Sharing” button and, if the system does not show any errors or warnings, click on the “Finish” button.
In Windows 8 and 10, there is an easier way to share the contents of a folder or drive with HomeGroup users:
After this, the system should open access to the specified path for all users of the local network.
Checking the functionality of the Server service
“Server” is a built-in service in Windows necessary for the operation of the local network and connection to remote computers, devices or files. If the computer has not previously been used as a server or to connect to a home network, the service may be disabled. This often causes errors in accessing network folders, even when the rights for all users are set correctly and other OS settings are normal.
Solutions to the problem
Here and further, I believe that you distributed everything over the network correctly. If you are not sure of your initial actions, I recommend reading our article on sharing files and folders over a local network.
After each stage, you can safely reboot and check.
Strange decision from me
A very quick and strange addition from me. It happens that the network setup seems to be fine, it was working even yesterday, the same versions of Windows 10, all rights assigned - but at least the above errors fall out against the wall. You click on folders, but it doesn’t let you log in (it’s even worse when it doesn’t let you log in to the computer itself in a networked environment or you can’t see anything there at all).
Personally, in this case, I also go to the Network on the second computer - as a rule, a search begins there, or even some kind of permission requests are made. The bottom line is that the second computer usually sees the first. And the most interesting thing is that after such manipulation the first computer also begins to successfully work with the second. An inexplicable magic that can continue to work for months without any failure.
The quick way is the registry
The whole problem with these accesses is connected precisely with that very access subsystem. Why don’t we nip it out in the bud? For most people, such an edit in the registry completely corrects the situation. I recommend trying it, but if anything happens, just do everything as before.
- Let's launch the registry. Don’t know how to do this? (For Windows 10 – right-click on the Start button and launch “Run”. In the window that appears, enter regedit.
- Expand the folders in the registry editor along this path:
- Add here the AllowInsecureGuestAuth parameter, type DWORD, value 1 (Enabled).
This method is especially relevant for Windows 10 Home, where there is simply no access to the local GPO editor. But it works like a clock. Experienced people can do the same using the command (but to be safe, it’s better to do it manually):
reg add HKLMSYSTEMCurrentControlSetServicesLanmanWorkstationParameters /v AllowInsecureGuestAuth /t reg_dword /d 00000001 /f
Step 1 – Checking sharing settings
Now let’s move on to the main part, if the previous ones suddenly didn’t correct the immediate problems of the system. Let's start with the base, in case you set something incorrectly in the settings (although I willingly believe you that you did everything correctly).
Let me remind you that granting access to a folder or disk takes place in two stages: access must be allowed in several places.
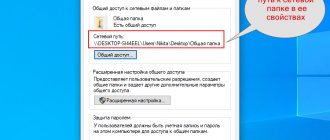
- The first time on the “Access” tab we click on the large “Sharing” button, and in the next window we add ALL users:
- Now go here to “Advanced settings” and do something like in the figure:
I really hope that you initially gave access in the same way. Some people recommend using the “Share” option in Windows 10 to share on your home network, but in practice this only leads to confusion. Personally, as an Old Believer, I use old-fashioned methods. Does not work? Let's move on.
Step 2 – Launch Services
The Server service is responsible for access to all the joys of folder sharing. Sometimes it is turned off - turn it on:
- Let's go to Services (the easiest way for me to launch them is through Search in the system):
- We look for “Server” in the list. If it doesn’t work, launch it (either through the right button, or by double-clicking through the general parameters, to your taste). The status can be seen right here:
In the startup settings, you can choose to turn it on automatically, otherwise suddenly something turned it off, and after a reboot it eventually turns off. Check it out.
Step 3 – Network Card
Usually the reason is rarely connected with this point, but no one forbids you to try.
- We are looking for your network card (go to Network and Internet settings - Adapter settings settings (on the ten) or to the Network and Sharing Center - Changing adapter settings (on the seven)). Select YOUR network adapter through which you are connected to the network, right-click on it and select “Properties”:
- We try to UNTick the IPv6 checkbox in the list (we leave IPv4 enabled):
- Now select IPV4 (don’t touch the checkbox), but click on the “Properties” button:
- WINS – NetBIOS Settings – Default (if you suddenly manually set IP addresses on the network, it is recommended to Enable it here):
Step 4 – Device Manager
Another unlikely event.
- Go to “Device Manager” (again, right-click on Start, or use the search).
- View – Show hidden devices (otherwise it will not be visible)
- Removing 6to devices Another ovary on the IPv6 protocol.
Step 5 - Impersonation
Personally, I don’t like this direction either, but there were those who found it helpful. Therefore, it was impossible to miss.
- Using Search, look for “Component Services”. Let's launch.
- We follow the path: Component Services – Computers – My Computer:
- Right-click on “My Computer” and select “Properties”.
- Next, go to the “Default Properties” tab. Authentication Level – Default. Impersonation Level – Impersonation:
Step 6 – SMB1
In case the new “top ten” is paired with older versions of Windows. By default, the SMB1 protocol is disabled. To resolve it, you will have to go to “Programs and Features” (preferably through Search) – “Turn Windows components on and off” and install it manually (SMB 1.0 / CIFS File Sharing Support).
If you find your solution, I definitely recommend sharing it in the comments. The error is not so simple, but sometimes it can be solved in a very strange, simple way. We decided for ourselves and shared – we helped someone save a couple of gray hairs. Thank you!
Method #2 Enable SMB1 protocol support
The reason that Windows 10 does not see the network environment may lie in the operation of the SMB1 service. It may be disabled. Activating it is not difficult:
- Open Control Panel and find “Programs and Features” settings;
- Open Windows Feature Settings;
- Enable the SMB 1.0 feature. Restart your computer.
After this, the problem when Windows 10 does not see network computers will disappear. If not, then the problems are caused by other factors, troubleshooting methods for which are presented below.
Sharing folders and drives in Windows 10
If there are several computers on your local network (and if they are connected to the same router, they are already on the local network), you can share access to a folder on one computer from another PC or laptop with the necessary rights (read, read and change). and others). This is not difficult, but novice users often have problems setting up shared access to Windows 10 folders due to ignorance of some of the nuances.
This instruction provides details on how to set up shared access to folders in Windows 10 (the same applies to disks), what additional information is required for this, which may be useful.
- How to enable and configure sharing of a folder or drive in Windows 10
- Connecting to a shared folder from another computer or laptop
- How to enable anonymous access to shared folders or network drives
- Video instruction
Brief description of the problem.
This error code means that for some reason the computer is blocked from accessing resources located on the server. That is, Windows, when connected to the Internet, simply “does not see” the folder necessary for correct work on the network, and, accordingly, limits the user’s access to the World Wide Web. Such a failure can occur either due to the fault of the provider or due to internal problems on the subscriber’s side.
How to enable and configure sharing of a folder or drive in Windows 10
Before you begin, keep in mind that to set up shared access to folders and drives, you must have “Private Network” selected as your network profile in Windows 10. You can change this before starting setup (How to change a public network to a private one and vice versa in Windows 10), or take no action yet - at one of the stages you will be automatically prompted to do this. The next steps to share a folder in Windows 10 are as follows:
- Right-click on the folder you want to share over the network, select “Share access to” - “Individual people”.
- If your network profile is set to Public, you will be prompted to make the network private. Do this (“No, make this network private”).
- A window will open showing the current user's name and a Share button. You can click this button immediately to share the folder, but in this case, connecting to this folder from another computer will require you to enter the username and password of that computer's owner user. Attention: If the user does not have a password, the connection will fail by default.
- If you don't want to use the current computer's administrator username and password when connecting from another computer, or your user doesn't have a password, you can create a new user on the current computer, not necessarily an administrator, but definitely with a password (How to create a Windows 10 user), for example using a command line running as administrator: net user Username Password /add
- Then enter this username in the field at the top of the sharing settings, click the “Add” button and specify the desired permission level.
- When finished, click the Share button. Done, the folder is now shared.
There is another option for sharing a folder (also suitable for a disk) in Windows 10:
- Open the properties of the folder or drive, go to the “Access” tab.
- Click the Share button and follow steps 3-5 from the previous section.
- If the Share button is not available (which may be the case when sharing a drive), click the Advanced Setup button, and then o.
- In the advanced setting, under Permissions, you can also specify the users who are granted access to the drive.
- Apply the settings you have made.
If you need to disable sharing access to folders, you can at any time either return the “Public” network profile, cancel sharing in the folder properties, or use the context menu “Give access to” - “Make inaccessible”.
Where to begin?
If the computer is connected to the network directly via twisted pair, the first step is to disconnect the network connector from the card by removing it from the connector. And, after a while, inserting it back, check the result. If you have a wireless connection, it makes sense to reconnect to your access point:
If the issue is not resolved, there is a high probability that the error was caused by:
- incorrect network settings applied by the system after the next update;
- damaged or incompatible network adapter (network card);
- infection with a computer virus.
Connecting to shared folders in Windows 10
In order to connect to a shared folder or drive from another computer or laptop (the instructions assume that Windows 10 is also installed there, but usually everything works for previous versions of the system), follow these steps:
- In Explorer, open the “Network” section and click on the name of the computer on which the folder that was shared is located.
- If the computer from which we are connecting has “Public Network” enabled, you will be prompted to enable the “Private Network” profile, do so (you can click on the notification at the top of the Explorer window and allow network discovery and sharing of folders and files).
- Enter your username and password to connect to the shared folder. This should be the username and password of the user of the remote computer rather than the current one, for example, the username and password of the user who shared the folder or the username and password that we created in step 4 in the first method.
- If everything went well, you will see the shared folder and you will have the access rights that you specified in the “Permission Level” column.
Also, if you wish, you can right-click on the “Network” item in Explorer and click “Map network drive”, then specify the path to the network resource (this path can be viewed at any time in the properties of the folder or drive on the “Access” tab) , or click on a network folder or drive and select “Map network drive”. As a result, the shared folder or shared drive will be mounted as a simple drive.
Resetting network settings
Now let’s try not to configure the network, but rather, let’s reset all parameters. Sometimes this helps, and shared files and folders are detected. Go to Internet and network settings. We need to click on “Network reset”.
Agree to "Reset Now". The computer will reboot and the network settings will be updated. This method often solves not only network detection problems, but also other network and Internet errors.
How to enable anonymous access to shared folders without entering a username and password
If you need to make it possible to open folders over the network without entering a username and password, in Windows 10 Pro and Enterprise you can do this as follows:
- On the computer on which the shared folder is located, in the sharing properties, add the “Everyone” group (enter Everyone in the top field, click the Add button) and provide the necessary permissions. In Windows 10, which was originally in English, this group is called Everyone.
- Go to the local group policy editor ( Win+R - gpedit.msc , note: the element is not present in Windows 10 Home), go to the "Windows Configuration" - "Security Options" - "Local Policies" - "Security Options" section.
- Enable the option "Network Access: Allow Everyone permissions to be applied to anonymous users"by double-clicking on it and selecting “Enabled”.
- Open the folder properties and on the “Access” tab at the bottom, in the “Password Protection” section, click on the “Network and Sharing Center” link to change the setting. Expand the “All Networks” section, install about and apply the settings.
- If we provide anonymous access to a disk and not a separate folder, additionally go to the disk properties, on the “Security” tab, click the “Change” button, add the “Everyone” group and set the necessary permissions.
- Some instructions suggest that in the same section of the Local Group Policy Editor, enable the "Accounts: Guest account status" , and then open the "Network access: Allow anonymous access to shares" and specify the network name of the folder in the line (or several lines, if there are several folders), the folder name is indicated without the path to it, for the drive we simply indicate the letter without a colon. But in my experiments, anonymous access (to all shared folders) works without this, although it can be useful if anonymous access needs to be provided only for individual shared folders.
From this moment on, you can connect to a shared folder or network drive from other computers without entering a login and password (sometimes you may need to restart the computers). However, keep in mind that this is not very good from a security point of view.
Services
You can also turn network discovery on or off in Windows 10 through services. They can be deactivated by the user himself or by third-party programs. To quickly get there, hold down our favorite “Win + R” keys and enter: “services.mcs”.
Next you need to go and enable the following services:
- Discovery provider host.
- SSDP Discovery Service.
- DNS Client Service.
- Publishing function discovery resources – here you need to set the launch type to “Automatic with lazy loading”.
- Universal PNP device node.
After this we restart the computer.
Nothing helped
Previously, we tried to solve almost all problems related to the network environment in Windows 10. If computers are still not visible, then most likely there are problems in system files or programs that are blocking or interfering with the network. We do the following:
- We check the computer with an antivirus program.
- Try disabling your antivirus and checking access.
- Download the CCleaner program - do a standard cleaning and search for and fix registry errors.
- Remember if you have previously installed any programs that, in theory, could interfere. Very often, utilities that work with Proxy or VPN install virtual network adapters. Go to “Programs and Features” and go through all the programs, removing unnecessary and unnecessary ones.
- Go to startup and remove everything unnecessary, unnecessary and suspicious. Alternatively, you can turn off everything except the antivirus program. Read more about how to do this here.
- Download the driver for the network adapter from the official website - I already left a link to the instructions in the article above.
- Go to the router settings and in the “Local Network” (LAN) section look at the display of all computers.