How to return photos to Samsung if they are missing
You can fix the problem when photos from the Android gallery disappeared on Samsung in one of the following ways:
- Disable automatic transfer of photos to the Samsung cloud.
- Clear application cache on Android.
- Remove ".nomedia" files from the gallery folder.
- Restore images using third-party tools.
All these options with instructions are described in more detail below.
How memory works
To understand how to recover photos on Android after deletion, you first need to understand one important point regarding memory performance. When you delete any information from your phone, the data does not disappear anywhere. A section of memory that is cleared of information receives the “Free” status, which allows the device to write something else there.
Accordingly, if you delete a photo, then in fact it does not disappear from the phone. The device simply pretends that this data does not exist. The photo will completely disappear from the phone only when a new photo is taken in its place. Until then, it is quite possible to restore a deleted photo.
Disable transferring photos to the cloud
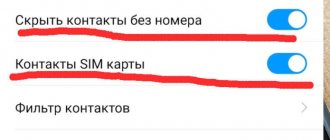
You need to disable automatic transfer of photos to the Samsung cloud as follows:
- Go to the Gallery.
- Go to the menu by clicking the three dots in the corner of the screen.
- Select Settings.
- Turn off synchronization with Samsung Cloud.
Now you need to access the photos that have disappeared from your smartphone. You can do it like this:
- Open the Samsung Cloud application - the phone must be logged into your Samsung Account.
- Or through a browser by going to support.samsungcloud.com and entering your account information.
In this case, you should return photos that have disappeared to your phone like this:
- Open Settings - Accounts and Backup.
- Find Samsung Cloud - the place where photos from the gallery on Samsung disappear.
- Click "Recover Data".
- Select a gallery.
Clearing cache
To clear the cache, you must perform the following steps:
- Open phone settings.
- Go to application settings or application manager settings.
- Find the “Gallery” application among a large number of programs.
- Go via “tap” to the page with information about the application.
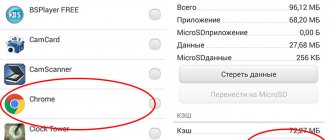
- Find in the settings and information about the application a mark called “cache”. And, depending on exactly how many photos and pictures are on the phone, the cache of this application can vary in size from 100 megabytes to several gigabytes. To clear the cache, you need to click on two buttons - “Clear”, and then, after that, “Clear data”.
- After clearing the cache, you need to go back one step, that is, to the application manager. There, in the general list, you need to find “Multimedia Storage”. For this application, you must also find its properties in order to clear the cache and all data.
Remove ".nomedia" files
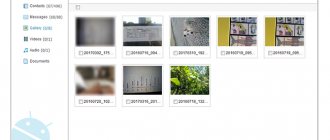
If you immediately lose all the photos from your Samsung Galaxy Android gallery, the way to restore them is to check the DCIM folder where images from the camera are stored. If the files are there, then the application may not be able to display them. A common cause of the problem is “.nomedia”, which in Android tells the system that the folder should be “invisible”. It could have been written to DCIM by a virus, due to a glitch, or accidentally by the user. To remove it, use a file manager:
- Install a file manager from the Play Market, such as ES Explorer or Total Commander.
- Find the DCIM folder.
- Check to see if there is a “.nomedia” file in it, or in its subfolders.
- Delete all such entries.
- Restart Android and check the images.
Reasons for failure
In general, the reasons for such a malfunction in a mobile device can be divided into two categories - hardware problems and software problems. Software problems include any damage to the cache in the standard Gallery software, the effects of viruses and other malware, problems related to the memory card or internal memory. Hardware problems include technical damage to the card or internal memory.
In this case, the first action of the user is to make sure that photographs are available. All you need to do is connect your mobile gadget to the PC and start the file transfer mode.
If the computer recognizes the photos, then it is likely that the user has encountered a software-type problem. If the computer does not even see the photos or, moreover, prompts the user to simply format the drive, then we are talking about a hardware problem.
File recovery
If the missing images were actually deleted manually or due to a failure, then you can restore them with special programs. You need to find them in the Play Market, or download the program to your PC and connect your phone to it. I will not dwell on this point in detail, since file recovery is a separate topic. But in short, you need:
- interact with the phone as little as possible so that it does not overwrite new information on top of the old one, where photos are still stored;
- download the recovery program on your PC or Android and follow the recovery steps that are usually indicated in the program description;
- Not all images may be restored, but most will be “saved.”
Now you know how to get back photos that have disappeared from the Samsung gallery, and how to make sure this doesn’t happen again. If you have turned off synchronization, then do not forget to transfer files to your PC from time to time so that your phone continues to work just as fast. I hope this instruction will be useful to you.
How to restore a gallery on Android
Sometimes on Android smartphones you may encounter a problem: you open the “Gallery”, but all the images from it are gone. We want to tell you what to do in such cases.
How to restore a gallery on Android
Contents - How to restore a gallery on Android :
- Causes and solutions to the problem
- Method 1: Clear the Gallery cache
- Method 2: Delete .nomedia files
- Method 3: Photo Recovery
Causes and solutions to the problem
The reasons for such a failure can be divided into two groups: software and hardware. The first includes damage to the “ Gallery ” cache, the action of malicious applications, and violation of the file system of a memory card or internal storage. The second is damage to memory devices.
The first thing you need to find out is whether there are photos on the memory card or internal storage. To do this, you need to connect either a memory card to the computer (for example, through a special card reader), or a phone if the images from the built-in storage have disappeared. If the photos are recognized on your computer, then you are most likely experiencing a software glitch. If there are no pictures or problems occur during connection (for example, Windows suggests formatting the drive), then the problem is hardware. Luckily, in most cases you will be able to get your images back.
Method 1: Clear the Gallery cache
Due to the peculiarities of Android, the gallery cache may fail, as a result of which photos are not displayed on the system, although they are recognized and opened when connected to a computer. When faced with this type of problem, do the following:
1. Open “ Settings ” in any possible way.
2. Go to general settings and look for “ Applications ” or “ Application Manager ”.
3. Go to the “ All ” tab or something similar in meaning, and find the “ Gallery ” application among the system ones. Tap on it to go to the details page.
4. Find on the page about. Depending on the number of images on the device, the cache can occupy from 100 MB to 2 GB or more. Click the " Clear " button. Then - “ Clear data ”.
5. After clearing the gallery cache, go back to the general list of applications in the manager and find “ Media Storage ”. Go to the properties page of this application and also clear its cache and data.
6. Restart your smartphone or tablet.
If the problem was a gallery failure, then after these steps it will disappear. If this does not happen, read on.
Method 2: Delete .nomedia files
.nomedia may appear in photo directories . This file migrated to Android with the Linux kernel and represents service data that prevents the file system from indexing multimedia content in the directory where they are located. Simply put, photos (as well as videos and music) from a folder that contains a .nomedia will not be displayed in the gallery. To return the photos to their place, this file must be deleted. This can be done, for example, using Total Commander.
1. After installing Total Commander, log into the application. Call up the menu by pressing the three dots or the corresponding key. In the pop-up menu, tap on “ Settings... ”.
2. In the settings, check the box next to “ Hidden files/folders ”.
3. Next, visit your photos folder. Typically this is a directory called " DCIM ".
4. The specific folder with photos depends on many factors: firmware, Android version, the camera used, etc. But as a rule, photos are stored in directories called “ 100ANDRO ”, “ Camera DCIM itself .
5. Let’s say photos have disappeared from the “ Camera ” folder. Let's go into it. Total Commander's algorithms place system and service files above all others in the directory during standard display, so the presence of .nomedia can be immediately noticed.
Press and hold it to bring up the context menu. To delete a file, select “ Delete ”.
Confirm deletion.
6. Also check other folders where photos may be located (for example, a download directory, messenger folders or social network clients). If they also contain .nomedia , remove it using the method described in the previous step.
7. Reboot your device.
After the reboot, go to the “ Gallery ” and check if the photos have been restored. If nothing has changed, read on.
Method 3: Photo Recovery
If Methods 1 and 2 did not help you, we can conclude that the essence of the problem lies in the drive itself. Regardless of the reasons for its occurrence, it will no longer be possible to do without file recovery. The details of the procedure are described in the article below, so we will not dwell on them in detail.
Read more: Recovering deleted photos on Android
Conclusion
As you can see, the loss of photos from the “ Gallery ” is not at all a reason to panic: in most cases it will be possible to return them.
Method 1: Recycle Bin
The easiest way is to restore photos from the trash, but this must be done within 30 days after deletion, otherwise they will disappear completely. The Recycle Bin is enabled by default, but it's a Galleries tool, so pictures deleted using another app, such as a file manager, won't go into it.
- We remove any picture from the “Gallery”.
- Click the “Menu” icon in the form of three dots, select “Trash”, select the photo that interests us, and click “Restore”.
Is it possible to find pictures that were not included in the “Gallery”
You can only find them if they are actually saved on the phone (Gallery simply refused to show them). To check for them, connect your phone to your computer using USB. Open the folder where all previously taken pictures are stored. If the photos are not there, you will not be able to restore them, since, most likely, the system did not really save them.
First, restart your phone and clear the device’s memory and, most importantly, the “Galleries” cache. Try creating a new DCIM folder by renaming it. Reset your camera settings. If all else fails, you need to reset your smartphone. The last resort method is a complete flashing of the device.
Sources used:
- https://lumpics.ru/photos-missing-from-gallery-on-android/
- https://games-instel.ru/pochemu-v-galerei-ne-otobrazhayutsya-foto-na-androide/
- https://droidov.com/kak-vosstanovit-foto-na-android
- https://upgrade-android.ru/stati/stati/5122-kak-vosstanovit-galereyu-na-androide.html
- https://kompkimi.ru/interesnoe/pochemu-ne-sohranyayutsya-foto-na-telefone
SHARE Facebook
- tweet
Previous articleCommunication programs: TOP 15 instant messengers for phones in 2022
Next articleWhat mobile device resolutions should the website be adapted to?
Recovering Photos from SD Card
If the photos were stored on removable media, then that's even better. The card can be pulled out and connected via a card reader to the computer. Here you can already use serious data recovery software. But if your card was formatted as internal memory, then nothing can be restored.
The most famous program is Recuva, which was released by the same company as the legendary CCleaner. It is free, but there is a version with extended functionality. However, the standard free version is enough for the average user.
The program is extremely simple. You just need to select the disk from which you want to recover data and click “Analyze”. Next, select the files you need from those found and click “Recover.”
You can also use the free utility R.saver. It has a simple and user-friendly interface.
Recovering deleted photos using a PC - overview of available solutions
A computer and special programs installed on it will help you recover photos lost from your smartphone. The main advantage of this method is that to restore photos the user does not need to obtain root rights. Programs that are suitable for solving such problems are described below.
Recovering deleted photos using Recuva
First of all, you should pay attention to the Recuva utility, which allows you not only to recover deleted photos, but also videos, music, documents, emails and other files.
To recover photos using this tool, download the program from the official website and run it.
Next, you will need to connect your smartphone to your computer using a USB cable, then select the type of files to be recovered and the location where you want to save them. Next, select a deep scan, click the “Start” button and wait for the result.
How to get back deleted photos from your phone using UltData for Android?
With this utility, you can not only recover deleted photos, but also call history, deleted contacts, SMS messages, etc. The program will help you quickly and freely recover most of your deleted photos.
To recover photos, proceed as follows:
The disadvantage of this program is that in some cases you may need superuser rights (root rights).
How to recover deleted photos from phone using 7-Data Android Recovery?
This program is no worse than the previous two. It will also quickly and effectively help you recover deleted photos from your smartphone. The interface has been translated into Russian, so it will be understandable to any user.
Download the program from the official website and run it. Next, connect your smartphone to your computer, set up filters and start the scanning process.
Preparatory measures
How to recover deleted photos from your phone? First, you need to take measures that will increase the likelihood of data recovery. Once you have discovered that files are missing, stop working with the memory. Never download new data to your phone. If the photos were located on the hard drive, remove it from the device. If the pictures were on the internal memory, then turn off the phone.
However, before turning off the power, you must enable USB debugging mode. It will allow you to work with your phone via a PC. To activate the mode, you need to go to the “Settings” menu. There you need to select the “For Developer” item, and then check the box next to “USB Debugging”.
If the “For Developers” item is not there, then look for “About phone”. We go there and click 7 times on “Build number”. After this, we will be transferred to the developer menu, which contains the treasured “USB Debugging” item.
Recommendations for Android
Owners of Android smartphones also face various problems, including missing photos. If you discover a problem, do not be upset, because it can be quickly and easily fixed.
Basket
Smartphones from well-known manufacturers such as Samsung, Xiaomi and Huawei have a special space where deleted files are stored. To access them, you need to execute a series of commands “Gallery” - “Albums” - “Recently Deleted”. If the last folder is not displayed, then you need to click “Gallery” - “Settings” and check the box next to the required function.
Via PC
It is enough to simply return lost information using a computer and various programs. At the same time, a person who does not have root rights can carry out his plans, since the system will not ask for permission. Particular attention should be paid to utilities such as Recuva, UltData for Android, and 7-Data Android Recovery.
They will help you scan your device, find all lost data and restore it.
Recovering photos from internal memory
If the photos were on the phone’s internal memory, then this is the most problematic situation. The fact is that modern smartphones do not connect to the computer like a regular removable drive. That is, this can be done, but not with standard means, and this method is suitable for experienced users. Instead, the phone is defined as a media player (MTP), which imposes some critical restrictions in our case.
Therefore, it remains to use only specialized programs for both smartphones and computers. The Google Play store has a huge number of free and paid data recovery programs. To increase the chances of recovering information, most programs require root access, but you can try without it.
One good recovery program that works directly from the device is DiskDigger. There shouldn't be any difficulties in using it.
You can also try programs for your computer, such as the free EaseUS MobiSaver for Android Free. It requires root rights.
Source
Method 4: Google Photos
Google Photos is an analogue of “Gallery”, which is built into most Samsung devices. Only copies of images are stored in the Google cloud service, which means you have an additional chance to restore them, provided that the auto-upload and synchronization function has been enabled.
- We launch the application and first see if there are deleted photos there.
Go to the “Library” tab, open the “Trash”, if there are pictures that interest us, select them and click “Restore”.
- If you recently reset your device to factory settings, you can search for images on the Google server at https://photos.google.com, but you will need to log in to your account. First, look for pictures in the “Photo” tab.
Go to the “Cart” tab. To return the photos contained in it, select them and click the “Restore” icon.