Here you are trying to connect to Wi-Fi from your phone or tablet. But you see an “IP configuration error” when the IP address is obtained endlessly or the address is not available at all. More often such problems can be seen on the Android operating system. And I will immediately answer why this happens. The smartphone sends a request to the router to provide it with an IP, mask and DNS. This is how the router works. Without a set address, the router will not know where to send information packets.
It's like living in a deep forest and ordering packages. The postman simply won’t know where to deliver them. By default, the DHCP function is enabled on all Internet centers. That’s exactly what she’s giving out all these addresses. But sometimes it happens that the function is disabled or it is broken. And on Android, in the network settings, it is set to obtain an autonomous IP address.
In this case, we have three options if we are unable to connect to the router:
- Go ahead and reboot your router - just unplug it and plug it back in after 2 minutes. If it doesn’t help, read the instructions below.
- Register the IP address manually on the phone;
- Enable DHCP on the router.
This is what we will talk about today. I will tell you everything in detail, with pictures and explanations. But let's probably start with the phone.
Why can't Android get an IP address?
Often, in the settings of wireless connections, it is set that the phone should automatically detect the IP address of the network and connect to it. But when this does not happen, the phone does not connect to the Internet, and the connection status stops at the moment “Obtaining an IP address.” Android does not connect to Wi-Fi or the error “Unable to obtain an IP address” appears - also one of the reasons for the violation of the user’s comfort of the mobile OS. This occurs because the router's DHCP server cannot automatically distribute an IP address to the phone. Accordingly, if the smartphone is set to automatically obtain an IP address, then the above error occurs.
This can be fixed if:
- specify a static IP address in the connection settings;
- reboot your home router;
- reset the router to factory settings;
- restart the DHCP server;
- change the name of the network;
- rename your Android smartphone.
There are many more methods for solving this problem, but it’s worth understanding everything in order.
Rebooting the Router
Often the problem can be solved by rebooting the router, but not always. If the problem remains after a reboot, you should go further in the article, but the “reboot” must be done correctly.
- You can reboot by clicking on the button in the left or right corner of the router’s administration panel. For those who don’t know, the “admin panel” can be launched by entering a simple IP address in the browser’s address bar: “192.168.1.1” and logging in with the username and password: “admin”;
Review and configuration of the D-Link Dir-320 modem
- You can disconnect the router from the power supply and wait 30-60 seconds, then turn it on and try to connect again.
If rebooting does not help, you should reset the gadget to factory settings. There are also 2 methods: using the administration panel or by pressing the special “Reset” button on the back panel of the router. This button is often hidden in the body, and to press it you need to use a toothpick or a needle.
Using the Asus router administration panel as an example, you should do the following:
- go to the address “192.168.1.1” and log in;
- go to the “Advanced” - “Administration” tab;
- open the “Settings” tab;
- press the button: “Reset” opposite the first line “Factory settings”.
In the case of a physical button, the reset is carried out differently depending on the router model. You need to do this with the router turned on or off. Information about this is on the w3bsit3-dns.com forum or in the device instructions. It’s worth taking a toothpick or a needle and using it to press the “Reset” button on the back panel of the router. Finding the button is very easy - it is a deep small hole near the Ethernet port or connector for connecting the power supply. You need to press the button and hold it in this state for about 30 seconds, then turn on the router.
Important! After resetting the router to factory settings, all settings that the user had previously set will be lost.
Ways to solve the problem
IP Wi-Fi configuration error occurs for various reasons, and each has its own solution. You need to use several methods in order to troubleshoot problems.
Reboot the router or do a full reset
Often rebooting the router will solve many connection problems. You can do this in three ways:
1 way. Disconnecting the router from the power supply.
Method 2. Reboot using the dedicated shutdown button on the router.
You need to press the WPS button (“WLAN/WPS”, “Wi-Fi/WPS”), holding it for several seconds (the button may have no label, just a Wi-Fi icon) or “ON/OFF”.
Some models of TP-Link routers have a reset function by holding down the WPS button (“WPS/RESET”), so you need to carefully study the instructions before rebooting.
For reference! It happens that the reset button on the router is made internal (“RESET”). It can only be pressed with a thin object.
3 way. Turning the router off and on through its control panel.
- In the address bar of any browser you need to enter 192.168.1.1 or 192.168.0.1 (the addresses are indicated on the router body).
- Once on the login page in the Web interface, you need to enter your login and password (admin/admin or admin/1234 - depending on the router model) and click “Login”.
- Select the “System Tools” / “System” or “Advanced Settings” tab (depending on the router model) - “Reboot” or “Reboot”. There is no need to look for a tab in Asus settings - the “Restart” button is in the upper right corner.
An example of rebooting a router using the internal button
Checking the DHCP server connection on a Wi-Fi router
The DHCP network protocol has the function of transferring IP to devices connecting to the router. If this server is disabled, the PC or smartphone will not be able to access Wi-Fi.
You can also check whether this function is enabled in the router's Web interface. There you need to find the DHCP section (the “Local Network” / “Home Network” / “DHCP” / “Network” / “LAN” tab, depending on the router model), click “Enable”.
Next, you need to save the changes with the “Save” or “Save” button and reboot the router, as indicated above.
Changing Wi-Fi network security and encryption settings
IP configuration error when connecting to Wi-Fi constantly occurs due to incorrect security or encryption type settings. The problem arises from the fact that the device can only work with a certain type. What are the differences between the levels of protection:
- WEP is an outdated type of security, so attackers can easily gain access to the network.
- WPA is a more advanced type of security that is compatible with all devices.
- WPA2 is a new, improved version that includes encryption support.
Encryption methods:
- TKIP is an outdated type, but works. Prevents intruders from infiltrating your home network.
- AES is a more advanced security option.
Note! When setting the encryption type, it is better to choose between WPA and WPA2 Personal versions (for a home network). The current encryption standard is AES.
Changing the type of security and encryption on a TP-Link router
To switch settings, you will need to go to the router’s Web interface. You need to find the section “Wireless Network” - “Wireless Security” / “Wi-Fi” - “Security Settings” or “Wi-Fi Network”.
Here you can change the encryption and security type. After switching versions, it is recommended to save the changes and reboot the router. If changing the protection option does not help, you need to try a different type.
Checking the operation of the DHCP client service on the computer
If your computer cannot obtain a Wi-Fi IP address, you need to check whether the DHCP client service is enabled on it. It is a network protocol that helps devices obtain IP addresses in order to connect to a wireless network.
To check the operation of the protocol, you need to run “Start” - “Control Panel” - “Administrative Tools” - “Services” (on Windows 10 - right-click on “Start” - “Computer Management” - “Services and Applications” - “Services”) ").
Here you need to find the “DHCP client” item and look at the status opposite it, as well as the startup type. It should be “Working” and “Automatic”. If the service is disabled, you will need to right-click on “DHCP Client”, select “Properties”, where you can set the necessary parameters.
Important! After this, you need to click on “Apply” to save the changes and restart the computer.
You can check whether automatic acquisition of an IP address and DNS is enabled in another way: go to “Control Panel” - “Network and Internet” - “Network Connections” - “Wireless Connection” - “Properties” - “IP version 4 (TCP/ IPv4)". The checkboxes for automatically obtaining the DNS server address and IP address should be checked here. Next, you need to click “OK” and restart the PC.
Setting up filtering by MAC address
In the router settings there is a “MAC Address Filtering” function. It must be disabled, otherwise the connection to Wi-Fi will not take place. Especially if the MAC addresses of the connected device are not listed and the filtering service is enabled.
To find out whether this function is activated or not, you need to go to “Wireless Mode” / “Wi-Fi” / - “Wireless”, find “MAC Address Filtering” there. Here you can “Allow” or “Deny” access to stations that are not in the list. The user must allow the connection.
Disabling MAC Address Filtering
Rebooting your smartphone (tablet)
There is no need for a million page explanation here, since in this situation you just need to restart your smartphone or tablet. To do this, you need to briefly hold down the power button until the shutdown menu appears. It is worth selecting the “Reboot” button. Before doing this, it is advisable to turn off Wi-Fi on the device. After turning it on, you can try to connect to the network again.
What are the differences between 3G and 4G networks: features, advantages and disadvantages
There is also a method with safe mode. It allows you to boot your Android system by disabling third-party applications that could, in theory, limit network usage or change network settings. To activate it you need to do the following:
- hold down the power button until a menu appears with the buttons “Shutdown”, “Reboot”, “Notification Modes”;
- press the “Shutdown” button and hold it in this state until the system window appears about entering safe mode;
- Click “OK” and wait for the smartphone to reboot.
Important! If your smartphone connects to the network in safe mode, it means some third-party application is changing the network settings and interfering with the normal connection.
Other methods
You should disable the antivirus on your laptop. Simply turn off the firewall built into your antivirus program. You can also disable the Windows 10 firewall. In general, we disable all applications or programs that can block the device’s connection to the access point.
You also need to check whether public access to the work network is open. This can be done in the “Properties” section of the selected network.
Increase
If general Internet access is not open, then the settings for this connection will indicate “without network access” or “IPv4 connection.”
Increase
Checking the sharing settings. It is necessary that next to the connection there is an inscription “publicly available” or “public network”.
Increase
Reconnecting to a Wi-Fi network
Ways to fix authentication error when connecting to wifi on Android OS
Reconnecting to the wireless network may correct the error, but not always. To do this, turn off the Wi-Fi module on the device by clicking on the corresponding icon in the notification shade, and then turn it on. If this does not help, you should delete the Wi-Fi access point on your smartphone and then connect to it again. Here you will need to re-enter your network password.
If you have several open wireless networks in your home, you can try connecting to them. Was the connection successful? This means that the problem is not with the Android smartphone. It is worth understanding the “configuration” of the router.
Renaming your device
This doesn't always solve the problem, but it's worth a try. To change the name of your smartphone, you need to go to the Wi-Fi settings, click on the three vertical dots or bars in the upper right corner and select “Settings”. There you can also find the “Wi-Fi Direct” item. On different smartphone models this item is located in different places. Perhaps it will already be present after clicking on the “three dots”. Then you can change the network name of your Android smartphone by selecting the appropriate option.
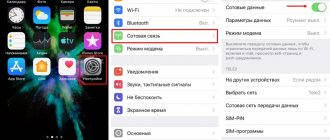
How to access Wi-Fi Direct on a Xiaomi smartphone with MIUI 10 shell?
- "Settings";
- “Wi-Fi” item;
- "Advanced settings";
- in the “Other connection methods” category you need to select “Wi-Fi Direct”;
- you need to click on “Device name”;
- After that, in the input field that opens, enter the new name of the Android smartphone.
Disable constant network search
When the Android system is constantly searching for Wi-Fi networks, the IP configuration error when connecting to Wi-Fi can occur almost constantly. To do this, just disable this function in the wireless connection settings. This can also be done by downloading a special program, but more on that a little later.
To prevent the Android OS from constantly receiving a list of networks, you must first go to “Settings”. Then select “Wi-Fi and wireless networks” or simply “Wi-Fi”. A list of all available wireless connections will open. You need to click on the three dots in the upper right corner and select “Settings” or “Advanced”. Next, you should find the “Constant network search” item and move the switch slider to the left as in the screenshot from the Redmi smartphone.
After this, it is advisable to restart the phone and try to connect it to the router again.
Resetting network settings
If none of the previous points helped, all that remains is to completely reset the network settings on your computer or laptop. If the router is configured automatically, then everything will configure itself. If you configure it manually, you will need to re-enter all the data, so it’s better to clarify in advance or remember which parameters you configured and how.
Via Windows Settings
Here we will describe only the method that is suitable for tens. For other systems it will be easier to use the command line. To get started, click on Start, then on the gear on the left side and select “Settings”. You can also simply press the Win+I key combination and the desired window will open. Here, select "Network and Internet".
On the left side of the window that opens, click on the “Status” section. Now on the right side, go to the very bottom. The “Network reset” option will appear here.
A new window will open. There is only one button “Reset Now”. Click on it. Please note that your computer will restart, so close and save any important documents.
After this, receive new settings automatically or enter the parameters manually.
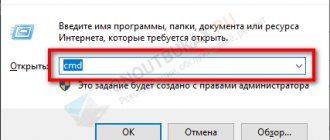
Via command line
Everything here is the same for any version of operating systems. Go to Start and launch Command Prompt there with administrator rights.
Now enter the following commands, after each of them press enter:
- netsh int ip reset
- netsh int tcp reset
- netsh winsock reset
- ipconfig /flushdns
- route –f
Then you need to restart your computer. Using these commands, you can completely reset tcp/ip settings, clear settings in Windows, reset the DNS cache and completely clear the routing table. In fact, according to its network parameters, you will see a new operating system, as if you had not used it or configured anything.
Registering a static IP address
If the automatic IP address cannot reach the smartphone, you should register it manually. To do this, you first need to define the values that the user will enter manually on Android. They can be found in the router's administration panel. Go to “LAN”, where you can see the main IP address. Surprisingly, it is not worth entering in the Android IP address field, since this is the gateway.
For example, the IP address looks like this: “192.168.1.1”. This is the gateway, it must be entered in the “Gateway” field. And in the “IP” field you must enter: “192.168.1.xxx”, where xxx is any number in the range from zero to 255.
If the distribution of the IP address from the DHCP server is normal to other devices, then it is recommended to take the values from the DHCP section of the router.
How to register a static address? You need to turn on Wi-Fi on your smartphone and find a broken network. After that, press and hold it until the context menu appears. You need to select “Change network”. There is no need to touch the password field, as you need to scroll down the menu and click on “Show advanced options”. You need to select static instead of automatic DHCP, after which fields for entering values will open.
In the DNS 1 field you need to enter the value provided by the provider or enter “8.8.8.8”. As the second value, you must enter “8.8.4.4” or leave this field unchanged.
Router DHCP server
This server plays the most important role in this case, since its task is to distribute an IP address to a smartphone, tablet, computer and any other gadget, after which it connects to the wireless network. But, if the DHCP server is turned off on the router itself, then this will never happen. How to enable it?
- You need to go to the administration panel;
- go to the “LAN” section;
- select the DHCP tab;
- Move the slider next to “Enable DHCP”.
Note! This happens differently on different routers, so you need to familiarize yourself with the functionality of the “admin panel” in more detail. If your Android phone keeps getting an IP address when connecting to Wi-Fi, then this method can solve the problem once and for all.
Reinstalling the driver
It happens that after updates a different network adapter driver is installed. This is common with wireless cards because they are driver sensitive.
Standard drivers are also suitable for Ethernet cards, unless you have some rare type. To make it easier to find drivers, you can use the DriverHub program, which scans your computer and installs the necessary drivers itself. you can follow the link.
For manual installation, go to the website of the manufacturer of your motherboard (if the network card is built-in), network card or laptop and download drivers for your version of the operating system from there. Install them and restart your computer. If it helps, you should always keep them with you, or better yet, block driver updates for the system.