Apple phones are modern gadgets that differ from others in their certain properties. The iPhone allows the user to use different types and types of media files, make calls, read books, communicate with other people and much more. As soon as a person buys his first iPhone, he most likely wonders how he can transfer all the data from the phone to the computer.
There are different data transfer options for this. Several methods that are suitable for iPhone may also be suitable for other gadgets from this company. The only thing is that a person needs to know the features of transferring each method in order to perform it as accurately and correctly as possible.
How to transfer files from computer to iPhone using iTunes
The very first way that will help in this matter is to use iTunes. There is an operation on a smartphone called “Shared Files”. So, with the help of it you can easily transfer data from your computer to your iPhone.
The iTunes program is generally used to manage the iPhone. It is used for equipment that has at least iOS 4 installed. The method is very convenient, since the user can initially store all the data on the computer, and, if necessary, take it and transfer it. You just need to do the correct synchronization. To do this you need:
- Connect the gadget using a special cable, which often comes with the iPhone;
- You must install the iTunes application on your computer. You can find it on the official website;
- Now you should go into this program on your computer;
- Click on the special icon at the top left that represents the phone;
- Go to “Shared Files”;
- In the menu on the left, you need to activate the utilities used during the transfer;
- We transfer documents using the “Add” button. A list will appear in which only planned utilities are selected. Once all the files have been added, tap on the “Save to” item and select a folder on your phone for further saving;
- All materials are transferred. You should wait for the process to complete.
If the user accidentally added some unnecessary files, then he needs to click on the “Delete” item. This is a very convenient way through which you can quickly remove all data from your PC.
Note! You can transfer data not only to an iPhone, but also to an iPad, for example.
Transferring photos via plug-in flash drives
Initially, iPhone manufacturers did not provide the ability to directly transfer files from or to a connected flash drive. Also, you cannot insert a micro-SD into Apple products, which would greatly simplify the task of storing and transferring files.
However, recently adapters for USB flash drives adapted to devices such as the iPhone have appeared on sale.
Such devices are Lightning flash drives, special adapters with a hole for the media to enter.
To view or save images or videos on your phone, the files must be in a compatible format and begin with DSC (for example, DSC_0006).
To take advantage of this opportunity, you must first transfer the necessary photos from your computer to the storage device, then connect your iPhone via an adapter to the flash drive, and wait until the device is authorized. Then transfer the photo from the flash drive to any folder on your phone.
If you want to transfer data from micro-SD, then in addition to the adapter you will need a memory card reader. But in that case, you don’t need to rename the files adding a special name; the iPhone should read them anyway.
You can learn more about this procedure by watching the following video:
iPhone developers are now ready to offer special flash drives that are compatible with their products and have a USB output, which will allow you to easily connect to your computer. In any case, innovation does not stand still, and tomorrow, perhaps with the use of such flash drives, the question of how to transfer images from a computer to your iPhone will no longer require such effort, and the whole process will be as simple as for the owners other brands of phones.
Rate this article
How to Transfer Files from Computer to iPhone Using iCloud
Another quite effective and fast way is transfer to the iCloud cloud, as well as further transfer of everything to the phone. This is a service that is also owned by Apple. The user can use it in different situations, even when you just need to save a file somewhere, but there is no space on your phone.
In order to perform a quality transfer, the user needs to create a backup copy on the computer and on the phone. The whole process can be described in several steps. You need to do the following on your iPhone:
- First you need to open the settings on your phone;
- After this, you should select the device name, that is, the very top line. Now the button from iCloud is activated;
- Next in the menu, the user should tap on the “Photo” item or launch “My Photo Steam”
- Let's go to iCloud. At the bottom of the screen the user will find the “General” section. Click on it, form the necessary photos and tap on the “Next” item;
- Now click on the selected album, click on the plus sign if you need to add additional files. Then tap on the cloud button;
- Install the program on your PC, log into your account, tap on options;
- We check the photo to load data, click on ready;
- By connecting your computer to a cable or using the “Transfer” function, you should select a smartphone and wait until the transfer process is completed.
As a rule, this method is most often used to transfer photos from a PC to a phone. It is also common to transfer files to an iPod. If the user backs up frequently, it will be easier to transfer files.
Uploading photos via iFunBox
Another popular and easy way to download an image to iPhone and iPad is to use the iFunBox program. The process consists of several simple steps:
- Download the iFunBox program from the Internet (no installation required, just save it in a convenient place).
- Connect the device to a PC or laptop and activate the program.
- On the left side of the program interface, select Camera, after which all images will appear in the program.
The Camera menu item allows you to display all existing photos on the screen
- To copy files to your computer, you need to right-click on the desired image and click Copy To PC, then select a location to save the file.
- To transfer photos to iPhone, click on Copy From PC in the main menu and select the necessary files.
Video: how to transfer photos from iPhone to computer
How to download files to iPhone from computer using apps
Also a quick way to transfer files. To do this, you need to download a special program to your computer – Dr.Fone. This utility is specifically designed for owners of Apple devices. You can perform not only the transfer, but also:
- Recovering documents that have been erased from your phone;
- Connect devices;
- Perform a backup;
- Restore the operating system;
- Unlock your smartphone;
- Speed up your gadget.
In general, there is a special application, namely dr. fone - iOS. It must be installed on your computer in advance so that there are no problems in the future. The menu is quite simple and clear. Every person who has basic technical skills will be able to transfer the data he needs.
Note! The application can synchronize not with all gadgets, but only with iOS above version 7.
The algorithm is very simple:
- To begin with, the user needs to install the program on the PC;
- Next, click on the item “Move from the main screen”;
- Connect your device;
- If the connection is successful, the application will report synchronization and automatically begin scanning;
- Select a specific folder on your device to transfer specific files. It could be music, photos or videos.
Thus, the user does not even have to worry that he will not be able to transfer files from the computer to the phone via a cable.
Unofficial methods
The above methods are not always convenient to use; in some cases it is easier to achieve the goal using available means.
Using social networks as a file sharing service
In order to use social networks as an exchanger, you just need to post the necessary photos on your page (not necessarily publicly, privacy settings will help hide information from unwanted eyes) . And after that, by logging into the social network from your device, download the necessary images to your phone or tablet.
How to copy files from computer to iPhone using cloud storage
On the Internet you can find a huge number of cloud services that copy data and transfer it further. Some users manage to transfer their entire media library to it because they buy additional space.
An example of such storage is Google Drive. In order to work with it, it is enough:
- Log in to your previously registered account. This can be done using a login and password;
- Now click on the “Create” item, which you can find in the upper left. A menu will open, in it we need to tap on download;
- We select those documents that first need to be transferred to disk. For Windows OS, click CTRL;
- Now the "Open" button appears. To start transferring images or files, select the files. We are waiting for the end;
- On your smartphone, you should launch the cloud storage, log in, select the necessary documents;
- When a user configures access to files, for example, sets access offline, he adds new functions to it. He can download it at any time. This could be music, photographs and much more.
Move to iOS is the official app from Apple.
To make life easier for users of their products, Apple has developed a special Move to iOS application that makes it easy and convenient to transfer files from Android to iPhone. If you have not yet managed to set up your new iPhone, then the first thing we recommend doing when activating it and launching it for the first time is to install the Move to iOS application.
If you have already set up your new smartphone and installed a lot of applications on it, you need to either use another method of transferring data or reset your iPhone. This can be done using the following sequence: “Settings”> “General”> “Reset”> “Erase all content and settings”.
Move to iOS allows you to transfer files from Android to iPhone using wireless Wi-Fi, so the first thing you need to do is make sure that Wi-Fi is also turned on on your Android device. Be sure to also connect both devices to a power source to ensure they don't turn off during the data transfer process.
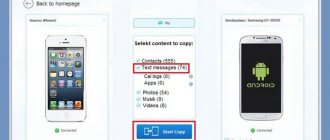
A brief description of the process for transferring files from Android to iPhone using Move to iOS:
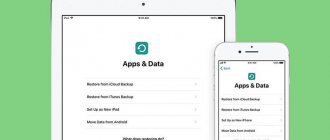
Step 1: On your iOS device, go to the Apps & Data menu, then select “transfer data from Android.”
Step 2. On your Android device, after installing Move to iOS, click the “Continue” button in this application, then “Agree”, and when the terms and conditions for using this program appear on the screen, click “Next”, and only then In the upper right corner of the screen you will see the “Find Code” button.
Step 3. On your iPhone, click “Continue”, then “Transfer from Android” and a ten-digit or six-digit code will appear on the screen.
Step 4: On your Android device, enter the code that appears on your iPhone. Wait until the Transfer Data screen appears, then select the content you want to move to your new device and click Next.
The duration of the transfer depends on the size of the content you want to transfer. Wait for the completed download icon to appear on your iPhone, then click “Done.”
How to transfer files from computer to iPhone using Windows
It turns out that the user can transfer data even using Windows. This is most often used for music or photos. To do this you will need standard Explorer:
- First step: connect the phone to the device itself;
- We allow computer access using the special “True” key;
- Go to “My Computer”. Find the connected device;
- After logging in, the user will have access to the DCIM folder. It stores photos, videos and other files. They can also be copied to a PC;
- We add to this folder all the documents that need to be transferred to the user using the “Add” button
All files will automatically appear on your phone.
SHAREit is a universal and convenient program for data transfer.
In addition to Move to iOS, there is another convenient application for transferring data from Android to iPhone. It's called SHAREit and it's a cross-platform tool for transferring files between different devices.
Everything is quite simple here:
interesting
The iPhone 14 series will receive a new 5G modem
The cost of the third generation iPhone SE has been revealed
Step 1: Download SHAREit on your Android and iPhone devices and then launch it on both smartphones.
Step 2: On Android, tap the Send button, then select the photos, videos, documents, and music you want to transfer and tap located by .
Step 3: Click “CONNECT TO iOS/WP” when the blue screen appears on your Android device. After this, you will see the name and password of the mobile hotspot.
Step 4: On your iPhone, connect to the created hotspot by clicking “Launch SHAREit” and selecting “Get.” Wait for the download and check all files for integrity!
How to Copy Files from a Mac Computer
The user can also copy files from a computer from the same company as the phone. To do this, use the Airdrop application:
- First, you need to open Finder on your computer. You can do this by tapping on the smiley face;
- Now select “Go” to display all available functions;
- Let's launch the application itself. Select "All". This feature allows you to detect your PC;
- We go into files on the iPhone, while tapping on the overview to open the corresponding control keyboard. Click “On my iPad”;
- Select files from the desired folder, upload them;
- Click on the AirDrop icon to show contacts and files. We go through authorization;
- We select the files and contacts needed for transfer in the system. After successful transfer, the user will receive a notification.
Which application to choose
Despite the similar principle of operation, all the programs reviewed differ from each other. This applies not only to ratings in the App Store, but also to functionality. A summary table will help you understand which application is right for you, which presents utilities that do not require a computer or prior configuration of a smartphone to interact with.
| Name | Type of data to be transferred | iOS version | Rating | Price |
| Photo Transfer WiFi | Photo and video | 8.0 | 4,6/5 | For free |
| File Transfer App | Multimedia | 9.0 | 4,9/5 | For free |
| AirDisk Pro | All files and formats | 9.0 | 4,1/5 | 149 RUR |
| Instashare Air Drop | All files and formats | 9.0 | 3,9/5 | For free |
| Sharable | All files and formats | 6.0 | 3,5/5 | For free |
The best application for transferring information from one iPhone to another is AirDisk Pro. The program supports all formats and is a full-fledged file manager. But AirDisk Pro has 2 drawbacks: the lack of a free version and a not very user-friendly interface.
As an alternative, you can consider Instashare Air Drop (for relatively new devices) or Sharable (for older iPhones). The rating also includes 2 more programs focused on exchanging multimedia files. They should only be considered if there is no need to worry about transferring notes, contacts and other data from iWorks. Please also pay attention to the article: how to transfer contacts from iPhone to iPhone, that it details all possible difficulties, which makes the transfer process much easier.
How to transfer files via mail and instant messengers
Many people don’t know, but even music can be transmitted using instant messengers. The user just needs to open the correspondence, add files from the computer and send. The most commonly used app is Telegram as it does not compress files. You can also add files from ICloud from there.
If you are working with personal gadgets, there is an “Images” section. All information will be available to messengers.
It is also convenient to transfer files via email. To transfer, you just need to activate mail on your PC, create a letter, enter your personal address, that is, send the file to yourself. All that remains is to open the desired file on the phone itself.
The inconvenience is that in messengers, there are format restrictions in mail. It's worth keeping an eye on.
What you need
▪ a computer on Windows 10 (I suspect that a couple of previous versions will do)
▪ any device running iOS or iPadOS, preferably with iOS 14 or later firmware
▪ local Wi-Fi network (a wired connection to a PC is also suitable if, as a result, this PC connects to the same local network with the iPhone or iPad).
That is, we take the iPhone in our hands, sit down at a computer with Windows - and off we go.
Search files
To access files, open the Files app and select the location of the file you want.
Save a local copy of a file
Files stored locally are found in the On [device] folder on the Places screen. To save files directly to your iPad, simply drag them into the On iPad folder. To save a file locally on your iPhone or iPod touch, follow these steps.
- Browse to the file you want to save to your device.
- Click Select > file name > Place.
- In the On [device] folder, select a folder, or click New Folder to create a new one.
- Click "Copy".
You can also long press on the file, then select the Move command and the folder where you want to copy the file.
In iOS 12 or earlier, tap the file you want and select Move. Then, in the On [device] folder, select Numbers, Keynote, or Pages and click Copy.
Move files from iCloud Drive
- Browse to the file you want to move.
- Click Select, then select a file.
- Click Post.
- In the On [device] folder, select a folder, or click New Folder to create a new one.
- Click Move.
You can also long press on the file, then select the Move command and the folder where you want to copy the file.
View files on other devices
Follow the steps for the appropriate device.
- On your Mac, choose Finder > iCloud Drive.
- On iCloud.com, go to the iCloud Drive app.
- On a PC running iCloud for Windows, go to File Explorer > iCloud Drive.