Hello everyone, and Bearded Man is with you! Just now I came across such an unpleasant problem - when installing an application through Google Play, an error with code 504 pops up. I spent half a day surfing the forums, and I still managed to solve this problem. An error occurs when updating or installing an application. Most often these are programs like istragram, vk, as well as system utilities Gmail, Photos and the Play Market itself.
First of all, turn your phone off and on again. The error may occur due to problems in temporary memory. Also try reconnecting to another Internet source (if possible) - be it Wi-Fi or mobile connection. The source itself can also cause a similar error. If this does not help, please read my solutions, I hope they will help you. I tried and collected all possible options from all forums. Go!
date and time
In the Play Market on Android, everything is the same as on a computer (who has ever encountered a similar problem in a browser). If you have an out-of-date time or date, the server to which the request is sent will deny you access. In “Settings” go to the “Date and Time” section (most often located in “System”). Make sure the date and time are up to date. It's best to use the network settings, but you can try entering this information manually.
Reasons for the error
Like most failures in the Android OS, error 504 has many causes. The main ones include:
- Automatic date and time settings failed. This usually happens when the time zone or date is not set correctly;
- Lack of connection or unstable Internet operation;
- Failure when updating the Play Market or the operating system itself;
- Incorrect data of the store, its services or a full cache in the system;
- Error in the operation of the external storage device (SD card). This could be either a technical failure of the card or a software failure;
- Insufficient memory in the internal storage of the device (section “Default installation”).
Clearing the cache and uninstalling the latest update
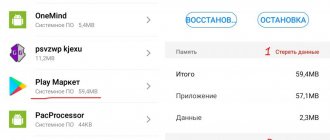
If the problem persists, and you still see the message “The application could not be installed,” then we will try to fix this error in a different way. In the settings, go to the “Applications” section, open the entire list there and find “Google Play Market”.
On some firmware, the “Clear cache” and “Uninstall update” button is located right here. In some you need to go to “Storage”.
First click “Clear cache”, then check the functionality. If this does not help, then we resort to “Clear storage”.
The same thing needs to be done with Google Play Services. If this does not help, then on the previous page, click on the three dots in the upper right corner of the screen and select “Uninstall updates.”
If this does not help, then again go to the list of all applications and click on the three dots, first try “Reset application settings”. If this does not help, then select “Show system processes”.
Find “Google Services Framework” and go there.
And we do all the same actions. First we try to “Stop” the process. If Google Play does not launch, then restart your phone. Next, go to “Storage”, first try “Clear cache”, and then delete the data.
Restoring from a copy
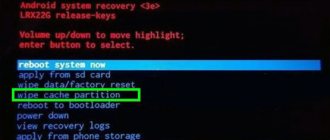
If error 504 appeared after the next Android OS update, then you should try rolling back to the previous stable version. To do this, you can use the built-in utility (if available), or you can do this using the Team Win Recovery Project tool. First, make a copy of the current OS version by going to the “Wipe” section and activating all partitions except the external memory card. After this, restore the previous version of the system by going to the “Restore” section. We wrote in more detail about working with the Recovery menu in this article: Fastboot Mode, what is it on Android, how to exit the mode. You can also read about a detailed reset to factory settings.
Uninstalling the application and reinstalling it
If an error occurs while updating an application, you can simply uninstall it and install it again. There are two ways to delete it. First - on the panel, press the program icon with your finger and drag it to the trash, after which we confirm the action. The second method is to find the desired program in the “Applications” section, go there and click on the “Delete” button.
Using a VPN
Using a VPN has shown good results in bypassing error 504 on Android when installing applications.
To do this you need:
- If the Play Market allows it, download and install a VPN program (for example, VPN) on your device.
- Launch the application, select an alternative country to Russia (for example, USA) and click on the connection option.
- Now try to download (update) the previously problematic program.
This can help get rid of the 504 error when installing applications on your Android gadget.
Removing unnecessary junk
The problem may occur when there is no longer enough memory space. Just like with a computer, all the programs you use store a ton of cache and garbage, cluttering up your memory and system. And as in the case of a PC, the CCleaner program will come to our aid - it is free, so you can safely use it.
Try installing it from Google Play, if this fails due to an error, then search for CCleaner.apk on the Internet using a browser. After installation, click “Quick Clean” and everything unnecessary will be removed. You can also force close all running programs - click on the “Optimize” button and then turn off active applications.
Increasing the amount of free space
For comfortable installation and operation of applications on Android without displaying error 504, it is recommended to have about 1 gigabyte of free space on both your smartphone and memory card. Free up space on your device by deleting unnecessary files. Restart your gadget and try downloading the desired program from Google Play again.
This is interesting: How to save photos to an Android memory card.
Deleting a Google Account
Very often this method is indicated as working, so I’m sharing it with you. In “Settings” we find the “Accounts” item and go there.
Find your Gmail account to which your phone is linked.
Before clicking the “Delete account” button, if I were you, I would remember the password for it, since we will reconnect it later. If you forgot it, you can remember it. Also go to “Account Synchronization” and see which sections of the phone are saved in the cloud.
The script takes a long time to process
Of course, it's best to lighten a heavy script. This way it will not load the server and cause an error. However, it is not always possible to replace it. In this case, you can increase the server wait time so that the entire script has time to be processed. By default, the maximum script execution time is 30 seconds. You can increase this time through PHP, Nginx and Apache settings.
PHP
You can change the request processing time in the max_execution_time in the php.ini file. To change this time:
- Open the php.ini file.
- Add the line:
max_execution_time = 60
Where 60 is the query execution time in seconds.
Nginx
If you are using Nginx, script processing time settings are made in the nginx.conf .
1. Go to the nginx.conf file. To do this, enter the command:
sudo nano /etc/nginx/nginx.conf
2. Enter the lines:
proxy_connect_timeout 600; proxy_send_timeout 600; proxy_read_timeout 600; send_timeout 600;
Where 600 is the script execution time in seconds.
3. Restart Nginx using the command:
service nginx reload
Note! If you change the request processing time in Nginx, we recommend increasing max_execution_time in php.ini. In the parameters, specify the same number of seconds as specified in nginx.conf.
Apache
If you are using Apache, you can increase the request processing time in the httpd.conf . For this:
1. Go to the httpd.conf file. 2. Enter:
# Timeout: The number of seconds before receives and sends time out. Timeout 600
Where 600 is the script execution time in seconds.
3. Save your changes and restart Apache.
DNS change
If there are any connection problems, especially with Google Play, it may be due to incorrect DNS. If you did not register them manually, then most often they are taken from the provider. Unfortunately, they cannot yet be registered in a mobile Internet connection, but they can be changed on Wi-Fi. Let's try to do this.
- Go to “Network and Internet” and find the “Wi-Fi” section. You can also open this item through the “Blind” menu, just hold your finger on the “WiFi” icon.
- Next, go to the “Settings” of your connection.
- We need to look at “Network Information” - click on the “Advanced” button.
- Remember the network settings: IP address, Gateway and subnet mask (you can even write them on a piece of paper so you don’t forget).
- After that, click on the pencil.
- To open additional configuration, click “Advanced” again and open “IP Settings”. Select "Custom" mode.
- Enter the IP, gateway and mask as in the previous settings. Set the prefix length to 24. But at the very end we need to set two DNSs - we use the official DNS from Google: 8.8.8.8.
- 8.8.4.4.
- Save the settings. You can try reconnecting to the wireless network.
Fixing error code 504 in Google Play Market
Unexpected errors when downloading and updating software sometimes disrupt the usual mode of using a device on the Android OS. For most of them, a solution has already been found in the process of studying the operating system, and effective instructions for eliminating them have been proposed. Error code 504 Play Market suffered the same fate.
Most often, the user does not need specific knowledge to solve this error. It is enough to follow the instructions that will be given in this article; only in especially severe cases will you have to turn to additional tools that expand the capabilities of your phone.
Not a certified device
From 2022, Google must issue certification to all smartphones and tablets. If there is no such certification, then problems may arise with the operation of all official applications and services. Go to “Google Play” and then click on the menu to expand it. Go to “Settings” and scroll down to the bottom to “Play Protect Certification”.
If the parameter “Device is not certified” is selected, then this is the problem. Of course Google doesn't say how to get certified, but there is a workaround:
- Download Device ID.
- Launch the program and copy the number “Google Service Framework (GSF)”.
- Go to the converter website and copy the GSF number into the “Hex number” line. After that, click on the “Convert” button.
- Now we go to the official certification website and paste our number copied from the “Decimal number” line, then click on the “Registration” button.
- We check the functionality and our certification - reboot the phone. If this does not help, then do the following - go to the “Settings” of the phone in the “Applications” section in the “Google Play Store”, click on “Storage” and then “Clear storage” - delete all data. We do the same with the Google Play Service.
Ways to solve the problem
There are three main ways to solve error 504: the standard method, restoring from a copy, or working with a memory card. It is recommended to try them in the same order as described in the article.
The standard method has an 80% probability of helping to solve the 504 error. Follow all the steps as indicated in the instructions below:
As you change various settings and data, be sure to back up your data. Also try to remember the initial position of all active elements, checkmarks, and sliders. This is much easier than later “rolling back” to factory settings and losing important data.


