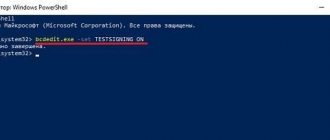
The program developers made sure that it was impossible to disable the antivirus on Windows 7 with just one simple action. But situations often arise when the user is forced to turn off the protection temporarily or permanently. Below we describe the main reasons for deactivating the firewall built into the OS and the installed anti-virus utility, as well as detailed guides on how to disable the firewall and anti-virus on the Windows 7 operating system, as well as the method for properly removing the anti-virus program.
Turn Windows 7 Defender on or off
Windows Defender is not a full-fledged antivirus program, so comparing its capabilities with such mastodons of computer protection software development as Avast, Kaspersky and others is incorrect. This OS component allows you to provide simple protection against viruses, but you can’t count on blocking and detecting any miner or a more serious threat to your computer’s security. Also, Defender may conflict with other antivirus software, which is why this service component has to be turned off.
Let's say you are satisfied with the work of this antivirus program, but because of some recently installed program or as a result of setting up the computer by another person, it turned out to be disabled. No problem! As was said earlier, instructions for resuming the work of the Defender will be indicated in this article.
conclusions
The easiest way is to simply disable this application and not think about whether to remove it from the system. In principle, this component takes up little space on the hard drive, and therefore its presence will not cause much harm. If you want to free up RAM and take the load off the processor, then simply turning it off is enough.
In case of critical lack of hard drive memory, you can easily remove Defender and the information in this article will help you.
Disable Windows Defender 7
You can stop Windows Defender by turning it off through the interface of the Defender program itself, stopping the service responsible for its operation, or simply removing it from the computer using a special program. The latter method will be especially useful if you have very little disk space and every megabyte of free disk space is valuable.
Method 1: Program settings
The easiest method to disable this component is in its settings.
- We need to get into the “Control Panel”. To do this, click on the “Start” button on the taskbar or on the button of the same name on the keyboard (the engraving on the “Windows” key matches the design of the “Start” key in Windows 7 or later versions of this OS). On the right side of this menu we find the button we need and click on it.
- If the “Category” view type is enabled in the “Control Panel” window, then we need to change the view type to “Small icons” or “Large icons”. This will make it easier to find the Windows Defender icon.
In the upper right corner of the content window there is a "View" button and the selected view is indicated. Click on the link and select one of the two viewing types that suit us.
- Find the “Windows Defender” item and click on it once. The icons in the Control Panel are arranged chaotically, so you will have to skim the list of programs located there yourself.
- In the Defender window that opens, find the “Programs” button on the top panel and click on it. Then click on the “Options” button.
- In this menu, click on the “Administrator” line, which is located at the very bottom of the left options panel. Then uncheck the “Use this program” option and click on the “Save” button, next to which a shield will be drawn. In Windows 7, a shield indicates actions that will be performed with administrator rights.
After disabling Defender, a window like this should appear.
Click “Close”. Done, Windows Defender 7 is disabled and should not bother you from now on.
Method 2: Disable the service
This method will allow you to disable Windows Defender not in its settings itself, but in the system configuration.
- Press the key combination “Win + R”, which will launch a program called “Run”. We need to enter the command written below into it and click “OK”.
msconfig - In the “System Configuration” window, go to the “Services” tab. Scroll down the list until you find the line “Windows Defender”. We uncheck the box in front of the name of the service we need, click “Apply”, and then “OK”.
- If you then receive a message from System Settings that offers a choice between restarting your computer right now or not rebooting at all, it is better to select “Exit without rebooting.” You can always restart your computer, but it is unlikely that you can recover data that was lost due to a sudden shutdown.
Why you might need to disable your antivirus software
Today, among the most popular antivirus programs are the following:
- Avast;
- AVG;
- Eset;
- Essential;
- Free Kaspersky;
- Microsoft Security Total.
Windows Defender in Control Panel
The main reasons for disabling one of these services temporarily or permanently are as follows:
- the need to download a program that is essentially not malicious, but the antivirus does not let it through. Such situations happen often. They are caused by incompatibility between the downloaded software and the computer defender;
- System Seven slows down due to the operation of Kaspersky or another antivirus. Such problems occur if Windows is to be reinstalled in the near future, or the user wants to download the game online at maximum speed;
- incompatibility of the antivirus and Windows 7 software. In this case, only disabling the program or reinstalling the system will help.
One of the options to disable the antivirus
Enabling Windows Defender 7
Now we will look at the methods to enable Windows Defender. In two of the three methods described below, we only need to check a box. We will do this in Defender settings, system configuration and through the Administration program.
Method 1: Program settings
This method repeats almost all the instructions for disabling it through the Defender settings, the only difference is that Defender itself will prompt us to enable it as soon as it is launched.
We repeat the instructions “Method 1: Program settings” from steps 1 to 3. A message from Windows Defender will appear, notifying us that it is disabled. Click on the active link.
After some time, the main antivirus window will open, displaying data about the last scan. This means that the antivirus has turned on and is completely ready to work.
Windows Defender Basics
Defender takes over the functions of the antivirus in the event of its absence. In practice, the application in question guarantees protection only from the so-called. "Trojans". To combat other malicious products, you need to install third-party antiviruses. The developer of the defender additionally notifies the owner about this.
The product arsenal is quite rich. Defender allows you to do the following:
• monitor autorun;
• control security settings;
• monitor applications that are activated with IE;
• control browser settings;
• regulate the operation of various kinds of files and add-ons that start with the browser;
• monitor the functioning of drivers and services;
• regulate the actions of installed and already installed programs;
• monitor files and add-ons for registering and launching various software products;
• control the order of updating OS modules.
The list of functions may vary depending on the version of Defender and Windows itself.
What it is?
Reference. Windows Defender is software developed by Microsoft in 2005 and built into all versions of Windows starting with Windows XP. Its purpose is to protect the operating system from malicious spyware.
This type of malware sneaks onto a computer in order to copy the user’s personal information and send it to third parties.
Windows Defender should monitor the activity of such programs and quarantine them, but this can often only be a nuisance for an experienced user. On the other hand, for inexperienced users, Windows Defender can be a good safety net when surfing the Internet.
1In what cases may it be necessary to disable the antivirus?
The most common reasons for disabling personal device protection are:
- The need to run a resource-intensive software product with low PC power (for example, a graphics or video editor).
- Playing “heavy” computer games.
- Incompatibility of some anti-virus resources with the firewall.
How to enable Operating System Defender?
In 7 Windows
If for some reason Windows Defender is disabled on your PC, and you want to start it, you should perform the following operations:
- Open the Start menu by clicking on the icon in the lower left corner of the screen or using the Win key.
- In the “Start” menu we find the “Services” utility. Let's launch it.
- In the window that opens, select “Windows Defender” from the list and launch it by double-clicking.
- In the Windows Defender settings window, in the “Startup type” line, select “Automatic (Delayed Start)”.
- Find and click the “Run” button.
Thanks to these steps, you will not only launch the utility at once, but also add it to the list of applications for automatic launch. If the utility does not start, before it can start working, you should check your computer for viruses, as they may block Windows Defender from starting.
- What is Windows Defender and how to disable Defender in Windows 7, 8/8.1 and 10?
In 10 Windows
The utility can be launched in version 10 of Windows in the same way as in version 7. The method using the “Options” menu is similar in effectiveness. To enable Defender this way:
- Bring up the Start menu.
- Select the Options menu.
- Launch the "Update and Security" section.
- Using the panel on the left, go to the Windows Defender section.
- For the most effective operation of the program, you should run all 3 options.
Attention! When you enable Windows Defender, you should remember that if you have programs on your computer for illegally gaining access to licensed software (cracks, keygens), they will be quarantined and subsequently deleted.
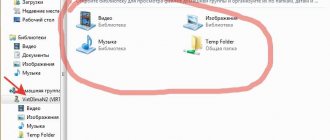
Looking for installed protection
One of the most effective ways, which does not involve an endless search among the installed software of the same program, is viewing through the “Control Panel”. In Windows, it is possible to find out the protection installed on your computer, therefore, it is more effective to use it. The exception is incorrectly installed applications, as they may not appear in the list.
This example is shown on Windows 10, so some steps may not be the same for other OS versions.
You can make it easier by viewing the list of programs in the tray. When you hover your mouse over the icons, you will be shown the name of the running program.
This search is not suitable for little-known antivirus programs or for users who do not know basic antivirus programs. And besides, the protection may not be visible in the tray, so the viewing method through the “Control Panel” is the most reliable.
Well, if no antivirus is found, then you can download any one to suit your taste.
Source
How to disable?
In OS version 7
Disabling Defender is a much more difficult task than enabling it. This is due to security reasons, so that malware cannot disable the utility for the user.
To disable, you must do the following:
- Call up the “Start” menu and in the search bar find and launch “Control Panel”.
- In the “Control Panel” we find and launch the “Windows Defender” item.
- In the window that opens, select “Programs” and then “Options”.
- In the menu on the left side, click on the line “Real-time protection”. Uncheck the corresponding box.
- Next, select “Administrator” in the menu and uncheck the “Use this program” option.
- Click the “Save” button. The system will notify you that the protection has been removed. We ignore the message.
Important! The above steps are necessary to disable the utility one-time.
In order to remove it from automatic launch, additional steps must be taken:
- Open the “Run” window. This can be done through “Start” or by pressing the Win+R keys.
- In the text field of the window that opens, enter the command “services.msc” and click “OK”. This action opens the Services menu.
- Find the “Windows Defender” item in the list and open it.
- In the window that opens, find the “Startup type” item and change its value to “Disabled”.
- In order not to receive notifications that the program is not working, open the “Support Center”. In the window, find and click on the item “Do not receive any more messages on the topic: “about protection against spyware and other malicious code.”
In OS version 10
In version 10 of the operating system, disabling Defender was made even more difficult. A one-time shutdown is performed as follows:
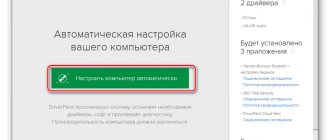
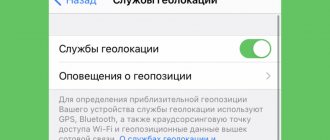
- On the right side of the control panel we find an icon in the shape of a shield. It can be located either directly on the panel or in a drop-down menu when you click on the arrow. We click on it.
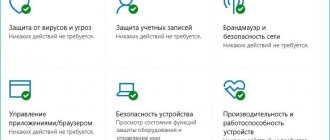
- In the window that opens, select “Protection against viruses and threats” and then click on the hyperlink “Protection settings against viruses and other threats.”
- We switch all the switches available in the menu to the off position.
- In order not to receive notifications about the disabled Defender, click on the “Close” button next to the exclamation mark and the inscription “Cloud protection is disabled. The device may be vulnerable."
Important! The steps described above disable Defender until the next computer restart.
To disable it permanently, you need to take additional steps:
- Launch the “Run” menu through “Start” or with the Win+R key combination.
- In the text field of the window that opens, enter the command “gpedit.msc” and click “OK”. This action will open the Local Group Policy Editor service.
- In the navigation menu on the left, open and expand the tree in the given sequence: “Computer Configuration”, “Administrative Templates”, “Windows Components”, “Windows Defender Antivirus”.
- When you click on the last item in the menu on the right, a list will appear in which you need to find the item “Turn off Windows Defender Antivirus.”
- Double-click to open the specified item, and then in the window that opens, change the switch value to the “Enabled” option.
- We apply all changes.
Attention! If you are using the Home version of the operating system, the second part of the instructions cannot be completed. This is due to the fact that this version does not have a “Local Group Policy Editor”.
In this case, you can use another method:
- Launch the “Run” menu through “Start” or with the Win+R key combination.
- Enter the command “regedit” into the text field. After completing this action, you will open the “Registry Editor”.
- In the navigation menu, expand the tree in the following sequence: “Computer”, “HKEY_LOCAL_MACHINE”, “SOFTWARE”, “Policies”, “Microsoft”, “Windows Defender”.
- After clicking on the last item from the list in the menu on the right, click with the right mouse button. Select “New”, “DWORD Value (32 bits)”. Open the created parameter with the left mouse button.
- We indicate the name of the parameter as “DisableAntiSpyware”, and in the value item we set the number 1.
- Apply all changes and restart the computer.
Disabling the antivirus
Disabling an antivirus is a fairly simple task, because these actions only take a few clicks. But, nevertheless, each product has its own shutdown features.
McAfee
McAfee protection is very reliable, but there are times when it needs to be disabled for certain reasons. This is not done in one step, because then viruses that could penetrate the system would turn off the antivirus without unnecessary noise.
- Go to the "Virus and spyware protection" section.
- Now, in the “Real-time check” section, turn off the application. In the new window, you can even select after how many minutes the antivirus will turn off.
- Confirm with the “Done” button. Turn off other components in the same way.
360 Total Security
The advanced antivirus 360 Total Security has many useful features in addition to protection against virus threats. Also, it has flexible settings that you can choose to suit your needs. Another advantage of 360 Total Security is that you don’t have to disable individual components like in McAfee, but can immediately resolve the issue.
- Click on the protection icon in the antivirus main menu.
- Go to settings and find the line “Disable protection”.
Kaspersky Anti-Virus
Kaspersky Anti-Virus is one of the popular and powerful computer protectors, which, after being turned off, can after some time remind the user that it is time to turn it on. This feature is designed to ensure that the user does not forget to ensure the security of the system and his personal files.
- Go to "Settings" - "General".
- Move the slider in the opposite direction in the “Protection” item.
Avira
The well-known Avira antivirus is one of the most reliable programs that will always protect your device from viruses. To disable this software, you will need to go through a simple procedure.
- Go to the main menu of Avira.
- Switch the slider under “Real-Time Protection”.
Dr.Web
Well-known to all users, Dr.Web, which has a rather nice interface, requires disabling each component separately. Of course, this is not done in the same way as in McAfee or Avira, because all protection modules can be found in one place and there are quite a lot of them.
- Go to Dr.Web and click on the lock icon.
- Go to "Protection Components" and disable the required objects.
How to recover?
Restoring a manually disabled Defender is performed in the reverse order in accordance with the instructions for disabling it. When disabling through the “Registry Editor”, you need to open the directory where the parameter was created, and then delete it.
If the disabling was carried out through the “Local Group Policy Editor”, you should follow the above-mentioned branch and switch the switch to the “Disabled” mode. When choosing to disable it through the “Services” menu, in the “Startup type” item, select “Enabled” .
You don’t have to carry out the actions from the first shutdown point, since after you restart the computer, Defender will turn on automatically.
What to do if the software product is not updated?
Windows Defender update problems can occur for a variety of reasons. Unfortunately, they are often very individual and can only be solved by professionals, but there are several universal solutions.
- First of all, Windows Defender may conflict with other antiviruses. Try disabling them, or ideally removing them.
- Another reason could be an error in writing some files. To correct the error, you should delete the C:$WINDOWS.~BT folder, as well as clear the contents of the C:WindowsSoftwareDistribution folder, and then try the update again.
- If none of the methods helps, you should refer to the chapter “How to install Windows Defender?”. When installed over an existing program, it will automatically update to the latest version.
Where is Defender quarantine located in the operating system?
Attention. The utility may consider some files on your computer dangerous and quarantine them.
To find out the list of files placed there and, if necessary, restore them from quarantine, use this method:
- Through the “Start” menu, open “Settings”, where we select “Update and Security”.
- In the menu on the left, select “Windows Defender” and click on the link “Open Windows Defender Security Center.”
- Select “Virus and Threat Protection” and follow the “Scan Log” link.
- By clicking on the link “View the full magazine” we open the full list.
- To restore the selected file, select the “Show details” link and click on the “Restore” button.
The “Delete All” button does not delete files from quarantine, but erases them from the computer. Be careful.
Windows Defender is far from the most effective anti-malware tool. His responsibilities include only fighting Trojan programs; he may not notice many other types of viruses. Whether to use it or not is a personal decision for each user.
Hello, friends! While I was writing about Microsoft Security Essentials, I came across Windows Defender 7. I realized that I didn’t know anything about it and decided to write an article to make it a little clearer for myself why Windows Defender 7 is needed and when it is advisable to use it.
Search for antivirus installed on your computer
An active user needs an antivirus, because it is not always possible to keep track of the processes occurring in the system on your own.
And they can be different, since even by accidentally downloading just one malicious file, you can seriously “infect” your computer. Malware can have many goals, but first of all, they aim to get into the user's system and execute their malicious code. Information about the installed antivirus can be useful in various cases. For example, when a person buys a computer or laptop, he can use the services of setting up and installing the system from other people. When he gets home, he may wonder what kind of protection he has installed. Situations are different, but there is a simple and effective way to find out the installed antivirus.
How to enable and disable
When no antivirus is installed in Windows 7, Windows Defender starts working. The latter only protects against spyware. That is, from the Trojans. You need to install something additional to prevent viruses. Windows reminds you of this through Action Center
You can launch and see if Defender is working by searching in the Start menu
The main window of Windows Defender 7 is shown in the figure below.
If Windows Defender does not start, you may need to manually start the service of the same name. Also, by searching in the Start menu, launch the “Services” utility.
Find the Windows Defender and double-click on it. In the Startup type , select Automatic (delayed startup) and click the “ Run ”
After this, we should launch Windows Defender without any problems. If the service, for some reason, failed to start, then I would check the computer for viruses with two different utilities (for example, Dr.Web Cureit and Kaspersky). Then I would check for Trojans using MBAM. I rebooted and tried to start the service. If the result is negative, then restore the system files. If the result is still negative, then I would think about reinstalling the operating system.
Hopefully, getting Windows Defender up and running will be easier.
How to disable Windows Defender
If you install Microsoft Security Essentials, the defender disables itself.
Moreover, if you click on the link “click here...” you will get an error
Trying to start the service manually will also fail.
That is, installed Microsoft Security Essentials completely disables the defender. Perhaps antiviruses from other manufacturers do the same.
If you do not have an antivirus installed and you want to “conduct smuggling,” then you can disable the defender by stopping the service of the same name. In this case, the main Windows Defender window will look like this:
You can disable Windows Defender 7 in the settings. Click on Programs and Options
Select the Administrator and uncheck Use this program . Click Save and Windows Defender will be disabled.
This is how you can enable or disable Windows Defender 7.
How to enable defender through the registry
Valentina shared this method in the comments to this article. Thank you, Valentina.
- Go to the registry branch: HKEY_LOCAL_MACHINESoftwarePoliciesMicrosoftWindows Defender to the DisableAntiSpyware key, and change the value (1) to (0).
- We restart the computer and rejoice, Windows Defender is working.
When should you use Microsoft Defender Offline?
Run Microsoft Defender Offline if:
Windows Security (Windows Defender Security Center in previous versions of Windows) detects rootkits or hard-to-remove malware on your computer and alerts you to run Microsoft Defender Offline. You may see a message indicating that malware has been detected on your device, or Windows Security may display a message indicating that additional cleaning is required.
You suspect there is malware lurking on your computer, but your security software doesn't detect anything. In this case, you can run a Microsoft Defender Offline scan of your computer by going to Settings in the Windows Security menu. To do this, follow these steps:
On the Virus & threat protection screen, do one of the following:
In the latest version of Windows 10: Under Current threats, select Scan options.
In previous versions of Windows: In the Threat History area, select Run new advanced scan.
Select Microsoft Defender Offline Scan and then Scan Now.
You will be prompted to exit Windows. After this, the computer should restart. Microsoft Defender Offline will load and perform a quick scan of your computer in the recovery environment. Once the scan is complete (usually taking about 15 minutes), the computer will automatically restart.
Before using Microsoft Defender Offline, save any open files and close all applications and programs.
You typically need administrator rights on the computer on which you plan to run Microsoft Defender Standalone.
If you encounter a fatal blue screen system error during the offline scan, force a restart and try running the Microsoft Defender Offline scan again. If the blue screen error persists, contact Microsoft Support.
Setting up and checking your computer
Setting up Windows Defender 7
The settings are almost the same as in Microsoft Security Essentials. By default, the defender performs a quick scan every day at 02:00. The schedule can be configured or disabled completely in the Automatic check . You can get to this section through Programs > Options
I find it helpful to check the "Check for updated definitions before checking" checkbox. In this case, you will always have up-to-date spyware databases or definitions.
In the Actions section, by default I set “Delete” for the High “Critical” danger level. There is most likely a typo in the Russian version.
As I understand it, if you leave “Recommended action based on definitions”, then Windows Defender 7 will work according to the program specified by the developers and received with definitions.
In the " Real-time protection " section you can disable this protection. It seems to me that in this case, Windows Defender will not consume resources at all, since it will stop monitoring your system.
This function can be used, again, for “smuggling contraband” or to reduce the load on the computer. It will be relevant if the system is weak (an old netbook for example).
Real-time protection can be partially disabled. For example, disable scanning of downloaded files and attachments (relevant if you need to upload an image of n-gigabytes). You can only disable scanning of programs running on your computer. In this case, you can only rely on the browser (Google Chrome, for example, sometimes blocks the downloading of potentially dangerous files), a firewall, also known as a firewall, the Windows update installation system, which closes many security holes, and UAC.
Everything seems to be clear with excluded files, folders and file types. If the defender mistakenly reacts to a file that is known to be safe, then you can add it to the exceptions.
On the Details tab, just like in Microsoft Security Essentials, I check the box to scan USB devices so that the defender scans connected flash drives, external hard drives and other storage devices.
In the Administrator , you can turn off the defender completely and allow the log to be shown to all users. If you have multiple users using your computer, you can allow them to see what Windows Defender 7 has detected.
Everything is done with the settings.
Windows 7 Defender Update
If you want, for example, to conduct a full scan of your computer, then it is advisable to check for updates before doing so. You can do this by clicking on the Down Arrow next to the help icon and selecting Check for updates
Magazine
In the Log , you can view what the defender did with the detected objects.
There are links here to view Allowed objects and objects in Quarantine.
Microsoft SpyNet
In the Journal section you can join the Microsoft SpyNet community. That is, if unknown spyware is running on your computer and you are connected to Microsoft SpyNet, then the information from your computer will be sent to Microsoft. There they will be processed and the “Antidote” will be found. This “antidote” with new definitions will then be downloaded into Windows 7 Defender on all computers in the world and this spyware will be neutralized.
You can join as a regular member or as an experienced member . In the second case, more data will be transferred from your computer and, as I understand it, the efficiency of finding an antidote will become higher.
You can also join the Microsoft SpyNet community in the “Programs” section
I have chosen to join as an experienced member or as an advanced member.
Checking your computer
It is advisable to update before performing the scan. To perform a Quick check, just click the Check . If the computer begins to work unstably, then it is advisable to conduct a Full scan. You can launch it by opening the menu to the right of the Check button.
Custom Scan is used to scan individual folders or external devices. Click Select to select individual drives or directories (folders) and then Check Now
Everything about settings and use.
Main reasons for deactivating security software
Before disabling the antivirus, it is advisable to determine the extent to which this action is necessary and the adequacy of the reasons to leave the PC without protection.
When developing malicious and various spyware applications, the same programming language with similar protocols is used as in some programs that are safe and useful to the computer owner. Therefore, antivirus utilities often classify even useful software as viruses. There are no absolutely perfect antivirus programs that never make mistakes. Some users who use various “Cracks” (crack.exe) and decryptors of licensed programs (KeyGen.exe) often have to protect installed applications from known safe sources from anti-virus utilities.
It should also be noted that some antivirus applications place a significant load on system resources, especially if you have a low-power computer. Usually, in order to be able to work in a resource-intensive program, for example, graphic or video editors, it is necessary to first disable anti-virus software. Computer game lovers usually deactivate power-hungry software before playing their favorite game without pauses or stuttering.
There are also problems with the incompatibility of some antivirus programs with the firewall built into the Seven, when you have to change the software or decide how to disable the antivirus.
For people who have analyzed the load level, for example, with the anti-virus application from Kaspersky, it is far from a secret that this effective utility for security against malicious content heavily loads the PC and often does not allow you to work comfortably even in simple programs.