Each MacBook from Apple has an individual Apple ID, which theoretically belongs to one user and allows him to access the services of the MacOS operating system (iTunes, iCloud, App Store).
However, there are situations when a MacBook can be sold to another user or transferred for use to someone else for a while. In this case, a logical question arises: how to unlink a MacBook from Apple ID .
What else can you do?
If you encounter a personalization error when restoring macOS as a fresh copy, you'll have to use Apple Configurator to resolve the issue. To do this, you may need the following devices and tools to solve the problem:
- Additional Mac running macOS Catalina 10.15.6 or later
- Apple Configurator 2 installed on secondary Mac
- USB-C to USB-C charging cable
- USB-A to USB-C cable
Apple has carefully explained what you may need to do to erase and reset your M1 Mac if the firmware recovery process is unsuccessful. You can check out the Apple Support page for a detailed step-by-step guide on what to do to restore your Mac using an additional MacBook or any other Mac device. Keep in mind that this method requires you to establish a physical connection between your M1 Mac and the secondary Mac device.
Was the above guide helpful in erasing and factory resetting your Mac?
CONNECTED WITH
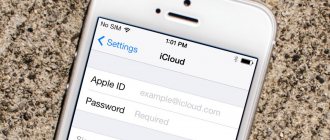
I can't change my iCloud account because I forgot my password. How to return?
If you were unable to change your iCloud account because you forgot the password that you currently activated on your device, what you can do to solve this problem is to reset the password .
While this is true, the instructions for completing this process vary depending on the type of security you use for your Apple ID. . Typically, Apple users opt for two-factor authentication and the procedure for this depends on whether you are using an iPhone, iPad or iPod Touch or a Mac computer.
To restore it to iPhone, iPad or iPod Touch
“UPDATE ✅ Do you need to change or change your iCloud email address or Apple ID but don't know how? ⭐ LOG IN HERE ⭐ and find out how to do it ✅ EASY and FAST ✅ »
It is important to note that this protection method allows you to recover the password of any trusted iOS device using a key or activated code.
The step-by-step instructions for one of these devices are extremely simple and quick and are based on:
- First of all, you need to make sure that your device has iOS 10 or later for the trick to work perfectly .
- Once detected on your device, go to the Settings .
- Later, tap "[Your Name]" and tap " Password & Security" .
- In this section, click on » Change Password And follow the instructions below to update your password and that's it.
If you are unable to complete the last step successfully, you may not have successfully signed in to iCloud .report this ad
To resolve the above issue, enter " Settings " and click " Sign into [Your Device] ".
After that, click on the option “Don’t have an Apple ID or have you forgotten it?” »And follow the instructions on the screen.
Si device runs iOS 10.2 or earlier , you should click on “ iCloud ” and now click “Forgot your Apple ID or password? and finally follow the instructions.
What problems may arise
All transactions with your Apple account require authorization. You need to clearly know your login, password, and answers to security questions when identifying a user. It is possible to restore your credentials, but only if you are using a personal device.
Before purchasing a smartphone, tablet or laptop in the secondary market, you should require unlinking from Apple ID and ICloud in the presence of the new owner.
There are services from the company that allow you to check the status of a product by identification number. If you do not know the password, no service center will be able to help.
In conclusion, I would like to add that the security measures taken by Apple are aimed at protecting the user’s personal and payment data. This is a guarantee of the safety of money, personal correspondence and the device itself. A stolen Macbook or iPhone cannot be used or sold by an attacker.
Change payment methods
Before you unlink your card from your Apple ID, you can get an electronic card that is not linked to your salary account.
Having completely removed the main card, it is recommended to leave the virtual one as a means of payment.
When installing a new payment card, repeat all the above steps, change the bank card, and save its details.
How to unlink iPad from Apple ID
Unlinking an iPad from an Apple ID occurs through the settings menu.
- Open settings and launch the iCloud application.
- At the bottom of the menu, click “Log Out”.
- Confirm data deletion.
- Enter your Apple ID password.
After completing all the steps, the device will be deleted from your account and the tablet search function will be disabled. If desired, you can reset to factory settings, resulting in a clean product.
Apple ID - login to your personal account
How to unlink Macbook from Apple ID
To unlink an Apple laptop from your Apple account, you must:
- Log in to the iTunes application installed on your computer.
- Select the “ View Account ” section and log in by entering your username and password.
- Find the item “ Manage devices ” and open the list of all available ones.
- To the right of the icon of the desired MacBook, click the “Delete” button.
- In the dialog box that opens, confirm the action by clicking “Done.”
- In the “ Accounts ” section, click on the “Authorization” and in the drop-down menu “ Remove authorization on this computer ”.
The process of unlinking from your account can be considered complete.
How to create a backup on Mac
Before performing a full factory reset, be sure to back up all your data. This way you can save all the valuable files that may be stored on your device. It is preferable to use an external SSD for these purposes.
Most likely, while following the instructions described above, the Mac itself will prompt you to carry out this procedure, but we will still remind you of the algorithm:
- Connect your external hard drive to your Mac. It is important that the storage capacity is no less than the built-in SSD.
- Open System Preferences, then Time Machine.
- Click Select system drive.
- After that, select your hard drive.
- The system will prompt you to format it. Agree and click the Erase button.
- After this, macOS will begin backing up your data.
Measure twice, back up once.
Subscribe to us on Yandex.Zen, where you will find a lot of useful information from the world of mobile technologies.
Is the erase and restore process the same as on Intel-based Macs?
No. Unlike Intel-based Macs, Apple's M1-based Macs will require a different method to access the macOS recovery tool. On earlier versions of Mac, you could get to the macOS recovery screen by simply pressing and holding the Command (⌘) and R keys after turning on the system.
Using the same set of keys on a new MacBook won't launch the macOS Recovery Tool because Apple has changed how it's accessed on new M1-based Macs. The below guide will help you better understand how you can erase and restore Apple M1 Mac easily.
Why you need to erase your data before returning your Mac
You can factory reset your MacBook or any Mac device to safely erase all the data inside it before moving on to the next device. This way, you can be sure that your data will not fall into the hands of the wrong person or be misused by anyone. Apart from this, there are many reasons why you might want to erase data on your Mac:
- To reset user data before selling or trading on your Mac/MacBook
- To remove unwanted software that is otherwise impossible to remove
- Make your Mac faster with a full update
Why unlink your card and devices from Apple ID
Bank cards have an expiration date. By default, when the period of its activity ends, it is impossible to write off funds from it. Apple, using its resources and some unknown levers, was able to circumvent this problem, and banks are releasing data from newly issued cards. If the user has subscriptions to paid services, then the company will be able to write off money forever. The solution is not to link real payment cards to any accounts, especially Macintosh ones. If this happens, then you need to untie them.
How to create a new Apple ID account How to disable two-factor authentication in Apple ID
You may need to unpin your device for a variety of reasons. The most common is a change of owner. When buying a phone, tablet or laptop with the Apple logo, you need to make sure that the gadget is unlinked from the account of the previous owner. Otherwise, its use will be limited, and the previous owner will be able to remotely disable it at any time, turning it into a useless brick.
When purchasing a used Apple device, the previous owner is required to disable device detection in the presence of the buyer.
How to Erase and Restore M1 Mac Before Returning It
You can reset your computer-powered Apple Silicon Mac to factory settings without additional tools. To begin the erase and recovery process, you can turn on your Mac by pressing the power button. Once turned on, press and hold the Power button until the Startup options appear.
On this screen, select "Options" (the one marked with a gear icon) and then click the "Continue" button.
Once your Mac boots into macOS Recovery, you'll need to select an administrator account from the list of options and then enter a password to gain access to delete user data.
You should now be able to see the Utilities window in MacOS Recovery. Here, select "Disk Utility" and then click the "Continue" button below.
On the Disk Utility screen, wait for the drives to load, and then select the "Macintosh HD" drive in the left sidebar.
On the right side of this screen, click the Erase button at the top. When the Erase Macintosh HD dialog box appears, click Erase Volume Group. This is a necessary step as now all the data on your Mac will be deleted and the recovery tool will create a new volume as “Macintosh HD”.
To complete the erasing process, click Finish and then close Disk Utility by pressing the Command (⌘) and Q keys on your keyboard or choosing Disk Utility > Quit Disk Utility from the menu bar at the top.
You can now install a new copy of macOS Big Sur by selecting Reinstall macOS Big Sur from the Utilities window and then clicking Continue.
You can follow the on-screen instructions to complete the installation process, click Continue, and then agree to Apple's terms of use for the software by clicking Agree.
You'll be asked to select the drive where you want to install your new copy of macOS. Select "Macintosh HD" as your option and click Continue.
macOS Recovery will begin installing a new copy of macOS Big Sur on your MacBook or Mac device. Your Mac device will restart several times, so wait a while before the installation is complete.
Once the installation is complete, the installation assistant will appear when you boot your Mac. If you decide to give away your Mac, you may not want to enter your details and sign in using your credentials on that system. So, you will need to exit the Setup Assistant by pressing Command+Q on your keyboard and then click Shut Down so that it is ready for the next user to use.