Almost every modern laptop is equipped with a built-in microphone, so for comfortable communication in programs with voice calls and for voice recording, you do not need to buy additional equipment.
However, quite often a problem arises when it is impossible to use this advantage. Simply put, the built-in microphone on the laptop stops working. What to do in such a situation? Why doesn't the microphone work on my laptop or PC? Is this problem a consequence of a serious breakdown? Or is it possible to fix everything without having special knowledge? More details in our review.
The main reasons for problems with the microphone on a laptop
In many cases, you can fix a problem with a microphone or headset yourself.
Any equipment is subject to software and hardware malfunctions, but this is not always a reason to contact a service center or dispose of the device. Many errors can be eliminated with your own hands without much effort.
Most often, problems with recording equipment occur for the following reasons:
- Lack of necessary drivers and software.
- Software glitches in the operation of the integrated microphone.
- Incorrect settings.
- Lack of device permissions in individual programs.
- Component damage.
Additionally
If the previous options did not help, use a selection of tips that may also help you.
Reconnect and test on another PC or device
If the microphone is detected but does not work in Windows 10, the connection may be incorrect. There is always a chance that the cable is not fully inserted into the microphone jack or that the jack itself no longer works.
To make sure the microphone is working correctly, check it on other devices, if we are talking about a headset or a separate microphone (not built-in). The connector is checked in the same way.
Inplace Upgrade System Update
Finally, if all of the above methods do not help, you can try updating the system without losing data - this is called Inplace Upgrade.
To perform Inplace Upgrade, download the Media Creation Tools utility from the official website (https://www.microsoft.com/ru-ru/software-download/windows10) and run it.
After that, select “Update this computer now” - after this, the download and subsequent update of system components will begin. This process takes from 15 minutes to a couple of hours, it all depends on the performance of the computer.
In this short article, we tried to talk about possible solutions to the problem when an application or system does not see the microphone in headphones or a headset in Windows 10. We hope that this information was useful to you.
Ways to solve the problem on a laptop
For each problem, an individual solution method is selected. So, if the errors are caused by the lack of suitable drivers, you need to find and download a compatible package on the Internet, indicating the exact model of your laptop or sound card.
In case of mechanical failure, you will need to disassemble the laptop case and check the condition of the module. If the gadget does not see the external microphone or it no longer appears after reinstalling Windows 7, you should roll back the previous hardware configuration, check the correct connection and the integrity of the plug.
Checking application permissions
In the settings you can add or disable applications that use recording.
Often, failures in the operation of sound recording equipment occur due to the lack of permissions granted for individual programs. The problem is resolved by changing the privacy settings. This is done in the following way:
- Open the “Settings” section.
- In the “Privacy” area, select “Microphone”.
- Proceed to setting up access to the device.
- If the option is enabled, disable it and re-enable it.
To check if the problems have disappeared, you need to restart the system.
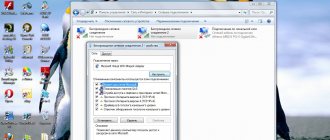
Checking with built-in Windows tools
To evaluate the performance of the microphone, you must follow these instructions:
- Right-click on the speaker icon on the taskbar (lower right corner) and select settings.
- In the menu that opens, find the “Recording Devices” tab.
- Go to the “Recording” section and view the list of available devices for entering information into PC memory. There should be information about the connected microphone and a green circle with a check mark indicating the current operating status. If you double-tap the component icon, you can see additional settings, such as adjusting the volume level and input gain.
- To check the operating properties of the equipment, you will need to go to the “Security” category through “Control Panel” or “Windows Settings”.
You can also evaluate the health of a component using the built-in audio recording tool. Try to save a test sample to check the level and quality of the incoming signal.
View programs that use a microphone
If any software is using your microphone, a corresponding icon will be displayed in the system tray. When the OS light theme is activated, it is black, and when the OS dark theme is activated, it is white.
You need to hover your mouse over this icon and see information about the application connected to the recording device. If the icon is missing, you should open the menu of hidden icons by clicking on the arrow in the lower right corner on the taskbar. If desired, you can move the symbol to the tray for easy searching in the future.
There are 2 lists in this menu - one is responsible for applications from the Microsoft store, and the second is for other installed programs on your PC. Be sure to review both sections.
Diagnostics for viruses
The Windows system often experiences errors and crashes caused by viruses and malicious files. They may affect the operation of important components, including the built-in microphone. To restore the previous state, you need to use an antivirus tool or perform a deep clean of disk space from unwanted software, and then reconfigure the drivers manually or automatically.
To avoid such troubles in the future, you should periodically clean your laptop from viruses and scan the system.
Built-in troubleshooting tools
Windows 7 has a standard utility for dealing with system failures. It's called the Windows Troubleshooter. In some cases, the tool effectively solves the problem with the microphone not working, especially if it is caused by software errors.
When running diagnostics in Windows, you need to be connected to the Internet.
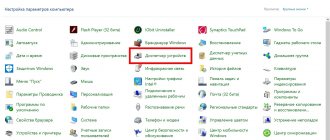
To open the tool, you need to go to the Control Panel or Settings of your computer. To do this, you can use the combination Windows + I, and then find the “Update and Security” section on the main page.
In the window that opens, there will be a “Troubleshooting” item on the left. Then on the right side of the screen you can see the “Record Audio” button. You need to click on it and select the “Run the troubleshooter” option and follow the instructions of the operating system.
System rollback
Sometimes, to restore normal operation of important equipment, you have to roll back Windows 7. This is quite simple to do:
- Open the Start bar on your laptop."
- Enter the word “Recovery” in the search bar.
- From the list provided, select the “System Restore” option.
It is possible to change parameters by returning the previous system configuration.
Then the active restore points will be displayed in the window that opens. Select the appropriate option by date and start the process. The changes will take effect after the next reboot of the device.
Installing the correct drivers for your sound card
The most common reasons why the built-in microphone may turn off or malfunction is the lack of necessary software. In most cases, the problem is accompanied by problems with the speakers.
Since the sound recording device is integrated into the laptop, special drivers are needed to ensure its normal operation. Before downloading the latest package, you must open the “Device Manager” and review the information provided in the “Audio inputs and outputs” or “Sound, game and video devices” section. If this list contains the designation “Unknown device” or there is an icon with a yellow exclamation mark, this indicates that there are no suitable drivers.
To troubleshoot problems, you need to open the official website of the laptop manufacturer and find compatible software. During the search, you will be offered several versions of drivers that are suitable for different editions of Windows 7.
Checking using third-party software
To diagnose the microphone, you can use third-party audio editors, for example, the free Audacity utility. To carry out the check, you must:
- Download the utility from the official website and run the installation file.
- Select the interface language and confirm agreement with the license.
- Specify the installation directory and the need to create an icon on the desktop.
- Start the installation process.
- Open the application and record a test audio fragment.
The program works with the microphone built into the laptop system, as well as external headsets.
To listen to the saved segment, click on the play button. If there are no errors, the sound will play without any problems.
Setting up through a specific program
If you do not plan to use your laptop to communicate in instant messengers with a webcam, you can download them to diagnose the microphone. A program like Skype provides 2 tools for checking recording equipment. The first method involves making a test call, before which the system will ask you to configure it. You can also call the Echo/Sound Test Service contact who is responsible for technical support.
When performing a test, you can see directly in the system whether the microphone responds or not, and also configure it.
After a short introduction, you will need to say a few words. The recording duration does not exceed 10 seconds, but this is enough to evaluate the signal quality.
Parameters of an individual device
If there is no signal from the microphone of a wired or wireless headset, you need to make a separate setup. The power button on the external accessory may be disabled or the volume may be set to minimum. Many headphone developers equip their equipment with a special wheel for adjusting microphone sensitivity.
If it is at zero value, the other party will not hear you. In addition, some headsets have special keys to instantly deactivate the microphone. Therefore, you should evaluate the specifications of your device on the official website and make sure that it is configured correctly.
Connecting an external microphone
When figuring out why there is no signal from the built-in microphone on a laptop and what to do to solve the problem, you should try connecting an external device. If it works properly, then the failures are due to a mechanical failure of the integrated component. If the external microphone does not respond to connection, you will need to scan the system for software failures, search for missing drivers and evaluate the performance of the sound card.
When you connect a headset, the device appears in the settings and is ready to change sound settings.
It is possible that there is poor contact between the 3.5 mm jack and the audio card connector. The problem often occurs on budget laptops from Acer, Asus, Lenovo, Samsung, HP and cheap models from other companies.
Privacy Options
These settings are responsible for providing applications with access to certain system functions - camera, location, microphone, notifications and many others. These settings may interfere with the microphone's normal operation. What you need to do:
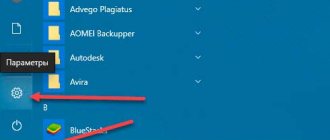
- Open Windows Settings (Win+i or Start menu)
- Open “Privacy” options
- And open the “Microphone” tab
- First of all, grant access to the microphone if access is limited
- Give apps access
- And select the apps that can be given microphone access (if required)
If this option does not help, then move on to the sound drivers.
Noise in headphones on microphone - how to remove it
When using an external headset with a microphone, you may encounter problems such as noise, crackling, and other problems with recording quality. There are several proven solutions for this situation.
Disable and enable the device
The noise may be due to the microphone input. You need to remove the plug from the connector and reinsert it. If the problem persists, you should turn off the device programmatically using the Task Manager.
Realtek HD Settings
The Realtek HD application interface includes a software noise reduction option. If your laptop does not have this program, download it and find the setting in the "Advanced" section. Using this utility, you can make other improvements to the quality of the microphone.
Third party setup programs
In addition to standard tools, third-party applications are provided to adjust sound parameters. Among them is a utility for setting up audio, developed for a specific laptop model. It can be found on the website of the manufacturer of your gadget.
Mechanical damage to the microphone
In case of mechanical failures of the microphone, the noise problem can be either temporary or permanent. To eliminate it, you should check the device, find the location of the damage and repair it.
Default Recording Devices and Default Communication Devices
It is possible that the correct microphone has already been selected in the Windows 11 settings, everything is set correctly in the privacy settings, and it even works in some programs, but in others it still does not work. In this case, try this approach:
- In the System - Sound options tab at the bottom, click Advanced Sound Options. Or press Win+R , type mmsys.cpl and press Enter.
- In the window that opens, go to the “Record” tab.
- If you see that there are two or more microphones in the list and there are green marks on several, click on the microphone you need for all tasks and select “Use as default” or “Use default communication device” - as a result, the green mark will only appear on the desired microphone, and it will be used in the system for all tasks: recording and communication.