Overclocking RAM can be a bit challenging at times, especially if you know it produces relatively poor results. Sometimes it's better to leave RAM alone.
However, if you've seen the latest DDR5 memory modules that will become generally available in a year or two, you now feel like your RAM sticks aren't fast enough. In the next article, we will talk in detail about what is required to overclock RAM .
Simplicity is not so easy with overclocking RAM, and it largely depends on many different variables such as the motherboard, your system, and the RAM modules.
While adjusting the speed of your RAM may not bring additional FPS to your games, it can provide smoother file operations and can help with video editing and multitasking.
Replacing HDD with SSD
First, you must be prepared to install Windows 7 or Windows 8. Only these operating systems work correctly with SSD drives. Windows XP will also work quickly, but it does not support the trim command and the degradation of the SSD drive will be significantly higher than on Windows 7 and after some time you will experience a loss in performance.
Secondly, you need to check whether the laptop's SATA controller can operate in AHCI mode. It is very important! Since only in this mode the operating system sends the trim command to the SSD disk when deleting a file. This allows the drive to clean up deleted file cells in the background. If the SATA controller operates in IDE emulation mode, then this command does not arrive and you can only rely on the internal garbage collector of the SSD drive itself... To check, you need to go into the laptop BIOS (usually F2 when turning it on) and find the SATA controller settings. It should be able to switch to Native
, or
AHCI enable
-> yes.
After installing the SSD drive in the laptop and before installing the operating system, you need to go into the BIOS and switch the SATA controller operating mode to AHCI (native) mode.
Laptops with Core 2 Duo controllers usually only support SATA II mode. Therefore, you can choose a cheap SSD drive with a data transfer speed of 300 MB/s (for example Intel 320). If you buy the fastest and most expensive drive, it will still be limited in speed to 300 MB/s due to the controller. If the controller supports the SATA III version, then purchase an SSD with a speed of more than 300 MB/s (for example Intel 520, OSD Vertex). They have a speed of about 500 MB/s.
You can find out the supported SATA version of your laptop using the free program HWiNFO: Bus -> PCI bus -> ... SATA ... -> SATA Host Controller -> Interface Speed Supported
Gen2 2.0 Gbps is SATA II, buy SSD SATA 3Gb/s. Gen3 6.0 Gbps - SATA III, buy SSD SATA 6Gb/s.
There are two things to consider before purchasing an SSD:
- The cost of storing a gigabyte of data with SSD drives is several times higher than with HDD. Therefore, you will have to sacrifice either money or the amount of stored data.
- An SSD disk, due to its architecture, starts to work slower when more than half of its capacity is filled. If the SSD drive is filled to 90% capacity, the speed will decrease significantly after a while.
Therefore, it is advisable to fill the SSD disk only 50-75 percent. If you have a lot of data and little money, then buy an SSD drive for the system and important data with a capacity of 100 - 160 GB, and for movies, music and data that you rarely use - an external USB HDD drive.
Alternative ways to increase RAM
In cases where it is not possible to purchase new RAM modules, and the PC owner needs to increase performance, you should familiarize yourself with alternative methods to understand how to increase RAM
Increase productivity using a flash drive
The well-known company Microsoft, which provides interesting resources in the field of computer technology, has provided users with a unique development that allows them to increase RAM using a flash drive. This technology is called ReadyBoost.
The working principle of this technology is easy to understand. The flash drive stores the created file, which quickly caches those programs that are most often used.
This is not the only advantage of using a flash drive. The USB drive is endowed with the highest speed of processing and recording information, due to this there is an increase in productivity.
Performance is also ensured by the fact that the system does not need to spend a long time searching for files required for execution throughout the entire hard drive space, since all the necessary files are concentrated on external media.
Having chosen this particular method to increase the performance of the PC, the user must purchase a flash drive with the necessary parameters, otherwise all attempts will simply be unsuccessful. The flash drive must have at least 256 MB of free space, the write speed must be 1.75 Mbps, and the read speed must be 2.5 Mbps.
Once all the important tools are available to the user, you can proceed to the process to increase the cache size and speed up PC performance.
After inserting the flash drive into the USB connector, you should wait for it to fully load, and then right-click to bring up the context menu. Next, go to “Properties”, and then to “ReadyBoost”. On this tab, you should check the box, confirming your desire to use the ReadyBoost technology, and you should also manually set the desired cache size. All you have to do is click “Ok” and wait for the process to complete.
A PC user must remember that a flash drive to which ReadyBoost technology has been applied cannot simply be removed from the computer. To remove the USB drive, you must first disable the previously running ReadyBoost technology.
Installing 4 GB of RAM
The second important point is to install two, or preferably four, gigabytes of RAM. Nowadays the Windows operating system and even browsers consume a lot of memory. If there is not enough RAM, programs begin to slow down because data begins to be actively cached in the page file, which is located on a slow disk (even an SSD), rather than fast RAM.
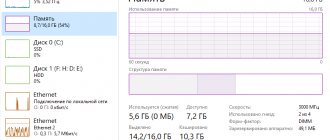
In the vast majority of cases, laptops support the installation of two memory sticks and have easy access for replacement. The memory is usually located under the cover at the bottom of the laptop, or under the keyboard. Before buying memory, you need to see what memory is supported by the laptop. This can be done using the HWiNFO program. Memory -> Maximum Supported Memory Clock
333.3 MHz - buy PC2-5300 (667 MHz) or PC2-6400 (800 MHz) memory 400 MHz - buy PC2-6400 (800 MHz) memory
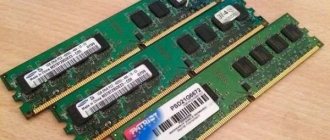
Then, with the laptop turned off and de-energized (even without a battery), you need to get to the memory and see if there is another memory slot. You can see what the memory looks like in the last photo in the article (using my Asus F9E laptop as an example). If there is only one slot, then buy one 2 GB or 4 GB stick (extremely rare and expensive and not all laptops support such memory). If there are two slots, then buy two memory sticks of 2 GB each.
How much productivity increases
Changing the RAM clock speed may not result in significant performance improvements, but it will provide better performance for the system and supported programs. It is impossible to give exact numbers; it all depends on the specific PC build. However, the resulting result in all cases will be more valuable than the base one, so it’s worth taking an interest in the overclocking process.
Of course, compliance with precautions will be a prerequisite, as well as constant analysis of the stability of overclocked memory.
A clear example from life
When purchasing the Asus F9E laptop, it had:
- Windows Vista operating system.
- Processor Intel Core 2 Duo T5550 1.83 GHz.
- Memory DDR2 SO-DIMM 1 GB PC2-5300.
- HDD Seagate ST9160821AS Momentus 5400.3 160 GB.
The HDD drive was replaced with an SSD OCZ Vector 150
120 GB, SATA-III, 600 MB/s. The Asus F9E laptop motherboard only supports SATA II and the drive operates at a maximum speed of 300 MB/s. I took this disc because of the 5 year warranty. Cheaper and slower models had a 3-year warranty.
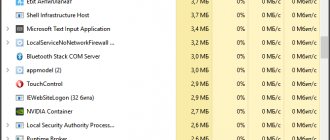
The laptop (Windows 8.1 x64) now starts to boot within 30 seconds from the moment you press the power button and is immediately ready to work. Previously, the laptop took two or three minutes to boot. And I had to wait some more time after the desktop was displayed before launching applications. You probably feel this every time you turn on your laptop, if you haven't upgraded yet.
Graph of random data read speed BEFORE replacement on a Seagate Momentus 5400.3
.
Random data read speed graph AFTER replacement with OCZ Vector 150
120 GB on the Asus F9E laptop.
As you can see, the speed of reading random data has increased 6 times.
On a computer, this SSD drive connected to the SATA 3 port shows a linear read speed of about 500 MB/s, and a random data speed of about 400 MB/s.
Also, I installed two DDR2 SO-DIMM memory sticks of 2 GB each: - Kingston ASU256X64D2S800C6
2Gb 2Rx8 PC2-6400S 666-12-E2 -
Hynix HYMP125S64CP8-S6
2Gb 2Rx8 PC2-6400S 666-12 The laptop motherboard does not support 800 MHz speed (PC2-6400) and therefore the memory operates at the motherboard frequency of 667 MHz. You could buy PC2-5300 memory, but only PC2-6400 memory was available.
New memory:
Increasing physical memory
If there is an urgent need to increase physical memory, then the first thing you need to do is understand which RAM stick is compatible with your motherboard. This is done like this:
- Run a monitoring utility like CPU-Z or HWMonitor.
- Check your motherboard model.
- Go to the manufacturer's website.
- Review the motherboard specification, paying particular attention to the memory specifications.
The specification will look something like this:
From the information provided, we can conclude that the motherboard supports the DDR3 memory standard, dual-channel mode. Available maximum volume is 16 GB, frequency is from 800 to 1800 MHz. The next step is to open the system unit and see how many free slots there are.
Remember that DDR, DDR2 and DDR3 are three different formats that are incompatible with each other. Therefore, if your motherboard supports the DDR2 standard, you do not need to buy DDR3 - the module will not fit into the slot.
The release of the DDR4 standard is announced at the end of 2015 - it is also better not to rush into purchasing it, since the technology has not yet been tested. As for DDR5, messages about which can be found on forums, such a standard does not exist at all. There is GDDR5 video memory, but it has little to do with RAM.
If the motherboard has a dual-channel mode, install two smaller sticks, rather than one larger one. Two 4 GB sticks will be about 15% more productive than one 8 GB module. When purchasing modules, try to choose strips that are as close in characteristics as possible. If you plan to buy a pair at once, it is better to choose a KIT set consisting of two completely identical modules.
If you increase the amount of RAM to 8 GB, then do not forget to install a 64-bit system, because Windows x32 cannot work with memory larger than 4 GB.
Important parameters (besides volume and standard) are frequency and timing. The higher the frequency, the faster the RAM will transfer data to the processor for processing and calculations. The lower the timing, the faster the RAM controller will respond to system commands. From this we conclude:
- We select the maximum frequency that the motherboard and processor support (its frequency can also be found using the HWMonitor utility).
- Timing (delay before executing a request) is minimal.
If the price difference is significant, then it is better to take a bar with a high frequency and high timing. Latency doesn't impact performance that much, so you can sacrifice this parameter.
Related links
wikipedia.org/wiki/Solid-state drive - A solid-state drive (SSD) is a computer non-mechanical storage device based on memory chips.
wikipedia.org/wiki/TRIM - TRIM (English to trim) is an ATA interface command that allows the operating system to notify the solid-state drive which blocks of data are no longer contained in the file system and can be used by the drive for physical removal.
wikipedia.org/wiki/SATA - SATA (English Serial ATA) is a serial interface for data exchange with information storage devices.
wikipedia.org/wiki/DDR2_SDRAM - DDR2 SDRAM (double-data-rate two synchronous dynamic random access memory - synchronous dynamic memory with random access and double data transfer rate, second generation).
Any user wants the performance of his laptop to be at the proper level. If a laptop is used constantly, after several years it begins to respond more slowly to commands, takes a long time to load the operating system and freezes. Several methods will help increase the performance of a laptop, and they can be used either individually or in combination.
When files are written to a hard drive, they are located on it in sequential pieces (clusters). When there is a lot of space on the hard drive, these files can be located nearby, which allows for quick reading of information. Because files are erased, copied, and transferred, parts of them end up scattered across the entire disk. With a large amount of data, the laptop will run much slower and performance will decrease. Therefore, it is necessary to systematically defragment the hard drive, which will allow file elements to be located as close to each other as possible. To do this, you can use the built-in Windows defragmenter or download a program on the Internet (Auslogics Disk Defrag, MyDefrag, Defraggler, Ultra Defragmenter). Cleaning the registry can significantly improve the performance of your laptop, as it is an important element of Windows. The system notifies the user about errors that have occurred due to incorrect settings or damage to the Registry. Problems with the Registry occur due to the installation or removal of software. You can scan the Registry and remove all existing errors using the following programs: CCleaner, Registry Cleaner, Vit Registry Fix Free, Regcleaner. You can remove all unnecessary programs. To do this, go to the Start menu, go to Control Panel, then to Programs and Programs and Features. You can also delete software and files (music, movies, pictures) that the laptop owner absolutely does not need. Malware can significantly slow down your laptop. A reliable antivirus will help deal with this problem. The antivirus must work constantly and be sure to update the database via the Internet. You should manually scan your system for viruses several times a week, and install tools to remove spyware and malware. You should regularly empty the Windows Recycle Bin to free up space on your hard drive. You should remove background programs that occupy a large amount of memory. To see which programs can be disabled in “Autorun”, you need to enter “msconfig” in the “Run” field. It is also worth deleting copies of web pages that are saved on the hard drive when the user goes online. If there are many such copies, the laptop's performance will drop significantly. Therefore, “Browsing History” needs to be cleared frequently. You can increase the performance of your laptop by purchasing additional RAM. To do this, you will need SODIMM memory modules. First you need to determine what memory standard the laptop supports and its maximum capacity. Installing a hard drive on an SSD drive will not only increase performance, but also make loading the operating system much faster.
The laptop should never be overheated. Overheating can cause slow operation and damage to its components, so do not leave it on on a soft surface (lap, sofa).
First, I want to tell you about hardware upgrades, but I will say right away that upgrading a laptop (replacing components) is not an easy task, because this is not a desktop computer, where most of the parts can be bought in a store, but there are ways.
How to set it correctly
Of course, you should start by finding out the standard settings recommended by the manufacturer for this module. We looked at how to check RAM timings earlier. Then you can look at the statistics on Internet resources dedicated to overclocking to get an approximate idea of what you can expect from a particular RAM module.
As noted, incorrect latency values can easily make your computer unable to boot, so find out exactly how to reset the BIOS. Moreover, not only in software, but also in hardware, in case it is not possible to even enter the BIOS. Information about this can be found in the documentation for the motherboard or on the Internet.
It usually doesn’t take much time to figure out how to set RAM timings in the BIOS. The first time you may need documentation, then everything will be easier.
All timing changes must be made slowly; it makes sense to change one parameter and only per clock. After this, it is important to check whether the computer can start and load the operating system.
Next, you should test how the system behaves under load. To do this, you can use specialized programs or simply load your computer well, for example, run a game for an hour with high graphics settings or encode a high-resolution video file. If the computer is stable, you can lower the timings by one more clock cycle. If freezes occur, system error messages appear, or programs crash, you need to undo the changes and go back a step.
Having figured out how to correctly reduce the timings of ddr3 and more modern ddr4 RAM, you shouldn’t immediately start experimenting. First, you should determine, based on the characteristics of your hardware, what is preferable: increasing frequencies or lowering delays. Now, in most cases, greater effect can be achieved by increasing clock frequencies.
Hardware upgrades for speed.
CPU.
The first and, perhaps, the most important thing that can be done is to replace the processor, this should speed up the execution of computing operations, as a result, the comfort of applications will improve, and loading programs will be slightly faster.
To replace the processor, it is better for you to contact the appropriate service centers, but if you decide to do it yourself, then the main points will be as follows:
Find instructions for disassembling your laptop model; I don’t recommend going in and disassembling the laptop without it - everything can end in disaster, I’ve verified this from personal experience (once I screwed a long bolt into the wrong place and ended up damaging the RAM slot).
Find the instructions for your motherboard; you can find out the latest model either after disassembling the laptop, or use an Internet search for your model. This manual indicates the brands of processors that can be installed on the motherboard.
After these manipulations, you can buy/order a processor and, armed with thermal paste, carefully replace it. By the way, in older laptop models the central processor is tightly soldered to the board, so it cannot be replaced.
RAM.
The second thing you can do is add RAM, this will reduce the load on the hard drive and should speed up the laptop as a whole. Everything is simpler here, carefully unscrew the small cover on the bottom of the laptop (usually on it or next to it you can see the inscription - MEMORY, DDR, DIMM or a schematic image of a memory module). First, check if there is an additional free slot for a RAM module; if it is not there, you will have to add capacity by replacing the existing module. Write down or remember the memory model, you will actually need one parameter - frequency, you can also refer to the instructions for the motherboard, which should indicate the maximum supported amount of memory. After that, we buy/order a RAM stick and enjoy life after installation.
Laptop hard drive.
The third method is to replace the hard drive (HDD), by analogy with memory, we find the cover with the HDD designation next to it, unscrew it, take out the hard drive and replace it with a similar, but faster one (we use reviews in computer magazines or the Internet).
At this stage, the hardware upgrade ends, and further, I would like to dwell in more detail on the software acceleration of the laptop.
Overclocking RAM using BIOS/UEFI
Before proceeding to a detailed consideration of the overclocking procedure, we emphasize that the parameters must be changed gradually. If we sharply increase the frequency and lower the timings, there is a high probability that the computer will not be able to boot, and solving this problem will require additional efforts from us.
The settings screen looks different on different motherboards.
In general, the acceleration scheme looks like this:
- Turn off the computer or reboot it.
- Turn on the computer again and load the BIOS (or UEFI on new motherboard models). Which key or keyboard combination can be used to do this can be found in the motherboard manual or on its manufacturer’s website. Combinations such as “Del”, “F1”, “F2”, “Ctrl-Alt-Esc” are very common.
- We find the section responsible for RAM settings. Where it is located depends on the BIOS type. The names of this section may differ for different models. For example, for a Russified UEFI GIGABYTE motherboard, the necessary parameters are located on the MIT tab in the “Advanced frequency settings” . Here you can set the desired memory multiplier value. In order to adjust the timings and change the voltage, you will need to go to the “Advanced memory settings” section.
- We load our XMP profile (detailed information about this is provided in the section “Preparing for overclocking RAM”). This will allow you to set the frequency to an acceptable value. We only increase the frequency; it’s better not to experiment with timings for now.
- Save the new settings and restart the machine. Most systems use the F10 key to apply changes.
- Let's check how stable the computer is after overclocking.
- If no failures are detected, you can try to increase the frequency further.
- After you have selected the maximum frequency at which the computer works without failures, you can try to change the timings.
- Finally, the voltage should be adjusted. But its value should not exceed 1,450 V.
After each change, the system should be checked for functionality and stability.
Software acceleration methods.
Extra programs.
Removing unnecessary programs from startup
, which hang around idle in RAM and slow down the laptop.
To do this, we need to remove unnecessary programs from startup, for this we will use standard Windows tools - go to “Start - Run”, type “msconfig”, a window will load in which you need to go to the “Startup” tab. If everything is done correctly, you will see this picture:
We uncheck unnecessary programs and reboot the system, after this the laptop should feel better J.
We remove unnecessary programs from the system
.
To do this, go to “Start > Control Panel”, after this operation click “Add or Remove Programs”, carefully look through the list of installed applications and remove unnecessary ones.
Unused services.
Disable unnecessary services.
To perform this fairly simple operation, go to “Start > Control Panel”, then click the “Administration” icon, then services. We will see a list of all services that can be activated or, conversely, excluded from operation. I would recommend disabling the following services:
Automatic update.
Print spooler (unless you have a printer, of course).
Uninterruptible power supply (if one is missing or not connected via the control bus).
Messaging service.
Background Intelligent Transfer Service (BITS).
Remote registry.
We disable it by double-clicking on the corresponding service, the following window will appear.
In this window, select the startup type “disabled”, stop the service, then use it and enjoy life.
Defragmentation of the file system.
Defragment your hard drive
, to do this, go to “Start” > “Programs” > “Accessories/Standard” > “System Tools” and the “Disk Defragmenter” program. After this you will see the following dialog box:
We select the desired partition of the hard drive and first click on “Analysis”, the feasibility of defragmentation will be checked, and after that we actually perform defragmentation by pressing the appropriate key. During this operation, it is better not to work on the laptop; as a rule, defragmentation is started at night or during downtime.
These were the main methods for speeding up a laptop, which can be done without the help of
third-party utilities and programs.
November 28 Monday
Laptops, unlike desktop PCs, are significantly limited in terms of energy consumption. This is due to the compactness of the case and the inability to install powerful cooling, as well as the need to ensure autonomy. Therefore, laptops have a small performance reserve, and laptop hardware becomes obsolete faster than desktop PCs. Components with similar names for desktops and laptops differ noticeably in terms of performance. This article will tell you how to increase laptop performance and get rid of slowdowns.
Increase by installing new modules
Increasing RAM can significantly improve computer performance, so users interested in performance are eager to find ways to make such actions easy. One such method is to purchase additional RAM modules and install them on your computer. In order to properly increase RAM, it is useful to first familiarize yourself with information on how to add RAM to a computer, as well as perform a number of preparatory actions.
Determining the type of RAM
Computers were purchased at different times, so their equipment may differ significantly. Purchasing RAM at random is strictly prohibited, because the currently existing types of RAM, which include DDR 1, DDR 2, DDR 3, are incompatible with each other, and their joint use on one computer can lead to a sad result.
In addition, the motherboard can also only support a certain type of RAM, so by trying to add the wrong type of RAM, the user can damage the entire motherboard.
To prevent such undesirable consequences, before purchasing RAM, you should first study the characteristics of the existing memory, as well as count the number of free slots where new modules can later be added.
There are two ways to determine the number of free slots. The first is to install a special program that allows you to diagnose your computer. But the second option is optimal, for which it is enough to remove the cover from the system unit and visually determine the number of free spaces for installing new RAM modules.
Experts recommend filling all slots, thereby activating two-, three-, or four-channel memory modes.
When purchasing RAM modules, it is important to pay attention to their speed, giving preference to modules with the maximum speed. In this case, of course, the user will be able to significantly increase PC performance.
One more important circumstance should be taken into account. Each computer has a specific operating system. If a 32-bit OS is installed, then the computer can only accept and display 3.2 GB of memory, so there is no hope of increasing the memory even to 4 GB.
If a user has an incredible desire or urgent need to increase RAM to 4 gigabytes or more, he should initially consider options for installing a 64-bit operating system.
Installing purchased RAM modules
After the user purchases new RAM modules, you should figure out how to directly increase the RAM on your computer, and how to technologically correctly add the purchased modules.
Adding a new module is very simple. Each slot is equipped with special clips located on both sides. These clips should be moved to the side, after which it will be easy to add the purchased module and remove the one that has become unusable.
When the module is correctly secured, the user will hear a characteristic click, indicating that the module has firmly “sat down” in the installed location; now it only remains to be secured with latches, returning them to their original position.
Experienced users do not recommend assembling the system unit right away, since installation errors are still likely, as a result of which the memory will not be recognized on the computer. For this reason, you will have to reinstall it, following all the instructions.
To determine whether the installation is correct, right-click on the “My Computer” shortcut, calling up the context menu, and then go to the “Properties” submenu. The total amount of RAM will be indicated there.
Experienced users recommend taking into account another very important detail for those who are trying to figure out how to increase RAM on a computer.
Before you begin removing the old RAM stick and installing a new one, you should remove static electricity from the system unit, since all installed internal devices are very sensitive, any part can simply burn out. To remove static electricity, simply turn off the power to the system unit, remove the plug from the socket, place one hand on the system unit, and the other on the radiator of the heating battery. All static that has accumulated will be completely neutralized.
For the same reason, it is not recommended to add RAM while wearing silk clothes.
Cleaning and replacing thermal paste
The first thing you should do before increasing the performance of your laptop is to inspect the condition of its cooling system. Even if the room seems sterile, laptops tend to draw dust, dirt, hair, etc. into the radiator. In addition, the thermal paste between the cooler and the chips tends to age, dry out and lose thermal conductivity. Overheating of a laptop causes its components (processor, video card) to reduce frequencies and slow down. Therefore, you should disassemble the laptop (it is advisable to study the instructions in pictures and watch a video of disassembly/assembly before doing this), and thoroughly clean its insides from dust (with a brush, a compressor, a can of compressed air).
After cleaning, you need to remove the remaining old thermal paste with a napkin and apply a new, high-quality thermal interface. There is no need to apply thermal paste very thickly, this will only make things worse. It should be applied in a thin, even layer, smoothing and removing excess with an unnecessary credit card or other plastic strip.
Timing optimization
To obtain the maximum performance increase, it would be necessary to simultaneously reduce the timings while increasing the frequency. But by doing this, you can set a mode in which the computer will not be able to operate. Therefore, at first the timings should be left as they were configured by the manufacturer and only the frequency should be changed. You should move on to timings once you are convinced that everything is working stably. In some cases, their values even have to be raised. In this case, the above rule for determining the efficiency coefficient should be taken into account.
Improved cooling
If after cleaning and replacing the thermal paste the temperatures still have not dropped much, you should take care of improving the cooling. This is especially true if the laptop is often placed on your lap or on upholstered furniture. You can increase the efficiency of the cooler using a cooling pad or a special external fan attached to the radiator air intake grille. An influx of fresh air will have a positive effect on laptop components, prevent them from overheating and extend their service life.
If the noise doesn’t bother you, you can make the standard cooler work at maximum speed. You can do this using a fan speed control program like SpeedFan. Although the laptop will make louder noise, it will be possible to get rid of overheating, and thus increase productivity.
What to do if you can’t find a suitable memory?
The memory type (DDR, DDR2, DDR3, etc.) must match in any case. However, there may be problems with purchasing new DDR and DDR2 modules - these are outdated standards that are practically never found in stores.
And for current DDR3 and DDR4, complete coincidence of these parameters on all memory modules is not strictly necessary - many motherboards will work correctly with installed “dies” of different ranks, frequencies and sizes. But there are also rare “picky” motherboards that will not run with modules of different ranks, or will not work in the most optimal way. Therefore, when purchasing a new module, it is recommended to select the same parameters as those of the already installed one. If for some reason this cannot be done, then make sure that the frequency of the new module is not lower and the timings are greater than those of the installed one.
Overclocking a video card
One method to increase the performance of a laptop for gaming is to overclock its discrete graphics card. The procedure should only be carried out after cleaning and in the presence of good external cooling! Otherwise, it will overheat and drop frequencies, or the process of wear will occur faster. Overclocking a video card (as well as monitoring its temperature) on a laptop can be done with the MSI Afterburner program. In it you can increase the frequencies of the GPU core and video memory, adjust the cooler speed, monitor the load and temperatures.
It is recommended to control clock frequencies gradually, adding 10-20 MHz. After each rise, you should fire up a heavy game, play it for a bit, and then exit (or shut down) and look at the GPU load and temperatures. If you select excessively high frequencies of the video card or its memory, artifacts (multi-colored spots and stripes) may appear on the screen, the game may crash, or the laptop may freeze or reboot. In this case, you should reboot and reduce the frequencies to stable ones. If it is possible to regulate the speed of the video card cooler, it is better to set it to maximum.
Overclocking your graphics card can improve your laptop's performance for gaming, but it comes with certain risks. Therefore, when overclocking and finding the maximum stable frequency of the core and memory, it is better to check your success with a long gaming test. The temperature of the video card during the game should not rise above 80 degrees, otherwise overheating can cause harm.
Intel and AMD processors
Tests that are carried out when overclocking RAM indicate that Intel processors built on modern architecture are difficult to adjust with respect to the BCLK parameter. If you change it, there is a high probability of serious failures.
This information determines that changing the “reference frequency” will be quite difficult. Therefore, the only way out of this situation is to change the multiplier, which usually leads to a slight increase in power .
Some of the processors from the manufacturer in question respond well to such experiments. Let's take the Core i7−8 as an example. Their production uses Lynnfield architecture.
The results of the experiments may also be influenced by the type of maternal memory . This computer element also has a chipset that is responsible for processing some information.
Processors produced under the AMD brand are gradually leaving the market. At the same time, they behave more predictably as RAM performance increases, which reduces the likelihood of errors.
In conclusion, increasing performance always results in more heat being generated. Therefore, if the system unit is insufficiently cooled, a more powerful heat removal system should be installed, since there is a high probability of overheating.
SSD installation
Installing an SSD is one of the ideal methods to improve the performance of a laptop. Thanks to the new drive, the system will start up much faster (about 10-20 seconds from the moment you press the button), programs will start opening almost instantly, and in general, the laptop will become faster. An SSD can be installed either instead of a native hard drive (in which case you will have to choose a drive with a significant capacity) or in parallel with it. True, the second option is available only to owners of laptops with an M.2 socket on the board, a second slot for HDD, or a DVD drive. In the latter case, you also need to fork out for an adapter to install an SSD instead of a disk drive, but you can save money by purchasing a modest 30-64 GB disk for the needs of Windows and programs.
Installing an SSD instead of a disk drive to increase laptop performance is easy. You just need to remove the bottom cover, unscrew the screw holding the DVD drive, and pull out the drive. You need to remove the decorative panel from the front, place it on the adapter with the SSD and insert this structure instead of the drive. However, it is better to swap the drives: install an SSD in the hard drive slot (this will reduce system heating), and put the old hard drive in the adapter.
Practical examples
Results from some video games were used as an example of the effectiveness of overclocking. Basic RAM parameters: DDR-2133 speed and CL15 latency. The best performance result was given by the following overclocking option: DDR-3600 and CL15, the voltage was increased to 1.39V. Here are the results:
- "Counter Strike Global Offensive", performance increase - 10%.
- "GTA 5", performance increase - 18%.
- "The Witcher 3", performance increase - 24%.
- "Shadow of the tomb rider", performance increase - 22%.
As you can see from the report above, enabling the XMP profile or manually overclocking the memory results in a noticeable increase in computer performance. In the most favorable case, that is, in “The Witcher,” the performance increase was almost 25%, and in the worst case, that is, in “Counter Strike” - 10%.
Adding RAM
The easiest way to improve laptop performance by upgrading is to add RAM. It is possible on almost all laptops, as well as ultrabooks equipped with an SO-DIMM slot. Ultra-thin models (like the Apple MacBook) often cannot be upgraded, since their memory is soldered directly to the motherboard (like a smartphone or tablet).
To increase the amount of RAM, you need to carefully read the characteristics of the laptop. You should find out how many slots (1 or 2) there are on the board, what type of memory (DDR2, DDR3, DDR4) and what is the maximum amount of memory supported. If there is a second free slot, you can put a new bar in it, similar to the one that already exists. If there is only one connector, the memory stick needs to be replaced with a more capacious one.
Ticks and nanoseconds
Is it possible to express clock cycles in seconds? Yes. And there is a very simple formula for this. Clocks in seconds are calculated by dividing one by the actual clock frequency of the RAM specified by the manufacturer (although this indicator, as a rule, must be divided by 2).
That is, for example, if we want to find out the clock cycles that form the timings of DDR3 or 2 RAM, then we look at its markings. If the number 800 is indicated there, then the actual RAM frequency will be equal to 400 MHz. This means that the duration of the cycle will be the value obtained by dividing one by 400. That is, 2.5 nanoseconds.
Processor upgrade
A more radical way to increase the performance of a laptop for gaming is to replace the processor with a more powerful one. This option is available for laptops that are equipped with a socket (connector) that supports replacing the CPU. In ultrabooks and many laptops from 2015-16, the percentage is often soldered on the board (BGA mounting) and cannot be replaced. You can find out what type of editing is being used in a program like CPU-Z. PGA or LGA indicates the possibility of replacement, but BGA indicates a chip tightly soldered to the board.
Finding a processor for sale for a laptop is much more difficult than for a desktop PC. If there is no more powerful processor for your laptop (check the list of supported ones) in stores, you can look for it at a “dead body”, or look at the Chinese, but there is usually no guarantee for such components. For example, a dual-core Athlon II N350 for socket S1G4 can be replaced with a quad-core Phenom II N950, but it’s almost impossible to find a new processor like this.
RAM vs CPU: which is better to speed up?
In fact, no specialist will give you an answer to this question. Everyone, as one, argues that it is best to increase the productivity of both elements at once, and with a minimum time interval.
Some professionals even doubt the advisability of overclocking RAM. They are convinced that speeding up the processor will give a guaranteed effect, but the same work with RAM may not give real results.
How can you still increase the performance of RAM and at the same time prevent deterioration in PC performance? The answer to this question is quite simple - speeding up the board will be effective if the rest of the PC hardware can work with the same characteristics.
Accordingly, if you decide to overclock one element, make sure to improve the performance of the rest, because without this, time will be wasted. For example, if you are overclocking a device for programs that place serious demands on graphics, it is better to immediately speed up the video card.
Remember, increasing the characteristics of devices must be done by approximately the same values for the computer to function correctly. This will help avoid the “bottleneck” effect, when one element slows down the operation of the entire system.
Replacing the video card
The most dramatic way to increase the performance of a laptop for games and 3D rendering is to replace its video card. This upgrade is not available on most inexpensive laptops, since their graphics and video memory are soldered on the board and cannot be replaced. But the owners of some models considered gaming have this opportunity. Video cards of such laptops are installed in the MXM slot, a special type of PCI-Express (not to be confused with Mini PCI-E, which accommodates Wi-Fi/Bluetooth network cards). There are several revisions of these slots, which are not very compatible (or even incompatible) with each other. Therefore, you should look for a new card of the same MXM type as the current one.
A supporter of healthy competition in the electronics market, a fan of high-quality Chinese technology, a lover of high-quality screens and resolution. Has a talent for expressing dissatisfaction with a smartphone using one word: “pixels.” He is interested in everything that runs on semiconductors, drives, flies or is powered by electricity. Loves hitchhiking and cycling, power metal and summer. Dislikes Samsung, winter and Windows Phone.
The capabilities of laptops are limited by their electrical parameters. Powerful iron consumes a lot of energy and produces a lot of heat. Relatively modest batteries and compact cases do not allow the installation of a powerful battery and an effective cooling system. As a result, the performance of laptops becomes insufficient faster than that of PCs. If a desktop of the current generation is able to cope with new heavy games and programs for several years, then a laptop a year after purchase may not be able to handle new applications with a sufficient level of comfort from use.
In such a situation, the natural question becomes how to improve the performance of a laptop. A simple way to solve the problem is the software method. Disabling unnecessary applications from startup, cleaning the system, deleting unused programs - you can increase the speed of the device. But they only reveal the potential of the hardware. It is not possible to significantly increase the performance of a laptop using this method.
The way out of this situation is to upgrade your laptop. Replacing components with more efficient ones allows you to increase the speed of the device, opening up new possibilities for it. Unfortunately, the design of mobile computers has its limitations that do not allow changing all internal components, but an upgrade is possible.
Using tests
There is no exact way to overclock ddr3 RAM . This is due to the fact that there are a huge number of RAM sticks, each of which can react differently to changes in factory settings. That is why the way out of the situation is to select the most appropriate settings when testing each change. To do this, you can use special programs that significantly simplify the tasks.
When choosing programs for testing your computer, it is recommended to pay attention to the following:
- PC Mark.
- Everest.
It is difficult to select the best program from the two above, since each has its own advantages and disadvantages. Why exactly these two programs with a huge choice? The answer is quite simple - they not only monitor key indicators under load or when the device is idle, but also have a function for monitoring the stability of many RAM models. In a similar way, they reduce the likelihood that the changes made will lead to a loss of stability in the RAM.
Is it possible to improve the processor on a laptop?
The central processor is the main part of the computer, on which the overall level of performance depends. If the old CPU is not capable enough, it needs to be replaced. In a PC, this operation is not difficult: you need to remove the cooling, remove the old chip, install a faster model in its place, lubricate it with thermal paste and return the cooler to its place. There are a number of nuances in laptops.
To save internal space, reduce the thickness of the device, simplify production and reduce prices, engineers resort to installing the processor using the BGA (ball grid array) method. In this case, the chip is soldered onto the board using small tin balls and its dismantling (without sophisticated equipment) is impossible. If your laptop has an Intel Atom processor, it most likely cannot be replaced.
The processor with BGA contacts is soldered on the board and cannot be replaced
It’s another matter if the CPU is installed in a socket - a special multi-pin connector. In this case, removing the old processor and installing a new one is no more difficult than in a PC. At Lenovo, you don’t even need to disassemble the laptop to do this: just remove the bottom cover and unscrew the cooling system.
When replacing a processor, it is worth considering the socket type and CPU generation. You need to choose a replacement so that both the connector and the architecture of the old and new chips match. Even if the purchased CPU has an identical socket, the motherboard may not recognize it if such a processor model did not yet exist at the time the laptop was created. To clarify the compatibility of the laptop and the selected “new thing,” you should contact the technical support of the computer manufacturer, consult with specialists in the service center or on a thematic forum.
Processor socket on laptop board
Finding a new CPU may be difficult: laptop processors are less common on the market than desktop processors.
Virtual memory
On Windows XP and later versions, virtual memory is enabled by default: a specific partition of the hard drive is allocated a specific space that the system accesses if there is not enough available RAM. Simply put, virtual memory (page file) allows you to increase performance at the expense of your hard drive.
To configure virtual memory:
- Right-click on the “Computer” icon.
- Open Properties.
- Go to "Advanced Options".
- Expand the "Advanced" tab.
- In the Performance field, open Settings.
- Click "Edit" on the "Advanced" tab.
This path is relevant for the “seven”, Windows 8 and Windows 10. On XP the order is the same, only in the system properties you need to immediately open the “Advanced” tab. In the virtual memory settings window that appears, you can set automatic selection of the paging file size, specify the size manually, or disable the function. Let's take a closer look at how to independently set the amount of virtual memory:
- The initial size is 1-1.5 times the amount of physical RAM (if you have 2 GB of RAM, then set it to 2-3 GB of virtual memory).
- The maximum size is 2 volumes of RAM.
These are the recommended parameters, but there is one subtlety: if you do not have an SSD drive, but a regular HDD, then the allocated volume will be fragmented. This has a bad effect on performance, so in this case it is better to leave the initial and maximum sizes the same - equal to the size of the physical RAM modules.
If the page file has already been fragmented (its size has been dynamic for a long time), then you cannot simply change its size. You need:
- Set to "No paging file".
- Reboot the system.
- Open the virtual memory settings again and specify the size of the paging file.
You will receive a swap file that will not fragment and will help slightly increase your computer's performance.
What is a page file?
The paging file is a special reserved space on the hard drive that is used as RAM when there is a shortage of it.
In other words, if, for example, an application needs more RAM than you have installed, then the lack of RAM will be compensated by this page file.
However, you can’t just go and install a 16 GB swap file with only, say, 2 GB of RAM on board. It is not advisable to do this for the following reasons:
- The paging file is significantly slower than RAM. It can compensate for the lack of RAM, but not speed. Thus, you may even slow down the system.
- Frequent use of the paging file accelerates wear on the hard drive. After all, it is intended more for storing information than for constantly rewriting it.
But in any case, the page file should always be enabled! Because if there is not enough RAM, the computer can start to slow down very much, but this will not happen if the paging file is enabled. Let's figure out how to enable it and configure it correctly.
How to enable and configure the paging file?
Just repeat after me. I’m showing the example of Windows 7. But in any case, everything will be the same for you.
First, go to the computer properties, that is, right-click on the “My Computer” icon, and then select “Properties”.
Next, select “Advanced system settings”.
Then go to the “Advanced” tab, look for a section called “Performance” on it and click on its “Options”.
Here again go to the “Advanced” tab, look for the “Virtual Memory” section. Yeah, this already tells us something. And here's what Windows itself tells us:
The page file is an area on the hard drive used to store virtual memory pages.
Well, almost the same thing as I told you. In short, click “Change”.
After this, you will need to select the hard drive volume on which the paging file will be stored. It seems to me that it is better to create it on the system volume (for me it’s the C: drive) to avoid transferring the system file cache from the volume to the volume. But if the system volume is almost completely filled with Windows, then any other volume of the hard drive will do. And one more thing. This is important, so I’ll highlight:
For optimal and balanced operation, it is recommended to make the paging file volume one and a half times larger than the existing amount of RAM.
Of course, this is approximate, otherwise you will now begin to calculate, convert GB to MB and so on (and one GB does not contain exactly 1000 MB, so calculating this is not as easy as it seems). No, only approximately.
Is it possible to improve the video card on a laptop?
Replacing the video processor in a laptop may be of interest not only to those who are fond of computer games. Programs that use multi-threaded computing and GPGPU functions load not only the CPU, but also the GPU. Improve performance by replacing the video card with a more powerful one. As with the processor, this feature is not supported by all laptop models. Atom-based devices cannot be upgraded. The graphics accelerator update is also not available for models with a built-in video card that do not have an expansion slot on the board.
A laptop video card soldered on a board cannot be improved
In budget laptops, the graphics chip is often installed separately from the CPU, but also using the BGA method. It is theoretically possible to change it, but you will have to spend money on the services of a specialist with professional soldering equipment.
If the graphics processor is removable, you can also change it to a more powerful one yourself. You just need to find a newer, connector-compatible video card on sale. Laptops use the MXM connector, which is much smaller than full-size PCI-E, but belongs to the same data transfer standard. There are two generations of this interface, each of which contains several standard sizes of contact groups. They are only partially compatible with each other. Within the same generation, you can install smaller modules in a larger slot, but not vice versa. Different generations are not compatible with each other.
Removable laptop video card can be replaced
The luckiest ones are the owners of budget versions of laptops belonging to the mid-range category. In such laptops, manufacturers use the same versions of the motherboard, but to reduce cost they install inexpensive processors with built-in video and leave the slot for discrete graphics empty.
Dynamic RAM performance and a ridiculous idea on how to increase it
A little history
At the dawn of computing, dynamic memory worked quite well at the processor frequency.
My first experience with a computer was with a clone of the ZX Spectrum computer. The Z80 processor processed instructions at an average of 4 clock cycles per operation, with two clock cycles used to regenerate dynamic memory, which gives us, at a frequency of 3.5 MHz, no more than 875,000 operations per second. However, after some time, processor frequencies reached a level where dynamic memory could no longer cope with the load. To compensate for this, an intermediate link was introduced in the form of cache memory, which made it possible, through operations performed on a small amount of data, to smooth out the difference in the speed of the processor and main memory. Let's look at what computer RAM is now, and what can be done with it to increase the performance of the computer system.
Briefly about static and dynamic memory
Memory is built in the form of a table consisting of rows and columns.
Each cell of the table contains an information bit (we are discussing semiconductor memory, however, many other implementations are built on the same principle). Each such table is called a “bank”. A chip/module can house multiple banks. A set of memory modules is projected into the linear address space of the processor depending on the bit capacity of individual elements. A static memory cell is built on the basis of a trigger, which is usually in one of the stable states “A” or “B” (A =! B). The minimum number of transistors for one cell is 6 pieces, while the complexity of routing in cells apparently does not allow making static memory modules of 1 gigabyte, at the price of a regular module of 8 gigabyte.
A dynamic memory cell consists of one capacitor responsible for storing information and one transistor responsible for isolating the capacitor from the data bus. In this case, it is not a suspended electrolyte that is used as a capacitor, but the parasitic capacitance of the pn junction between the “substrate” and the electrode of the transistor (increased especially for these purposes, usually they try to get rid of it). The disadvantage of a capacitor is the leakage current (both in itself and in the key transistor), which is very difficult to get rid of; in addition, it increases with increasing temperature, which entails the possibility of distortion of the stored information. To maintain reliability, “regeneration” is used in dynamic memory; it consists of periodically updating the stored information at least for a specified period during which the information retains a reliable value. The typical regeneration period is 8 ms, while updating information more often is possible, but less often is not recommended.
Otherwise, the operating principle is identical and is as follows:
— the initial fetch of a memory row leads to access to its entire contents, which is placed in a buffer row with which further work occurs, or multiplexing of access to columns occurs (the old, slow approach); — the requested data is transferred to the main device (usually the CPU), or the specified cells are modified during a write operation (there is a slight difference here; for static memory, a cell of the selected row can be directly modified; for dynamic memory, the buffer row is modified, and only then writeback is performed the contents of the entire line in a special loop); — closing and changing a memory line is also different for different types of memory; for static memory, an instant line change is possible if the data has not changed; for dynamic memory, the contents of the buffer line must be written in place, and only then can you select another line.
If, in the early days of computing, each read or write operation completed a full memory cycle:
— line selection; — read/write operation from a cell; — change/re-select a line.
Modern operations with “synchronous memory a la DDRX” chips are as follows:
— line selection; — read/write operations of row cells in groups of 4-8 bits/words (multiple accesses within one row are allowed); — closing the line with recording information in place; — change/re-select a line.
This solution made it possible to save data access time when, after reading a value from cell “1”, it is necessary to access cells “2, 3, 4, or 7” located in the same row, or immediately after the reading operation, it is necessary to write back the changed value .
Learn more about how dynamic memory works in conjunction with cache
The memory controller (in the chipset or built into the processor) sets the block address and line number (the high part of the block address) to the memory chip/module.
The corresponding block is selected (we will consider further work within one block) and the resulting “binary number” is decoded into the positional address of the line, after which the information is transferred to the buffer, from which the data is subsequently accessed. The time in cycles required for this operation is called tRCD and is displayed in the “9-9-9/9-9-9-27” schemes in second place. After the row is activated, you can access the “columns”; for this, the memory controller transmits the address of the cell in the row, and after a time “CL” (indicated in the above diagram “x-x-x” in 1st place) data begins to be transmitted from the memory chip to the processor (why in the plural? because the cache intervenes here) in the form of a package of 4-8 bits (for a single chip) to a cache line (the size depends on the processor, the typical value is 64 bytes - 8 words of 64 bits, but there are and other meanings). After a certain number of clock cycles required to transmit a data packet, you can generate the next request to read data from other cells of the selected row, or issue a command to close the row, which is expressed as tRP specified as the third parameter from “x-x-x-...”. When closing a line, data from the buffer is written back to the block line; after the end of writing, you can select another line in this block. In addition to these three parameters, there is a minimum time during which the line must be active “tRAS”, and a minimum time for a full cycle of working with the line separating two commands to activate the line (affects random access).
grossws April 19, 2016 at 12:40
CL - CAS latency, tRCD - RAS to CAS delay, tRP - row precharge, CAS - column address strobe, RAS - row address strobe.The performance of semiconductor technology is determined by the delays of circuit elements. In order to obtain reliable information at the output, it is necessary to wait a certain time for all elements to assume a stable state. Depending on the current state of the memory bank, the data access time changes, but in general the following transitions can be characterized:
If the block is at rest (no active row), the controller issues a row select command, as a result, the binary row number is converted to a position number, and the contents of the row are read in “tRCD” time.
Once the contents of a row have been read into the buffer zone, a column select command can be issued, which converts the binary column number to a position number, in CL time, but depending on the alignment of the low addresses, the order of bit transmission may change.
Before changing/closing a line, it is necessary to write the data in place, since during reading, the information was actually destroyed. The time required to restore the information in the “tRP” line.
According to the full specification for dynamic memory, there are many more time parameters that determine the order and delay of changes in control signals. One of these is “tRCmin”, which determines the minimum time for a full row cycle, including: row selection, data access and writeback.
The RAS signal determines whether a row address has been issued; The CAS signal determines whether a column address has been issued.
If previously all control was transferred to the side of the memory controller and controlled by these signals, now there is a command mode, when a command is issued to the module/chip, and after some time data is transferred. It is better to read the standard specifications, for example DDR4, for more details.
If we talk about working with dram in general, then during mass reading it usually looks like this:
set the row address, set RAS (and removed it after a clock cycle), waited for tRCD, set the address of the column from which we are reading (and every next clock cycle we set the next column number), set CAS, waited for CL, started reading data, removed CAS, read the rest of the data ( more CL bars).
When moving to a non-next row, precharge (RAS + WE) is done, tRP is waited, RAS is executed with the row address set, and then reading is performed as described above.
The latency of reading a random cell naturally follows from what was described above: tRP + tRCD + CL.
In reality, it depends on the previous state of the “memory bank” that is being accessed.
It is important to remember that DDR RAM has two frequencies:
— the main clock frequency that determines the rate of command transmission and timings; — effective data transfer frequency (double the clock frequency with which memory modules are marked).
The integration of a memory controller increased the speed of the memory subsystem by eliminating the intermediate transmission link. An increase in memory channels will require the application to take this into account, for example, a four-channel mode with a certain file location does not provide a performance increase (12 and 14 configurations).
Processing one element of a linked list with different steps (1 step = 16 bytes)
Now a little math
Processor: Processor operating frequencies now reach 5 GHz.
According to manufacturers, circuit solutions (pipelines, predictions and other tricks) allow executing one instruction per clock cycle. To round off the calculations, let's take a clock frequency of 4 GHz, which will give us one operation in 0.25 ns. RAM: let’s take as an example RAM of the new DDR4-2133 format with a timing of 15-15-15.
Given:
processor Fclock = 4 GHz Tcycle = 0.25 ns (also the execution time of one operation “conditionally”)
RAM DDR4-2133 Fclock = 1066 MHz Fdate = 2133 MHz tclock = 0.94 ns tdate = 0.47 ns SPDmax = 2133 MHz * 64 = 17064 MB/s (data transfer rate) tRCmin = 50 ns (minimum time between two row activations)
Data acquisition time
From registers and cache, data can be provided within a clock cycle (registers, level 1 cache) or with a delay of several processor cycles for level 2 and 3 caches.
For RAM the situation is worse:
- row selection time is: 15 clk * 0.94 ns = 14 ns - time before receiving data from the column selection command: 15 clk * 0.94 ns = 14 ns - row closing time: 15 clk * 0.94 ns = 14 ns (who would have thought)
This means that the time between a command requesting data from a memory cell (if it is not in the cache) can vary:
14 ns - the data is in the already selected row; 28 ns - the data is in an unselected row, provided that the previous row is already closed (the block is in the “idle” state); 42-50 ns - the data is in another row, while the current row needs to be closed.
The number of operations that the (above) processor can perform during this time ranges from 56 (14 ns) to 200 (50 ns line change). It is worth noting that the cache line loading delay is added to the time between the column selection command and the receipt of the entire data packet: 8 bits of the packet * 0.47 ns = 3.76 ns. For a situation where the data will be available to the “program” only after loading the cache line (who knows what and how the processor developers screwed it up, memory according to the specification allows you to output the necessary data ahead), we get up to 15 more missed cycles.
As part of one work, I conducted a study of memory speed, the results showed that it is possible to completely “recycle” memory bandwidth only in operations of sequential memory access; in the case of random access, processing time increases (using the example of a linked list of a 32-bit pointer and three double words, one of which is updated) from 4-10 (sequential access) to 60-120 ns (line change), which gives a difference in processing speed of 12-15 times.
Processing speed
For the selected module we have a peak throughput of 17064 MB/s.
Which, for a frequency of 4 GHz, makes it possible to process 32-bit words per clock (17064 MB / 4000 MHz = 4,266 bytes per clock). The following restrictions are imposed here: - without explicit scheduling of cache loading, the processor will be forced to idle (the higher the frequency, the more the core simply waits for data); — in “read modification write” cycles, the processing speed is reduced by half; - multi-core processors will divide the memory bus bandwidth between the cores, and for a situation where there are competing requests (degenerate case), memory performance can deteriorate by “200 times (line changes) * X cores.”
Let's do the math:
17064 MB/s / 8 cores = 2133 MB/s per core in the optimal case. 17064 MB/s / (8 cores * 200 skipped operations) = 10 MB/s per core for the degenerate case.
Translated into operations, we get for an 8-core processor: from 15 to 400 operations to process a byte of data, or from 60 to 1600 operations/cycles to process a 32-bit word.
It's kind of slow in my opinion. Compared to DDR3-1333 9-9-9 memory, where the full cycle time is approximately 50 ns, but the timings are different:
— data access time is reduced to 13.5 ns (1.5 ns * 9 clock cycles); — the transmission time of a packet of eight words is 6 ns (0.75 * 8 instead of 3.75 ns) and with random access to memory, the difference in data transfer speed practically disappears; — peak speed will be 10,664 MB/s.
It hasn't gone too far. The situation is helped a little by the presence of “banks” in the memory modules. Each “bank” is a separate memory table that can be accessed separately, which makes it possible to change a row in one bank while data is being read/written from a row in another; by reducing downtime, it allows you to “clog” the data exchange bus to capacity in optimized situations.
Actually, this is where the ridiculous ideas came from.
The memory table contains a specified number of columns, equal to 512, 1024, 2048 bits.
Taking into account the row activation cycle time of 50 ns, we get a potential data transfer speed: “1/0.00000005 s * 512 columns * 64 bit word = 81,920 MB/s” instead of the current 17,064 MB/s (163,840 and 327,680 MB/s for 1024 and 2048 column rows). You will say: “only 5 (4.8) times faster,” to which I will answer: “this is the exchange speed when all competing requests are addressed to one memory bank, and the available bandwidth increases in proportion to the number of banks, and the increase in the row length of each table (will require an increase in the length of the operating line), which in turn depends mainly on the speed of the data exchange bus.” Changing the data exchange mode will require transferring the entire contents of the line to the lower-level cache, for which it is necessary to divide the cache levels not only by speed, but also by the size of the cache line. So, for example, by implementing the “length” of the N-level cache line to (512 columns * 64 word size) 32,768 bits, we can, by reducing the number of comparison operations, increase the total number of cache lines and, accordingly, increase its maximum volume. But if we make a parallel bus in a cache of this size, we can get a reduction in the operating frequency, from which we can apply another approach to organizing the cache, if we break the specified “Jumbo” cache line into blocks along the length of the upper cache line and exchange with small portions, this will allow you to maintain the frequency of operation by dividing the access delay into stages: searching for a cache line, and selecting the desired “word” in the found line.
As for the direct exchange between the cache and main memory: it is necessary to transfer data at the rate of access to the rows of one bank, or with a certain margin for distributing requests to different banks. In addition, there is a difficulty with the access time to data located in different areas of the line; for serial transmission, in addition to the initial delay associated with fetching the line, there is a data transmission delay depending on the amount of data “in the packet” and the transmission speed. Even the rambus approach may not be able to cope with the increased load. The situation can be saved by switching to a serial bus (possibly differential), by further reducing the data bit depth, we can increase the channel throughput speed, and to reduce the time between the transmission of the first and last bit of data, apply division of line transmission into several channels. This will allow you to use a lower clock frequency of one channel.
Let's estimate the speed of such a channel:
1/0.00000005 ns = 20 MHz (line change frequency within one block) 20 MHz * 32,768 bits = 655,360 Mbit/s For differential transmission with the same data bus size, we get: 655,360 Mbit/s / 32 channels = 20,480 Mbit/s per channel.
This speed looks acceptable for an electrical signal (10 Gbit/s for a signal with built-in synchronization at 15 meters is available, why not 20 Gbit/s with external synchronization at 1 meter), however, a further increase in the transmission speed is necessary to reduce the transmission delay between the first and last bit of information may require an increase in bandwidth, with the possible integration of an optical transmission channel, but this is a question for circuit designers; I have little experience working with such frequencies.
and then Ostap suffered
Changing the concept of projecting the cache onto main memory to using “main memory as an intermediate ultra-high-speed block storage device” will make it possible to shift the prediction of data loading from the controller circuitry to the processing algorithm (and who better knows where it will go after a while, obviously not the memory controller), which in in turn, it will allow you to increase the size of the external level cache, without compromising performance.
If we go further, we can further change the concept of orienting the processor architecture from “switching the context of the executive device” to “the working environment of the program.” Such a change can significantly improve code security by defining a program as a set of functions with specified entry points for individual procedures, an accessible region for storing data for processing, and the ability to hardware control the ability to call a particular function from other processes. Such a change will also make it possible to more efficiently use multi-core processors by eliminating context switching for some threads, and to use a separate thread within the available “process” environment to process events, which will allow more efficient use of 100+ core systems.
PS: Incidental use of registered trademarks or patents is accidental. All original ideas are available for use under the "anthill" licensing agreement.
How to improve laptop performance in other ways
Besides replacing the CPU and GPU, there are other methods to improve the performance of your laptop. They are often easier and cheaper than replacing the CPU and GPU.
Adding RAM
With the advent of larger memory chips on sale and the transition to 64-bit operating systems, software developers began to pay less attention to RAM consumption. Even simple Opera or Chrome, with a large number of open tabs, can consume more than 2 GB. 3 or 4 GB of RAM installed in a laptop becomes insufficient even for simple tasks.
Fortunately, SO-DIMM memory boards used in laptops can be freely purchased at electronics stores. Replacing old sticks with more spacious ones allows you to speed up your laptop PC.
You can increase the amount of RAM in your laptop
Such an upgrade is not possible in some inexpensive netbooks, where the chips are directly soldered to the motherboard. But there are relatively few such models on the market, so this problem is insignificant for 95% of users.
Replacing the hard drive
Another way to improve laptop performance is to replace the drive. Laptop hard drives are subject to mechanical stress when moved and used on trips. They negatively affect the condition of mechanical structural elements, lead to the appearance of bad sectors, slowing down the speed of the hard drive. A motion sensor built into the drive is triggered by small vibrations and triggers the head parking mechanism. This also helps reduce the speed of the computer (when driving in public transport or while using a laptop placed on your knees).
Replacing the hard drive with an SSD will speed up your laptop
To avoid this, you can replace your hard drive with a solid state drive (read about it). Owners of laptops with an installed CD/DVD drive (which is most likely rarely used or not needed) can save money by installing an SSD as the main drive and replacing the DVD drive with a capacious hard drive (there are special adapters for this).
A special adapter allows you to install an HDD or SSD in place of a DVD drive
Additional Tips
To conclude our story, we note that the performance increase from overclocking RAM does not exceed a few percent, which is not so noticeable for the user. Overclocking can be considered justified if:
- the system uses an integrated graphics processor (at the same time it consumes RAM resources);
- there is no technical or financial possibility of installing more productive RAM on the computer.
If you nevertheless decide to increase the performance of RAM by overclocking it, take into account all the tips given in this article. This will minimize the likelihood of system crashes due to incorrect RAM settings and allow you to get the most out of your computer that it is capable of.
What to do if the laptop does not see the new RAM
How to fix the situation:
1. Check to see if the RAM sticks are inserted correctly. Try inserting them again.
2. Make sure the memory and board are compatible. Mismatches rarely occur: usually, unsuitable modules are simply not installed in the motherboard.
3. Test the RAM for malfunction. This can be done using the free software Memtest86.
4. Clean the contacts. You can use a simple eraser, but better - a cotton rag soaked in isopropyl alcohol. When everything is dry, blow the dust off the bar and place it in the motherboard.
5. Testing on another PC. If you have a computer with a suitable board, try installing the bracket there. Works? Perhaps on the first desktop the motherboard itself is damaged. Does not work? It's definitely a matter of RAM. If there is no additional PC, then you can try inserting other compatible modules into your device.
Usually, if the RAM is chosen correctly, there are no problems.
Decoding the random access memory module (RAM)
Now let's decipher the name of the memory module presented in one of the popular online stores:
Crucial Ballistix Sport XT BLS2C4G3D18ADS3CEU DDR-III DIMM 8Gb KIT 2*4Gb PC3-14900 CL10
- So, manufacturer Cruisal, the kit consists of 2 modules of 4 Gb each.
- Memory standard DDR-III and form factor DIMM, that is, for a desktop PC.
- Bandwidth - 14900 Mb/s
- Timing - CL10
- In this case, you need to look at the detailed characteristics of the product, or calculate it yourself by dividing the bandwidth (14900) by 8.