On computers running the Windows 10 operating system, users may experience disk load from the Microsoft Compatibility Telemetry process. If such a load on computers with a solid-state drive is not noticeable, then in a system installed on a regular hard drive the user will feel discomfort while working.
This article will tell you what Microsoft Compatibility Telemetry is, and only then we will look at what needs to be done first when Microsoft Compatibility Telemetry loads the Windows 10 disk. Definitely the easiest solution is to disable Microsoft Compatibility Telemetry in Windows 10.
What is Microsoft Compatibility Telemetry (CompatTelRunner.exe) High CPU and disk usage
Also known as Microsoft Compatibility Telemetry , CompatTelRunner.exe is the name of a built-in Windows service that helps developers collect reports on your system's performance. This information is typically collected by Microsoft in the background to create a list of logs, errors, and other things that may be useful for working on future fixes. This service was originally added to Windows 7 and 8.1 in update KB2977759. Unfortunately, although CompatTelRunner.exe actually performs a useful function, it can sometimes not work properly, resulting in high resource consumption. As a result, most systems start freezing and crashing due to high CPU and disk usage. To fix this, you should disable this service. Don't worry, this can be done without harming the system. Some people advise uninstalling it, but there is no point in doing so, since it will reinstall itself after some time. Microsoft Compatibility Telemetry was created for informational purposes only, so you can disable it without any problems. Below we have provided a complete guide on this topic:
Deactivation of MCT
Following are some methods through which you can disable Microsoft Compatibility Telemetry in Windows 10.
By executing commands
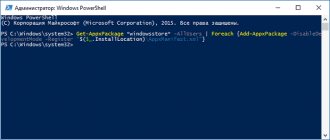
At the command prompt, enter the following lines:
sc delete dmwappushservice
reg add “HKLM\SOFTWARE\Policies\Microsoft\Windows\DataCollection” /v AllowTelemetry /t REG_DWORD /d 0 /f
Restart your PC and make sure that the process in Windows 7 is disabled.
Using the list of services
- Press Win+R, then type services.msc.
- Find Diagnostics Tracking Service in the list.
- Open its properties and select "Disabled".
Restart your PC and check the functionality of Windows 8 and other versions.
Using parameters
There are several basic ways to disable Microsoft Compatibility Telemetry using the CompatTelRunner.exe file, but before doing so, you should know what CompatTelRunner.exe is and what it does.
What is CompatTelRunner.exe
This is the process used to update your OS to the latest version or make related changes. The process is part of Windows Update, specifically KB2977759, which acts as a compatibility update for Windows 7 RTM (Developer Edition). It requires high storage bandwidth, which can slow down your PC and you will most likely want to get rid of it. Users have complained about numerous CompatTellRunner.exe files showing up in the Task Manager that are using up the CPU and HDD. It is used to run diagnostics on a PC to determine if there are potential compatibility issues, and collects program telemetry information if included in Microsoft's Customer Experience Improvement Program. The process allows Microsoft to guarantee compatibility when you install the latest version of Windows OS.
Make sure Windows has all updates downloaded.
Before disabling the Telemetry service itself, you should first install the latest updates. There is a possibility that Microsoft Compatibility Telemetry is not working properly. If you haven't updated your system for a long time, then downloading new updates may solve the problem. To check if you have new updates, do the following:
- Press Windows Key + I simultaneously to open Settings . Select Update & Security .
- In the right pane, click Check for updates . Wait for Windows to find new updates and install them. Sometimes users will see an Install right away because Windows has already found the updates in advance.
- Once the update process is complete, restart your computer and check if anything has changed.
Check the integrity of system files.
It's unlikely that Microsoft Compatibility Telemetry may not work correctly due to missing or corrupted files. Such files are usually linked between many Windows services that provide proper communication. If some of these files are missing, then it may be causing problems with that service. Below we'll use both SFC (System File Checker) and DISM (Deployment Image Servicing and Management) to help detect and repair missing components. Here's how:
Using SFC
- Open Command Prompt by entering cmd in the search box next to the Start Menu button.
- Right-click on Command Prompt and then Run as administrator .
- Once the console opens, type sfc /scannow command and press Enter .
- When the recovery process is complete, restart your computer.
Using DISM
- Open Command Prompt as we did in the previous step.
- Copy and paste this command DISM.exe /Online /Cleanup-image /Restorehealth.
- Press Enter and wait for Windows to finish scanning and fixing.
- After that, restart your computer and install the update again.
After performing these scans, restart your computer and check if the CPU and Disk resource consumption has changed. If this doesn't help, move on to the other steps listed below.
Change the settings in the Diagnostics and Feedback section.
The next part of the steps will focus on configuring or disabling settings related to the Microsoft Compatibility Telemetry service. First, let's start by changing the amount of diagnostic data sent to Microsoft servers. Sometimes settings may choose to send broader data logs, including applications and features and enhanced error reporting, which may cause higher resource consumption. Therefore, changing this option to a basic data collection plan may make your system easier to operate. This is unlikely to solve the problem completely, but it may help improve performance a little.
- Open Settings as we did in the very first method above. Then select Privacy and go to Diagnostics & Feedback in the left pane.
- Make sure the Required diagnostic data is selected. If not, just click on it to turn it on.
Now you can close all windows and see the result. If nothing has changed, you can proceed to completely disabling the CompatTelRunner.exe service.
Why does the MST service load my computer?
The manufacturer provides the following: If the application does not receive a response from the server, it must stop working until a stable connection is established. However, in practice this is not possible, so the processor and hard drive are overloaded.
There are many possible reasons why MST cannot boot a disk.
- Damage to files involved in information transfer.
- There was an error connecting to the server.
- Possible network connection failure.
Hard drive overload up to 100% due to improper handling. You can use Task Manager to search for utilities in the list and see how many resources they are taking up on your system.
Completely disable Microsoft Compatibility Telemetry
After all the above steps have been tried, you can go to extreme measures and disable the service itself. This can be done in three ways - through the Task Manager, Local Group Policy Editor or Registry Editor. You can select any of them below. If you're not sure whether the Telemetry service is down, try all three solutions.
Using Task Manager
- Press the Windows + R keyboard shortcut to open the Run prompt, then paste taskschd.msc and click OK .
- Go to Library > Microsoft > Windows > Application Experience .
- After this, you will see a list of tasks displayed in the right pane.
- Find and right click on Microsoft Compatibility Appraiser . Select Disable and reboot your system.
Using the Local Group Policy Editor
- Press Windows + R at the same time as we did above and type gpedit.msc to open the editor.
- Go to Computer Configuration > Administrative Templates > Windows Components > Data Collection and Preview Builds .
- Among the list in the right pane, right-click on Allow Telemetry and then Edit .
- Select Disabled , click Apply and OK to save the changes.
- Restart your computer and see if that solves the problem.
Using Registry Editor
- Press Windows + R again, but paste regedit this time.
- Click Yes User Account Control window appears .
- Once you are in the Registry Editor , go to HKEY_LOCAL_MACHINE\SOFTWARE\Policies\Microsoft\Windows\DataCollection.
- Then right-click on the DataCollection , hover over New and select DWORD Value (32-bit) at the end.
- Name the newly created entry AllowTelemetry , then right-click on it and select Edit .
- You will see a new window. Be sure to change the value from 1 to 0 under the Value item.
- Click OK and restart your computer.
- Regardless of which option you chose, CompatTelRunner.exe should now be disabled and no longer burden your system.
Turning off telemetry in Windows 10 settings
Before disabling CompatTelRunner, make sure that the Internet is turned off on the system. WAN access can send data to the server about a user's attempt to delete a process. This instruction is suitable not only for Windows 10, but also for Windows 8.1:
1To disable the CompatTelRunner exe process in Windows 10, open the All settings window by clicking on the corresponding tile in the Action Center;
Fig.6 – Notification Center window
2Use the search field to find Privacy settings and select the item shown in the picture;
Fig. 7 - privacy settings
3In the new window, go to the General tab and disable all options. This will stop your data from being uploaded to the developer's server. Even if the process is visible in the task manager or registry, it will not be able to send your data.
Fig. 8 - changing privacy settings
After making changes, restart your computer.
Disable the connected user interface and Telemetry service.
The penultimate step on our list is to disable the Connected Users Experiences and Telemetry service. In fact, this is the name of one service designed to perform the same purpose - sending usage data to Microsoft servers. Since the Connected User Experiences and Telemetry service starts every time your system boots, we will simply change this value in the settings for this service. If the previous steps did not resolve the issue, try this method below.
Completely remove CompatTelRunnner.exe.
Although deleting the Telemetry service is useless in most cases, we will still show how to do it for educational purposes. Of course, this measure will most likely help you avoid excessively high CPU load, but only for a while. Windows has a list of essential services that are installed by default on every operating system. If something is missing, Windows is more likely to detect the missing service and load it after some time. Therefore, high CPU and disk usage will be temporarily resolved, but will return once Windows installs the remote service back (unless the Telemetry service starts running on its own). In any case, it is usually pointless to remove CompatTelRunnder.exe from your system, but here are the steps to do so:
Before starting the process, it is important to obtain administrator rights, otherwise you will not be able to remove CompatTelRunnder.exe. Also, if you have two accounts created on your computer, be sure to sign in to the one that has administrator rights. Once everything is ready, follow these steps:
These instructions will help us change administrator rights. Then we must grant the necessary permissions to delete the file:
- Close all windows and right-click on CompatTelRunner again. Select Properties > Security and Advanced as above.
- Then select the user from the list and select Edit right at the bottom.
- Finally, you can customize what permission should be granted. Select Allow and Full Control to make any changes to the file. Apply the changes and close the tab so that you can finally remove CompatTelRunner.exe .
MCT Disabling Results
By disabling MCT, you will reduce the load on the system, and Microsoft will no longer receive information about your computer. If the first news is extremely positive, then the second is worth thinking about.
On the one hand, you will increase your level of privacy. On the other hand, this will not help you protect your personal information from attackers, but you will leave the company that develops the operating system you use without useful information. It is impossible to identify all problems without having extensive information from a wide variety of types of users. Here you will have to decide for yourself whether it is worth helping the company improve the product it produces for you or not.
The MCT service is responsible for collecting and sending data. If its operation fails, it begins to take up a significant portion of system resources. In this case, it must be deactivated, and this can be done in different ways. There are both built-in methods and third-party programs that allow you to disable MCT.
«>