It's time to write a step-by-step tutorial for people who are holding an iPhone for the first time in their lives. I have always been unnerved by the fact that many people, when buying phones, entrust the initial setup of the device to the sellers of the same stores.
And everything would be fine, but in most cases it’s like this, because... subsequently the user is either left with a locked device or loses all data.
To prevent this from happening, today I will tell you how to set up an iPhone so that everything is correct and works.
We all know the interface of this wonderful phone very well, but when it comes to any settings, many people’s hands begin to shake. Yes, indeed, the iPhone interface is intuitive even for small children, but even most adults do not know how to properly set up an iPhone after purchase.
In this article, I will walk you by the hand through all the settings that you MUST DO. By initially setting up your iPhone correctly, you will save yourself from problems with data loss and other unpleasant situations in the future.
You've likely already completed some of the steps below, but be sure to go through each one again to make sure all the necessary features are enabled on your device.
Be sure to remember all passwords that you enter during the setup process. Bad memory? - Then write it down in your notebook!
Turning on the device
The next step is to turn on the smartphone. To do this, the user must first connect the device to the charger and plug it into an outlet. With zero (or minimal) battery charge remaining, activation will not be possible. It will simply stop. To successfully cope with the task, you need to have a charge of at least 20-30%.
How to activate iPhone 5S? On the top panel of the Apple phone, you need to press the power button. After holding it pressed for several seconds, the device will start.
If everything is done correctly, a silver apple will light up on the display. This is a sure sign that it's time to take the next step.
How are the two concepts “activation” and “Apple warranty” related?
Many users who pick up an Apple device for the first time are wondering what the warranty means when starting from scratch for the first time or again? The fact is that the activation process is accompanied by the automatic start of the warranty time from Apple. The warranty period does not begin on the day of purchase, but rather from the moment the Apple ID account was created (or re-authorized).
Important note! The initial text accompaniment “Hello” (Hello and other greetings in different languages) in no way signal that the device is new. This inscription appears regardless of whether the device is new straight out of the box or used with the content reset.
Sim card
The first thing to do is insert a SIM card into the phone. Apple devices have excelled in this regard. They provide a special process for connecting a SIM card.
How exactly to proceed? The owner of an Apple phone must:
- Take a paper clip for the SIM card.
- Insert the mentioned component into a special hole on the side panel of the smartphone.
- Click on the paper clip.
- Remove the SIM card slot.
- Insert the SIM card into the slot.
- Return the component back to the phone.
Ready! Now you can move on. Activation of iPhone 5S continues.
Communication
An iPhone is primarily a means of communication, therefore it has all the necessary tools for communication. The Phone and Messages apps are classic methods of communication. Apple also has tools for connecting over the Internet, such as iMessage (a tool for sending messages between devices) and FaceTime (video calls similar to those you can make using Skype).
In addition to already built-in applications, you can also use third-party ones, which means that any social networks (Twitter, Facebook, VKontakte) and instant messengers (Viber, WhatsApp, Telegram) will migrate to the iPhone along with the user.
Getting in touch using other VoIP services is not prohibited, that is, you can download and start using Skype on your iPhone.
Activation errors and how to solve them
If the activation process fails, check the following:
- Problems with the modem or router. Perhaps the whole problem lies in the lack of Internet via a wireless network or the gadget is unplugged from the outlet. Check Wi-Fi functionality on other devices;
- SIM integrity. Make sure that the SIM card has not been damaged (especially in cases where the card was cut with a special tool). Perhaps the contacts were erased due to the SIM being outdated. Check if it is installed correctly;
- Long wait for an answer. The response from Apple servers may take some time (depending on the company's workload and data transfer speed). Don't worry if your phone can't get permission to use your current operator for a few minutes. You should sound the alarm if the wait takes more than an hour;
- Reboot. Roll back your progress by entering your details again. Just hold down the “Power” button to turn it off, all entered information will be erased;
- Alternative method. If you were unable to launch the gadget using the first method described, then try doing it through iTunes.
If for some reason the phone freezes and does not respond, then you should contact Apple service or a service center for diagnostics. But in general, the iPhone activation process is not complicated and you cannot confuse any items or buttons here. On most Apple devices, the procedure is the same, so after activating the device once, you can do it the next time without any instructions.
Share link:
OS update
The new line of iPhones runs iOS 10. The first version of the iOS 10 operating system is pre-installed on all phones. In October, Apple released a new firmware version (10.2). Also, other updates are planned to be released in the future. During the first startup of the phone, the firmware will be updated over the air. So, whenever you buy your iPhone 7, you are guaranteed to get the latest version of the OS.
After restoring the data and identification settings, the “Software Update” window will appear. If new firmware is available for your region, it will appear in the corresponding list of updates.
Click on “Download and Install” to begin the OS update process. To download the software, you must enter your personal Apple ID and password. Next, the phone will begin the update process, during which you will be shown information about new features and services. Immediately after the update, you will be able to turn on Siri and select a comfortable degree of pressure on the Home key.
iPhone activation process
Before turning on your iPhone, make sure you have the correct size SIM card (micro for older models and nano for newer ones). Without a SIM, activation will not be possible. You will also need a wireless Internet connection (or cellular connection) or a computer with iTunes (as an option for restoring a backup). And only after you are convinced of all the steps listed above, you can safely hold down the Power button (or hold down the lower volume key and the lock button on iPhone 10 and higher).
There are no legal methods for activating a device without a SIM card! In versions of iOS 7 and higher/lower, such a vulnerability actually existed, but starting with iOS 7.1.2 it was fixed.
Activation on iPhone
To activate, you only need an iPhone, no other devices are needed. All you need to do is complete the following steps:
- Paste SIM-card in a special tray. The slot is located on the side of the device, namely on the right side (on very old devices, starting with the first iPhones like 2G, 3G, 3GS, the slot is at the top). The hole can be opened using the tool that comes with the device itself on a piece of cardboard paper. If you don't have this device on hand, you can use a paperclip (do not open the tray with sharp objects, such as needles, as this may cause damage). Insert a paperclip or tool into the thin hole and remove the slot, then insert a SIM card of the appropriate size (remember, these are micro or nano sizes);
- Launch the gadget . After you have inserted the SIM card, turn on your iPhone. To do this, you need to hold down the power button for a few seconds. When the signature apple icon appears, you can release the key. The welcome screen should appear. Press the Home button or pull up the shade on iPhone 10 and above models;
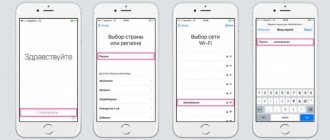
- Calibrating Basic Settings . The welcome screen does not leave much choice of actions: you just need to select the language in which all information on the phone will be displayed (application names, notification texts, system texts, and so on). The next step is to select your region of residence;
- Internet connection. It is best to use a Wi-Fi wireless connection - this will make the setup more stable. After selecting the region and language, the smartphone will check for available Internet networks. If there is one, you will have to enter a password. In another case, you can use the mobile Internet if it was previously connected to the SIM card. To do this, click on “Use cellular network”. Both LTE and 3G will work. Important note! You won’t be able to activate your iPhone if you use a gadget that distributes mobile Internet as a Wi-Fi connection;
- Setting up services and authentication. Wait until synchronization finishes after the last step and proceed to the next settings. Some of them are optional and can be skipped by calibrating them later.
- Set up Face ID (facial recognition) or Touch ID (fingerprint recognition). In both cases, you will have to either place your face in the camera frame several times and perform a circular movement of your head, or put your finger on the “Home” button several times;
- Create a password code. Initially, you are always prompted to enter a six-digit combination. The number of characters can be changed to 4 by clicking on “Passcode settings.
- Selecting the type of setting.
- Quick setup . If you're upgrading from an older iPhone model to a new one, or you have another gadget in the ecosystem (like an iPad), you can significantly speed up the setup process. It is enough to bring the device close to the new device. The only requirement is that you have the iOS 11 update or higher;
- Restoring from a copy iCloud. Move “over the air” all the data that was saved on your previous Apple device. These are photos, videos, notes, messages (it all depends on what you saved in iCloud). Select one of the latest synchronizations from the list after entering your account information;
- Use your gadget like new. If you purchased an Apple device for the first time and have not used iTunes or iCloud services, then select this item and set it up as new.
- Create an account or log in. The next step is to enter your Apple ID login and password. If you already have an account, then simply enter the required data. If you don’t have an account, then click on “Don’t have an Apple ID or forgot it?” It is better not to skip this important step, since the Apple ID is tied to important services: Apple Pay, iTunes, iCloud and others. If you don't want to create an account right now, select "Set up later in Settings" and then "Don't use." Or create a username and password right now, additionally answering some simple questions;
- Setting up additional services . Optionally, if desired, the user can calibrate geolocation (determining the current location), configure the Siri voice assistant, the True Tone function on iPhones 8, 10 and higher, agree or refuse to share device diagnostic reports with Apple, select the type of interface display, etc. . It is not necessary to configure this; you can always find these services in “Settings”;
- Last step. Click on the “Start work” button.
Activation via iTunes
Another method of activating an Apple device is to turn it on for further work through the iTunes utility. The multifunctional program allows you to organize space, purchase and download content, backup or delete data. It can be downloaded for free on the official Apple website. For the following instructions, you will not need a PC and a USB cable.
- Connect the USB cable to the computer (for smooth operation it is better to use the original one);
- The program should start automatically. If this does not happen, turn it on yourself;
- Wait a while until the utility recognizes the connected gadget and contacts the company servers;
- On the left side of the screen, find the icon of your device and click on it;
- The program will ask you to log in to your Apple ID. Register or log in with your username and password. You can skip this step and create an account after complete setup, but, most importantly, do not forget to do this later;
- The next step is iTunes will offer to restore the backup or start the iPhone as new;
- Wait a while. The iPhone should restart. After this, setting up the phone is no different from the previous instructions.
Restoring data from backup if necessary
Everything is simple here: if you completely delete your data, make a backup copy, and then, when setting up a new gadget, select “Restore from iCloud copy.” Log in using your ID and find the most recent backup in the list. Recovery may take several minutes, and the process must not be interrupted!
Setting up an Apple ID
The next step involves setting up an account that allows you to sign in to various Apple services. You can log in using your already registered Apple ID (username), create a new account, or skip this step altogether.
If you have an account, you should log in to it by writing a username and password, which you will not need to provide later when logging into Apple services. The account allows you to download applications and music from the App Store, synchronize several gadgets, make video calls between them for free, communicate in chats, etc. To obtain it, you must select “Create an Apple ID for free.” Next, you will need to indicate your date of birth, first name, last name, and click “Next.”
Please note that the account creator must be at least 18 years old, otherwise registration will be denied.
After entering your personal data, you must provide an existing email address or get it for free in iCloud. This will be your Apple ID login. Next, you need to come up with a password, select a security question, write down the answer to it, and also enter a backup e-mail. Next, the system will offer to subscribe to updates and news from Apple or refuse by moving the slider. The final step in setting up Apple ID is to accept the Terms of Use. This step cannot be skipped, so you must click “I Accept.” This completes the creation of your Apple ID.
Setting up a network connection
Internet access is possible through a mobile operator or via a Wi-Fi network. For the first option, go to the “Cellular Communications” item in your smartphone’s settings and turn on the “Cellular Data” mode. By default, cellular data mode is turned on, but be careful with it when roaming.
To connect a Wi-Fi network, go to the appropriate item in your smartphone settings and select the network from the list. The system will remember it and, when detected again, will automatically connect to it without entering a password.
Results
We figured out how to get an Apple phone to work for the first time. The instructions below will help you activate any iPhone. The main thing is to properly prepare for the procedure.
At first, you can refuse to create an AppleID. Without this profile, the phone owner simply will not have the right to use Apple services. For example, iCloud or AppStore. Therefore, it is advisable to immediately start Apple ID.
Optimizing battery life
One of the features of all modern smartphones is working with GPS. This function allows you to determine the location of the device, which helps you navigate the area, calculate the route to work, or find devices in case of loss.
The disadvantage is a significant reduction in the operating time of the gadget on a single charge. Therefore, although the geolocation function is necessary for the iPhone 5s, settings to optimize its operation are still worth making. First of all, go to “Settings>Privacy>Geolocation Services”, here you can disable all unnecessary programs that require access to GPS, as well as system services, such as compass calibration, collection of diagnostic data and frequently visited places.
Another way to reduce power consumption is to disable background updates; to do this, go to “Settings>General>Content Update” and disable unnecessary programs (those that, in your opinion, can do without constantly running in the background). These two simple procedures for optimizing the operation of the iPhone 5s, setting up the geolocation and disabling background services, will significantly extend the life of your smartphone.