12/25/2018 Category: Additional functions and capabilitiesAuthor: Ekaterina Vasilyeva
Both native Windows tools and various third-party applications allow you to create screenshots of displays. The main question that arises when using all these tools is where to subsequently look for saved screen images?
- When “screenshots” are saved to the clipboard
- When a screenshot is immediately saved as a file to your hard drive
Video: Where are pictures taken using Print Screen and Windows?
- How to change the location where screenshots are saved to your hard drive
- Saving screenshots in Windows 10 when using special programs
Saving a screenshot using standard means
1. When you press the Print Screen (photo of the entire screen), Alt + Print Screen (photo of the active window) buttons, the resulting image is saved to the OS clipboard. The clipboard is a designated area of RAM that stores temporary copied data. Often users use the clipboard to copy and paste text. The screenshot is also saved in the clipboard until it is overwritten by other information.
To save a screenshot on your computer, you need to paste it into a graphics editor or other program. For example, use the built-in Windows Paint application. In the search, write the word Paint, then launch the application. Pressing the combination Ctrl + V will paste the screenshot into the application window.
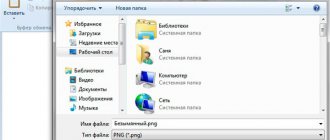
After working with the image, click on the floppy disk icon or Ctrl+ S. Specify the name, file type and folder where screenshots of the Windows 7, 8, 10 screen will be saved and click “save”. Look for the resulting image files in Explorer in the specified folder.
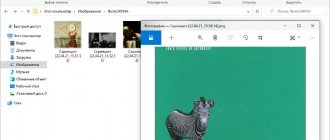
2. The snipping tool allows you to work with display snapshots in Windows. Enter the name “scissors” into the search area, then launch the application. When you click the “create” button, the image is placed in the application editor window. Saving a screenshot is carried out as in the Paint program.
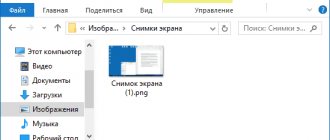
3. In Windows 8, 10, a function was introduced with the ability to save a screenshot directly as a file to your hard drive. The image is created by pressing the Win + Print Screen button in Png format. To find the screenshot, open Windows Explorer. In the left navigation, select “images,” then navigate to the “screenshots” directory where screenshots are saved.
Linux
The procedure is similar to the instructions for the Windows OS. But, unlike Windows, the operating system in question offers an expanded range of capabilities without downloading additional programs.
To create a screenshot of the entire screen, press the Print Screen key. Then in the window that appears, select the path where the screenshots are saved.
You can press Alt+PrtScn and activate the print screen of only the currently active tab on your computer. It’s easy to find a screenshot taken on a computer in the “Pictures” folder.
You can also take a photo of the selected area on the monitor. First, press the Shift+PrtScn combination, which activates the screenshot function. Next, select the desired area for the screen. By default, the print screen is saved in the “Pictures” folder.
Additional settings are available in the Gnome-Screenshot service. The utility is located in “Accessories” – “Applications”. The option to delay the shot for a few seconds is often used. The program stores the screenshot in “Pictures”.
Screenshots of the computer screen are created simply and are located in the standard system folder of the device or in a path you specify yourself. Sometimes they use a special program to take and then find a screenshot faster.
Saving a screenshot by programs
Programs that create screenshots and capture video from the screen with sound usually use the same Print Screen key, or their own combination of buttons. In this case, the storage location of the files is specified in advance in the settings, or you yourself specify each time where to save the pictures.
As an example, let's look at the process of saving a screenshot in the Magic Screenshot program. Download the archive here, unpack it, then install and run the program. In the tray, click on the butterfly icon to exit to the main menu.
Click “settings”, set the parameters for yourself and click “save”. Select “screen” or “fragment” and select the screenshot area with the mouse. Here you can draw on the image, apply text, and undo changes. Click the “save” button, set a name and indicate the location where to save the screenshot.
Now you understand where the screenshot is saved in Windows 7, 8, 10, depending on the selected method. In most cases, you specify the storage location for the image file yourself.
Where are Windows 10 screenshots saved?
Screenshots of a computer or laptop screen are taken quite simply, but where they go after they are taken is not always clear.
It all depends on how the screenshot was taken, or rather with what program, key or combination thereof. Now we will look into this issue.
From the previous article, you learned how to make the taskbar transparent in Windows 10. Today we will figure out where screenshots taken in Windows 10 go.
Interesting! In the article on how to take a screenshot on a computer, we have already discussed this issue. I advise you to read it, there are some pretty interesting things on this topic.
- 1 Where are screenshots saved on Windows 10 1.1 1 - When you press the Print Screen button
- 1.2 2 - When pressing the WIN + Print Screen buttons
- 1.3 3 - Sketch on a fragment of the screen or scissors
- 1.4 In conclusion
Windows Phone
Let's find out where the screenshots taken on Windows Background are located. The method for creating a screen depends on the device version. Windows Phone 8.1 owners press and hold Volume Up + Power at the same time. The resulting screenshot will be immediately saved in the “Screenshots” album.
Windows Phone 8 provides a combination and “Power”. The photo in the Photos folder is viewed.
Where are screenshots saved on Windows 10?
1 - When you press the Print Screen button
When you take a screenshot by pressing the Print Screen key, it goes to the clipboard and is not saved anywhere yet. To get it out of there, you need to paste it into some graphic editor, maybe Paint - it is installed in Windows by default.
Important! Screenshots taken using the WIN + SHIFT + S key combination are also included in the buffer.
1. Open the start menu, type the word - PAINT and open the found program.
2. Paste a screenshot from the clipboard by simultaneously pressing two keys - CTRL + V.
3. Now you can save it by clicking on the menu - “File” - “Save As”.
Interesting! To avoid performing these steps after taking each screenshot, in Windows 10 it is better to use the key combination - WIN + PRINT SCREEN. This way the picture will be immediately saved in PNG format to the user’s folder.
2 - When pressing the WIN + Print Screen buttons
When you press these key combinations, the screenshot is automatically saved to the user’s folder - “Images” in PNG format. This is much more convenient than simply taking a screenshot only to the clipboard.
1. To get to this directory, open the start menu. To do this, left-click on the Windows icon in the taskbar or press the WIN key on your keyboard. Then click on the image icon in the menu, this will open the user's image folder.
2. Go to the “Screenshots” directory and see all the screenshots you have taken.
If you want to change the location where screenshots are saved, then while in the same folder, click on the free space and open “Properties”.
Switch to the "Location" tab and move it to any location convenient for you. After that, click on the “OK” button.
If you often take screenshots, for example, you can select a folder on your desktop so that it is always at hand. It's really convenient.
3 - Sketch on a fragment of the screen or scissors
If you take pictures using any of these utilities, the result is always displayed first in the program window. And to save the screen you need to click on the save button (the floppy disk icon).
Interesting! If you use special software for these purposes, then look in its settings where the created images are placed.
Finally
In Windows 10, there is little point in using third-party applications to take a screenshot. Everything can be configured the way it’s convenient, plus there are several tools for creating pictures.
iOS
The saving instructions are suitable for users of the latest versions of iPhones, starting with iPhone 6/6s.
- Turn on your phone and go to the tab, image, or panel you want to pin.
- Simultaneously hold the “Home” and “Lock” buttons for a couple of seconds. The first is the round interface piece on the front of the phone. The second is located in the upper right part of the device.
- If a click is heard after pressing a key, the image has been successfully created.
- You can find the image in the Photos application, Camera Photos section.
In other versions, the folder name changes (iPhone 6/6S - “Recently added”). You have to look for the printscreen at the bottom of the list.
Where are “screenshots” saved in “top ten” if you take a photo using standard means?
It is not at all necessary to download and install a third-party utility on your PC to create permanent snapshots of your PC display. Let's look at all the standard Windows services that allow you to take screenshots.
When “screenshots” are saved to the clipboard
Images will be placed in the buffer when you press once on the Print Screen button (abbreviated PrtSc) on the keyboard, located to the left of the Delete key at the top right or on the side of the F12 key, but provided that you do not have third-party software installed for creating “screenshots” (or if it is disabled).
Press the Print Screen key to copy the picture you see on the screen to the clipboard
This creation method is not popular because it takes more time than other methods:
- It involves further launching the graphical utility Paint - open it through the Start panel or the Run window, which is called by the combination Windows + R, and the mspaint command.
Run the mspaint command in the window - Paste the image, temporarily saved in the buffer, into the utility window using the V + Ctrl key combination or through the “Insert” button on the top panel of the editor.
Insert the screenshot you took using the button on the panel - After this, save the image created in Paint to a location convenient for you.
Save the file to any location convenient for you
Pictures taken using the hotkey combination Print Screen and Alt are also saved to the buffer. It allows you to capture not the entire display, but only the window that is currently active on the PC (the cursor is usually located on it). In this case, you also need to resort to the help of a graphical application to manually save the image, which is currently only located in a temporary block of PC memory.
When a screenshot is immediately saved as a file to your hard drive
The most convenient and instant way to make and save a “screen” of the display at the same time is through the hotkey combination Windows and PrtSc.
Press the combination of PrtSc and Windows
Hold down these two keys - the “internal camera” of the system will work, which will immediately save it to the “Screen Screenshots” folder located on the system drive. At the moment of pressing, the screen will become slightly darkened - this will mean that the command has been completed. The screenshot itself will be located in the folder “My Computer” - “Images” - “Screen Screenshots” (or Screenshots).
Select a previously saved screenshot
If you don’t find the “Images” directory in the left panel, take a longer route: open the root folders of the system drive (usually a local drive with the letter C - it should have the Windows logo on it). Now we launch the following folders: “Users” - the directory with the name of your current account - the “Images” section.
Open the “Images” section in the user’s folder
Video: Where are pictures taken using Print Screen and Windows?
How to change the location where screenshots are saved to your hard drive
If you are not satisfied with the location of the saved “screenshots”, change it as follows:
- Expand the contents of the Screenshots section in the image directory on your system drive using the instructions from the previous section of this article. Right-click on the white free field in Explorer, and then click on the “Properties” line in the gray menu.
Click on the “Properties” item in the context menu - In the location section in the new window, click on the button to move the directory.
In the “Location” tab, click on “Move” - In another window, select a directory on any of your local hard drives, for example, it will be Desktop. Click on "Select Folder".
Select a new save folder - Click "Apply". Apply changes to the window
- Confirm the directory change in the warning window. If you want to return the original folder, just click on the “Default” button in the same window.
Confirm that you want to change the folder
If you take a screenshot using Snipping Tool
The built-in system utility “Scissors” has wider functionality compared to the Print Screen button (creating marks on “screens”, independently determining their sizes, creating pictures of different shapes, etc.). The advantage of this method is that the user himself determines in which folder he should save a specific current snapshot during its creation:
- Launch the utility through the Start panel (in the directory with standard Windows applications). Or enter your query as the program name in the Search panel.
Enter your query in the search - Select a mode if desired (rectangle, freeform, entire display, or specific window).
Select one of the modes from the drop-down menu - Add a delay period if necessary if, for example, you need to prepare a screen in advance. Click on the first “Create” button.
Set the delay period if desired - The display will become pale - select the area of the future “screen” with the left mouse button.
Select an area of the screen - When you release the mouse button, a graphic editor will appear - make notes on the picture if necessary.
Edit the picture if necessary - In the “File” menu, select save or press S and Ctrl at once.
Save the file using S and Ctrl - Select a location to save the file.
Select a folder to save the screenshot
Video: several methods to make a “screen” using built-in Windows tools
Android
Most Android phones take screenshots the same way.
- The power and volume down buttons are pressed.
The method is suitable for users of Samsung or Asus.
- To further work with the finished image, go to Gallery – Screenshots, where all screenshots taken by the device are stored.
On HTC and Samsung Galaxy S2-S4 smartphones, hold down the Home and Lock keys. The answer to the question in which folder the screenshot is located is similar: Gallery-Screenshots.
Thousands of users know that you can take a screenshot using special applications downloaded from the Play Market. An example program is the “LightShot” utility. Among the main advantages of the service: a convenient graphic editor, the ability to view pictures from the prnt.sc website directly in the application and share screenshots with friends on social networks. The screen is quickly and easily captured, the photo is sent by mail, or the system saves it in the Lightshot Gallery folder (or with a similar name).
Saving screenshots in Windows 10 when using special programs
For those who do not want to use built-in programs, third-party applications for “screenshots” have been created - LightShot, ScreenShooterJoxi, PicPick, Microsoft Snip Editor, Gyazo and many others. They all differ in functionality and where images are saved. In the LightShot utility, for example, the image is saved each time to a separate location, which the user selects after capturing the screen (as is the case with “Scissors”):
- Click on Print Screen (the utility must be active - its icon is located in the Windows tray).
- Select an area of the screen with the mouse. On the left side of the selected area there will be tools for editing, and on the bottom there will be buttons to save the image in Google, a cloud of your choice, as well as icons for copying the image to the clipboard and saving (floppy disk icon). If you copy it to the clipboard, you will need to launch Paint later. For example, click on the floppy disk.
Select a zone and click on the floppy disk icon in the lower right corner of the zone - Select a location to save in Explorer.
Save the screenshot made in the program to any folder
In the ScreenShooter utility, you can pre-define a place to save “screens”:
- Find the application icon (blue circle) in the Windows tray and right-click on it. Point the arrow to the "Save to" menu.
Select "Save to" from the menu - Select one of the following options (prompt when saving, hard drive, various cloud drives, or clipboard).
Choose one of the proposed options - If you select a hard drive, a ScreenShooter folder will appear in the “Images” directory, which we talked about earlier, and all “screenshots” will be automatically saved into it. You can change this location by following the guide described in the “How to save a save location” section in this article.
The Screenshooter directory has appeared in the “Images” folder
“Screens” can be saved to various places: clipboard, cloud storage, folder on any hard drive. The standard creation tool - the Print Screen button - takes and places a snapshot of the display on the hard drive if the Windows key is pressed together with it. The directory to save in this case is the Screenshots folder in the “Images” block on the system drive. If desired, this location can be changed. The standard “Scissors” utility, as well as third-party applications, place images in those folders that the user selects directly when creating them.
Option 3: Third Party Programs
When it comes to third-party screenshot programs, many of them save screenshots to the user's Pictures library folder by default. Some screenshot programs can create child folders in this directory, for example, the Ashampoo Snap program creates a directory of the same name in the “Images” directory.
There are also applications that, when creating the first screenshot, offer to manually specify a permanent location for saving them. If you are at a loss with where to search, open the screenshot settings and see where the pictures are saved.
We are glad that we were able to help you solve the problem. In addition to this article, there are 12,719 more instructions on the site. Add the Lumpics.ru website to your bookmarks (CTRL+D) and we will definitely be useful to you. Thank the author and share the article on social networks.
Describe what didn't work for you. Our specialists will try to answer as quickly as possible.
Ways to take screenshots in Windows 10
There are currently several options for taking a screenshot in Windows 10. They differ in the buttons that need to be pressed and the type of content that is captured. There are the following methods.
- PrintScreen( PrtScr). Capture is carried out using the PrtScr button. The entire desktop (even with the taskbar) acts as the capture object.
- Win+ PrintScreen ( PrtScr). An alternative to the method described above. The only difference is the key combination you press.
- Alt+ PrintScreen. This key combination allows you to capture exclusively the currently active window.
- Win+ Shift+ S. This method appeared in the top ten with the release of the Creators Update. However, few people use it. Enough of all of the above.
- Game panel. This thing allows you to take a screenshot during the game without any problems. You just have to call the panel using the Win+G button combination.
Where are screenshots stored when using PrtScr?
It's impossible to find them because they don't exist. The pictures are simply saved to the clipboard. In order to see them, you will have to launch some graphic editor (for example, Paint) and paste them there. So, first we launch Paint. It is located in the standard applications in the Start menu.
Now you need to insert an image. It is better to use the Ctrl+V key combination for this. The image will appear in the editor. You can edit it or save it in format.
Now let's look at other options. Where do screenshots go if you use other key combinations to create them? There are not so many places in the operating system for storing user graphic files.
Getting a picture of the application's appearance
If you want to save a picture of some running application (appearance image), for example, the Windows Calculator, it is easier for you to use the Alt key combination +
PrintScreen.
of the active application
to the clipboard .
Let's give an example: open the calculator and press Alt + PrintScreen.
Now let’s open the graphic editor Paint (available in any version of Windows) and press the Paste button, or the keyboard shortcut Ctrl + V, which is easier. We will see that the editor now contains an image of a calculator:
By inserting an image into the editor you can:
Copying part of an image in Paint
If you need to cut out part of the screen image
, the easiest way to do this is in the
Paint
.
After copying an image to the clipboard using PrintScreen or Alt +
PrintScreen go to
Paint
and press Ctrl + V.
Next, turn on the “ Select”
»
and use the mouse to select the area required for saving.
Then, press Ctrl + C to save part of the screen to the buffer, open a new file using the File
, “
New”
and applying Ctrl + V you will get the previously copied section of the image.
Folder for screenshots in Windows 10
Everything is simple here. By default, screenshots are placed in the “Screenshot” directory, which is located at drive “C”, “Users”, “Username”, “Pictures”. This is where all the screenshots are stored.
All screenshots can be found there. And it makes absolutely no difference what combination was used: to capture the entire desktop or just one active window. Now let's talk about the game panel.
Where to look for screenshots if you used the Game Bar
In this case, screenshots and videos are saved in the “Capture” directory, which is located at “C”, “Users”, “Username”, “Videos”. There, the panel saves the screenshots you take and the videos you record while you play.
In general, in the panel settings you can select your own directory to save the recorded content. Then you definitely won’t need to look for it. This option is preferable, because there may not be enough free space on the system disk.
What is a screen
This word is translated from English as “screenshot”, from the English words “screen” - “screen” and “shoot” - “frame”, “snapshot”. Essentially, this is an instant photograph of the monitor at the moment when the user is busy with some work on the computer. Having taken such a photo, the user can send it from his computer by e-mail or print it by calling the context menu and selecting “Print” (if a printer with a refilled cartridge is connected to the computer). Usually there is no need to save them, because they are needed only for temporary use. However, sometimes such a need still arises.
So, for example, the need to save a screenshot may arise if:
- the screen contains payment data, which the user must send by email as proof of payment;
- the user periodically records his achievements in computer games using screenshots;
- the editor must send the translator or copywriter a screenshot of the text indicating any errors made;
- the screen contains instructions on how to work in a computer program, and the user must send these instructions by mail. For example, programmers and system administrators often do this when providing remote assistance to their clients.
Where are screenshots taken with the Print Screen button stored?
Using the Print Screen key and a combination of other buttons with it, you can place the screen on the clipboard and then save it using a graphical application or save it as a file on disk. Also, the screenshot button may have the following names: Prt Sc, PrntScrn, Print Scr and similar.
1. Screenshot without direct saving to disk. This option involves doing it in several ways, namely:
- By simply pressing the Prt Sc button, a snapshot of the entire screen is taken in size equal to the resolution of your display matrix.
As a result of using the three methods above, the screenshot is placed in an area of RAM called the clipboard and remains there until it is saved or overwritten with other information. There can only be one screenshot in the buffer, and old screenshots are overwritten by new ones.
To save to disk, software for working with graphic files, for example, Paint or another graphics editor, is launched. Then, by pressing Ctrl + V, the screenshot is pasted into the graphic editor window. Next, the image is processed or not (at the user’s discretion) and saved. For example, in Paint you need to click the floppy disk icon, which will result in a save window popping up. Here you need to specify the storage location, future name, file type, then click “Save”. The resulting image is placed in the selected directory.
2. Screenshot with direct saving to disk. When you press Win + Prt Sc, the display briefly darkens, and a snapshot of the entire screen is created, placed directly on the disk.
You should look for the screenshot in Explorer (Win + E). Having launched Explorer, in the left menu you need to select the “Images” item, then go to the “Screenshots” directory, where the saved images with numbers in ascending order will be located.
The snapshot storage folder can be moved to another location. Right-click on an empty area of the “Screenshots” folder and select “Properties” from the menu. On the "Location" tab, click the "Move" button.
Next, specify a new empty directory and click the “Select Folder” button. Click OK. In the warning, choose whether or not to move files from the old location, and click Yes accordingly. As a result, the selected folder will turn into the “Screenshots” folder, and now all new screenshots will be saved to it.
Where are screenshots taken by apps saved?
There are many apps that take display photos. Let's look at the process of saving a screenshot using the built-in Scissors application as an example. This application can be found through the search form. It allows you to take a photo of the entire display, a window or an element, an arbitrary and rectangular area. Another advantage is that there is a delay of up to 5 seconds, during which you can perform certain actions.
When the mode is selected and the necessary parameters are set, all you have to do is click the “Create” button. The screenshot will be placed in the program window. You can do some minor image editing here. Next, you need to click on the floppy disk icon, specify the location, name and image format. The last step is to click the “Save” button. Third-party applications also work on the same principle; basically, screenshots on Windows 10 are saved to the location specified by the user.
Where to find screen photos taken by the game bar
Using this tool you can take a snapshot of the game, you can get more information about the game panel here. Pressing the Win + G keys during a game brings up a message where you need to check the box “Yes, this is a game.”
As a result, a panel will appear at the bottom. The picture is taken using the Win + Alt + Prt Sc keys or by pressing the corresponding button on the panel.
Successful saving is accompanied by a message appearing in the notification area.
Open File Explorer. In the left menu, select “Video”, where there will be a “Clips” directory. Screenshots of the game are saved there, the name of which will contain the name of the game and the date.
You can move the storage location of the Clips directory. This process is described above.
Now you know where to find screenshots on a computer with Windows 10. They are either in the clipboard, where they need to be saved with any graphic editor, or they are created directly on disk. It all depends on the method.