How to save a screenshot directly to your desktop?
To instantly take a screenshot of your entire screen, use the Win (with checkbox) + PrtSc (Print Screen) key combination. The system will take a screenshot and immediately save it to your hard drive in PNG format. You will find the finished file at: “This PC” → “Images” → “Screenshots”.
Interesting materials:
How to remove error 601? How to clear an error on a Canon printer? How to remove wallpaper residue? How to remove padding between table cells? How to remove the panel from the bottom? How to remove potassium permanganate stains from linoleum? How to remove a subscription on an iPhone? How to remove a blank line in Word? How to remove dust from painted wallpaper? How to remove hyphenation?
Saving a screenshot by programs
The most convenient way to take PC screenshots is using special third-party programs. Most of them, when installed, create their own subfolders on the hard drive where screenshots taken with their help are stored. Let's look at the most popular screenshots.
Where to find a screenshot taken in PhotoSCREEN
The PhotoSCREEN program allows you to capture and save any part of the screen as a picture. The program is convenient because it has several export methods: you can select a folder to save manually or leave the default settings. If you choose the second option and don’t know where to find the screenshot, look in the “Images” system folder in the “PhotoSCREEN” subfolder.
Folder “PhotoSCREEN”
However, photographing your computer desktop is not the only useful function of this program. Additionally, you can use the following options:
- Apply text immediately when creating a screenshot;
- Draw any things on the screenshot using the Pencil tool;
- Create a numbered list;
- Select an important area using a marker;
- Add lines, arrows, rectangles to the frame;
- Blur the selected area of the photo;
- Send the picture to the Internet or copy it to the clipboard.
Instantly edit images and add notes
Where does Yandex Screenshot save pictures?
Users of the desktop version of Yandex.Disk know that this software includes a screen capture tool. There is a folder on the disk itself where screenshots are automatically saved. If necessary, they can be sorted by creation date. You can take a photo using the hotkeys Ctrl + Shift + 3 or using the shortcut on the desktop. In the second case, users also have access to a built-in editor.
Yandex screenshot saves screenshots in cloud storage
However, unlike PhotoSCREEN, the application does not allow you to select a folder manually, so you may wonder where to look for the screenshot on your laptop or PC. In both cases, the created frame is automatically sent to the “Screenshots” subfolder on Yandex.Disk. You can access these files both from your computer and through a browser in the online version of the service.
Where does Lightshot save pictures?
LightShot is a special application that is built into the system and “intercepts” the action of the PrintScreen button. This greatly simplifies the work, since the print screen does not have its own control panel, which often raises the question of where screenshots are saved on a laptop or PC. As a result, when you press this key, the user is taken to the LightShot interface, where you can also overlay labels, shapes, etc. on the screen.
There are several export options here. You can copy the image to the clipboard, upload it to the Internet to the service and send it to social networks. Including the user can download the file to any folder on the hard drive. If you clicked “Save” without tracking the folder, and did not have time to notice where the screenshot was saved, you can find the picture in the “Documents” -> “LightShot” folder.
Look for screenshots in the “Documents” -> “LightShot” folder
Where to look for screenshots if you used the Game Bar
In this case, screenshots and videos are saved in the “Capture” directory, which is located at “C”, “Users”, “Username”, “Videos”. There, the panel saves the screenshots you take and the videos you record while you play.
In general, in the panel settings you can select your own directory to save the recorded content. Then you definitely won’t need to look for it. This option is preferable, because there may not be enough free space on the system disk.
Where is the screenshots folder in Windows 7 and 8
Now let's move on to Windows 7 and 8 and figure out which folder the screenshots are saved in here. If you take a screenshot using the PrtSc or Alt+ PrtSc key (to capture the active window), it will be saved to the clipboard in the PC's RAM. It will remain there until you:
- Don't restart your computer.
- Do not make a new screen using the same keys or copy (cut) any text using Ctrl+C (Ctrl+X).
This means that in order not to lose the screenshot you took, you need to save it somehow. You can paste it into a text editor or add it to a presentation. Just open the document, place the cursor in the desired place and press Ctrl+V.
You can read: how to take a screenshot in Windows 7, and how to take screenshots in Windows 8.
If the photograph taken needs to be processed or saved as a picture in a certain format, then you will have to use any graphic editor. The simplest one is Paint. It is installed on the system by default, so you don’t have to think about it. You can choose something professional, such as Photoshop.
Let's focus on Paint. Use the search bar to find the application and launch it.
Next, press Ctrl+V to paste the screenshot into the program. Process, trim if necessary. Now you need to save the image. Click "File" - "Save As" - "Select one of the suggested formats."
An Explorer window will open. Here you need to select the directory where the picture should be saved. Name it something and click “Save”. Well, you have a folder with screenshots that are saved as pictures.
If you are not satisfied with this and you need to first make a lot of screenshots, and then insert or view them when necessary, then you should use special programs. The fact is that all screenshots and copied text are stored on the clipboard. I won’t talk about it here, read the detailed article at the link. This file is located at the path: C:\Windows\system32 and is called clip.exe. You can't just open it like that. But using a special utility is easy.
You can search and choose any one. I'll show you all the steps using Clipdiary as an example. You can download it from the official website at the link: https://clipdiary.com/rus/. After downloading, run the program and from now on it will remember everything you screenshot.
The main window (1) will display all copied information. If you select a picture, it will appear on the side (2). The program itself runs in the background and is located in the tray (3) until you close it yourself. This means that you select the desired picture, then in the utility at the top, click the “Copy” button. All that remains is to open a text document or graphic editor and paste the selected screenshot there.
Another tip: try taking a screenshot using the Win+PrtSc button. If the screen goes dark for a moment, go to the folder with images, the photo you took will be saved there by default. I will talk about this in detail in the section below.
What is it and why is it necessary?
A screenshot is a snapshot of an image that is located on the desktop of a desktop computer or laptop. The user has the opportunity to screen the entire screen or a separate part of it.
What is ScreenShot and how to do it
Note! This option is often used to solve system problems in the computer, and also allows you to save and send reminders.
Top reasons to learn how to take screenshots on a PC or laptop/netbook:
- system conflicts, various buggies. It’s hard to disagree that solving such problems over the phone takes a long time, especially if the user doesn’t understand what the problem is and tries to explain the reason to the system administrator in his own words. There is also the problem of explaining to grandma where to click to perform this or that action. It’s much easier to quickly take a screenshot and send the photo or print it;
- ability to save a web page. With a dynamic site structure, the user will not need to re-search for specific text, or plot a route in online maps;
- saving program settings. This point has a lot in common with saving web pages. This option is especially useful for those who are just learning to use a particular program. To avoid mistakes when using it, do not look for answers to questions on the Internet, it will be enough to simply open previously taken images from the computer screen.
- creation of illustrations. In order not to spend a lot of time on retouching and choosing lighting during the filming process, it is enough to instantly illustrate the text in a message or blog. This is very convenient when creating recipes, various master classes and infographics;
- protected file. Correcting the text on such images is quite difficult, so screenshots are often used as evidence, for example, a remittance report. If, for example, a user needs a report, but does not want to publish personal data, you can use any photo editor and cover up personal information;
- lists and correspondence. For example, while texting with a friend, I managed to come up with a funny joke that I wanted to share with. A screenshot will help in this case. A child or husband forgot the list of products that need to be purchased at home; again, a screenshot will help solve the problem.
The most common location of the PrintScreen key on the keyboard
Important! There are a huge number of ways to take a screenshot. To do this, you can use built-in programs or turn to third-party services. The whole process takes a few seconds, but the ability to take a screenshot itself has many advantages. No additional program settings are required.
Browser extensions
Screen capture may be necessary while surfing the Internet. To take a browser screenshot, standard programs may be inconvenient. In this case, it is better to use browser extensions that will “capture” the screen without capturing the taskbar and address bar.
Yandex browser
An extension that allows you to take an instant screen photo is already built into the new version of Yandex Browser. To use it, just activate the function by following the following chain:
Using the extension is very simple. Just click on the feather and select the desired area of the screen. The rest of the space will become "inactive" gray. Toolbars for working with the image will appear next to the selected area.
Mozilla Firefox browser
Fox Browser, like its advanced counterparts, has a built-in utility for creating snapshots. Click on Explorer and select “Page Actions”. A menu appears, at the bottom of which there is the option “Take a screenshot”. Click on it and get a photo.
You can also right-click anywhere on the screen to activate the “image capture” function. The interactive tooltip contains a “Screenshot” sub-item.
In Mozilla Firefox, you can take a screenshot of both the area displayed on the screen and the entire page the user is viewing.
Another advantage of Mozilla is the two-week storage of taken screenshots on the Firefox cloud.
Screenshot in Opera
Opera developers follow trends, so their brainchild was one of the first to acquire the Screenshot function. To activate it, just go to your browser settings, where you can find the “Screenshot” tab.
The button combination “Ctrl+Shift+5” or the camera icon on the sidebar of the browser has the same function.
Opera allows you to capture both the entire screen and its individual fragments. Another useful function is editing the resulting frame and adding effects, vector elements and even stickers to it.
There are many ways to take a screenshot of your computer screen. Each user can choose the most convenient one for themselves. You should look for saved screenshots in the place provided by the selected program.
How to take a screenshot using standard Windows tools
The first thing that comes to mind here is, of course, hot keys and functions already built into the system. You don't need to install software, but there is a downside. Standard services do not offer additional options for editing and quickly sending a picture; for example, you cannot take a long scrolling screenshot or send the result to instant messengers.
Screenshot in Windows XP
On Windows XP you can only create a screenshot of the entire monitor. Also, to save the picture you will need a graphics editor. To capture content:
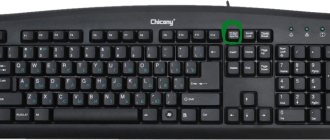
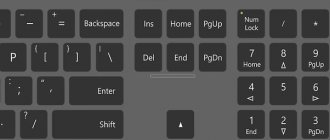
- Open the window you want to capture. Press Alt+ Print Screen (PrtScr) at the same time. Where to look for the button? See the picture below. Most often it is located at the top of the keyboard between F12 and Scroll Lock.
- Launch any photo editor, for example Paint. In the top menu bar, click “Edit” - “Paste”. You can use the combination Ctrl + V.
- Click on the "File" menu and export the image.
Location PrtScr
Snipping Tool in Windows 7
You can use the built-in Scissors application. It will allow you to remove a selected area or the entire monitor. How to make a screenshot?
- Open the Snipping Tool. To do this, click on “Start” and type the phrase “Scissors” in the search bar.
- Hover over the arrow next to New and choose Freeform, Rectangle, or Full Screen.
- Click "Save As..." and select the appropriate folder.
✦ When using a rectangular fragment, select the desired area with the mouse.
✦ In full-screen mode, the service will capture material immediately after selecting the capture type.
Scissors interface
Recommendations for Windows 8.1, 10
To remove the display on Windows 8 and 10, you can use the Snipping Tool. You can take a quick screenshot using the keyboard:
- Press Win together with Printscreen. The monitor will go dark for a second.
- The document will be saved in “Images” - “Screenshots”.
This will give you a PNG file.
Where are screenshots saved when you press F12?
In the game center next to the “play” button there is a drop-down list. In it you need to click “open game profile folder”. The “ScreenShots” folder will contain all the screenshots.
Interesting materials:
How to remove a stain from silicone sealant? How to remove a pine resin stain? How to remove a superglue stain on a jacket? How to remove an old grease stain? How to remove a rust stain from a white sweater? How to remove a stain from a shirt? How to wake up a PC from hibernation? How to remove faded stains on white? How to remove sweat from a shirt? How to remove vegetable oil from jeans?
Where to send the photo?
Where exactly you place your screenshots is entirely your own business. You can send them by email, save them on disk, print them and burn them - it all depends on the richness of your imagination.
But since screenshots are stored in a specific place - the Windows clipboard - they must first be extracted from there.
This is done as simply as making the copies themselves. Using the keyboard shortcut for pasting from the buffer, Ctrl+V or Shift+Ins. The image receiver can be any program capable of interacting with the clipboard (there are almost no other programs left today) and capable of inserting pictures. This could be standard Paint or Word, or some kind of graphics editor.
If you need to save the picture in image format, then it is preferable to use the Paint Windows program, where you place the screenshot, and then save it in any desired graphic format under any name. For long-term storage of such images, use any folder (preferably a separate one) where your personal data is located and your personal drawings are stored.
If there is no need for further storage of the picture, then you can place the picture in any other program. You just need to remember that the clipboard is not rubber and as a result of its overflow, all data in it is lost.
Source
What folder are the screenshots in?
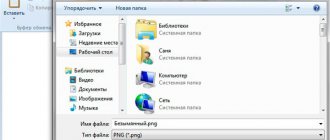
Every version of Windows has a Snipping utility that you can use to quickly take screenshots. So, if you used it, received the desired image, and then simply left the program, agreeing with everything along the way, then look at the pictures below. First there was a question: do you want to save? You agreed.
Then an Explorer window appeared, in which you clicked “Save”. Thus, you have saved the resulting image in *.jpeg format in the default folder.
By the way, the utility assigns the name “Snapshot” to absolutely everything. That is, the previous file will be overwritten by new ones. Therefore, if you do not want to lose anything, rename the pictures when saving.
Now let's figure out where the screenshots folder is. To find it, click on the “Computer” shortcut on your desktop. An Explorer window will open. In it, on the left, select the “Images” item or open the folders one by one: “Drive C:” – “Users” – “Your username” – “Images”. It is in this folder that all pictures made with scissors are saved by default.