If you have Web & App Activity turned on, your searches and activity across Google services are saved in your Google account. Thanks to this, search results appear faster, and you only receive recommendations for applications and content that may interest you.
Note: If you use a Google Account at work or school, to use Web & App Activity, you may need to ask your administrator to enable this optional service in your organization.
Turn activity tracking on or off on your computer
- On your computer, open the Manage Activity page. You may see a request to sign in to your Google account.
- Turn on or off Application and web history.
- When Internet and app activity tracking included:
- Select the Also save Chrome history and activity data on sites, apps, and devices that use Google services.
- Select the Save voice prompts and commands checkbox.
Note: Some browsers and devices may have more options that affect how this activity is saved.
How to view, open browsing history in Google Chrome
Click on the three horizontal stripes in the upper right corner of the Google Chrome browser window to open the menu (in other versions of the browser - a wrench icon or three dots). Then select History - History.
The browsing history window can also be opened by pressing the keyboard shortcut Ctrl+H .
A window with the history of visited pages will open.
Turn tracking on or off on Android
- On your Android phone or tablet, open the Settings app → Google → Manage your Google account.
- Go to the Data and Personalization tab.
- Under Activity Tracking, turn App and Web History on or off.
- When Internet and app activity tracking included:
- Select the Also save Chrome history and activity data on sites, apps, and devices that use Google services.
- Select the Save voice prompts and commands checkbox.
Note: Some browsers and devices may have more options that affect how this activity is saved.
Search and sort
Entries are sorted by date and time. There is a history search where you can enter keywords, as in a regular search, or elements of the site address. Then the entries in the history will be filtered according to the request.
If you click on the three dots at the end of the line of any entry and select Other entries for this site in the drop-down list, the history of visits to this particular site will be displayed.
What activity history is saved
Information about your requests and any other activity on Google sites, applications and services
When "Web and App Activity Tracking" is turned on, Google stores the following data :
- Queries and other actions you make on Google services, such as Maps or Google Play;
- Your location, language, IP address, as well as information about the viewing device used – browser or application;
- Ads and things you buy on advertisers' websites;
- Data from your device, such as recently used apps or contact searches.
Note: Activity may persist even when you are offline.
Information about what you view and other activity on websites, mobile devices, and apps that use Google services
When Web & App Activity Tracking is turned on, you can also save other activities, such as:
- Activity on partner websites and apps that work with Google to display advertising;
- Activity on websites and applications that use Google services, including data provided by Google programs;
- Browsing history in Chrome;
- Information about Android usage and diagnostics, such as battery level or system errors.
To allow Google to store this information:
- Web and app activity tracking must be turned on.
- The Also save Chrome history and activity data on sites, apps, and devices that use Google services must be checked.
Chrome history is only saved if you're signed in to your Google Account and have Chrome Sync turned on.
Note: If someone other than you is using your device, or you are signed in to multiple accounts, your activity may be saved to the default account on your browser or device.
Android devices
Let's start with smartphones running on Android. To figure out how to delete your search history, you need to understand that 2 histories are saved on your device (2 different places):
- Directly in Google's Chrome browser.
- In the Google account itself.
Note! The same situation applies to computers running Windows.
Let's look at both cleaning methods.
Browser Cleanup
- Launch the Chrome browser on your phone.
- In the upper right corner of the browser, click on the 3 dots.
- In the menu that opens, select “History”.
The entire Google search history of your queries and viewed Internet resources will open in front of you. Next to each page there is a cross that allows you to delete only that specific link.
If you want to delete all internet browsing information in your browser, then select “Clear history”.
In the main settings, the browser will offer you the following choices:
- Delete all browser history.
- Delete cookies and site data.
- Images and other files saved in the cache.
Pay attention to the section "Images and other files stored in the cache." It stores clips of videos you watch, pages with images, and other files. They take up the most space on your smartphone. Therefore, remove them first.
You will also be able to select the temporary mode that you want to clean.
In addition, you can use additional settings.
After checking the boxes next to the sections you need to clean, click “Delete data.”
Clearing your account
Algorithm of actions with the account:
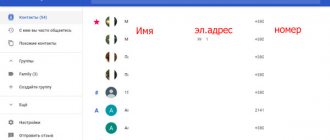
- Click on Google search on the desktop of your smartphone.
- In the window that opens, in the lower right corner, click on the 3 dots.
- In the new tab, select “Search History”.
- Scrolling down a little, we find the “Delete” button. Click on it.
Advice! If the description of step-by-step actions is difficult, or you cannot find these options in the settings, then simply follow the link https://myactivity.google.com from any device. You will immediately be taken to the desired section - see photo above.
- Having selected the desired time interval, you need to click on it.
All search information will be deleted automatically.
Where is your browsing history stored?
Few people wonder where the history of open sites is saved, and when there is a serious need to view important information, they begin to go into all folders and sections of the browser. So, your browsing history is saved in two places:
- In the browser: menu button, then select “History”.
- On the computer: system folder with the following address - Local drive C:\Chrome\User Data\Default\ in the Defaul folder, find the “History” file, and after “History-journal”.
If you do not want the history of your queries and website visits to be saved in Google Chrome, then turn on the “Incognito” mode in your browser. It's located in Settings, Privacy and Security.
When you know where to save your most recently viewed tabs, you can quickly access them and even resave them to another location for greater security if you're afraid of losing important pages, especially if you reinstall the operating system or the Chrome browser itself. This advice will be useful not only for beginners, but also for experienced web browser users.
How to view history in Google Chrome
Save your search history on Google Maps or delete it
The ability to search through all your previous searches on Google Maps is convenient, but the idea of Google collecting this information is also a privacy issue. The choice is yours: allow Google Maps to track your activity or automatically delete it without leaving a trace.
You can even go a step further and erase all your Google account data to remove the records Google keeps about you.
Have you viewed your search history on Google Maps before? What do you think about Google's user data collection? Share your thoughts with us in the comments section below.
Checking activity in a VK group: why is it necessary?
Communities on the VKontakte social network are very popular in various areas, be it business, entertainment, information or news. Regardless of the purpose of creating a group, for it to work effectively it needs quality management.
VKontakte provides administrators with all the necessary tools to create and develop optimal community management strategies. One such tool is activity tracking. By learning how to use it correctly, you can figure out what content is more preferable for the audience, and what actions need to be taken to ensure that the group develops.
Activity in a VK group refers to actions performed by the audience. These actions are characterized as the reaction of users to posts published on the community wall. These include:
- Oh, comments and clicking the share button.
- Viewing posts, messages to a group, subscribing to mailing lists, subscribing to notifications, participating in surveys and voting.
- Clicking the “This is not interesting” button under the posts, unsubscribing from the news, subscribing/unsubscribing from the group.
- General statistics of visits, publication of audio and video materials, photographs, participation in discussion of topics.
It is worth noting that not all of the listed points may characterize activity in the VKontakte group. For example, messages, newsletter subscription buttons may be disabled, comments may be closed, etc. In this case, subscriber activity data for these items will not be displayed.
The need to check activity lies in the fact that, firstly, it is an excellent tool for identifying the main audience segment that actively participates in the group (you can find out the age category of subscribers, gender, location). In the future, when preparing a strategy for posting posts, the administrator will be able to target a specific group of people, satisfying their needs and interests and thereby increasing the performance of the community.
Secondly, tracking activity will provide insight into what content is most preferred by the group’s audience. In accordance with this information, you can build strategies for further development.
For example, in search of a suitable niche on VKontakte, the group administrator decided to publish exclusively entertaining material for a certain period of time. After this period, you need to check the statistics and compare them with past results. If the dynamics of change are positive, you can build a further strategy, if negative, you can continue the search further. This is just one example of how group activity metrics can be used.
Tips for increasing efficiency
To achieve good results in developing the community and increasing user activity, it is necessary, first of all, to work with subscribers. This is achieved through:
- Comments under posts where users can discuss posts and various topics, debate, communicate, and express their opinions. You can also create a special chat for subscribers to communicate.
- Creating topics in the group for discussion and taking personal participation in this on behalf of the group.
- Conducting surveys and voting.
- Creating a photo album where subscribers can add pictures and photographs.
- Conducting competitions and sweepstakes with prizes. This is the most popular and effective way to recruit subscribers and increase activity in the VK group.
- Publishing interesting and high-quality content at least 2-3 posts per day. If you don’t have time for this, you can use the VKontakte delayed posting tool.
All these points create natural subscriber activity. However, when achieving your goals, you must not give up the work of maintaining activity. In particular, you should periodically clear the group of comments with obscene language and spam, which repel users and often cause unsubscribe; delete blocked accounts that are bots.
What is browser history
When you use Google Chrome, it stores your browsing history by default. That is, whether you like it or not, the browser automatically transfers all the history of your search and work with tabs to a separate menu. The following information is stored in this menu:
- names of sites;
- their URL;
- date and time.
This function is quite useful and can be useful in the following cases:
- The story log helps with parental control.
- You can find those sites that were of great importance to you, but you do not remember their names or you cannot navigate to them through a regular search.
- From your browsing history, you can select interesting and useful pages and add them to bookmarks for greater convenience.
The list of visited sites, which is added to the history, is stored only in your browser and under your email account; it is not transferred or sent anywhere without your action.
The pages that you worked with in the browser, in addition to the program itself, can also be stored in the cloud of your Google account if you have connected your Gmail mail to your web browser. Thus, you can access the history on your other device if you also link the same Google account in Chrome and synchronize. Not all users are aware of this feature. You can view at any time which sites you visited, when and at what time.
Delete browsing history in Google Chrome completely or partially
If you want to clear your browsing history for a certain period, then click Clear history.
A window will appear in which you can select the period for which you want to delete data (all time, last hour, day, week, month), and select what you want to clear. Check the Clear browsing history checkbox and click Delete data in the lower right corner of the window. Here you can also set to clear cache and cookies.
If you want to delete only one entry from history , then click on the triangle at the end of the line and in the drop-down list, click on Delete from history.
If you want to delete several entries at once , then tick them and click Delete.
Remember that you wouldn't have to manually erase your history if you used incognito mode in the Google Chrome browser.
Getting your IP address
To view the report, we must know this value.
The easiest option is to go to Yandex and type the request “My ip”. Carry out a search and the results will show you the current value.
Getting your IP address
Pay attention from which device and through which browser you work on the social network.
Having this data, we move directly to the tool.
How to Use Timeline to Manage Search History on Google Maps
Google Maps offers you another way to visualize your entire location history and see all the places you've searched for on one map. Timeline gives you an estimate of the places you've been and all the routes you've taken based on your Google Maps search history.
You can use Timeline to privately view and edit your location history on mobile devices and computers, and pause and re-enable your location history.
- To access your timeline, open Google Maps on your computer or the Google Maps app on your smartphone.
- Go to Menu and select your schedule.
- Select Manage location history.
- The Timeline displays an Activity Controls page where you can turn location history on or off, set up auto-delete to automatically delete part or all of your location history, and Manage Activity to view and edit your past activities.
How to view VKontakte activity history
Using activity history, you can prevent any attempts to hack the page. You must do the following at least once a week.
p, blockquote 7,0,0,0,0 –>
1. First you need to find out your IP address. It's very simple, just follow the link:
Remember the IP address:
p, blockquote 9,0,0,0,0 –>
p, blockquote 10,0,0,0,0 –>
2. Next, from your page, go to the “Settings” section, open the “Security” tab and click on the link “Show activity history”:
p, blockquote 11,1,0,0,0 –>
3. In the activity history, we check the correspondence of IP addresses:
p, blockquote 13,0,0,0,0 –>
p, blockquote 14,0,0,0,0 –>
- Here you can see the activity history for the last days (you won’t be able to view it for the entire time/month/week)
- Don’t be alarmed if the IP address is slightly different from yours (xx.xx. xxx . xxx), perhaps you have a dynamic modem or at some point you were using the mobile Internet;
Address bar
You can view the site through the history of visiting Internet pages using the address bar. It contains not only the names of the portals, but also the commands.
- Click once on the address bar to make the cursor blink.
- Enter the command "chrome://history/".
- Press "Enter".
This will open a list of visited sites. The method is convenient because the address bar remembers commands. Next time, write just the beginning of the line, and the browser will prompt you to view the log.
How to clean
You can delete your browsing history using the built-in social network tool by clicking on the “End all sessions” button. You can read about this above. But this method has a drawback: on all devices you will have to re-enter your account information to access your page.
There is an alternative way to clear VK activity history. To do this, use a special utility for cleaning the cache - CCleaner. At the same time, it deletes all requests, video views and browser visits. But the program frees up space on your PC's hard drive.
You can download the version for mobile devices. It will also clean up all unused and junk files. Also, with its help, you will clear traces of your presence not only on the social network, but on the global network.
Now you know how to view the entire history of VKontakte activity. You can use special services or built-in security features of the social network. It is recommended to regularly check recent visits in order to notice a page hack in time and take action.
How to turn off tracking
On the computer
If you wish, you can set up your account yourself and select the information that you would like to share with the developers.
The user has the right to configure the saving of history in some Google services. These include:
- YouTube.
- Google Chrome browser.
- Google search.
This will increase operating comfort and safety of use.
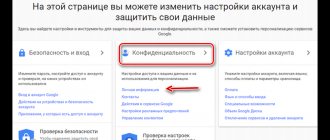
To see what data is saved, you need to go to the “Action Tracking” section:
- Click on the item with nine dots “Services”.
- Select "Account".
- Next, go to the “Confidentiality” section.
- Then click on the “Personal Information” item.
- Scroll down to the Activity Tracking section
Here you can select data that Google can subsequently save, as well as completely disable the collection of personal information.
To edit, click “Check activity tracking settings.”
What you can do with it: disable it by clicking on or click “Manage History” and customize it personalized.
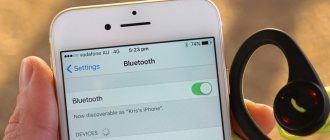
On the phone
To see your account usage history on a mobile device and delete it:
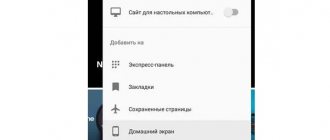
- Go to the browser.
- Click in the right corner.
- Select "Settings".
- Click on your name at the top below the caption.
- Select "Tracking"
- Each item has a symbol to turn data saving on and off.
On a tablet
On this device, the viewing method depends on the operating system, but is similar to Windows and Android.