TWRP
- (
TeamWin Recovery Project
) are the gold standard for various devices in the development world. What sets it apart from other recovery resources available is the design, interface, and many features it comes with. TeamWin Project was one of the first recovery programs that boasted a fully touch interface. For the first time, it made flashing ROMs and other ZIP files much easier.
TeamWin Recovery Project
— released back in 2011, was meant to compete with Clockworkmod, which was the best available at the time. Over the years, custom recovery now supports over 50 different OEMs with timely updates like no other.
It's been fun to see how a small project has grown into something so mainstream that we can't imagine our lives without it. In this article, we will briefly discuss what TVRP actually is, talk about the main functions and, finally, detail several ways to install it on your own Android device.
Essentially, it is an open source custom software that has a touch screen for installing third party applications or flashing any zip file. It gives you the ability to perform various actions on your phone such as backing up partitions in TAR or raw Image format, restoring backups from internal storage, external SD storage or OTG devices, installing custom ROMs, wiping partitions, accessing terminals, root shell etc.
The official TVRP is now available for download for new Xiaomi models such as Mi 9T Pro. The build is now official, it is a stable version with all functions working including data partition decryption, MTP copy, Nandroid and much more. Moreover, it supports the latest Android 10.
What is CWM Recovery
CWM Recovery is an advanced software project that gives the user the power to comprehensively manage Android. In simple words, this is a utility thanks to which you can carry out operations with your phone at the system level .
The full name of the program is ClockworkMod Recovery . This is a great replacement for stock recovery if you have good technical knowledge and skills. What can CWM do?
- Install various firmware . This is most relevant for phones that run proprietary shells.
- Make backups and clear the internal/external memory of your smartphone with one click.
- Work through a computer with various programs , for example, ADB.
- Create partitions on an SD card , format, edit and delete them.
Differences from TWRP
Both recoveries are almost identical. The only difference is in the controls: in TWRP touch input is available , in CWM only mechanical input is available . In the first software project, the menu is located in the form of squares, in the second it is more familiar, in a regular list.
CWM has a little less features, but all the main options are presented in it . You cannot install two utilities at once, so you will have to choose the most suitable option for yourself.
↑ What is TWRP and why is it needed?
There is an installation option that allows you to flash ZIP files.
This makes it possible to install mods, ROMs and custom kernels, as well as some applications. There is also a backup option designed to make NAND memory backups quick and easy. And there is also a Mount option that gives access to various sections. In addition to the above, an Advanced option is offered with additional settings such as a file manager, the ability to manage MultiROM mods, activity log backup and access to the ADB command console. And without access to this partition, there is Wipe to perform a factory reset or hard reset and clear the cache, and Dalvik, Restore to restore a NAND backup, Settings to set up a custom recovery, and Reboot to reboot the smartphone.
This is a fairly universal utility. It carries many functions, such as:
- System backup;
- Cleaning partitions;
- Recovery;
- In addition, it also serves as a basis for installing other firmware modifications.
Installing CWM recovery via Rom Manager (root required)
This is a simple and straightforward method , which has one main disadvantage - the mandatory presence of root rights. The procedure is carried out without a PC, but the program does not work on all devices . The list of supported models can be found directly in the application itself or on the official website.
Stage 1: Obtaining root rights
We wrote about how to activate Superuser mode in a separate article. There are a huge number of methods that work both on the computer and on the phone itself. Here we will look at obtaining rights using several excellent programs.
Kingo Android Root
Download the utility to your computer from a reliable source and install it on the system disk in the standard way. Meanwhile, enable USB debugging on your phone (developer mode is required). In settings, allow installation of applications from unknown sites .
- Launch Kingo Android and connect your smartphone via USB .
- Within a minute, the necessary drivers will be scanned and installed, and then the program will identify the phone.
- A page will appear in blue and white with the name of your device, and at the bottom there is a large “ROOT” . Click on it and reboot your device. That's it, the phone is rooted .
360 Root
Another worthy Chinese program, with which the chances of getting root reach 90% . Unfortunately, it does not support all devices, but well-known models are definitely on the list.
- So, first, download the utility to your computer. Open it and go to the section “Control Panel” - “Internet Options” . Pay attention to the item “Connection” . Enter the following address into the proxy column – 144.217.182 , click “OK” .
- A button appears with the name “ROOT” , which we tap on. The smartphone should reboot, indicating that the procedure was successful. If nothing happens, repeat the above points . It is not always possible to activate Superuser mode the first time.
Stage 2: Installing ClockworkMod Recovery
QR Code
ROM Manager
Developer: ClockworkMod
Price: Free
Now that you have obtained root rights, you can proceed directly to installing custom recovery on your Android phone. We look for an application called ROM Manager , download and install it in the usual way.
Downloading applications
Open the application
The main screen of the special program opens, where the main functions are listed. We will need the first item “Recovery Setup” . Next, in the new window, select the line “ClockworkMod Recovery” .
“Recovery Setup” item
Item “ClockworkMod Recovery”
The utility determines your phone model and displays it on the next page. Click on the name of the device and indicate which version of CWM we want to install .
Model selection
Selecting the CWM version
The recovery download process begins, which takes a few minutes on average. At the end, the program will require confirmation of root rights; without them, further actions are impossible. Click “Provide” – “OK” . That's all, you are the owner of an excellent custom recovery.
There are situations when, after installing CWM, a malfunction occurs in the phone, which can lead to “bricking”. If it does not turn on at all, immediately contact a service center. Remember, the editors are not responsible for the actions you take!
What is Android recovery, main features and differences
Every device with an operating system, including Android OS, contains a “recovery mode” - Stock Recovery Mode. This is a manufacturer-installed program that runs in the pre-boot state of the mobile device and allows for various operations: updating the OS, clearing the cache, resetting data and restoring to factory state. The capabilities of the factory mode are limited, but there is no chance of harming the device, and the manufacturer does not void the owner’s warranty for use. Moreover, it is important to note that Stock Recovery Mode allows you to install official updates and firmware developed only by the manufacturer.
Third-party recovery mode “Custom Recovery Mode” is a modified custom variation with an expanded list of functions. On some devices it is installed instead of the factory mode, on other devices it is installed in parallel with the standard recovery mode. Here is a partial list of possibilities:
- Installation of unofficial firmware, updates and add-ons.
- Replacing the system core.
- Creating full OS backups or just individual parts.
- Restoring data from backups.
- Creating and deleting partitions on a memory card.
- Remove screen lock.
- Obtaining Root rights.
Important! To use third-party recovery, you need ROOT rights and/or an unlocked bootloader. And since both procedures are accompanied by hacking using existing vulnerabilities, this is a sufficient reason for the manufacturer to refuse warranty service. At the same time, some companies produce smartphones/tablets for developers, with the ability to factory unlock the bootloader. Motorola allows bootloader unlocking for models that are no longer in production and within the manufacturer's warranty period. And Xiaomi removes the block after submitting an application with the user’s request.
Installing CWM recovery on Samsung phones
We will probably tell you how to flash smartphones produced by the Korean company Samsung in a separate article. Here you will also find brief, but clear and easy instructions for both beginners and professionals.
You can implement custom recovery into your phone using the proprietary built-in utility Odin . Usually it is installed on the smartphone by default and does not require a separate download.
First of all , download the recovery file , then turn off the phone and put it into download mode . You can activate Download Mode using the power button, home button and volume rocker down.
Launch Odin and click on the “AP” item (sometimes it is called “PDA” ). In this field we indicate the path to the recovery file. It is desirable that there are no Russian characters, only the Latin alphabet and, as a last resort, numbers. At the bottom, click on the big left button “Start” and just wait for the procedure to complete.
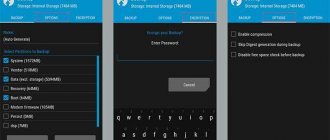
Using the Official TWRP App
If you couldn’t install TWRP Recovery via your computer or this method seemed too complicated to you, nothing prevents you from using the official program from the TWRP developers. However, in this case you will definitely need Superuser rights. Download the application from the Play Market, and then launch it, providing root rights the first time you launch it.
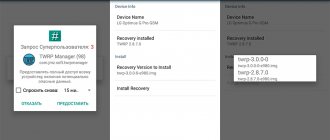
Next, click on the “TWRP Flash” button, and then select the device model and software version from the drop-down list.
We confirm the transition to the official TWRP website, from which we download the Recovery file.
After the download is complete, click on “Select a file to flash..” and select the saved img image.
Click on the “Flash to recovery” button to begin the installation.
If it is completed successfully, the message “Flash Completed Successfully!” will appear.
Frequent problems and errors in ClockworkMod Recovery
And finally, let’s discuss what troubles a user may encounter after a seemingly successful implementation of CWM on a device.
- Recovery refuses to start at all . When this error occurs, it says that the Android device is incompatible with the zip file. To avoid this problem, always check that the recovery file you download is compatible with your model. Solution to the error: in a text editor, delete part of the system code responsible for binding to a specific phone.
- The utility does not recognize the SD card and does not read its contents . There are several reasons for this: incorrect partitioning into disks, a damaged memory card, or restricted access to it. Solution to the error: Open a terminal and edit the file called "updater-scpript" .
- When launched it shows corrupted files . The one that suffers most often is update-binary . Solution to the error: pay special attention to this archive and replace it with a working one.
Third-party programs for installing TWRP Recovery
You can replace the standard Android recovery environment with a modified TWRP Recovery using a number of other applications. Each of them only works if you have root rights. Let's list the most popular programs.
Rashr
Flashify
TWRP Manager
The sequence of actions in all applications is almost the same. First, select the phone/tablet model, and then the TWRP Recovery version. After downloading the file, the custom menu is installed. To check its functionality, the gadget reboots in recovery mode.
In conclusion, I would like to say that installing TWRP instead of standard Recovery is associated with certain risks. To reduce them to a minimum, the installation file must be selected strictly according to the device model. If your gadget is not on the list or you are not sure about the correct selection of the img image, then it is better to abandon the procedure of replacing the recovery menu altogether. Otherwise, you risk getting a non-functional device.
- 30shared
- 0Facebook
- 30Twitter
- 0VKontakte
- 0Odnoklassniki
Answers to popular questions
How to enter CWM mode?
Phones from different manufacturers have completely different combinations for entering recovery. The most common is the power and volume down button. On some models there is also a pre-menu, from which you need to use special keys to go to the main recovery.
Is it possible to install CWM via SD card?
No, all files must be located only on the internal system memory. On a computer this is drive C, and on a smartphone it is the main storage.
How to manage the menu in custom recovery?
If this is a mechanical input, then use the volume up and down buttons for the upper and lower items, and the power key to confirm the selection.
Tell me, what method can I use to get out of third-party recovery?
The easiest option is to simply restart the phone.
Click Reboot system and that's it. If that doesn't work, hold down the power button for 15 seconds, then remove the battery and put it back. Today we discussed how to properly install custom recovery on any Android device. As you can see, the procedure is not very easy and has several ways to perform it . Choose the method that suits you best, read the instructions and get started! If you have any questions, feel free to write to us. Good luck!
Types of third-party recovery for Android
For Android OS, two main Custom Recovery Modes are used: CWM and TWRP. Both modes perform the same tasks, but there are visual differences in the menu and minor differences in the list of features.
Important! Before installing CWM or TWRP, you first need to clarify whether the device is supported, as well as what type and version of recovery is preferable.
CWM - abbreviation for ClockworkMod, visually resembles the factory recovery mode, with a similar navigation method: volume buttons - move up or down, power key - select an item. Therefore, for users who have thoroughly mastered the factory recovery mode, it is easier for them to adapt to CWM. In addition, the latest versions support touch control.
CWM Touch is a modification with touch controls, improved navigation and pleasant design.
TWRP is an abbreviation for Team Win Recovery Project. Represents a thoughtful and improved alternative to CWM. To enter commands, touch controls are initially used. And menu items made in the form of buttons facilitate convenient and simple navigation.
Getting Root access
Step 1. Installing ADB/FASTBOOT drivers
Therefore, the first thing we will do is install a custom Recovery . There are several developers in this niche. Team Win Recovery Project or TWRP, Orange Fox, Sky Hawk, etc. And of course various forks based on them. To install TWRP on a smartphone, it must have an unlocked Bootloader.
Initially, the bootloader can be unlocked, locked or encrypted. We have the first (perhaps after some manipulations or initially) option. There are several ways to install Recovery. We'll start with the one that allows installation on any (almost) smartphone with Android OS.
Except for smartphones that fundamentally lack fastboot mode.
You can find an individual version of firmware software for almost every smartphone brand. Recovery will also come in handy, for example, if you want to delete system applications on another smartphone that has problems with the bootloader, make a backup, or flash something without outside help. We’ll look at how to do this without root access if the need arises. But our main task is to obtain Root. And then we won’t need a PC at all anymore.
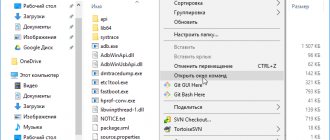
We need to install ADB/Fastboot (Android Debug Bridge) on the computer . Adb, in short, makes it possible to work with Android by connecting it to a PC.
Download archives with software from here, according to your PC ( ). To download anything from w3bsit3-dns.com, you need to register on the forum. Let's register. This will come in handy later. If the site does not open, use a VPN.
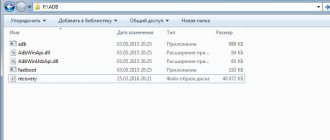
We also download and install the drivers on the computer. Unpack the archive (it is recommended to unpack it to the root of the disk or to another folder that does not contain Russian letters and spaces in the path). For example: C:\\Tools .
Another option is to download the following archive, unpack it and run the installation bat file. The drivers are in the archive and will be installed automatically. To install the second option, run install.bat as an administrator (RMB -> run as administrator). Installation folder C:\Program Files\adb
I give two options, because at the preliminary stage, due to problems on the PC side, some may have problems installing software and drivers.
Step 2. Drivers for your smartphone.
Go ahead. We connect the smart phone to the PC. Important point! We connect the data cable to the USB connector on the motherboard, that is, on the back of the system unit, and not on the front of the case . Otherwise, the computer may not connect to the smartphone, or the connection may fall off at the most inopportune moment. This does not apply to those who work from a laptop.
If you have not yet installed drivers for your smartphone, now is the time. The PC, when connecting the phone to it, must do this itself. But if for some reason this does not happen, we search the network and install it.
Step 3. Developer Mode and “USB Debugging”
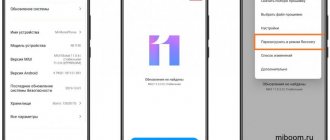
Now on the smartphone we need to open the “For Developers” mode . To do this, look for “About phone” in the settings. Depending on the firmware and manufacturer, the settings menu is slightly different.
Ultimately, you need to find “Build number” and tap on the line 7-10 times in a row (more on some firmwares). As a result, the message “You have become a developer” will appear, and the corresponding item “Developer Options (For Developers)” will open in the settings.
Go to the “For Developers” section and scroll to “ USB Debugging ”. Turn it on.
Important! Adb can only work with the device when USB debugging is enabled.
When connected to a PC, the smart device will display a debug notification. You need to confirm the digital key to allow this computer to connect to it.
Android 11 has a feature to automatically revoke debugging authorization. If the smartphone has not connected with a certain device within 7 days, you must re-confirm the authorization key when connecting. But this leaves your device vulnerable during this time.
For example, if the device was seized along with the laptop. Therefore, when confirming authorization, do not check the “Always Allow” checkbox.
Step 4. Check ADB, FASTBOOT
To check the connection to ADB, in the command window, enter the command: adb devices And look at the line: Adb Attached . The serial number of your device should be displayed below it.
Next, we check if Fastboot is working . At the command line, enter: adb reboot bootloader The smartphone should reboot into bootloader mode.
Or the second method: turn off the smartphone and press the “Volume Down + Power + Home” keys (if this hardware key is present).
Now we check the connection with fastboot. Enter in the command line: fastboot devices The serial number should also be displayed.
Step 5. Custom Recovery, installation
Like the firmware, custom Recovery (recovery menu) must strictly correspond to the smartphone model. Otherwise it will not install at all. Or, much more fun, it will turn your phone into a brick! There are nuances here too. For example, for devices such as Redmi Note 8 and 8t, 1+5 and 5t, there is usually one recovery for both smartphones, due to the similar architecture.
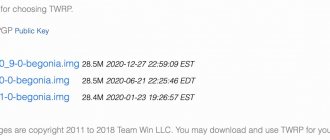
For owners of Mi and Xiaomi phones, I recommend downloading recovery from TWRP (website https://twrp.me )
There is one more important point. Many devices, after installing a custom recovery environment, WILL NOT LOAD into the system with the stock boot image (boot.img).
We save files on the PC. For those who have two types of files: .img and .zip, we don’t do anything for now. For those who only have .zip, we take out the .img file from the archive.
Those who have two types of files have a dual-slot device architecture (A/B). Let's remember.
A few words about the structure with two A/B slots. Why did they do this? You can google it at your leisure. Our only concern is the fact that smartphones with this structure do not have a separate Recovery section. Here it is part of the boot.img boot image. Therefore, depending on the phone, a temporary image is first loaded, then permanent recovery is installed. Or, as for example on the 1+ 7t Pro, the recovery is sewn into each slot in turn, switching slots via fastboot.
Step 5a. Nuances of installing Recovery
In general, for many devices there are nuances when flashing recovery firmware. For example, if the Mi A3, which was bricked all over the world after the first official (!) update to Android 11, it was optimal to first root it through a kernel patch and only then install TWRP, then at the moment there is no working recovery for this smartphone at all, except for a stripped-down version recovery functionality from Lineage firmware.
There are also a number of nuances in installing custom firmware on such smartphones. For example, before this you need to install the same version of the drain in both slots. Next, I will give the basic algorithms for installing custom recovery in cases with different structures.
- For convenience, we rename the resulting recovery file in .img format to recovery.img and drop it into the Tools folder. We throw additional files (for example vbmeta for some Xiaomi) there.
- We put the device into bootloader mode. Connect to the PC and check the connection with fastboot. For smartphones with a single-slot structure, enter the command: fastboot flash recovery recovery.img
After completing the operation, custom recovery will be installed permanently.
- For smartphones with dual-slot structure: fastboot boot recovery.img
After this, the device will automatically boot into temporary recovery. If there is no automatic loading into recovery mode, then there is a jamb somewhere. Most likely the twrp version is not kosher, and you need to choose another option.
- After flashing the firmware for a device with one slot, disconnect the smart device from the PC.
Press Power+Volume Up until you reboot. It is important to prevent the smartphone from loading into the system. It is IMPORTANT to prevent loading into the system!!!
A small digression. If at some stage something went wrong, I would like to immediately reassure you: this is in the order of things. Doing everything right the first time is rather an exception. In addition, there are many nuances not only for each brand, but also for each smartphone model.
So, the smartphone should reboot into recovery. You will immediately understand if everything worked out as it should. In order to enter recovery in the future, turn off the phone and press Volume Up + Home (if available) + Power .
When you log into TWRP, you will be greeted with the option to select a language and will be asked whether you allow changes to be made to the system or leave this section “read-only.”
Step 5b. About Samsung
For those who have a Samsung, there is a proprietary flashing tool - Odin, and it is designed to work only with Samsung. You won't be able to flash anything else from it. There are also separate utilities for other brands, but not for all.
Download and install the ODIN flasher on your PC. We bring the application to the desktop. Open Odin. Turn off your smartphone.
- Click on the “AP” button in the Odin window. The rest won't be needed. The system will prompt you to select a file for firmware. Select the recovery file, which you must download in advance (use the search on the 4PDA forum).
IMPORTANT!!! On the left side, click on “Options” and uncheck the “Auto reboot” checkbox, otherwise the flashed twrp will not be saved, and you will be left with stock crap.
- Now we manually put the smartphone into bootloader mode. To do this, simultaneously (the phone is turned off) press the “Home”, “Volume Down” and “Power” buttons. Then we connect to the PC. The phone will ask for confirmation. Press the “Volume Up” button.
- After a couple of seconds, the window of one of the ports will light up in Odin. This means that everything is OK and there is a connection with the PC.
- Click “Start”. After a couple of seconds, TWRP will be flashed and the port will light up green.
- Now disconnect the cable and turn off the smartphone. To turn off the phone, press the power button for 10 seconds. Then immediately press the “Home” and “Volume +” buttons
Step 6. Go to Recovery
Next, like everyone else, in order to enter recovery in the future, turn off the smartphone and press Volume Up + Home (if available) + Power .
Attention! Latest Samsung models DO NOT allow changes to be made without additional settings.
DO NOT RELOAD the device into the system. Without installing root rights, some models may go into cyclic loading (bootlap).
In the second part of the article we will install the new Magisk Canary firmware and obtain root rights.
How to go back to stock Recovery on Android
If you want to go back to a stock recovery, the easiest way to do so is to flash the stock firmware on your phone or tablet. However, be aware that this will reset your phone to factory settings.
Another way to get the stock recovery back is to flash the stock recovery image on your device. You can find this image on sites like XDA forums and then use the appropriate method to flash the image on your device.
With TWRP recovery on your Android device, your options for customizing your device are endless. You can now flash various custom ROMs, enjoy better performance with custom kernels, and take full backups of your device with a few simple clicks.
Option number 4. Flashify
Root rights are required to operate. When they are, follow a series of simple steps:
Rice. 10. Using Flashify to install TWRP recovery
Actually, this is where the installation ends. You can use the new Recovery with complete peace of mind.