A password is the basis for the security of any system and helps to lock your computer from third parties intending to use it. By neglecting safety, you consciously take upon yourself all the possible consequences of your actions. It often happens that it becomes too annoying to enter a password, especially when you are the only owner of the computer. So how to remove the password when logging into Windows 7?
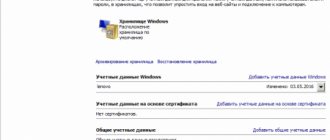
Before removing it, let's take a look at the advantages of such a system.
To achieve the desired result, you do not necessarily need to remove your password set for your account; there is the option to create a new account.
Thanks to these actions, you will be able to:
- Be protected from unwanted computer use;
- Log in to an unsecured account;
- Protect your PC from the harmful actions of some viruses that cannot be executed without the required level of access.
Such an alternative exists, and in this article we will briefly consider it; read in more detail in the next publication. But first, we will perform actions related to the immediate topic of the article. To achieve the desired result, you will need access as an administrator and, of course, a password for recording during the procedure.
Why set a password?
It often happens that some important and confidential data is stored on the PC, access to which should be limited. Microsoft Windows makes it possible to easily limit the circle of people who have access to files on your computer by installing a special key. Each person can have his own if there are several users.
An access code is also required to protect information on the PC to different owners from each other. For example, this is often necessary for parents so that curious children are not able to get acquainted with some information that they are not entitled to.
Entering a command
To disable the function in question, you must enter a specific command. It will open a special applet that allows you to do this.
The process of entering the command is as follows:
- open the Start button menu;
- click on the “Run” item;
- In the field that opens, write “control userpassword2”.
After completing these operations, a window called “User Accounts” will open.
It contains two tabs:
- "Users";
- "Additionally".
You need to focus your attention on the first tab. Since this is where all account settings are made, including changing the login, access key and other attributes. In addition, if desired, you can easily add new accounts or remove old ones.
Disabling the password
To disable Password, just open the corresponding window (“accounts” -> “users”). In it, you need to uncheck the box called “Require username and...”. In this simple way you can disable the need to enter Password.
Confirming the user
You can also completely disable the Microsoft Windows login window.
To do this, you need to do the following:
- in the window called “Accounts”, double-click on the desired line (admin, user or something else);
- click “OK”.
A window will open containing three fields. Only the top one should be filled in; login is written there. The rest remain empty. After that, click on “OK” again. After performing these operations, when starting Microsoft Windows, there will be no need for Password. Which is quite convenient if only one person has physical access to the PC.
Using system recovery tools
What should you do if you don’t have access to the Internet or another computer, but you need to log into your account? A bootable USB drive or disk containing the distribution of the Windows 7 operating system used on the computer will help solve the problem.
In this case, resetting the Windows 7 administrator password is carried out as follows.
- We connect the boot drive of the same edition of the “seven” as installed on the PC.
- Reboot the PC.
- Call up the boot menu of the computer/laptop. This can be done using the F2, F9, F11 or other keys specified in the motherboard manual or on the BIOS boot screen.
- In the list of available devices, select the target USB drive to start the computer from.
- Press any key to boot from the selected media.
- Select the language of the system installed on the computer, and then click the Next button.
- Click the link "System Restore" in the window with the Install button to launch the Windows 7 OS recovery tools.
- In the parameters, select the command line to call the tool for executing system commands.
- In the window that appears, enter the command regedit and execute it using the Enter key. As a result, the classic registry editor window will open.
- In this window, as in the file manager with the display of directories in the form of a tree, go to the HKLM section.
- Through the main menu, call the “ Load hive ” command, located in the “ File ” menu.
- Select the file "config» — «SYSTEM", which has no extension.
- Set any file name without using Cyrillic characters and confirm it by pressing the enter button.
- Go to the hive “ HKLM ” - “entered_hive_name” — Setup.
- CmdLine key editing menu .
- For the parameter value, enter “cmd.exe" to launch Command Prompt before booting Windows 7.
- In the same way, set the “ Setup Type ” value to “ 2 ”.
- Select a new bush in HKLM.
- Call the “ Unload Hive ” command located in the “ File ” menu item.
- We restart the computer, as a result of which the command line will appear.
- At the command line, enter a command like net user username password and execute it with the Enter key. After this, the command line can be closed.
Thus, it is easy to recover a forgotten password as many times as you like, but using the proposed method on other people’s computers will not work due to the fact that changing the password is required when gaining access to any of the accounts.
Removing the password when starting Windows without programs
Also, Password in the operating system in question can be unstuck without using the “Run” item, as well as various third-party applications. To do this, just use a special command line. In this way, you can avoid having to enter Password when you turn on the computer, as well as when it comes out of sleep mode.
Command line setup
In order to configure the command line, you need to use the Windows distribution disk. This method of setting up and resetting the access code is suitable if it is forgotten and it is not possible to start the OS otherwise.
First of all, you need to install it through the BIOS to boot from a CD or other device containing the distribution. After this, you should reboot and start the installation.
After this, the following actions are performed:
- A window for selecting language options opens, click “Next”;
- select “System Restore” -> “Command Line”;
- enter “regedit”
; - in the registry editor that opens, we find a section called “HKEY_LOKAL_MACHINE”
; - select it, click on the “File” menu, and select “Load hive”;
- select the disk where the OS is installed and open the file located at the address “disk name: windowssystem32SYSTEM”
; - you must enter a custom name for the selected section (for example, 999);
- go to the HKEY_LOKAL_MACHINE999Setup section and double-click on the parameters:
- CmdLine – enter cmd.exe;
- SetupType – replace parameter 0 with 2;
- select section 999 and click “Unload hive”;
- extract the distribution package and reboot the PC.
Resetting your password and login
After loading the operating system, the user will immediately see the command line window. To reset the password, you must enter the following command: net user username
If for some reason User has forgotten the account name, then you can simply write net user without parameters. This will allow you to display all available items and select the one you need.
If the new Password is not intended to be used, then it is sufficient to leave the field blank.
If you need to enter a new one, the command will look like this: disk name: Windowssystem32net user username new-key.
It is also often necessary to create a new account without an access key.
To do this, you need to run the following commands in strict order:
- net username_password /add;
- net localgroup Administrators name /add;
- net localgroup user name /delete.
These commands perform the following operations in strict order:
- creating a new User;
- adding it to the Administrator workgroup;
- removal from the Users group.
The reset method in question is quite complicated, but quite feasible even for not very experienced PC owners.
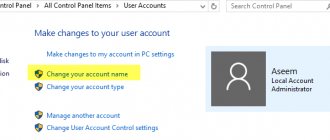
Change or delete your account password (if you remember it)
To remove or change the secret code, you need to:
- Go to “Start” → click on the icon (located in the upper right corner above the name of the current account);
- Now in the “User Accounts” , select the item you need: “Change...” or “Delete your password” ;
- Settings will open with fields that need to be filled out. You need to enter a new password, a confirmation hint for it (or the old one, if you are deleting it) → click on the “Change password” (or “Delete password”) .
Figure 3. Changing/removing the password. Ready.
Now it is advisable to write down the new password and save it in a safe place. After reading this chapter, questions might arise if:
- You have completely forgotten your password and want to view it or delete it;
- You are looking for a more reliable way to protect your data than standard means.
Then read the chapters that provide instructions on how to recover your password (even if you have forgotten it) and “Bonus” with steps to install protection on the BIOS.
Complete password removal on Windows 7
This chapter contains information on completely resetting the password for absolutely any account.
To do this, you will need a flash drive and a working (with the ability to log into the OS) computer. Attention! All further actions must be agreed upon with the owner of the account/computer. Let's begin. Step 1. Preparing a flash drive.
First you need to clean the drive.
To do this, in the “My Computer” , you need to right-click on the flash drive and select “Format…” → file system: “ FAT 32” → “Start” .
Wait for the process to complete. Figure 4. Formatting our flash drive. Step 2. Download the required program to reset your password.
Everything is simple here: download the archive with the program (the archive is attached at the end of the article) → unpack it to any convenient place → copy the files to the root of the flash drive.
Step 3. Assign the drive status to boot.
This can be done using standard system tools - using the command line ( CMD ) .
To do this you need:
- Open “Start” → enter the following query into the search bar: “cmd” → open the corresponding item using the right mouse button (required!) → “Run as administrator” (a black command console will launch);
Figure 5. Open the command console with administrator rights.
- Next you need to enter the command: “G : syslinux . exe - ma G :"
(instead of "G" in both cases, use the letter of your flash drive, which can be found in the
"My Computer" ); - The operation should proceed without errors . You can now close the command prompt. If errors still occur, repeat the steps starting from Step 1.
Figure 6. We get a seemingly “zero result.” Step 4. Start the computer from a bootable USB flash drive. Executing this step depends in part on your motherboard/laptop model. We need to set our drive as a priority in the Setup Menu ( BIOS ) or Boot Menu → turn off the computer on which we plan to recover the password and:
- Enter BIOS by pressing the F1/F2/F12/Delete button (depending on the motherboard);
If you don't know how to enter the BIOS on your computer or laptop, then this article will help you.
- Go to the “ Boot ” (navigation is carried out using the arrows on the keyboard);
- Place the bootable USB flash drive as the very first one in the line “ Boot priority ( order )” / “ Boot device priority ”
- Save changes in the “ Exit ” tab (“ Save & Exit ”) by selecting “ Exit Saving Changes ” → confirm by clicking “ Yes ” .
The computer should automatically boot from the flash drive
Step 5. Remove the password.
First, you need to wait until the program is completely loaded (time 2 minutes if you are not sure). We enter the following commands sequentially without quotes (relevant for most users): The following actions are also suitable for resetting the administrator password.
- Press “ Enter ” ;
- “C:WindowsSystem32config” – access to the registry;
- “Password Reset ” – launching a script to completely remove the password;
- Enter the username whose password you want to reset;
- “ Clear User Password ” – clearing the password from the registry
- «!»–just an exclamation point;
- Press the “Y”
.
Now you need to restart your computer if this does not happen automatically. The login password will disappear and you will be able to continue using the OS. Don't forget to write down the new combination on a piece of paper to avoid similar troubles in the future. The following is information about the most reliable (standard, of course) method of keeping data on a computer practically invulnerable to hacking - installing protection in the BIOS.
Method for resetting key data from SAM file
There are a huge number of different ways to reset your login code. But all of them only change in various ways the information stored in a special file called SAM. It is used by the OS to store data related to both User and Password. This abbreviation name stands for Security Account Manager .
The file in question does not have an extension, since it simply does not require one. It is a direct part of the registry, located in the systemrootsystem32config
. Also, a copy of the file in question is available on the emergency recovery disk, if for some reason this function was not disabled earlier.
Editing this file to change the operating system login parameters is the most difficult way. To work with SAM, you need specialized software from third-party developers. All operations with SAM must be performed with the utmost care and precision.
Creating a flash drive to instantly reset a password for a specific account
If you don’t want to repeat the situation with a forgotten password, it’s better to make a floppy disk to reset it. By floppy disk we mean a flash drive, because the use of floppy disks and disks has not been relevant in recent years.
- Call “ Start ” and click on your account avatar.
- In the vertical menu on the left, click “Creating a Password Reset Disk».
- "Forgotten Password Wizard", where we click Next > .
- Select our flash drive (or floppy disk) from the list.
- Set the current account password, then click Next >.
As a result, the wizard will generate a boot disk necessary to unlock the account for which the password has been lost.
Now, if for some reason you cannot log into Windows 7, click the Reset password button, insert the created disk or flash drive and follow the instructions. which boil down to clicking the Next button.
After reinstalling the system, changing the password, or creating a new account, the password reset disk will have to be created again.
Knowing how to reset the Windows 7 administrator password and having a flash drive with the key file, a forgotten password will no longer be a problem.