How to delete all contacts
First, let's figure out how to completely delete all contacts from an Android phone, and not each one individually.
For this you will need:
- Open device settings.
- Go to the "Applications" section, and then - "All applications".
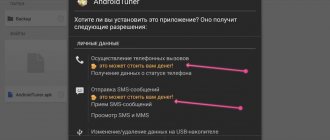
- Select “Phone” from the proposed list.
- Click on the “Clear data” button.
Important. Clearing Phone app data only deletes numbers stored in internal memory. All contacts remain on the SIM card.
There is an alternative option that allows you to perform the same action. A different instruction is used for it, which, however, should also not cause any difficulties:
- Launch the Contacts or Phone application (the name may vary depending on the smartphone model).
- Select one of the numbers by holding your finger on it.
- When a checkmark appears next to the subscriber, select the “Select all” option.
- Click on the "Delete" button.
This will delete all contacts, including those saved to the SIM card. Of course, only if the function of displaying subscribers from this medium was previously activated in the application settings. It happens that it is disabled by default, which should not be forgotten.
Answers on questions
What to do if you deleted the wrong contact?
If you deleted the wrong contact from your phone by mistake, there is still a way to restore it. Try this:
- Turn off the Internet or synchronization as quickly as possible
- Go to Google Contacts
- Find an entry that was mistakenly deleted from your phone
- Copy the number somewhere
- Re-enter the contact into your phone
All modern smartphones running Andorid or iOS operating systems allow you to link contacts to an account and store them in the cloud. This is very convenient, because if your phone is lost, lost or broken, you can quickly and easily restore your entire phone book, rather than collecting bits and pieces of the phone book again. Therefore, there is no need to store numbers on the SIM completely. It remains only to provide cellular communications. But here users of newfangled gadgets face a difficulty - they are unable to delete contacts from the SIM card. When you try to do this, the numbers are easily deleted, but from the phone’s memory. There is no way to clear the card. There is no way to remove them from the card. What to do? Do not despair! There are several ways!
The easiest and fastest way
To easily clear the SIM card memory on your smartphone, just take it out and insert it into some old simple phone. No wonder they say - “simplicity is the best beauty”!!! On such devices, all this is done very simply and quickly. Just go to contacts and in the settings select the option “Delete all” or “Delete several” and check the “All” box.
The device will ask where it will delete from. Select the “From SIM card” option. After this, the SIM card memory will be cleared.
Cleaning SIM on Android
The Android operating system has very extensive functionality and allows you to do a lot. But simply deleting all the numbers on a SIM card won’t work that easily. To do this you will have to delve into the settings. For example, consider a phone running Android 6. On older versions, everything is done in approximately the same way. At least the algorithm is the same.
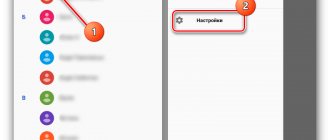
So, go to Contacts and open the options menu:
Select the menu item “Delete multiple contacts”. The following source selection menu will appear:
Select the SIM card that we want to clean. After this, a list of numbers and contacts that are present on it will be displayed:
Since we want to do a complete cleanup, check the “Select all” checkbox. Profit!
Note:
If you were unable to find such an opportunity in your Android, use third-party applications. For example, HTC SIM Manager. This will allow you to keep control of the SIM card memory while creating or deleting contacts.
Removing numbers from SIM on iPhone
This is the official method from Apple. Unfortunately, it is not very convenient and here's why. This option allows you to completely delete all numbers from the iPhone’s memory, including those on its SIM card. That is, if you want your contacts to remain on the device itself, you will have to save them by synchronizing them with the iCloud service.
After this, you need to connect your phone to your computer and launch iTunes. In the program window, open your smartphone and go to the “Information” section. Here you need to check the “Sync Contacts” checkbox:
Below we check the “All contacts” checkbox. Scroll down the window to the “Advanced” subsection:
Here you need to check the “Contacts” box. Click on the “Apply” button. A confirmation window should appear, in which you need to click on the “Replace information” button. Ready. After this, the device’s memory and SIM card will be cleared. To return your contacts to the device itself, synchronize it with iCloud and they will be on the phone again.
A mobile phone is a repository for all kinds of information, which includes not only multimedia files and applications, but also contacts of other people. When interacting with a smartphone, many users regularly update their notebook with new data.
As a rule, not all numbers need to be stored for a long time, so sometimes you have to get rid of some outdated or unnecessary information yourself. This article will tell you how to delete contacts from a mobile phone on.
Delete one or more contacts
The need to delete all numbers once and for all does not arise as often as the need to delete one or two contacts. This is a much more popular scenario, which is also implemented using an Android smartphone. In this case, it is proposed to act in accordance with the following algorithm:
- Open your phone book.
- Go to the individual subscriber's page.
- Click on the “Delete” button or the icon presented in the form of a sketch of a trash can.
You need to do the same with all contact information that you consider unnecessary. That is, open each business card one by one, and then click on the “Delete” button on the page of each contact. Alternatively, you can go the other way:
- Launch the Contacts application.
- Hold your finger on one of the extra subscribers.
- Place a checkmark next to all the numbers you want to get rid of.
- Click on the “Delete” button.
Most often the second option works. The first method is not available on every smartphone due to the characteristics of the manufacturer. Therefore, do not worry if you are unable to delete the number using one of the methods presented, because there is always an alternative option.
Blocking
Now let's look at how to delete a contact on Android if it is a duplicate. More precisely, if it was previously present on the SIM card and mobile device. It also happens that two identical contacts appear in the address book. First, you should visit your notebook, then click on the menu section, and in the additional window click the “More” button, which is located at the very bottom. After this, you will be offered a special option to “Merge identical contacts”, so you can get rid of duplicate options. Also in this pop-up window you can find a solution to the question of how to block a contact on Android. This function can be used, for example, if you no longer want to receive calls and SMS messages from a certain person.
Now you know how to delete a contact on Android. If you approach this matter responsibly, then everything can be done very quickly and without errors. Currently, there are also special applications for working with such data, which, if desired, can be downloaded and installed on your smartphone.
How to delete numbers in your Google account
It's no secret that when setting up a smartphone, the system requires you to create a Google account. It synchronizes with various company services, including Google Contacts. Callers saved in the phone are also displayed here. Therefore, it is also important to figure out how to clear numbers in Google Contacts:
- Open the page https://contacts.google.com in your browser (it can be opened on both a smartphone and a computer).
- Log in using your account details from your phone.
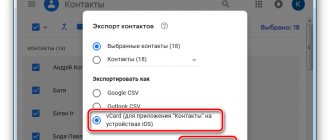
- Go to the "Contacts" section.
- Highlight all the extra numbers that you need to get rid of.
- Click on the "Delete" button.
Now the list of subscribers will be cleared not only on the phone, but also in the Google Contacts service. It's also worth noting that some devices use Google Contacts as the default calling app. Therefore, owners of such gadgets do not need to perform the operation again. Contacts will be deleted from two sources at once.
Recovery
Many users of mobile phones that run on the Android platform do not even think about the fact that sooner or later the SIM card will be full and in this case they will need to transfer contacts. For example, if you have updated the firmware on your device, then after you visit the Google Play service, automatic data recovery will begin. All contacts will be duplicated. If there is already not enough space, then some of them will simply disappear. We'll talk about duplicates a little later, but, however, deleting them is as easy as deleting regular contacts on your phone.
Why do double contacts appear?
When using a smartphone, the user faces a variety of problems. In particular, many people pay attention to the presence of several identical numbers in the phone book. There are several reasons for this kind of problem:
- saving the number both in the device memory and on the SIM card;
- synchronization of numbers with instant messengers and other services;
- OS crash.
Based on the identified reasons, we can create a universal algorithm that will help get rid of duplicates. So, you will need:
- In your smartphone settings, disable synchronization with Google Contacts.
- Through the phone book, delete duplicate numbers if they remain.
- Reboot your device.
On a note. If you need to have numbers both in the internal memory and on the SIM card, but you don’t want to deal with duplicates, try disabling the display of SIM card subscribers in the dialer settings.
As a rule, the recommendations presented above are sufficient to solve the problem. If you still have duplicates, then the Android operating system may have crashed. It can only be resolved by resetting the settings, but performing this operation will delete all files saved on the smartphone.
Standard application
The built-in capabilities of the system make it quite easy to manipulate entries in the book of telephone numbers, adding or deleting certain information. Using this method is the simplest and most obvious solution to the above problem, but for some users this procedure causes difficulties. Most often this is due to the recent transition to a new mobile platform, noticeably different from the old one. To delete an unwanted contact on Android OS, follow these steps:
Thus, the selected contact will leave the smartphone’s memory forever.
Will be useful
You can delete several entries at once by simply marking them with checkboxes.
Why the contact may not be deleted
Finally, you may encounter an issue where the deleted number appears again. Most often, this kind of problem occurs due to synchronization of the phone with Google Contacts. Try deleting unnecessary subscribers through the Google service, and also disable synchronization with it in your phone settings.
The second reason is less common, but also causes inconvenience. In the Phone app settings, you can turn on or off the display of contacts saved on your SIM card. Therefore, if you delete only the numbers from the internal memory, they may remain on the SIM card.
The problem can be solved by deleting contact information again or by blocking the display of SIM card numbers, when only subscribers saved in the device’s memory are shown.
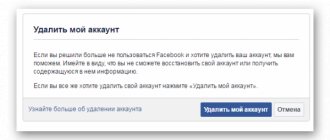
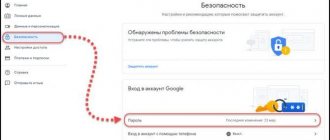
Disabling an account
To disable your account, you need to go to “Settings”. When disconnected, all numbers that were synchronized will be deleted. This can be useful for erasing a large number of items at once. You need to select the “Accounts” option in the “Personal Information” section. Now you should select the account for which you want to disable synchronization. Any numbers from this account will be deleted from your device.
If you are interested in how to delete a phone number, then you need to keep in mind that by turning off contacts, you can stop their synchronization so that the list is not automatically updated along with your account. If you don't see the Contacts option, you'll need to completely turn off syncing for the account you're using. Next, you need to press the button in the form of 3 vertical dots. It is usually located in the upper right corner. A small menu should open in which you should click the “Synchronize” button. This will activate interaction with your account. Since contacts have been disabled, all items for that account will be erased from your device.