Removing Windows 10 from a hard drive You cannot remove Windows 10 from your computer using standard operating system tools—you need to resort to third-party software. The process of formatting a disk is a set of tasks that is performed through the interaction of a number of specialized software. Cleaning is carried out outside of Windows, so the computer should be started from a boot drive on which a special program has been pre-recorded.
How to format a hard drive via BIOS: 2 effective ways
Formatting is the process by which the media is marked up, that is, a file system is created.
For the user, this usually means that the information that was previously contained on the media is completely deleted. In this article we will look at how to format a hard drive through BIOS. Suppose you have a hard drive connected to your computer that needs to be formatted, and formatting must be done through the BIOS, for example, if the computer does not have an operating system installed. If we talk about formatting, then as such this procedure cannot be performed only through the BIOS, since this menu does not provide the ability to erase connected disks. However, if you use special utilities that can be launched through the BIOS, then the task becomes feasible.
Uninstalling Windows 8
After weighing the pros and cons of your actions, you decide to remove Windows 8 from your computer. Now the main thing is to do it correctly and avoid possible unpleasant consequences. Let's consider three methods for solving the problem.
Method 1: Formatting the system disk without booting Windows
If there is only one Windows 8 installed on your computer and you decide to completely remove the only operating system, then you can format the system partition of the hard drive. But remember - formatting will destroy all stored information, so first copy all valuable data to another partition of the hard drive, to a flash drive or to cloud storage.
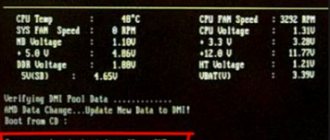
- Reboot the PC and enter the BIOS. Different manufacturers have different keys that need to be pressed for this. For example, on modern ASUS motherboards it is “Del” or “F2”. In the BIOS we find the boot source priority settings and put the DVD drive/flash drive in first place. We confirm the changes.
- We insert any installation or recovery disk/flash drive with Windows into the drive. We format the system volume of the hard drive.
- After rebooting, we get a PC without an installed operating system. After this, you can take further steps at your own discretion.
The formatting process is described in detail in the article, which can be found by clicking on the link below.
Read more: What is disk formatting and how to do it correctly
Method 2: Format from another system
If your computer has two operating systems on different partitions of your hard drive, you can boot into one version of Windows and format the disk with the other version. For example, on drive C: there is “seven”, and on drive D: there is Windows 8, which needs to be removed. The system will not allow you to format a partition with its location, so we will format the volume with the “eight” from Windows 7.
- First, let's configure the system boot parameters. Click “Start”, right-click on the “This PC” icon, go to “Properties”.
- In the left column, select “Advanced system settings”.
- On the “Advanced” tab that opens, the bottom block is “Download and Recovery”. Go to “Parameters”.
- In the “Default operating system” field, select the one that will remain on the computer. We complete the settings with “OK”. We reboot into Windows 7.
- In a parallel system (in this case, “seven”), click “Start”, then “Computer”.
- In Explorer, right-click on the partition with Windows 8, call up the context menu and select “Format”.
- On the formatting tab, we determine the file system and cluster size. Click “Start”.
- All data in the partition and the Windows 8 operating system were safely deleted.
Method 3: Removing Windows through system configuration
This option is faster than method No. 2 and is also designed for use on a PC with two parallel systems in different hard drive volumes.
- We boot into the operating system that will not be deleted. I have Windows 7. Use the keyboard shortcut “Win+R” and enter the msconfig command in the Run window.
- On the “System Configuration” tab, select the line Windows 8 and click “Delete”.
- Be sure to clean the registry. This can be easily done using third-party software, such as CCleaner. In the program, go to the “Registry” page, select “Search for problems” and then “Fix selected”.
- Ready! Windows 8 has been removed.
As we have seen, if you wish, you can always remove any unnecessary operating system, including Windows 8. But it is very important not to create serious problems and difficulties in the further operation of the computer.
We are glad that we were able to help you solve the problem. Thank the author and share the article on social networks. Describe what didn't work for you. Our specialists will try to answer as quickly as possible.
Formatting a hard drive via BIOS
Below we will look at two methods available to each user that will allow you to format a hard drive through the BIOS. Each of the methods will use additional tools in its work (you can’t do without them), and you just have to choose the most suitable one.
Method 1: Format the hard drive through the Windows setup menu
This method is the most common, since today many users have a boot disk or flash drive with a distribution kit of any Windows.
As you may have already figured out, you will need a bootable device that contains the Windows Installer. In this case, we will not install Windows, but will launch the installation program through the BIOS, in which the formatting process will begin.
The caveat is that using Windows Installer you can perform extremely quick formatting - no additional settings are provided here. In addition, the size of the Windows installer is significantly larger than the utility in the second method.
1.
First of all, you will need a boot disk or flash drive. If you have neither one nor the other, the most convenient thing is to burn a bootable USB flash drive with the distribution kit. For example, on the official Microsoft website at the link below there is a special utility that will download the Windows distribution kit to your computer, and then allow you to easily and quickly write it to a flash drive, thereby making the flash drive bootable.
2.
Once you have the boot device in hand, you need to connect it to the computer on which the hard drive will be formatted, and then enter the BIOS.
As a rule, for most computers, entering the BIOS is accomplished by quickly pressing a special hotkey at the very early stage of enabling - most often F2, Del or F1
.
3.
Once you get into the BIOS, you will need to find the “Boot MENU”, in which you can set the boot device that will start first.
In different BIOS versions, this item may be located differently and have a slightly different name variation, but the essence is the same. In our case, the item we need is in the menu “Advanced BIOS Features” - “First Boot Device”
, where you need to set the name of the flash drive as the first boot device (if the name of the flash drive is not displayed, select USB-HDD) or CDROM (if Windows disk is used).
4.
When the necessary settings are set, you just have to exit the BIOS, after which the computer will begin to reboot, and as a result, the Windows installation menu will be displayed on the screen.
5.
Having selected a language, a window will appear on the screen in which you will need to select the drive on which Windows will be installed.
Select the disk with one mouse button, and then click on the “Disk Setup”
.
6.
An additional set of options will be displayed on the screen, where you need to select
“Format”
.
7.
A warning will appear on the screen stating that formatting will delete all data from the disk.
If you agree with this, click "OK"
to continue.
The process will begin. Once the formatting is completed, a message indicating the successful completion of the procedure will be displayed on the screen.
Method 2: Format the disk using Acronis Disk Director
If you do not have bootable media with Windows OS, then it is better to immediately move on to this method, since in this case you will need to write much less information to a disk or flash drive (3-4 GB versus 15 MB).
Popular tool Acronis Disk Director
allows you to carry out complex work with hard drives even if there is no operating system installed on the computer. The utility is paid, but it has a free demo version that will allow you to verify the capabilities of this program and, of course, complete the formatting task we have set.
1.
After downloading the utility from the developer’s official website, you will need to install it on your computer and then launch it.
2.
Connect the USB flash drive or disk to the computer on which the Acronis Live-CD will be written.
In the left area of the program window that opens, click the button “Acronis Bootable Media Builder”
.
3.
A utility window will appear on the screen, in which you will need to click on the
“Next”
.
4.
Leave the settings presented in the next window as default.
5.
Specify the components that will be written to the bootable media (in our case, for example, the component for 64-bit systems will be used, but if you do not know the bitness of your computer, select both).
6.
Finally, you will need to choose where the utility will be written: directly to a flash drive or saved as an ISO image for subsequent recording to disk. Since in our case a flash drive is connected to the computer, we select it and move on.
7.
If you need to add drivers, the program will prompt you to do so in the next step.
8.
Click the
Continue
to begin burning bootable media.
9.
The recording of the bootable media will begin, which will take a little time, since the size of the utility being written does not exceed 20 MB. As soon as a message indicating the successful completion of the process is displayed on the screen, the flash drive or disk can be removed from the computer and connected to the one on which the hard drive will be formatted via BIOS.
10.
You will need to enter the BIOS and set your boot device as the primary boot device. How to do this was described in the first method from points two to four, so we will not stop at this stage.
11.
The Acronis window will appear on the screen.
To continue working with the program, you will need to select the desired utility. In our case, only one version was recorded, so we select “Acronis Disk Director”
.
12.
The utility will begin downloading, which may take several minutes.
A disk browsing window will appear on the screen, showing the available disks. To continue, click on the “OK”
.
13.
Right-click on your disk and select
“Format”
.
Remove the old Windows and install a new one
The reinstallation process is as follows:
- First, we create an installation disk or flash drive, with which we will reinstall the system.
- Through “BIOS” we enter the boot disk or flash drive and delete the old system
- Next, we install a new “Windows” from scratch.
So let's get started:
- To be able to freely remove old Windows and install a new one, we need to create an installation disk or flash drive. From such a disk you can boot your computer, as well as install Windows from it.
- If you prefer to use a disc, prepare a blank R/RW DVD. To use a flash drive, any external drive whose capacity must exceed 5 GB is suitable.
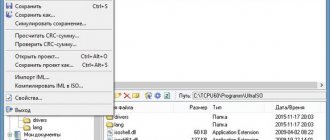
- To create an installation disk/flash drive, use the UltraISO program. Download here
- Next, you will need, in fact, the installation version of Windows itself. We do not recommend using pirated free Windows installation tools, as this can cause a lot of problems both with the operation of the operating system and with the law. You can download official versions of Windows (scroll down the page).
- When you have downloaded everything you need and installed the specified program, run it. In the program window, go to “Boot - Burn hard disk image - Disk Drive”. Next, enter the letter of the flash drive or installation disk. Specify “Image file”, that is, the path to the downloaded installation version of “Windows”, click on “Format”, and then on “Start”.
- When the installation disk is ready, we will proceed directly to the process of reinstalling the Windows system.
- Now we need to boot the computer through the BIOS and reinstall the system. Make sure the disc is inserted into the drive or the flash drive is connected to the computer.
- Turn on the computer and immediately press the key to enter the “BIOS”. There are different keys for this depending on your motherboard model. If you don’t know exactly what key it is, then use each time you turn on the computer in turn: Del, F2, F8, F1.
- After this you will enter the “BIOS”. Each motherboard model may have its own BIOS version with its own specific design and menu. But in all cases, the principle of working in BIOS will be the same for us. We need to assign our installation disk/flash drive as the first boot device. To do this, opposite the “First Boot Device” item, you need to select the appropriate device that your computer sees - a flash drive or a disk in the drive. After that, click on F10 (saves the settings and restarts the computer).
Remove the old Windows and install a new one
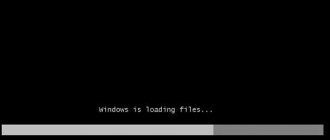
- Next will be the process of restarting the computer and loading the necessary drivers.
Remove the old Windows and install a new one
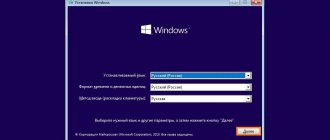
- So, now you can remove the old Windows and install the new one. We wait until the Windows installer window appears on the screen. First, set up the languages, as shown in the screenshot, and click on “Next”.
Remove the old Windows and install a new one
- Next, click on “Install”
Remove the old Windows and install a new one
- In the new window you need to select installation options. Since we want to remove the old Windows, we click on the “Full installation” item.
Remove the old Windows and install a new one
- Now select the partition on the computer where “Windows” will be installed. As a rule, this is drive “C” - it will be indicated on the monitor as “Partition 1”. Select this section, click on “Settings” at the bottom, then on “Format”, and then on “Next”. The old operating system will be completely removed and the installation process of the Windows we previously downloaded will begin.
Remove the old Windows and install a new one
Remove the old Windows and install a new one
- Depending on the power of your computer, you will have to wait between 20 minutes and 1 hour for the installation to complete. Now you need to make the finishing touches. In the new window, enter your name and computer name.
Remove the old Windows and install a new one
- Then, if you wish, you can set a password so that in the future only you can log into your Windows. You can skip this step, leaving the fields empty, and click on “Next”.
Remove the old Windows and install a new one
- Now we need to enter the license key, since we bought Windows and abandoned the pirated version.
Remove the old Windows and install a new one
- Finally, set the time and date according to your time zone and click on “Next”
Remove the old Windows and install a new one
- That's all. The simple procedure for reinstalling the Windows system will be completed, and you will find yourself on the Desktop. Next, we recommend that you immediately begin installing programs and drivers. Start with antiviruses, video card drivers and other devices.
Preparing your computer to remove the operating system
Removing Windows 7 must begin by creating a boot disk and copying all important documents that are on your PC. Remember that most of the documents are saved on drive C, which will be completely formatted, nothing will remain. This also becomes the reason why programs on other partitions of the hard drive will also not work (the registry with their data is located in C).
Decide on what media you will have the Windows boot file. Some modern laptops and PCs do not have a CD-ROM, so you will need a bootable usb-fdd. It must have special software installed; it will launch during installation of the operating system on the computer. To do this, you need to use Acronis Disk Director or another program in advance to create bootable flash drives with a Windows distribution.
Rollback from Windows 10 to previous OS
To use the feature, click on the notification icon on the right side of the taskbar and click “All settings”.
In the settings window that opens, select “Update and Security”, and then “Recovery”.
The last step is to click the "Get Started" button under the "Back to Windows 8.1" or "Back to Windows 7" section. At the same time, you will be asked to indicate the reason for the rollback (choose any), after which Windows 10 will be removed, and you will return to your previous version of the OS, with all programs and user files (that is, this is not a reset to the manufacturer’s recovery image).
How to remove Windows 7 via BIOS
The seventh version of Windows was very successful, so most users chose it. Sometimes a reinstallation is required because the system inevitably becomes clogged and begins to malfunction. Clients even refused newer versions (8 or 8.1), so they simply removed the old OS and installed the exact same one on top. You need to uninstall the system step by step so as not to delete anything important and the computer will continue to work without problems. One option is formatting via BIOS.
First you need to uninstall the previous version and then install a fresh operating system. To do this, you must first set the correct settings in the BIOS:
- Insert the disk or flash drive with the Windows distribution into the computer.
- Next, restart your computer to enter the BIOS. A welcome message from the motherboard developer will appear and a button or buttons will be written below that provide access to the BIOS. Typically this is the Del or F2 key. It depends on the presets of the company that created the motherboard. Press this button several times until the BIOS environment boots.
- Find in the menu the item that is responsible for the boot order. By default, there is a hard drive there, but you need to select the device where the system boot file is located - a disk or flash drive. The section usually has the word BOOT in its name.
- Next, press F10 to save your changes and restart your computer.
- When loading, a special menu will appear where you specify the language.
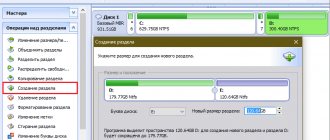
- Next, a special interface will appear where you must select a disk for the operating system and click “Format”. This will remove the previous version of the OS.
- After this, you can continue installing the latest version of Windows.
Uninstalling Windows 8 after purchasing a laptop
You bought a gadget with a ready-made eight, but after a while you realized that it was more convenient to work with Windows 7 or 10. The transition operation is quite simple if you know how to set Boot in the BIOS so that the boot starts from the OS media. We'll start with preparation. We need media with OS installation files. We also recommend that you take care of the software for your device in advance in order to use the Internet normally. Typically, the system automatically installs graphics and sound drivers, but you have to download software for network devices yourself. A backup copy of the figure eight disc won't hurt you either. You can create a backup in the Backup and Restore section - use the search bar from Start to quickly find the section.
Preparing the BIOS for uninstalling Windows
Most often, users cannot get rid of 8 precisely because of the BIOS, since it is difficult to get into it on modern laptops. We'll run special boot options to get you into UEFI (a modern version of the BIOS with a simplified design and a working mouse):
- To do this, you need to move the cursor as far to the right as possible on the desktop - a panel with tabs will appear on the screen, we are interested in Settings. Next, go to the section Changing settings, select the General tab. We find Special boot options and click on the Restart now button - the system will take us to the next menu.
- If you have Windows 8.1 installed on your laptop, the names of these options will be different. You need to click on Change computer settings and open the Recovery and update section, click Recovery and get to the standard menu, then the steps are no different.
Here we see several options for action, select UEFI settings. You will find them in the Diagnostics – Additional parameters section. The system will reboot again, now the UEFI menu will appear on the screen, where you need to click on the BIOS Setup section.
You can also get into the BIOS using a specific key that must be held while the computer boots. Usually this is Del or F2. In order not to waste time searching for the treasured button, we recommend using the instructions for the laptop - the exact key will be indicated there. Most likely, the BIOS will be in English: go to System Configuration and click on Boot Options. In some BIOS versions, this section can be found in Security. Here we need to disable Secure Boot; to do this, set Disabled instead of Enabled.
We also need to go to the Legacy Boot Order menu and set the boot sequence - the first place in Boot UEFI should be the media with the seven installation. Don't forget to save your changes when exiting the BIOS.
Uninstalling Windows 8 and installing another version
The process goes as follows:
- After rebooting the laptop, you will be taken to the standard installation menu for the version of Windows you selected. Select the second option (Full install).
- Next we will be taken to the disk settings, where we need to select the partition on which the new system will be installed. If you want to get rid of Windows 8, then you need to format this partition and then select it to install a new operating system. The tools are located at the bottom of the screen, click the Format button. Windows 8 is now uninstalled.
- In any case, there will be a hidden partition on the laptop, from which you can return to the original system installed before purchase.
- Further installation follows the standard procedure - you need to specify the computer name, enter the license key and set the basic parameters.
Done, you have installed a new system on your laptop!
- How to remove Windows 7 from a laptop or computer: step-by-step instructions in pictures.
- Setting up Windows 8: desktop, sound and Internet (in pictures).
- Which is better Windows 7 or Windows 8? Full review.
Windows removal program Acronis Disk Director
The beginning of the procedure completely repeats the first 6 points of the step-by-step instructions in the previous section. You need to debug the BIOS so that the system starts from the media. First, you need to install the operating system distribution on a flash drive or disk and Acronis Disk Director is a program for removing Windows 7 from your computer. After setting the necessary parameters for loading, you must do the following:
- Restart your computer with the removable media already inserted.
- After turning it on, a blue window will appear with an option to select Acronis Disk Director.
- Click on it, the application working environment will appear in front of you. Click “Launch management console”.
- A window will open with a list of hard drives installed in the computer. Right-click on the partition from which you want to remove Windows 7. Click “Format.”
- All that remains is to click on the “Apply planned actions” item. The program will start the procedure for deleting information; it cannot be restored.
Preparing the system
Before you start uninstalling Windows 7 from your laptop or computer, make sure to back up your files. It's good if the hard drive is partitioned and you have a special volume for storing information that you won't have to format when installing another system.
Open the disk with the files and create a special folder on it. Copy the necessary information into the created directory. This could be the contents of the “My Documents”, “My Videos”, “Music” folders, etc.
Be sure to back up your desktop files: formatting the system partition will delete them.
If you don't have a second partition on your hard drive, you can use network folders or removable media as backup storage.
How to install a new Windows and remove the old one
There are two ways to update your operating system. One involves removing Windows already during the installation of a fresh OS, when the distribution kit prompts the user to select a hard drive directory and format it before starting. In the second case, you can install Windows on top of the existing one. This will result in two system folders appearing on the computer. This will entail the need to select a “Master” operating system at boot time. However, you can still remove the old Windows and leave only the new one.
If you have saved all the necessary files from your hard drive, it is recommended to perform a clean installation of Windows by formatting the system volume. To do this, you can use the two methods described above:
- installation via removable media via BIOS;
- Installing Windows using Acronis Disk Director.
What is needed for removal?
In order to completely remove the OS from a laptop, you must first save all important files to some kind of media (USB flash drive, portable hard drive). Since complete removal will require a formatting procedure. It involves erasing all data present in the PC's permanent memory - regardless of its type.
To perform the removal you will also need:
- ability to configure Bios;
- the presence of a USB port for running software from external flash memory;
- the presence of a drive for working with CDs for launching programs and further installation of another OS;
- software that allows you to format your hard drive.
When all of the above is available, you can begin to “erase” the seventh version from your computer’s hard drive. This is the only way to completely get rid of fragments of the old operating system on a laptop or regular computer.
How to remove a previous version of windows 7
If you do not format the disk with the old version of the operating system, you will have to remove Windows 7 manually. When you go to drive C, you will see a folder called Windows.old. It contains files of the old OS that may affect the performance of the new one. You will have to set the boot priority every time you start your computer. You should delete the unnecessary folder to avoid problems with Windows. Below are two typical situations that newbies encounter.
If the new OS is installed on disk along with the old operating system
If you skip the step of formatting the root directory on the hard drive, you will have to remove the old Windows from the computer separately. To complete this procedure, use the following procedure:
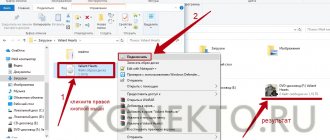
- Click on the “My Computer” folder, right-click on the system drive.
- Find the “Properties” item, in the new window you need the “General” tab.
- Click the Disk Cleanup button.
- Next, click on “Clean up system files.”
- Set o and click OK.
- Next, a notification will appear where you must confirm your desire to get rid of old data.
- Wait for the procedure to complete.
If multiple operating systems are installed simultaneously
When a person violated the installation algorithm and forgot to format it, he could perform several erroneous OS installations, which led to the existence of several system folders at once. This can affect the performance of Windows, consume PC power, and cause crashes or conflicts between device drivers. Optimally, the user should have 1 main OS. To remove unnecessary versions of Windows, the user must follow the following procedure:
- format the disk with its contents where Windows 7 was installed;
- remove the corresponding item from the launch list.
Removing Windows 7 from a laptop during the installation of Windows 8
This requires the skills of an experienced user. As well as basic knowledge of the internal structure of a PC. Since otherwise, deletion can lead to disastrous consequences, damage to the laptop and the need to call a repairman.
A safer and easier way to remove Windows 7 via BIOS on a laptop is to format it during the installation process of the eighth version of the operating system from Microsoft.
To perform this action you must do the following:
This way you can format and remove the old version of the OS from your computer with minimal risk. This method also makes it possible to save some time - there is no need to remove a disk with additional software, configure the BIOS, and perform other similar actions.
Installation
The installation itself of the new version of the operating system from Microsoft is quite simple and takes a minimum amount of time. Especially if installed from a USB flash drive.
The installation is performed in the following order:
- update;
OS setup
When the installation is complete, the system will provide the opportunity to perform initial setup.
This is done in several stages:
- protection and privacy: enable or disable the Do Not Track system (prohibiting tracking of visited pages) and Smart Screen (protection from potentially dangerous programs and data).
It is also very important to pay attention to the settings section called “sending data to Microsoft and other services.” Since the level of confidentiality of use depends on this.
This page allows you to enable or disable:
- automatic use of the Bing system;
- automatic loading of predicted pages;
- permission to use personal personal data (name, avatar);
- requesting information about the location of the device.
The last step is to set up your account.
.
Three options are available:
It is very important to choose the original distribution - the success of the subsequent installation greatly depends on this.
Since various kinds of pirated assemblies are often simply non-working. You can purchase the OS at any computer store.
If possible, it is necessary to carry out a “clean” installation of the operating system - format the hard drive before starting installation. Because otherwise, there is a high probability of all sorts of errors, as well as the appearance of difficult-to-delete files.
Installing a new operating system is not a difficult process; it is only important to be as careful as possible when setting up the BIOS.
Tired of using Windows 7? Do you want to return to the proven XP or install a more modern G8? Then it will be useful for you to know how to remove Windows 7 from your computer.
Preparing for removal
First of all, make sure that your important files remain safe. To do this, you should transfer them to a portable hard drive or large-capacity flash drive. This is necessary because when you remove the OS, the disk is completely formatted and any data and files stored on it are deleted.
In addition, if the removal is carried out on a laptop without a drive, you will definitely need a flash drive with loaded software, with which the system will be removed. Today, the most effective and safe tool for this is the Acronis Disk Director program.
Its main advantage is that it works normally outside the operating system environment, which is very important for us in this case.
How to completely delete all data and hide traces of its existence
It is not enough to delete all programs and files. You should also hide all traces to prevent attackers from recovering your data. You can use standard Windows 10 tools to perform cleaning.
- Follow steps 1 through 5 in the previous instructions.
- Select "Delete files and clean disk" as the reset option.
- Wait for it to complete.
Please note that a full reboot will take longer than a normal wipe. This is because we need to analyze all the thumbnails and saved files on your computer.
How to remove Windows 7: step-by-step scheme
The first step is to debug Bios. This is done so that the PC selects your media on which special software is installed as the boot disk. To do this, we do the following:
- We start the computer and immediately press one of the keys that are indicated in the table to launch Bios:
In the window that opens, you need to find a list that looks like this:
Next, in the 1st Boot Device parameters, select CDROM (for disk) or USB-FDD (flash drive), depending on which media the program to remove Windows 7 will be launched from.
- After that, save all changes and restart the computer.
- Insert the disk or flash drive into the PC and reboot the PC.
- When turned on, a blue window will appear on the screen where you need to select the Acronis Disk Director program.
- After this, the program’s working window will open, where you must press the “Launch management console” button:
Next, a window will appear on the screen with a list showing all the hard drives that are available in the PC. Right-click on the partition in which Windows 7 is installed and select “Format”:
The process of cleaning your disk will begin. On average, it takes from 5 to 15 minutes, depending on the power of the PC, the amount of information being deleted, etc. After the procedure is completed, all data from the hard drive, including operating system files, will be deleted permanently.
Uninstall Windows 8 and restore the previous version
We took the instructions on the official Microsoft website as a basis and simplified them so that even a novice user could perform the removal. This method is suitable for those personal computers and laptops on which Windows 8 was installed during the update process. If eight was installed on a formatted hard drive, then there is simply nowhere to roll it back.
- First of all, copy all the necessary files and folders that are present on the disk. Although reverting to the previous version does not involve full formatting, some files may be lost. Once your important data is saved, you can begin the recovery process.
- You need to find a folder called old on your system drive. Make sure that the size of this folder does not exceed the empty space on the system partition. That is, if the folder weighs 4 GB, and there is 3 GB of free space, you need to delete unnecessary data. For convenience, you can use the search bar from the Start menu to find Windows.old.
- Now you can boot from the Windows 7 disk - at this stage the process is no different from the standard installation of the operating system. You need to select the Install Windows button, then select the desired language and set the time zone. After making these settings, click Next.
- To make changes and remove Windows 8, you must restart your computer by clicking on the appropriate button in the installation wizard. After this, the system will automatically launch the recovery menu. Here we need to indicate the version you want to revert to.
- Click the Next button again. Now we need to call the command line. To do this, click on the Command Prompt button. The directories from the operating system root folder will be shown here. Using the command line, you need to create a copy of the system files. Enter the following commands:
- Now you can start moving directories, here you need to enter the following commands:
- The next step is to restore the Windows 7 boot sector. Run the Windows installation disk again using the Dir command, and then bootbootsect /nt60 D:
- Enter the command exit and press the enter key. After the PC restarts, you need to take out the installation disk and set Boot to boot from the hard drive again (if this did not happen automatically). Done, now you will run version seven instead of version eight.
- It remains to remove the eighth version from the boot menu. Enter the msconfig command in the Run line and select Boot, here you will see Windows 8. Click the Delete button, then Stop and OK. Below is a screenshot for the English version of Windows.
ATTENTION! If you upgraded to OS 8 for free during the promotion, then this method will not work to return to OS 7. The first instruction will suit you.
Uninstalling Windows 7 when installing a new operating system
The method described above can be somewhat difficult for beginners, because it requires intervention not only in the operating system itself, but also in the BIOS. A simpler method is to remove the old OS when installing a new one, for example, Windows 8. To do this, you will need an installation disk or flash drive with the operating system.
Let's look at the procedure:
When turned on, a window will appear on the screen where you need to specify certain data about the language and time:
The program will automatically begin the disk cleaning procedure and after deleting all files, you can install a new operating system, getting rid of the old one.
Using the Command Line
Disk cleanup using the Command Line involves using the DISKPART utility outside the installed operating system. To perform the steps you will need a flash drive and an image of any version of Windows.
Presets
Before deleting, you need to determine the number of the corresponding partition. This is done on the installed operating system through the DISKPART console utility. Procedure:
- Press Win + R.
- In the Run window, enter CMD and click OK.
- In the console that opens, enter DISKPART and press Enter.
- Display a list of disks using the list disk command.
- Select the drive partition with the operating system. To do this, enter sel disk #, where # is the disk number.
- Display a list of partitions using the list partition command.
Defining the system partition in the Command Line
A list of partitions will appear. You can determine the system one by comparing the occupied volume, which is clearly visible in the file manager.
Launching the console
The console to uninstall Windows must be opened outside the system. First you need to create a bootable drive with any version of Windows and start the computer through the Boot Menu.
When the installer main menu appears, press Shift + F10.
Removing the operating system
In the open Command Prompt to clean up the disk you need to:
- Type DISKPART and press Enter.
- Select the desired disk with the command sel disk #.
- Use the command sel part #, where # is the partition number, to select the required one.
- Enter the del part override command and press Enter.
Removing Windows 10 system partition via Command Line
Note! If you need to clear the entire disk, you need to select each partition one by one and run the del part override command.
At the end, you can close the installer: press Alt + F4 and confirm the action in the dialog box.
How to remove Windows 7 if you have another system?
The easiest way to get rid of Windows 7 is possible when there is already another OS installed on your PC or laptop. In this case, you will not need to go into Bios at all. First you need to make one of the systems the main one. Accordingly, if we need to remove Windows 7, then we need to make any other OS on the PC the main one. For this:
- Launch the Run panel using the Win+R keys and paste the msconfig
- The System Configuration window opens. In it you need to go to the “Downloads” tab, where there will be a list of operating systems that are installed on the PC.
- Select the operating system that you would like to keep (in this example, it is Windows Vista) and press the “Set as default” button.
- After that, select Windows 7 from the list and click on the “Delete” button.
After this, you will be able to use the disk on which the system was installed for any of your needs. In addition, removing unnecessary OS helps improve system performance and productivity. Therefore, you should not keep “extra” operating systems unless there is a direct need.
Removing an unnecessary Windows 7 operating system may seem like a problematic operation, so you can additionally watch a video that clearly shows how to completely remove it from your computer:
Installing a second system
If you have the opportunity to make a special partition for the second system, you can install it and then remove it from the Windows 7 boot list. In this case, all files on the hard drive will be saved.
To then get rid of the “seven” in the boot selection list, you need to know how to remove the second operating system. In Windows XP, for example, this can be done by editing the boot.ini file. You just need to delete the line that says loading Windows 7 and save the file. The operating system files themselves (folders “Windows”, “Users”, etc.) will have to be deleted manually.
Recommendations for removing Windows 7 from experts
What advice do experts give to those users who would like to get rid of an unnecessary OS? Let's look at them:
- Take your time when saving important files. It is best to start collecting everything on one third-party medium a few days before the deletion itself, because, as a rule, haste always leads to you forgetting something or simply losing track of it.
- Beginners are advised not to uninstall Windows 7 unless there is another operating system on the PC. In this case, you will not be able to access the usual graphical interface - all settings will have to be made through Bios.
- If you delete the Windows and Program Files folders, this does not mean that the system cleanup was successful. In addition to visible files and folders, the OS provides a huge number of settings and configurations that are essentially “implanted” into the hard drive, remaining invisible to the user. Complete removal of Windows 7 requires a complete cleanup of the disk itself.
How to remove Windows from a computer or laptop?
Step-by-step instructions for removing Windows
If you have decided, but do not know, how to remove Windows from a computer or laptop , first decide exactly what goal you want to achieve:
To proceed to specific actions, decide whether you want to switch from one OS to another (for example, from Windows to Linux) or whether you just need to format the partition with the system in order to later use this disk as an additional one or even transfer it to someone else.
Before proceeding, in any case, make sure that you have saved all important information in a safe place on another local or external drive, on a flash drive or on a DVD.
Now let's look at ways to remove Windows depending on the desired result.
Replacing one Windows with another
Move the data that is important to you from the desktop, from the Documents folder and other folders on the C drive, install the Windows media and run a normal installation. At the stage when you need to select the partition in which to install the new OS, select drive “C” and click on the “Format” button. This will clear the partition of all data stored on it, including the old version of Windows.
The same scheme should be followed if you want to remove Windows and install another OS, for example, Linux.
Important!
If, after uninstalling the OS, you have difficulties installing Windows, you can contact USService specialists for professional help.
There are two operating systems installed on the computer and you need to remove one of them
Let's say you have Windows 7 and Windows 8 installed at the same time and you want to remove Windows 7 from your computer or laptop in order to use a later version.
In this case, it is not enough to simply format the disk with unwanted Windows. First you need to remove this system from the bootloader list, so that when you start you are not offered a choice of two different versions.
To do this, on the desktop, press the Win + R keys, and in the “Run” menu that opens, enter the msconfig command, then click “OK” or press Enter. A settings window will appear. Open the “Download” tab and you will see a list of two (or more, if other OSes are installed on your computer) systems. First, highlight the one you want to use and click “Set as Default.” Then select the system you want to remove and click Remove. After this, the computer will ask to restart. Do it.
Video with a visual demonstration of removing unnecessary Windows
Now your chosen Windows should start immediately, without a boot selection menu.
formatting a disk via computer
All that remains is to format the disk on which the old system is installed. Go to “Computer”, right-click on the desired partition and select the “Format” option.
Be careful!
Make sure that there are no important files left on this disk, because all of them will be deleted during this procedure.
Formatting can also be done via the command line.
Open the Run window again, delete the previous command if you still have one, and type cmd. A black window will open, in which type the format command in Latin letters, then put a space and enter the letter - the label of the volume that needs to be formatted (in this case, it is drive “D”), put a colon after it, and then press Enter.
After formatting, all files of the old system will be deleted, and there will only be one OS left on your computer. The procedure is the same regardless of whether you want to remove old or new Windows. The same scheme should be followed if the Windows being removed is located not on another local drive, but on an additional hard drive.
Complete removal of Windows 10
A powerful tool for working with disks is used - GParted, which must first be written to a flash drive using a program for creating bootable drives. Before you remove Windows 10, you need to download a special application to your computer. Actions:
- Open the GParted download page.
- In the GParted Live CD/USB/HD/PXE Bootable Image Stable Releases table, follow the Download link, the name of which contains the corresponding system bitness (i686 – 32-bit; amd64 – 64-bit).
- Confirm downloading to your computer.
- Open the Rufus program page.
- In the Download block, click on the link Rufus <version> Portable.
- Confirm download.
Downloading GParted and Rufus
Note! You can use Google or Yandex to search for programs.
You should also prepare an external drive, which can be a 4 GB flash drive.
Creating a bootable GParted USB flash drive
The GParted installation image is written using the Rufus program. Need to:
- Launch the application.
- Select the flash drive in the Device list.
- Press the SELECT button and open the previously downloaded GParted ISO image in the file manager.
- Determine the Partition Scheme corresponding to the disk.
- Press the START button.
Creating a bootable GParted Live flash drive
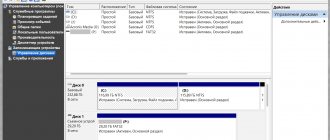
Note! You can find out the partition layout of your hard drive in the standard Computer Management application. Go to the Disk Management section, open the properties of Disk 0. The necessary information will be displayed on the Volumes tab.
Determining the partition scheme
After completing the transfer of image files to the flash drive, a system signal will sound. The program can be closed.
Launching the LiveCD program
It is impossible to remove Windows 10 while working on your computer. The GParted program must be launched from a flash drive. This is done when the computer is rebooted. When the inscriptions appear on the screen, you need to press a special key. Depending on the model of the desktop computer motherboard or the laptop manufacturer, the boot menu button is different. You need to refer to the table:
| Manufacturer | BIOS | Key |
| Laptops | ||
| HP | – | Esc → F9 |
| Asus | – | Esc |
| Dell | Dell | F12 |
| Lenovo | AMI | F12 |
| Sony Vaio | Inside H2O | F11 |
| Acer | Phoenix | F12 |
| Acer | Inside H2O | F12 |
| Packard Bell | Phoenix Secure Core | F12 |
| Toshiba | Phoenix | F12 |
| Toshiba | Inside H2O | F12 |
| Samsung | Phoenix Secure Core | Esc |
| Motherboard | ||
| MSI | AMI | F11 |
| Gigabyte | Award | F12 |
| AsRock | AMI | F11 |
| Intel | Phoenix/Award | Esc |
| Asus | AMI | F8 |
Important! If there is no information about the manufacturer, you can press the designated buttons one by one until you find a suitable one.
Next, you will need to select a flash drive to launch. Moving between items is carried out using arrows, selection is made by pressing the Enter key.
Presetting parameters
After determining the priority disk, the main menu of GParted LiveCD will appear, where you will need to set the program operating mode and set the parameters:
- Select GParted Live (Default settings), press Enter.
- In the Configuring console-data window, select the line Don't touch keymap. Press Enter.
- In the console, determine the localization of the program. Enter the language number from the list and press Enter.
- Enter 0, confirm by pressing Enter.
Launching GParted from a bootable USB flash drive
In the program window, you will need to make preliminary settings: define partitions, specify a command to change the format.
Important! At this stage, changing settings does not affect the operation of Windows 10.
Windows 10 is located on just one disk partition where system files are located. The rest are the recovery partition, EFI data and volumes for user needs. Additional information will help determine which one is correct for deletion:
- size over 40 GB;
- file system - NTFS;
- sometimes labeled as Windows 10.
After determining the desired section, you can proceed to setting the parameters. Actions:
- Right-click on the section.
- In the menu, hover over Format to.
- Define the file system as ntfs.
Formatting a partition in GParted
The selected configuration will clear the disk of Windows 10 files. To completely delete the partition, select the Delete option in the context menu.
Note! To return a disk to factory settings, you need to apply the Delete option to each partition one by one.
Applying changes
Formatting options are selected but not applied. At this point, you can override the settings. To cancel actions, use the Undo last operation button.
Button to cancel action
If the specified configuration is correct, you can clear the disk of Windows 10 files by clicking the Apply all operations button. Next, you just need to confirm the action by clicking Apply.
Button to apply operations in GParted
Important! Once the changes are applied, the data will be deleted. To avoid loss, important information must be moved to backup media.
After completing the cleaning operation, you can close the window: press the Exit button on the desktop, select Shutdown and remove the flash drive after turning off the computer.