How to delete a phone number on Android
Removing a contact from your phone book is easy. To do this, follow these steps:
Step 1 . Launch the Contacts (may also be called People depending on the OS version)
Step 2 . Touch and hold on the contact you want to delete until the context menu appears.
Step 3 . Click the "Delete" button and then confirm your selection.
Removal instructions
- Click on the “Contacts” application icon, but the specific name is determined depending on the version of the system on the smartphone;
- Select the caller you want to remove and the display will show more detailed information regarding the option. If you need to get rid of many numbers, you are asked to click and hold the first press until a list of available functions is displayed where you need to use additional contacts. The name of the latter similarly changes in various smartphone companies;
- Select "Delete". Despite the acceptable differences, the visually required command must be located in the upper area of the display. The option must be presented in writing or depicted with a corresponding animation of the shopping cart. You may probably need to first press the key with the appearance of three consecutive dots, and then select the “Delete” action in the expanded menu.
- Next, the system will display a notification requiring confirmation of actions, after which it will offer to completely remove mobile numbers from the phone’s contact book.
Method 1: Built-in tools
The most convenient way to solve our problem is to use the contact book built into the phone's firmware. There are many variations of these, it is impossible to list them all, so we will focus on the version that is present in the current, “pure” Android.
- Open the application menu and select "Contacts" there.
- Click on the three bars at the top left and tap on “Settings”.
- Use the Contact Filter option, which you set to All Contacts.
- Return to the address book window. Scroll through the list, select with a long tap the positions you want to erase, then find the button with the trash can icon on the toolbar at the top and click on it.
Confirm your intention.
If, after deleting, contacts appear again after some time, the reason may lie in synchronization. Therefore, to fix the problem, this option needs to be disabled - we have already described how this is done in a separate article.
Method 3: True Phone
The popular True Phone application combines both a dialer and its own version of the address book, which allows you to permanently delete corresponding entries.
- Set up the program and give it the necessary permissions to operate.
- Go to the “Contacts” tab, then call up its menu by clicking on the three dots and select “Delete contacts”.
- Mark unnecessary items by checking the boxes, then tap “Delete”, and in the warning window – “Yes”.
This application is a convenient and free tool.
Cleaning Google Contacts
- Launch your browser. If you're using a Google Account to store mobile numbers, go to contacts.google.com. To figure out how to delete a contact from an Android phone, you need to understand that the method concerns only the data contained in the account, so information recorded specifically on the phone or linked to another application is not affected;
- On the web page, you should log in to your account, then find the required subscribers and select by standard clicking on the option;
- Then click on the delete button at the top of the interface to remove the contact from your Google account;
- On your smartphone you need to go to the settings category. Once you have completed eliminating subscribers via the Google Contacts resource, you should reactivate synchronization;
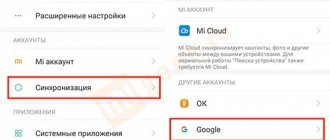
- Using the personal data category, go to the “Accounts” sub-item;
- Click on your Google account, however, if several options are available at the same time, the system will offer a choice with the settings for each profile;
- Next, you need to find the “Synchronize Now” item in the menu of available service actions, and then all numbers removed from the site will be automatically deleted, so all data that has been deleted from Google cloud storage will be correspondingly excluded from the mobile device’s number book.
Good to know How to connect a mobile bank?
You should assume that you understand how to independently delete a read-only contact from your Android phone. Despite certain differences in the names of items for different versions of the system on smartphones, the meaning and content of the functions remain the same.
Standard way to delete a contact
On phones with the Android operating system, there is an easy way to edit your contact list. To do this, you need to find an application that stores a list of them. Usually it is called “Contacts”, but it can be different. Its pictogram is a notebook with a schematic image of a person on it.
Next, the instructions will tell you how to delete a phone number on Android:
- Here is a list of contacts; find the one that is no longer relevant.
- Click on the contact you want to delete. Hold your finger until an additional menu appears.
- From the list, select “Delete” and confirm your decision.
When you click on the desired line, the operating system may behave differently. Sometimes the menu does not appear, and a line is activated at the top of the screen, which schematically displays the available actions. In this case, you need to select an icon that resembles a trash can or trash can.
Also, sometimes the interface of this application involves calling up the menu not by holding your finger for a long time, but by a special button.
Disable synchronization with Google services
The principle of operation of this parameter is simple: when a user has added information on one device with the Android operating system, it will automatically appear on another if it is synchronized with the same Google account. For some Android device owners, it will be useful to disable this option, because it can sometimes harm the smartphone or tablet:
The following instructions will help you disable the option:
After this, automatic data updating will be disabled. Sometimes you need to synchronize your device so that if problems arise with it, you can restore information. To manually synchronize, you need to do the following:
Note! In some models, you can enable synchronization through the icon in the quick access panel (above the notification window).
How to delete contacts from a SIM card
To delete contacts from a SIM card, you must first configure their display. The sequence of actions is as follows:
Step 1 . Launch the Contacts .
Step 2 . Press the Menu button on your smartphone.
Step 3 . The application settings will open, click the “Display” button.
Step 4 . Set the “SIM Card Contacts” checkbox to the “Enabled” position.
Step 5 . Return to the Contacts , find the SIM card contacts that have appeared in the list of numbers (they will be displayed with the appropriate mark), select and delete them at your discretion.
Batch deleting contacts
Selecting and deleting each contact from the Android phone book individually is a rather labor-intensive and boring task if there are several hundred numbers on the phone. Therefore, you can use the batch uninstall function:
Step 1 . Launch the Contacts app and tap the Show More icon (represented by three dots). In the context menu that appears, select “Settings”.
Step 2 . Here, find the “Group deletion” item. Click Select All and then click the trash can icon. If necessary, you can delete only contacts from a specific group. To do this, go to the appropriate section.
On older devices the procedure will be slightly different:
Step 1 . Launch the Contacts .
Step 2 . Press the Menu button on your smartphone.
Step 3 . Click the "Advanced" button.
Step 4 . Click the "Batch Uninstall" button.
Step 5 . You will be returned to the Contacts , where you can check the boxes next to the numbers you need and delete them with one click of a button.
How to get rid of duplicates in a notebook
Unfortunately, you can't do this from the contacts app itself. To do this, you need to log into the web version of the Google Contacts service and right on the service page you will see the “Similar Contacts” tab. Press it and the service will give you all contacts that have duplicates. Next, you can either delete duplicate contacts or combine 2 duplicates into 1 full contact.
You can discuss this and other articles in our official Telegram chat.
News, articles and publication announcements
Free communication and discussion of materials
iPhone is not my smartphone. I realized this almost immediately after I transferred all my data to it from the old Honor View 20, but I decided not to cut corners and use it for a while. After all, a habit is not a constant value; it can change. But, as it turned out, the essence of my complaints about the iPhone does not come down to my own habits, but to the objective shortcomings of both iOS and the hardware of Apple branded smartphones, which are inferior to Android devices.
Have you ever wondered how smartphones have changed in recent years? No, I'm not talking about performance increases, design changes and camera improvements. All this is obvious and does not require direct comparison. I'm talking about something deeper, which was previously perceived completely differently than it is now. It’s just that we have now forgotten that we once considered things that are completely familiar today to be something extremely obscene for everyday use in smartphones. Still don't understand what I mean? Now I will explain in more detail.
Google's approach to user security has always raised more questions than Apple's approach. Allegedly, Cupertino pays more attention to the privacy of its clients, while the search giant only does what it does to make money from them. But Google, unlike Apple, has a separate website where all our data is collected, which the search giant collects, while Apple has nothing of the kind. There you can see your search history, YouTube videos you watched, where you were, and much more. True, this data did not have any protection before. And now there is.
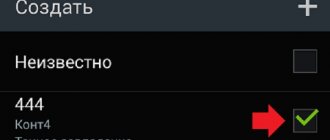
Not true! I don’t know about others, but in my built-in contacts application a warning appears that there are duplicate contacts!
Samsung Contacts always offers to merge related contacts. Very comfortably. This is a little off topic, just FYI. Removing unnecessary contacts is a double-edged sword. There have been cases when a contact hangs around for years, all communication with the person is lost, and the contact is deleted. After some time, it suddenly turns out that this contact becomes desperately needed. This is where you bite your elbows.
Why do double contacts appear?
Installing different firmware on a smartphone and then synchronizing the data can lead to the appearance of double contacts on Android. As a result, the book of numbers can grow to indecent sizes, and the user will have to constantly wade through the jungle of identical contacts. This problem can be partially solved using the function of merging duplicates:
Step 1 . Launch the Contacts .
Step 2 . Press the Menu button on your smartphone.
Step 3 . Click the "Advanced" button.
Step 4 . Click the Merge Duplicates button.
Step 5 . The OS will offer to find duplicate contacts and merge them. Click the Merge button to start this operation.
Removing duplicate contacts on Android
To completely remove duplicate numbers in the telephone directory, you should use tools from the Google service or install third-party programs, including Duplicate Contacts and others. The main methods are described below.
How to merge identical contacts
Please note that the feature is not available on all OS versions. To get rid of identical phone numbers in the list, use the following instructions:
- Launch Contacts.
- Click on the advanced options button (the button in the corner).
- Open advanced settings.
- Find the "Merge Duplicates" option.
After this, identical entries will disappear.
Additional Tips
It is also recommended to use the following options:
- disable synchronization with Google in settings;
- clear Google contacts by going to device settings, Google, “Contacts”;
- Take advantage of the ability to delete several contacts at once (additional settings in the Contacts program, Batch/Group deletion).
This way you can get rid of unnecessary numbers in the phone book on Android
How to Delete Duplicate Contacts on Android
Google tools or third-party applications such as Duplicate Contacts . Let's consider both options.
Google Contacts
Step 1 . Launch your browser and go to contacts.google.com.
Step 2 . Google account information .
Step 3 . Click the "Find Similar Contacts" button.
Step 4 . Select duplicate contacts and delete them.
How to quickly remove data from your Google account
A common problem is how to delete contacts from your phone so that they are not transferred to another device when you change your smartphone. Due to synchronization with Google, all information is automatically transferred to the new mobile phone.
To fix this, go to the system settings, to the “Accounts” section. We find a Google profile that will be linked to the new device. Click on it and uncheck the box next to the synchronization item shown in the screenshot.
From this moment on, information will not be transferred to the company’s servers. We remove unnecessary people from the phone book and enable the exchange of information with the company’s servers. The device will automatically start updating the data. Read what to do if numbers won’t load in the material: “Contacts won’t load on Android”
For information: on the Google website there is a function for selective deletion of mobile phones. Go to contacts.google.com, enter the Google profile data to which the device is linked and selectively remove elements from the list. For the actions to take effect, we re-synchronize.
Disabling an account
To completely delete the phone book on your Android mobile device, it is recommended to disable the account with which you previously synchronized. This functionality will be useful for users who are preparing equipment for sale or buying a smartphone from another person after use. In this case, there is a need to completely remove personal data or other people’s contacts. To disable your account you will need to do the following:
- Find in the smartphone menu a standard program for settings or a separate “Google Settings” icon.
- Having opened the software, you should find the section with personal data and go to the “Accounts” tab.
- Tap on the line with accounts, where several possible accounts will be presented. Often, telephone directory data is synchronized with Google.
- It is necessary to delete the “Contacts” section from your account, and also completely disable synchronization.
- If your Google accounts are not divided into several categories, then you should completely disable synchronization.
- Next, the user needs to go to the menu by clicking on the 3 dots at the top of the screen. In it, tap on the “Synchronize” button, after which the smartphone will update the information from the memory. Mobile number data or account information will be completely deleted from the smartphone.
The described actions help to leave only contact materials from instant messengers in the gadget’s memory, and delete previously saved phone numbers completely. If you need to leave saved contacts and delete data from instant messengers, then it is important to deactivate account synchronization in them. This allows you to exclude the appearance of data in the directory about contacts from social networks. networks.
Editing Google Synced Data
In the case when telephone numbers are duplicated in a Google account, the user has the opportunity not only to perform a complete deletion, but also to correct the information, and then synchronize the smartphone with the account. This will be a useful feature for users who have a large number of phones in the directory and do not know how to remove numbers from their account without deactivating it.
To perform the operation, use a step-by-step guide:
- To start editing phone data that is synchronized with Google, you need to go to the browser on your smartphone and open Contacts. Some versions of the Android operating system offer an application with a similar name; if it is not available, then you must log in through the Gmail service.
- When performing operations through a browser on a mobile device or computer, you need to log in to google.com/contacts. It is worth noting that it is more convenient to do the work via a PC.
- You must be authorized using your Google account password and login. After this, a telephone directory opens with photos that were previously saved.
- You need to click on the picture to select the ones you need.
- Removal is carried out through the “Trash” button, which is located at the top of the screen. All selected materials are completely deleted, the browser should be closed.
- After that, go to “Settings”, where you activate your Google account; this action is carried out if it has been disabled.
- Click on the menu in the form of an icon with 3 dots and find the synchronization key; by tapping on it, the directory list will be updated.
The described method does not work in the situation if the user saved phone numbers to the smartphone’s memory or to a SIM card. The method works only in the case when the owner of the mobile device used a Google account and all materials were saved there.
In some cases, the Trash button may be inactive. This indicates that certain phones in the list are saved via Google+. To solve the problem, you will need to go to the Circles section and delete numbers there, then go to Contacts and perform the same action.
How to disable synchronization with other applications?
Messengers and programs like Skype have their own phone book, which is synchronized with the smartphone after installing the application. To remove their display, go to the “Accounts” section, select the unnecessary program and disable it, as shown in the screenshot above.
Duplicate Contacts
Step 1 . Install and launch the Duplicate Contacts .
Step 2 . The program will scan your contact list and show whether there are duplicate numbers on your smartphone.
Step 3 . Select and remove duplicate contacts.
Is it possible to delete?
You cannot delete a contact from a read-only account, such as Facebook. If it is impossible to clear the user, a corresponding notification will be displayed indicating that the mobile number will become hidden. To restore such data for an account that does not allow manipulation, you should delete it from your smartphone and then return it again.
Good to know Where are deleted photos stored on Android?
If the subscriber's data includes information from standard categories, which include Contacts, as well as other services, for example, Facebook, then the user will see a message notifying that the number is read-only, so instead of deleting it will be hidden.
To find out how to delete a contact from an Android phone if it is not deleted, you need to click “ Edit contact ” in the smartphone’s number book, after which you will notice the presence of associated numbers with another mobile service. Therefore, through the menu you need to select “ Cancel connection ” and confirm the action with separation of contacts in order to get two numbers for the phone and the application. Once completed, both options can be cleaned up seamlessly.
How to delete contacts from both your Android phone and your accounts at the same time
This method of deleting contacts is suitable only for those who want to delete them both from the phone and from the accounts that are synchronized with the phone.
On your computer, sign in to your Gmail account. Then click on the Google Apps icon in the upper right corner of the screen, and click on the Contacts icon in the small window that appears.
On the next screen, hover your mouse over the contact, a checkbox will appear, check it. Selected:1 will appear at the top. There will be a checkbox nearby. When you hover over it, the message Select all will pop up. Check the box to select all contacts in your Gmail account.
Click on the menu in the form of three dots in the upper right corner of the screen and, in the drop-down window, select the Delete option.
Once you have deleted all contacts from your Gmail account, your Android phone will also automatically delete all contacts on the device once it syncs.
In case you do not want to wait for the next synchronization, click Settings - Accounts - Google. On the next screen, tap on the three-dot menu and tap on the Synchronize now option that appears.
Note: This method deletes all contacts permanently, without the possibility of recovery.
How to delete contacts on an Android phone: step-by-step guide
Phones and tablets equipped with the Android operating system have built-in software to interact with phone numbers that the user has saved. With their help you can add, edit, delete them. To quickly get rid of an entry, launch the contact viewer.
Please note that the names of settings and system programs differ on devices from different manufacturers. The firmware version also affects.
Typically, this program is called “Contacts”. By default, it is located on the desktop. The icon depicts a figure of a person or a telephone receiver. To remove a specific phone number from your saved list in a few minutes, do the following:
- Open the Contacts application on your smartphone or tablet running the Android operating system. In the MIUI shell, this can be done by going to the call log. The tab is at the top.
- Use the search or manually find an unnecessary contact.
- Press it with your finger for a few seconds. A window with additional options will open.
- In the list that appears, select the item responsible for deleting the saved number. After this, a warning will appear with the text “Delete contact “name”?” or “Are you sure you want to delete this number?” Confirm your actions by clicking the appropriate button.
In some devices, the procedure differs from that described in the instructions. When you long press on the name, the top menu appears in the form of a strip. The container contains different parameters.
In some firmware you need to click on the icon in the form of a basket or trash can. In others - the inscription “Delete”. After clicking on the option, a warning appears - select “OK”.
In other smartphones and tablets, the process is different from the previous two: you need to select the number you want to delete, click on it to see detailed information about the contact. On this page you can delete or edit (change name, add number, etc.) entry. The required button is usually located at the top (on the opposite side of the return to previous page icon) or at the bottom. Sometimes you need to click on the three dots in the corner, then select an option.
Deleting all contacts from an Android phone by clearing Contacts data
A quick way to delete all contacts is to clear the Contacts app.
Click on Settings - Applications - Contacts (make sure you are in the All applications tab).
On the app's information screen, tap Storage.
On the next screen, click on the Erase data button.
Next, you will see a pop-up window, click OK to confirm that you really want to delete all contacts on your Android phone.
Note: Clearing Contacts app data will also delete all call history and favorite contacts.
Erasing Contacts app data will delete all contacts stored on your device. However, all deleted contacts can be restored if you previously synchronized the data with your Gmail, Facebook or WhatsApp accounts.
However, you need to prevent new synchronization of phone data with these accounts. For this:
Click Settings - Accounts - Google.
On the Google Accounts screen, tap your Gmail account.
On the next screen, turn off synchronization by turning the switch to the off position.
In a similar way, you can disable synchronization with Facebook, WhatsApp and other accounts.
Click Settings - Accounts - WhatsApp.
On the next screen, turn off synchronization by turning the switch next to Contacts to the off position.
This method deletes all contacts from your Android phone, but you will still be able to access them through Gmail, WhatsApp and other accounts.
Part 5 Delete Android contacts from phone? Recover now!
Delete phone contacts from Android by mistake? Want to rescue deleted Android contacts as soon as possible? Do not worry about it. You can recover any deleted or lost Android file using Apeaksoft Android Data Recovery.
Moreover, you can run this all-in-one Android Data Recovery to recover data lost in various scenarios such as erroneous deletion, system crash, SD card problem and others. With support for more than 20 file types, you can recover not only deleted contacts but also other Android files such as call logs, messages and more.
Download and install Android Data Recovery for free. Then connect your Android phone to your computer using a USB lightning cable.
The moment you connect Android to PC, this program can automatically detect your Android phone or tablet. Next, follow the onscreen instructions to put your Android device into USB debugging mode.
You can see all available file types in a pop-up window. Then check the box in front of "Contacts". Click "Next" to move on.
Android Data Recovery can thoroughly detect all contacts stored on your Android. This way you can see all the categories appear in order. Enable the "show deleted items only" option to access only deleted phone contacts. Finally, select the contacts you want to recover and click "Recover" in the bottom right corner.
Of course, Android Data Recovery allows users to recover a deleted phone contact, recover multiple deleted phone contacts, and recover all deleted Android contacts without data loss. Given its fast performance and easy-to-use tools, the next time you need to recover any deleted or lost Android data, you shouldn't miss Android Data Recovery.
Now you can safely delete Android contacts using the above solutions because Android Data Recovery is always your reliable friend. Moreover, if you are still confused about how to delete phone contacts, you can record your difficulties in the comments below.
Source
Why contacts are not deleted from my Android phone
Synchronizing contacts with What's App servers
There are 2 reasons for this:
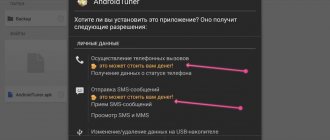
- Enabled automatic synchronization of contacts with Google servers, What's App, Telegram or After it, usually deleted entries are returned.
- The contact is associated with some messenger or other application, which is why the “contact is read-only” error appears.
In the first case, the problem can be solved in 2 ways: disable synchronization of contacts with Google and messenger servers or clear the list of contacts from your Google account, and then synchronize them with the device.
In the second case, the problem is also solved in 2 ways:
- Change display settings in the phone book so that identical entries from different applications do not confuse the user.
- Separate contacts and delete unnecessary ones.
Changing Display Settings
This feature does not delete contacts, but hides “duplicates” from different applications. The procedure differs on phones from different manufacturers due to differences in the interface, but the principle is the same. For example, on Asus Zenfone 4 (A450CG) with Android 4.5 and ZenUI v3.0 shell, this is done like this:
- Open "Contacts".
- Click on “Contact Filter”. On other phones, this item can be found in the application settings under the name “Display”.
- Mark the source of the displayed contacts (SIM, phone memory, Google accounts, What's App, etc.).
Contact separation
The procedure is as follows:
- Follow step #1 from the previous method.
- Find the desired entry, hold it with your finger and select “Edit” in the menu that opens.
- Click "Split".
- Delete unnecessary entries in the standard way.
This option is only available on Android 8.0 and 9.0. To delete on versions 7.0 and older, you will need a third-party Easy contacts delete utility. It is used extremely simply: click on the desired contacts and click on the button with a cross at the bottom of the screen.
To summarize, we can say that you can delete problematic entries in the phone book in a few clicks, without resorting to third-party applications.
Removing duplicate contacts on Android
To completely remove duplicate numbers in the telephone directory, you should use tools from the Google service or install third-party programs, including Duplicate Contacts and others. The main methods are described below.
Google Contacts
To remove duplicates using this method, you should use a simple guide:
- On a mobile device or PC, go to the browser and enter the path com/contacts in the address bar.
- Register personal information for your Google account.
- Press the button that corresponds to the search for similar mobile phones.
- Select duplicate numbers from the list and delete them.
In the case when a small portion of the data was synchronized through, then you need to perform similar manipulations in the “Circles” section. In order for the smartphone to display the directory correctly after completing all operations, you will need to complete editing by synchronizing. This is done through the settings menu, and the user needs to carefully ensure that his account is activated. Certain companies that release firmware for mobile devices immediately disable the function.
Duplicate Contacts
This utility is the simplest for the average user. It is easy to work with using the instructions. You can download the application through the Play Market completely free of charge. To do this, you just need to use the search bar, indicating the name of the software. From the presented list, tap on the icon to open the description of the utility. At the top right there will be a key for installing into the smartphone’s memory, which needs to be used.
Before installation begins, the user must give permission to use personal data. Without this action, the application will not be able to work with the directory. Wait until the download is complete, then open the program and do the following:
- In the main menu, press the scan button so that the utility searches for duplicates of the directory.
- At the end of the analysis, the application will offer to delete duplicate numbers. To do this, you need to select duplicates and delete them.