[Competition] Android from the inside or just about complex things
Introduction
Communicating on forums and being the curator of several topics, I often encounter a complete misunderstanding of newbies about the design of Android.
“Well, why does the average user need to know this?” - you say. And here I agree with you, asking a counter question: “Why then does an ordinary user get into the jungle of firmware, root access and system tweaks, without understanding anything about it?” This is what prompted me to write this article, in which I will try, in ordinary and understandable language, to convey complex things. The material is aimed primarily at ordinary users. Therefore, concise and superficial information will be presented here without technical depths and nuances.
Content:
- Internal memory sections.
- Bootloader, recovery, adb and fastboot
- Internalities of the system.
- Root.
What can be removed from the system?
To this answer, you can find 1000 answers on the Internet that state what is possible and what is not! The correct answer will be your individual approach and preferences! As the line of the great Russian writer A. S. Pushkin says
“and experience, the son of difficult mistakes”
Everything is individual, until you make a couple of mistakes and gain experience, you will not understand what can be deleted and what cannot!
Naturally, there is a small set of rules that can be deleted; if you see a similar name, then there is no need to delete it:
- WiFi
- Bluetooth
- Launcher
- C.S.C.
- Settings
- Phone
- SMS
- MMS
1. Internal memory sections
The internal memory of an Android device is divided into several logical drives (partitions).
I will give only the main ones:
Bootloader – here is the firmware (bootloader) that allows you to launch the operating system, recovery and other service modes.
Recovery – as the name implies, an engineering recovery menu or simply Recovery is installed here.
Boot is the heart of the Android OS; it houses the kernel, drivers, and processor and memory management settings.
System – system partition, which contains all the files necessary for the operation of the Android OS, it’s like the Windows folder on your C: drive (hereinafter I will associate it with the Windows OS)
Data – section for installing applications and storing their data. (Program files)
User is a well-known sdcard or, more simply put, a place for user files (My Documents). Here I am forced to make a digression, because... placement of this section has several options:
- The partition is not in the internal memory, and instead an external drive is used - the most popular option. (Fig.1)
- In devices with large built-in memory, this section is seen as sdcard , and the external memory card is seen as sdcard 2 or extsd (there may be other name options). Usually found on devices with Android 3.2. (Fig.2 Option 1)
- This option replaced the previous version, along with Android 4.0. User section media folder on the Data , which allowed us to use all the memory available to the user for installing programs and storing data, and not the amount that the manufacturer allocated to us. In other words, sdcard and data are one. (Fig.2 Option 2)
2. Bootloader, Recovery, adb and fastboot
Now that we know what is where, let's figure out why it is there.
Let's start with Bootloader . This is the bootloader that launches Android, recovery, etc. When we press the power button, the bootloader starts and, if there are no additional commands (pressed keys), starts loading boot . If a key combination was pressed (each device has its own), then it launches, depending on the command, recovery, fastboot or apx. The figure below clearly shows what Bootloader and how the sections are interconnected.
As can be seen from Figure 3, the Recovery does not affect the loading of the Android OS, but why is it needed then? Let's try to figure it out.
Recovery is essentially a small utility based on the Linux kernel and is loaded independently of Android. Its standard functionality is not rich: you can reset the device to factory settings or update the firmware (pre-downloaded to the sdcard). But, thanks to folk craftsmen, we have modified recovery, through which you can install modified (custom) firmware, configure Android, create backups and much more. The presence or absence of recovery, as well as its version, do not affect the performance of the Android OS (a very common question on the forums).
Particularly attentive readers may have noticed in Fig. 3 a certain Fastboot . This is an interface for working directly with internal memory partitions using the command line. Through it you can flash recovery, kernel or new firmware version, or format (delete all information) one or another partition.
Since we are talking about interfaces, I want to talk about another, quite well-known one - adb (android debug bridge). This is the so-called debugging mode , and it is named so for a reason - through it you can monitor the operation of both the system as a whole and individual applications. But that's not all, with adb you can get full access to the device's file system and change system files, or retrieve important information when your device is stuck loading. I will not describe all the functions of the debugging mode my goal is to convey general information, and not a detailed overview of the functions of a particular mode.
3. System internals
Having understood the theory, let's launch the Android OS.
We press the power button - Bootloader , which loads the Kernel (boot), which, in turn, starts the system (System), well, and it already loads programs (data) and user space (user). (Fig.3)
Now let's go to the root directory and look at the insides of the Android OS itself:
In this diagram I have provided only the directories necessary for reference. In fact, there are many more of them, and a review of just one System would require a whole article.
And so, the data . As the name suggests, it has something to do with data, but what kind? Yes, with almost everyone, this includes synchronization and account data, passwords for wifi access points and vpn settings, and so on. Among other things, you can find the app , data and dalvik - cache - let's look at their purpose:
- app – programs and games are installed here.
- data – application data, their settings, game saves and other information are stored here.
- dalvik - cache - program cache memory area for the Dalvik program. Dalvik is a Java virtual machine, which is the basis for running programs that have the *.apk extension. In order to make programs launch faster, their cache is created.
System folder stores system data and everything necessary for the operation of the OS. Let's look at some of these folders:
- app – here are system applications (SMS, phone, calendar, settings, etc.), as well as applications installed by the device manufacturer (branded widgets, live wallpapers, etc.).
- fonts – system fonts
- media – contains standard ringtones, notifications, alarms and interface sounds, as well as boot animation (bootanimation)
- build . prop – This file is almost the first to be mentioned in conversations and articles about fine-tuning the system. It contains a huge number of settings, such as screen density, proximity sensor delay time, wifi control, device name and manufacturer, and many other parameters.
4. Root
— Knowing what's in which folder is good, but can you do something about it?
- Yes! But you need superuser (root) or, if we draw an analogy with Windows, Administrator rights. Initially, all Android devices come without root rights for the end user, i.e. When we buy a device, we are not full-fledged owners of it. This is done both to protect against malware and from the user himself - after all, in inept hands, full access to the system can lead to the “death” of the operating system and the subsequent need to flash the device.
“Well, what is the use of such a dangerous thing?” - you ask.
- The ability to backup data and restore it after flashing or accidental deletion.
- Fine-tuning the system manually or using special programs.
- Removing system applications, ringtones, wallpapers, etc.
- Changing the appearance of the OS (for example, displaying battery charge as a percentage)
- Adding functionality (support for ad-hoc networks, for example)
This list can be continued for a long time, but I think these examples will be enough to get an idea of the capabilities and breadth of application of root privileges.
- This is all great, but now any program will be able to access the “heart” of the operating system and my data?
- No. You decide whether to allow this or that application to gain root access or not. For this there is a program called Superuser or its advanced sister SuperSU. Without this or a similar program, it is not possible to use root.
Epilogue
As you can see, Android is not that complicated. I hope that after reading the article, you learned something new or received an answer to a question that has been of interest to you for a long time.
I’ll take my leave then, see you in the comments.
Steps
Part 1 How to access files
- 1 Open the Settings app.
This application's icon looks like a gray gear and is usually found in the list of installed applications. - 2 Scroll down and tap About phone.
You'll find this option at the bottom of the screen.- On your tablet, tap About Tablet.
- 3 Scroll down and find the Build Number section.
It's at the bottom of the screen.- On Samsung Galaxy, tap "Software Information".
- 4 Click on the "Build Number" line seven times.
The message “You have become a developer” will open, meaning you have successfully enabled developer options.- You may have to click on the specified line more than seven times to receive this message.
- 5 Click the Back button.
It is located in the upper left corner of the screen or below the screen. - 6 Click For Developers.
This option is located above the About Phone option.- On Samsung Galaxy, the Developer option is at the bottom of the screen.
- 7 Scroll down and activate the USB Debugging option.
It's in the Debugging section in the middle of the screen. - 8 Scroll down and click USB Configuration.
You will find this option below the USB Debugging option. - 9 Click MTP (Media Transfer Protocol).
This option is at the top of the USB Configuration page. This is how you can view Android system files if you connect your device to your computer.
Part 2 How to open system files
- 1 Connect your Android device to your computer.
Connect one end of the charging cable to the USB port of your computer, and the other end to your phone. The process of synchronizing your Android device with your computer will begin.- A window may open asking you what to do with your Android device. In this case, close this window.
- 2 Open the Start menu.
Click the Windows logo in the lower left corner of the screen. - 3 Open File Explorer.
Click the folder icon at the bottom left of the Start menu. - 4 Click This PC.
This is a monitor-shaped icon that is located on the left side of the Explorer window. - 5 Double-click the connected Android device.
It will appear in the "Devices and Drives" section in the middle of the window. The Android system folder will open. - 6 Double-click Internal Memory.
A window will open in which all folders stored in the memory of the mobile device (including folders with system files) will be displayed. Now you can view these folders and files.- Follow the procedure before disconnecting your mobile device from your computer.
- before viewing system files because they depend on the operating system version.
Structure and purpose of files and folders in Android
on 12 April 2015. Posted in Android - General
Structure and purpose of files and folders in Android . In this article, you will learn what folders (directories) exist in Android, what files are in them, what these folders and files are responsible for, and why they are needed.
Preface about structure
Many people have a computer and Windows OS is installed on them. Everyone knows perfectly well that in this OS everything is distributed across disks:
C : - the system is located on this disk
D : - for personal files (the disk may not exist if it is not “partitioned”)
E : - Z : - flash drives, portable hard drives, CD or DVD drives.
In Windwows, everything is distributed across different drives. In UNIX/Linux, which includes Android (as well as BSD, which includes Mac OS X), everything looks a little different. The file structure is tree-like. It may not be clear now, but it will become more clear as you read the article.
It is also worth knowing that Android, like Linux, is very case sensitive, unlike Windows. For example, the folder Name, NaMe, name, NAME are 4 different folders, while Windows can only create one folder with that name.
To make it more clear what we are talking about, it is recommended to install the Root Browser file manager.
Structure and purpose of folders and files Android
As mentioned above, the structure has a tree-like appearance. Every tree has a root, and UNIX/Linux also has one. The root is the starting point in the file structure; from the root, the system acquires folders and files. The root in UNIX/Linux is marked as a sign:
Details about the cache section
/cache/ - this section contains temporary files; more precisely, system updates are downloaded here.
Details about the dev partition
/dev/ - this section contains information about system devices and files
Details about the data section
/data/ - user section in which installed applications and personal settings are located
/data/app - installed applications and games are located here
/data/app-lib - additional libraries necessary for the operation of certain applications (present in new versions of Android)
/data/dalvik-cache - cache memory for running the Dalvik Java machine, which is the “engine” in Android responsible for launching and running applications.
/data/data - this folder contains individual settings for each user application, libraries and other files necessary for their operation.
/data/system/ - this section contains global settings for the user environment, synchronization, accounts, blocking. Files gesture.key, locksettings.db, locksettings.db-shm, locksettings.db-wal - graphic key, pin code.
Details about the efs section
/efs/ - contains files and folders responsible for IMEI (this section is not available in all Android)
Details about the preload section
/preload/ - this section contains additional files and folders that are mirrored to the /system/ section (this section is not available in all Androids, mainly in Samsung)
Details about the system section
/system/ - this section contains system folders and files necessary for the functioning of Android
/system/app - system applications and services are located here (in the new Android OS, service applications were moved to another folder priv-app)
/system/bin and /system/xbin - the folder contains files and links to executable binary files.
/system/xbin/su - file responsible for Root rights
/system/camerdata - this folder contains files responsible for the operation of the camera
/system/etc - this folder contains configuration files necessary when loading the OS and also necessary during the operation of various programs
/system/init.d - this folder contains scripts that can affect the operation of the system.
/system/etc/ hosts - the file responsible for blocking and redirecting web addresses.
/system/etc/ apns.conf - file with information about Internet access points (APN)
/system/etc/gps.conf - GPS settings
/system/fonts - folder with system fonts
/system/framework - folder with Android “processes”
/system/lib/ - libraries of system applications and services
/system/lib/modules - system drivers
/system/media - folder with system sounds and startup animation
/system/media/ bootanimation.zip - executable archive with boot animation
/system/priv-app - folder with Android services
/system/tts - folder with system voice engines
/system/build.prop - configuration file with which you can change system settings
Details about the proc section
/proc - virtual partition containing information about the kernel and its configuration
Details about the mnt section
/mnt - memory cards and internal memory and other virtual partitions are mounted (added) to this partition (you can also find the storage )
Details about the storage section
/storage - only real (existing, that is, not virtual) memory cards and internal memory are mounted in this partition
Details about the mnt and storage section
All files that exist on your Android (pictures, melodies, videos, documents) are recorded either on the internal memory or a memory card. If Android has its own memory (internal memory), then it is mounted under the name
/mnt/sdcard or /storage/sdcard
Yes, I understand perfectly well that many people think of giving the name to their own memory with such a name, but what can you do...
If there is no internal memory, then this name is occupied by the memory card. If there is both internal memory and a memory card, then the internal memory remains under the name sdcard, and the memory card takes one of the names
sdcard2 external_sd sdcard1 extSdCard
Initial manual cleaning
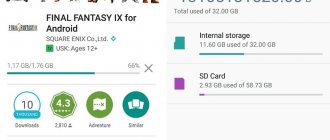
How much available disk space remains for applications can be seen in “Settings” - “memory”:
As you can see from the image, I have 27 MB of available internal memory left (do not confuse this with the built-in memory).
So we are interested in cleaning the internal memory, namely the “/data/” folder.
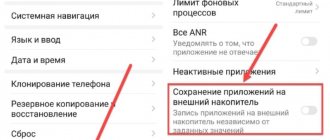
First of all, I would recommend moving all possible applications to the SD card.
Do not transfer to the SD card only:
- system applications and services
- applications you need without an installed SD card
- applications whose widgets you use, as widgets may stop working.
Which applications have not been transferred to the SD card can be seen in “Settings” - “Applications” - “SD card” tab:
Applications that are not ticked have not yet been transferred to the SD card. In order to transfer them to the SD card, click on the application and in the window that appears, click on the “move to SD card” button.
When you move an application to a card, not all application files are still moved. Some files remain in the internal memory in any case:
- Application - located in the /data/dalvik-cache/ folder - cache for quickly launching applications
- Data - located in the /data/data/application/databases/ folder - all your settings and saves in this application
- Cache - located in the /data/data/application/cache/ folder - such data as downloaded ad units, images and other temporary information that can be safely deleted
From this non-movable data on the card, we can “wipe data” and “clear cache”, as can be seen in the image above. That is, using the image as an example, we can free up an additional 11.80 MB + 4.67 MB in the investing application. BUT! It is worth understanding that clicking on the “Erase data” button erases all your settings and saves in this application, keep this in mind. Clearing the cache doesn't do anything like that.
Where are the folders and how do I access them?
If we use a desktop computer with Windows, we are probably accustomed to the fact that everything in this system is distributed across disks
- Drive C is where the system is installed, and drive D is used to store personal files. The remaining drives can be used, for example, for removable flash drives and external hard drives (for example, Z or E).
- The Android system, based on the Linux kernel, is organized in a different way.
- A tree structure of files is provided here, the starting point of which is the root.
- In addition, the mobile operating system itself is very case sensitive.
- So, if in Windows we cannot create ALBUM and Album folders in one place at the same time, then in Android this is quite possible.
- The data section on Linux contains the user’s data, as well as personal settings, and the cache section contains temporary files, including system updates.
- Information about devices is stored in dev, and files that are responsible for the IMEI identifier are stored in efs (although the last section is not always found).
- System folders are located in system. As for information about the kernel and its configuration, they are contained in proc.
- Let us add that in order to see the root partitions under these names, we will need root rights, as well as a special file manager.
- If we are interested in how to access folders in Android, and we do not have root rights, we should not take risks just to see partitions as they were originally presented on the Linux kernel
It is best to use one of the most common file managers like Total Commander. Through such a dispatcher we will be able to clearly see what is located and where exactly.
Conclusion
Deleting any folder or file in the internal memory section will only result in the loss of some data. Therefore, it will not be possible to disrupt or damage the mobile device by such actions. The next time you launch the application, it will download and write the missing files.
But deleting/moving files outside the data section is guaranteed to violate the integrity of the system and make the device unstable. In this case, resetting to factory settings or re-writing the firmware will help. Therefore, if you have ROOT rights, it is not advisable to touch the files of the system partition.
How to find the storage folder on Android
When downloading files on their Android smartphone or tablet, many users are faced with the fact that they cannot find the downloaded file. They simply don’t know where files are downloaded on Android. In this material we will try to solve this problem.
In short, on Android the files are downloaded to the Download folder. And the location of this folder may vary depending on the firmware of your Android device. For example, the Download folder can be located at one of the addresses:
To find this folder, install a good file manager. For example, such as AntTek Explorer Ex.
If the downloaded files are not in the Download folder, then the program you used to download may have saved the files in another folder. Open the program and go into its settings. Perhaps the folder for saving downloaded files will be indicated there. For example, in the Dolphin web browser, in order to change the folder for saving downloaded files, you need to open: Settings - Privacy and personal data - Upload directory.
In addition, you can often see a list of files that have been downloaded in the program itself. For example, such a function is available in the Dolphin and Firefox web browsers.
You also need to remember that after each downloaded file, a special message appears in the top notification menu indicating that the file has been downloaded. By clicking on this message you can open the downloaded file.
Is there anything to add to the material? Tell us about it in the comments.
I recently lost the contents of a micro-SD card and have not backed up the contents sufficiently recently. Luckily, I noticed that the photos I was missing ended up in /storage/emulated/0/DCIM/.thumbnails on an Android 5.1 device. The sad thing is that I can't get to these files to do anything with them on my device. The only way I even knew they were there was because the ASTRO file manager brought them up when I was searching for photos. I would like to be able to put them in a safe place and was hoping to do this through my computer. Does anyone know a way to get my computer (Windows 7) to recognize this file? (Naturally, I told my computer to view hidden files, so this is not a problem.) All I see is /Internal memory and SD card (not for storage). If you have a workaround please let me know too. If I could move (or better yet copy) these photos to another location on my phone and then move them around, that would be absolutely wonderful.
the folder "/storage/emulated/" doesn't actually exist. This is what can be called a "symbolic link", or, more simply put, a link to where the real data is stored. You will need to find the actual physical location on your device where it is stored. Since it's in /storage/emulated/0/DCIM/.thumbnails are probably in /Internal Storage/DCIM/.thumbnail./ Note that this folder probably only contains "thumbnails" which are very small versions of the actual files. Your real files may be gone forever if your SD card is faulty.
edit: "Never Say Never" The link actually refers to the emulated SD card on your device. Access data "immediately" * like an SD card and you will have access to all data on that card. *The Airdroid "app" file will allow this. And, if the memory serves, then access via the USB data cable will also be available.
I could restore my files by going to » Settings -> Storage & USB -> Images -> Camera. There, if you select a photo, the top right menu will change to “Select all” and “copy to..”. First select all and then copy to a folder like "Downloads" or whatever is visible in Explorer. After copying to the desired folder. Copy from this folder to the Computers folder.
I had a similar problem, only the folder didn't start with . . What solved it for me was resetting Media Manager.
On Settings -> Apps, make sure Show System is checked in the menu, look for Media Store or something similar, click on it and Clear Data. Then restart your phone and wait for the Media Store to repair itself.
the rebuild takes a few minutes. you can check if it's done by monitoring data usage in the same place where you cleared it. Once it stops growing for a few minutes, it's done. For example, mine stopped at 21 MB.
Andrey Podkin
When using applications for Android, sometimes questions arise: “Where does the application store the created files?”, “Is it possible to reach them?” and “Will the files be deleted when I uninstall the application?” Let's try to see where an application can store its data and what consequences this has for the user.
Internal data storage
The meaning follows directly from the name. Internal storage is always located in the smartphone’s memory, regardless of whether it is possible to install a memory card (and even more so, whether it is inserted). This memory area is protected. Located in the /data system partition. By default, all files located there are accessible only to the application that created them. Of course, you can make files available to other applications, but this must be done specifically. If the application does not open files for external access, you can only access them by becoming root.
The purpose of the storage is clear: internal protected data to which there should be no unregulated access. Problems (from the user's point of view) may occur in the following cases:
- Unreasonably large amount of data. I would like to transfer the data to a memory card to save internal space for other needs, but the application does not allow it.
- According to the user, the rules for accessing data should be different from what the application suggests.
Example: application “Lectures on the history of Russia”. The application has good content (both in content and sound quality). But it is saved in internal memory. On budget devices, where this memory is small, it becomes difficult to download many lectures in advance, and then, disconnecting from the Internet, listen to them. The second problem is the actual data access regulations. Even if we limit ourselves to the topic of the story, I have audio files obtained from three sources: this application, podcasts and audio versions of videos from YouTube. I would like to take and unite them all forever in their earthly vale under the dominion of the all-powerful Lord of Mordor into a single playlist, and listen to it with one audio player. But this cannot be done on a smartphone without root.
External storage of “personal” data
From the developer's point of view, in addition to the internal data storage, there is also external storage for personal application purposes. It is not necessarily located on the memory card. This may be the internal memory of the smartphone, but the entire section with such data is publicly available. At the root of the section there is a folder Android/data, and in it there are subfolders with the names of application packages.
The advantages of this approach are obvious: the data is available externally for the user’s purposes. And if it’s a memory card, then the capacity can be limited only by your finances (400 gigabyte memory cards can already be found on sale). The disadvantages are also clear: at any time, any application (of course, with permission to access “external” data) can take and erase someone else’s files. Also, the files will be deleted by the system when the application is uninstalled (or its data is cleared).
Example application: BeyondPod podcast manager (more or less recent version, previously files were stored differently). The user has access to downloaded podcasts and can easily delete them (for example, to save space) or listen to them in an external player.
Shared external storage
It is located in the root of the “external” partition at the same level as the “Android” folder. Designed to store data shared between different applications. Typically, Google documentation provides images as examples (photos from the camera - DCIM folder). The main problem with these files: they are never deleted automatically. Even if you deleted the application.
Example: Telegram messenger. Once you delete the application, the downloaded files do not disappear. They continue to sit quietly on the data storage device, taking up precious space.
How to delete files without deleting applications
Here it is important to introduce another classification of application files. It is valid for internal storage and for external storage of personal data. All data is divided into two types: actual data and cache.
Data (data folder) are certain files that, according to Google’s logic, are needed to constantly work with them. If you completely remove them, the application will behave exactly the same as if it had been reinstalled (uninstalled and reinstalled). Partial deletion of files may not lead to any unpleasant consequences. But it is important to understand what specific data you are deleting (for example, it is obvious that downloaded podcast files can be deleted completely freely - this will not affect the performance of the podcast manager).
Cache is temporary data that is generated during application operation and is needed to speed up this operation. For example, data that is often needed on the Internet is downloaded and then opened locally instead of downloading (of course, the cache can be updated so as not to show outdated data). You can delete the cache of any application with complete peace of mind; this is a normal operation.
Clearing memory and cache is called from the application settings. The Clear Cache button clears only the cache, while the Clear Data button clears both the cache and application data.
Deleting application files from shared external storage can only be done manually. Moreover, even assessing which application these files are from is also done manually.
Deleting content using a PC
This is the first method by which you can delete the Thumbnails folder or its contents. In principle, there is no point in deleting the directory itself, because the system will immediately create another one. But demolishing its contents is more effective. So, first you need to connect the gadget to your computer in media device mode. This will show not only the contents of the SD card (if you have one), but also the file system of your phone. However, the folder you are looking for cannot be found so easily. In Windows Explorer you need to enable the display of hidden files. Then she will become visible.
Now you need to open the folder, select all its contents and delete it in the usual way. If the system complains that the “file is read-only,” then you need to go back a step, right-click on the folder, open the “Properties” item and carefully review the file attributes. Uncheck “Read Only” and click “Apply to all files in directory”. After this, repeat the removal procedure.
How to find a file or folder on an Android smartphone and tablet
Android is a full-fledged OS that has its own file system, through which various files are written to the internal memory of the device or a microSD card inserted into it, depending on the user’s preferences.
The internal memory capacity of modern devices and memory cards allows you to store a large amount of information of various kinds: audio and video recordings, photographs, archives, etc. Smartphone/tablet owners willingly take advantage of this opportunity and accumulate gigabytes and gigabytes of necessary and unnecessary files, later faced with the problem of finding them on your gadget.
If photos can be seen using the standard Gallery application, then what should you do if you need to find a file or folder based on its name? In this case, a class of applications comes to the rescue under the general name File Manager , a large number of which are present in the Google Play store or are already pre-installed by the phone manufacturer.
Peculiarities:
- Application management (installation, uninstallation and backup)
- Application icons and their metadata in columns
- Logs, error reports, kernel logs, Shell
- Reboot from the menu (Shutdown, reboot, recovery)
- Screenshots (Simple copying from the .screenshot folder).
- Connect multiple devices with the ability to rename
- Suitable for devices with and without root
- Full Unicode support
- Support x32 and x64 systems
- TC command line integration
- Executing copy and move commands in the background
- Custom file data columns
- Full file system management
- Copy between two devices
- Changing file permissions
- ADB USB
and wireless
ADB
(no need to install Android SDK) - Device auto-mount support
- Debug logs
- Miscellaneous Settings
Finding a file or folder in Android using a file manager
If you initially did not have a file manager on your phone or tablet, then install any free one from the official Google Play application store by entering the phrase “file manager” in the search bar at the top. We can recommend such a popular application as ES Explorer . The algorithm of actions in other file managers is approximately the same and intuitive. So, to find the file we do the following:
- Launch FM, in our case it is ES Explorer.
- The start window will show an icon for a partition of the device’s internal memory called sdcard. When a memory card is inserted, two partitions will be displayed: sdcard0 and sdcard1. Accordingly, this is a microSD card and the device’s own memory.
- Select the section where you expect to find the desired file/folder and open it by tapping on the name. For example, let's select the internal memory of the phone (tablet), represented as sdcard
- The contents of the section will be opened in the form of folders, where photos are stored in the “DCIM” folder, and audio recordings in the “Music” folder (not always).
- If you remember the name of the file, or at least part of it, then enter its name (or part of the name) into the search bar of the file manager located at the top.
The application will find and display the desired object. If only part of the file name is entered, then FM will display in the search results all files and folders where a similar combination of characters occurs.
That's all. Now you know how to find a file on an Android phone or tablet.
ES Explorer
If your Android tablet or phone does not have a standard file manager, then you can use any free application from the official Google Play store or from a trustworthy source. Let's see how such a tool will function using the example of the very popular ES Explorer utility:
p, blockquote 11,0,0,0,0 —>
- Download the file manager from the link https://play.google.com/store/apps/details?id=com.estrongs.android.pop&hl=ru if it is not installed. In some firmware versions it is already installed. Let's launch the application.
- The screenshot below shows two memory cards: internal memory (gadget memory) and a memory card that is installed by the user.
Enlarge
Select the required partition, for example, internal memory. Go to the selected section and look at the displayed folders. The Music folder contains music, and the DCIM folder contains all your photos (be careful, there are exceptions).
Increase
- If you need to find a file by name, it is easier to use search. To do this, click on the icon that looks like a magnifying glass, and then enter the name of the file that you want to find.
Enlarge
Folders containing system files are accessible only if you have root rights.
p, blockquote 12,0,0,1,0 —>