The purpose of creating a personal account for TP Link is to make special settings for the wireless router. Another name for settings is web interface, control panel, web configurator, etc. It’s easy to log into your personal account and enter the necessary settings. However, some users have to face certain problems. Let's look at how to register a personal profile, as well as what difficulties may arise when logging into the system.
Registration of a personal account
You can register an ID for a TP Link router using the following instructions:
- In the search bar, enter the address https://tplinkwifi.net followed by the username and password specified on the device.
- Using the navigation, you need to go to the “Basic setup” tab, then the “TP Link Cloud” sub-item, then press the “Register now” button.
- Now you need to maintain an active email address to link the cloud service and password.
- Next, you need to confirm your registration using the identifier link received in the form of a letter to the specified email address.
- When all necessary registration steps have been completed, you need to open the “TP Link Cloud” section and enter new login details. They are necessary for remote control of the router.
It should be noted that after registering your personal account, authorization in the router settings is possible only using TP Link ID. It is now impossible to log in using the local administrator of the router with the device username and password.
A little more about the menu
This article discusses the menu using the TL-WR841N model as an example, but in general the TP-LINK router interface is the same for all models.
Status - shows the current state of the network as a whole. Quick Setup - launch quick setup. Network - network. Wireless - wireless network. Forwarding - redirection. Security - security. Parental Control - parental control. Access Control - access control. Static Routing - advanced routing settings. Bandwidth Control - bandwidth control. IP & MAC Binding - binding of IP and MAC addresses. Dynamic DNS - DNS is dynamic. System Tools - as you might guess, tools.
If the settings according to the instructions do not help, and the router still does not want to work, then you can reset the settings to factory settings and try again from the very beginning. If it is suddenly really needed, then we perform the following algorithm:
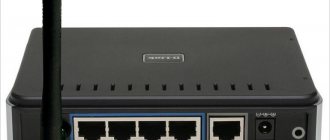
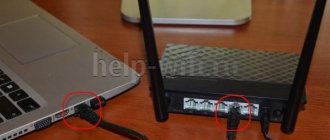
- On the back, next to the WAN and LAN ports, there is a Reset button. You need to hold it for half a minute. After this, the basic settings will be set.
- When you log into the router’s website, we launch the quick setup and do everything again according to the instructions indicated above.
Login to your personal account
You can log in to the router system using the standard IP address – 192.168.0.1. If there is no physical connection between the devices, you must first resolve this error.
The IP address may differ if it is replaced in the router.
You can log into your personal account of the TP Link wireless router using the following algorithm:
- In any browser (for example, Opera), write down the address 192.168.0.1 in the search engine.
- On the page that opens, enter your login and password details, and then click on the “Login” button.
- Now the main page of your personal router account will open on the website, where you can view detailed information about the device, as well as make the necessary settings.
Owners of any TP Link router model can log in this way.
Find out the router's IP address via the command line
To find out the router's IP address, you can use the command line. To run it you need:
- Press the Win+R key combination on your keyboard
- Enter the command “cmd” and click “OK”
- You must enter the command ipconfig /all and press Enter
- Technical data about all Windows network adapters will be displayed on the screen. You need to find the one that is used to connect to the router (denoted either as “Ethernet” or as “Wireless Network”, depending on how exactly the computer is connected to the router). And in its properties you need to find the line “Main gateway” - the IP address of the router is indicated there.
By the way, using this method you can find out the addresses of routers if several of them are simultaneously connected to a computer (laptop). For example, one is via cable, the second is via WiFi.
Login via smartphone
To gain access to the router’s personal account, you need to be connected to the Wi-Fi network that it distributes. If distribution is disabled within the router, you must connect Wi-fi.
Further user actions:
- You need to open the Wi-fi tab on your smartphone and connect to the network by entering your username and password.
- Launch the browser and then enter the IP in the search engine for authorization 192.168.0.1.
- Enter the standard login and password details in the first two lines (they can be changed to your own).
Now you can start managing the functionality of your router’s personal account.
How to log into tplinkwifi.net and enter the username and password admin?
Now a small guide for beginners who picked up a router for the first time in their lives and decided to configure it themselves. The procedure is as follows:
1. Connect your laptop or computer to the TP-Link router network using a LAN cable or wireless network.
2. Launch your favorite web browser. Now there are no restrictions on which browser to use - the router’s personal account is displayed the same on any browser. Those days when the markup slipped and you only had to use Internet Explorer are gone forever!
3. In the address bar of the browser (not in the search bar, but in the address bar!!!) enter the address of the router tplinkwifi.net and press the “Enter” key on the keyboard. Like this:
4. All that remains is to wait for the response from the Wi-Fi web interface of the TP-Link router, namely, a page with an authorization request should appear:
You can find the factory password for logging into the TP-Link router on the sticker on the device’s body, which I mentioned earlier. If this password does not work, it means it was changed during the first setup. Then you need to either remember it or reset the settings with the “Reset” button.
How to manage your TP Link personal profile via smartphone
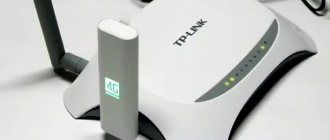
To make it possible to manage the router settings remotely, a special application for TP Link Tether smartphones was created. The following functions are available in it:
- managing the router profile and devices that are connected to it via the network;
- viewing models that support router cloud storage;
- registration of a new device in the cloud service.
Important! The program is available in Russian, so working in your personal account will not cause any difficulties.
How to find out the router's IP address using utilities
One of the simplest applications through which you can find out the IP address of a router is Advanced IP Scanner. It is free, displays a lot of useful technical information about the router’s local network, and takes up minimal space on your hard drive. Compatible with all current editions of Windows.
After launching it, you need to click “Scan”. A list of all devices connected to the local network will be displayed. And then in the “Manufacturer” column you need to find the name of your router. The “IP” column will indicate the router’s address.
How to change your router password
Changing the password is an important procedure, since the router settings can be used by unauthorized persons connected to Wi-fi. If there is no password for your network, anyone can easily change the factory settings by connecting their own login and password. In such a situation, you will have to use a reset.
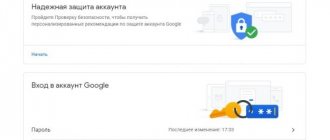
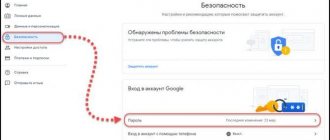
To avoid such difficulties, it is recommended to change the standard password immediately after connecting the router. To do this, go to the section with system tools (Sistem Tools) and go to the sub-item password (Password). A form will open on the site to fill out, where you need to indicate:
- in the first line - details of the old login;
- in the second line - details of the old password;
- in the third line – enter new login details;
- in the fourth line - we come up with a new combination for the password (it must be reliable and difficult to guess);
- in the next line we rewrite the new password to confirm its change.
Upon completion of the procedure, click on the “Save” button. The password has been changed. After this, you need to reboot the router by pressing the corresponding key in the “System Tools”. This will help you complete the password update process.
By the way, about changing the password
This is a rather important procedure, because anyone who connects to the network can enter the router setup menu. So if your network is not password protected, then your neighbor can easily change all the factory settings and set his own username/password. In this case, only a reset will help. Therefore, to prevent this from happening, you should change the standard password immediately. It's easy to do:
Go to the System Tools , then to Password .
Old User Name - in this field we write admin or previous login.
Old Password - enter admin or previous password.
New User Name - come up with any desired login.
New Password - write any desired password, we recommend a strong one that is difficult to guess.
Confirm New Password - type the same as in the previous field, thereby confirming the password and your desire to change it.
Click Save . Password has been changed. Now you should reboot the router. To do this, without leaving the System Tools click Reboot . The password has now been finally updated.
The most common problems that arise when logging into your TP Link personal account
There are situations when it is not possible to log in to the system, and the phrase “Cannot access the site” is displayed on the screen. Sometimes the service notifies that an error has occurred with the message “Web page not found.”
To solve this problem, you can simply call your provider to call a technician. A qualified worker will provide assistance in troubleshooting (you will have to pay for his services). If the user cannot wait for a specialist to arrive, or does not have the money to pay for his services, you can try to fix the problem without outside help.
Most often, problems with access to a personal account appear:
- due to incorrect entry of the device’s IP address;
- due to incorrectly entered network settings;
- in the absence of suitable software for the normal operation of the router;
- due to problems with the router itself;
- due to a cable defect;
- due to malicious applications.
Let's consider each of the points in more detail.
Incorrect IP address entry
Inattentive entry of IP in a web browser, namely missing dots between numbers, unnecessary spaces, etc., can lead to problems with access to your TP Link personal account. When logging into the system using IP, you must write data directly into the browser line, and not into the search engine.
If the identification details are entered correctly, but you still cannot log into your personal account, there may be no connection between the computer and the router (when using a Wi-Fi network connection). In this case, it is necessary to use a patch cord for connection. If the client uses a wired connection, a cable integrity check is required. It should be free of any damage, tears or bends.
Initially, to enter your personal account, you have to use the same login and password specified in the accompanying documents for the device and on the router case. If you are using an appliance that has previously been used by someone else, its settings will be changed. You should ask the previous user for a new password and login.
If communication with the previous owner of the router is not available, you can use the function of resetting the device to factory settings. To do this, you will need to take a thin, hard object and press the “Reset” button located deep inside the router case.
Important! The reset button must be held for approximately 10 seconds.
The device will notify you that the settings have been reset by turning on the indicator lights. After this, you need to release the button and wait until the router reboots. Now you can log in again using the standard factory login and password.
Network settings error
Another reason for the lack of access to your TP Link personal account is the presence of an error in the computer’s network settings. In this case, you need to do the following:
- Log in to the control panel and go to the “Changes adapter settings” section.
- Right-click on the connection and move the cursor to the “Properties” line.
- Click on the phrase “Internet Protocol Version 4” to highlight it.
- Now click on the “Properties” button.
- A menu will open on the site where you need to set checkboxes next to the lines for automatic address assignment.
- Finally, click on the OK button.
Why do you need a router IP address?
The most common situations when you may need a router IP address:
- Setting up a new router
- The user needs to create a local network between several computers. First you need to make sure that DHCP is enabled in the router settings; there is no prohibition on data exchange via the main network protocols.
- You need to change your WiFi password or name. All this is done through a web interface, to enter which you need to know the router’s IP.
- There is no Internet connection and you need to find out if your router is working. If an error occurs when you try to log into the web interface, then most likely the router is simply frozen and you need to reboot it. That is, if the user knows the IP address of the router, he will be able to quickly diagnose the connection.
- It is necessary to update the router's firmware or restore its functionality. Most manufacturers produce special utilities for this (Asus, TP-Link, Keenetic). But to configure them you need to specify the router IP.
Doesn't work after resetting to factory settings
This most likely occurs due to the fact that the PC or laptop has a static IP address with a different subnet.
- Left-click on the network connection in the tray.
- Next, select “Network and Sharing Center”.
- Now click on the “Change adapter parameter” link.
- Right-click on an available and enabled connection and then go to “Properties”.
- Select the TCPv4 protocol and click “Properties”.
- In the top field, select automatic IP detection. And in DNS, set the parameters as in the picture above: 8.8.8.8 and 8.8.4.4.
- Click "OK" to apply the settings.
Still won't log in
In this case, the router may be broken. First of all, let's call the TP-Link technical support number:
- +7 495 2285560 – for Moscow and the Moscow region.
- 8 800 2505560 – you can call from any region of the Russian Federation, the call is free.
- +7 495 2285560 – for calls from Belarus.
- The settings and firmware of routers, modems, and switches can be viewed on the official website.
If telephone numbers are not available, then you can describe your problem in a letter and send it by mail -
TP-Link is a format of home routers that are constantly being improved and modernized to meet all user needs. This is also the name of the portal through which these devices are configured. The devices fully meet modern requirements; they provide uninterrupted and high-speed access to the Internet, as well as make it possible to set up a local network (for example, if you need to connect a printer or TV to a computer to display video on a large screen).
To be able to configure your TP-Link router, you need to log into your TP-Link personal account.
How to login to Tplink router?
The internal web server, also called the router management web page, does not require Internet access. There is no need to connect the router to your computer. The connection can be wired or wireless. Follow the steps given below to login via Tp Link router.
- Open the Internet browser on the device connected to the Tplink router, and then enter the default IP address or web address. The default IP address is 192.168.1.1, or the default web address is tplinklogin.net or tplinkwifi net. Use any of them and you will see your router's login page.
- On the network login , enter your username and password. The default login information will be printed on the label of your router. Enter the same and you will be redirected to the tp link router admin page .
Click the login button and you will see the admin page. From here you can change various settings of your Tplink router. We recommend that you change your password once the setup is complete. Security is the main issue here. To change your router's password, follow the steps in the next section.
Best Features in Tplink Router
- MU-MIMO is Multi-User Multiple Input Output: This feature allows the device to communicate with up to four devices at the same time. Instead of waiting for devices, it streams data to up to four devices simultaneously.
- Dual-band and tri-band routers: Tri-band routers are the trend these days. These tri-band routers provide maximum speed using dual bands of 5GHz and 2.4GHz. Dual band is also useful for users who want high-speed Internet at home.
- QoS (Quality of Service): This feature prioritizes devices based on usage, such as games, applications, Ethernet LAN port, or MAC addresses.
- Gigabit Ethernet Ports: These are the fastest ports that transfer data from one device to another on a network.
There are many other features that make the Tplink router the best in the market.
Password doesn't work
Forgetting your admin password is quite easy. If you were the one who did the setting, then it’s worth remembering the combination; perhaps you wrote down this data somewhere - try to remember. As was already written earlier, if the setup was done by engineers from the provider, then it’s worth calling tech. support or reset the router to factory configuration.
NOTE! But remember that after the reset, you will have to do the Internet and Wi-Fi settings again. But there’s nothing wrong with that; our portal has all the available instructions for setting up all known routers - just enter the model name in the search bar at the top and read the article.
- We find the RESET button on the back of the device (it can be combined with WPS). The button may be recessed and look like a small hole, so you will need a paper clip or a needle to activate it.
- Press it for 10-12 seconds until the router reboots.
- After that, use your standard login details.