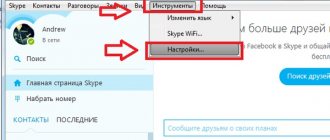
Setting up a router and wi-fi, at home or in the office? Everyone has this question sooner or later. This article will help you in this not SIMPLE matter. Let me note right away that this post is intended for users and novice system administrators. So please don't throw stones. In this article I will look at how to configure the D-Link router - DIR 320, in my opinion it is very common. The instructions I wrote are not tied to any of the many Internet providers. Therefore, you will have to get the settings from your provider. This post will help most owners of D-link brand routers. And it will help you save money on calling a specialist.
Setting up a D-link router:
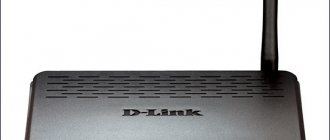
D-linl DIR-320 router
To configure the D-link router, you need to perform minor manipulations on the computer. Do everything that is written below and you will definitely succeed:
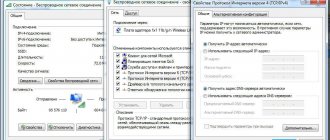
- Through “ Start ” open “ Control Panel ”;
- Go to “ Network and Sharing Center ”;
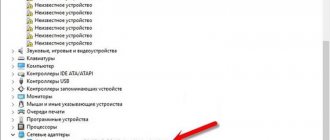
- Next, enter “ Change adapter settings ”;
- Right-click on “ Local Area Connection ”;
- Select “ IP version 4 (TCP/IPv4) ”;
- Click on the line “ Properties ”;
- And set about and “ Obtain DNS address automatically ”:
- Click " Ok ".
Computer settings
If your router has already been used, it is better to reset the settings to factory settings. Take a paper clip, toothpick or something else. On the back of the router, find the “Reset” sign. Insert a paperclip there, for example, and hold for 8-15 seconds until the lights on the router begin to go out and blink randomly.
How to set up a router
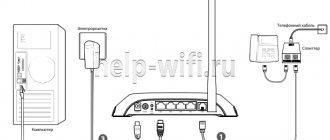
Phone outside, router inside
The DPH-150S model from D-Link is unremarkable in appearance. The manufacturer saved a lot of money on everything except the high-quality equipment of the device itself.
As a result, the end consumer received a powerful device with enormous functionality, but at an affordable price. The design of the phone is completely subordinated to practical tasks. Even the box looks very ascetic in appearance.
D-Link, unlike its competitors, did not even invest in advertising, believing that a high-quality product itself could make its way and gain the popularity of users.
The device is controlled via a full-fledged web configurator. It’s especially nice that you can set the Russian language in its settings.
Also, the IP phone is easily controlled through the built-in monitor using buttons on the body of the device itself.
Completeness
If the appearance of the packaging does not scare away the user, then inside he will find the device itself and the following accompanying elements necessary for quickly putting it into operation:
- Tube connected by a spiral cable;
- Spiral wire for connecting the handset to an IP phone;
- Power supply unit;
- Ethernet cable;
- DPH-150S;
- Legs;
- Instructions recorded on a CD;
- Fastening consumables;
- Documents confirming warranty support for the device.
Characteristics
The case is made of durable black plastic with a design that allows for both wall and desktop use. The weight of the device is about 1500 grams.
The technology used for communication is reflected in the name of the device “VoIP-Telephone”, which stands for “Transmission of audio via IP (communication networks)”. In the original language – “Voice over IP”.
Looking at the bottom cover of the device, the owner will find the “WAN” port through which the device can connect to the router. Nearby there is one “LAN” connector for connecting to a PC.
The equipment is classified as stationary and therefore requires a constant power supply. Even a beginner will not confuse its nest, since it has a round cross-section.
For the purpose of using an external headset, the device is equipped with an RJ-9 connector.
In addition to supporting the full standard set of features, it should be noted that thanks to the presence of acoustic echo and pause suppression, sound transmission is highly clear. The device supports HD voice.
Call forwarding and transfer of unaccompanied and accompanied calls are conveniently implemented. Professionals will appreciate the call waiting feature and the ability to organize a three-way conference.
Regardless of where the device is used, at home or at work, users often use the built-in anonymous call function and the convenient “Do Not Disturb” feature.
After activating this mode, incoming calls will be rejected, however, they are saved in the log. This feature in the phone is called “DND”.
If several people have access to the phone at the same time, the administrator can block some outgoing calls.
How to enter the router settings:
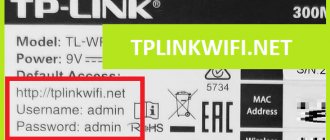
To do this, we need to take the router in our hands, turn it over and read the router address.
How to set up a router, router address
We see IP “ 192.168.0.1 ”, this is the router’s address. Next, look at Login “ admin ” Password admin . It is very important that the password is very case sensitive. In a word, if the beech is big, write big; if it’s small, then write small.
- Next, you need to launch a browser on your computer and enter the router address “192.168.0.1»;
- Click “ Enter ”; Entering the router address, How to configure the router
- A page will open and require you to enter your login and password. Login “ admin” , Password “ admin”
- Click “ Log IN ”, which means “ Login ”
- Great! You have now entered the main router settings menu.
How to set up a router
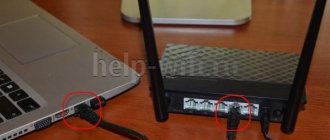
Connection via cable
Typically, the back panel of D-Link products has several LAN ports and one for the Internet. LAN ports are most often marked in blue and numbered. And the port for the cable from the provider has a corresponding inscription, for example, internet. Less commonly, it may be referred to as WAN. It is worth noting that in some new models the role of WAN can be played by one of the LAN ports.
So, the cable from the provider must be inserted into the port labeled Internet, and the short cable that comes with the router into any of the LAN ports. Its second end is connected to the computer's network card. The LEDs on the network card and on the front of the router will indicate that a connection has emerged between the two devices.
Router setup:
To configure the router you will need to follow the following steps:
- In the main menu, click “ Manually set up an Internet connection ”
- In the " Internet Connection Used " section, select " Dynamic IP (DHCP) " and click " MAC Cloning "
- Click "Save»
How to set up a router - If your provider provides a static “IP address,” then in the “ Internet connection in use ” section, set “ Static IP ” and fill in the fields IP, mask, gateway (your provider will provide this information)
- Press the button "Save»
How to set up a router - If your provider works via the PPPoE protocol, then in the “ Internet connection is used ” section, set “ PPPoE ” and fill in the fields: Connection type, name, password (This information can also be obtained from your provider.)
- In the “ Connection mode ” item, always set the connection on demand
- Click "Save»
How to set up a router - If the connection works via the PPTP protocol, in the “ Internet connection is used ” section, set “ PPTP ”
- Activate the “ Dynamic IP ” or “ Static IP ” item; you can also check this data with your provider.
- In the “ IP/Server Name ” section, type the address of the VPN server
- Now in the “ PPTP Account ” and “ PPTP Password ” columns, enter the data received from the provider.
- always set the connection on demand in the “ Connection mode
- Click the " Save "
How to set up a router
Connect via Wi-Fi
There is nothing complicated at all. Our task is to find the router’s network from your phone, tablet or laptop and connect to it. If you have done this more than once, then it will not be difficult for you. If you just bought it, make sure that the WiFi light on the front panel is on.
If it is not lit, then turn the device around and press the WPS button once.
After that, we look for the network on the device. The network name will be the full name of the brand and model of the router. But it’s best to look at this information under the casing on the label of the Internet center.
The model name will be the default network name. If you are asked to enter a password, you will see it in the “PIN” line. If you are too lazy to enter it, you can press the WPS button again.
Setting up WiFi on the router:
Now do we need to configure wi-fi on the router? since without it the setup will not be complete:
- In the main menu of the router, you need to go to the “ Setting up a wireless network ”
- Next click “Manually setting up a wireless connection»
How to set up a router - In the “ Wifi Protected Setup ” page that opens, uncheck
- Check the box "Turn on" In chapter "Enable Wireless Access»
How to set up a router - Next, we will need to fill out information about WI-FI
- Fill in the “ Name of the wireless network ” let it be nastroikarouterov
- After this, we need to deactivate the menu item “ Enable Auto Channel Selection ”
- I recommend specifying the sixth channel in the “ Wireless channel ” item, since it is usually not busy. But if the channel is busy, then nothing terrible will happen.
- In the “ Transmission speed ” field, set the highest number from the ones offered, as you can see, I have 54 Mbit/s
- Enable WMM ” box
- In the “ Security Mode ” column, set “ Enable WPA/WPA2 Wireless Security ”
- Then in the next item “ Encryption type ” put “ Both ”
- Now in the “ Network Key ” field, enter the desired password that your Wi-Fi will have. The password must be at least 8 characters.
- Next we click the “ Save ”
Checking the functionality of the D-Link router after setup:
To check the functionality of the router, we need to perform a couple of points:
- In the main menu of the router, go to the “ Maintenance ”
- Next, open the “ System Check ”
- This page informs us about a broken cord from our router to the computer. Either from the provider to our router.
How to set up a router - By pressing the key "More information", a window with information about the patch cord will be displayed.
Router cable test - After we are sure that everything is in order, click the “ Exit ”
That's all, we figured out how to configure the router. If you have questions, wishes or suggestions, write comments. I will try to help you set up your router.
Connection
You can manually configure the router without a provider cable. After all, to enter the admin panel, you only need to connect the D-Link router to the power supply and to a PC, laptop or smartphone. It all depends on the setup method.
Important! Without connecting the provider's cable, it will not be possible to check the correctness of the settings and functionality of the router.