- PREPARING TO INSTALL THEMES ON WINDOWS 10
- INSTALLING PROGRAMS TO CHANGE WINDOWS 10 THEMES
- ADVICE ON ADDITIONAL PROGRAMS
- INSTRUCTIONS FOR INSTALLING THIRD PARTY THEMES WINDOWS 10
Previously, in our article about Windows 10 themes , we looked at how to customize and change the default themes in Windows 10. If you take a good look at the themes available on the Microsoft website, you can come to the conclusion that they are all, in general, identical.
They differ only in the color scheme and the collection of desktop wallpapers included in their composition. Both the colors and wallpaper can be customized yourself, as demonstrated in the mentioned article. But the main disadvantage of official themes is the inability to change the shapes and sizes of visual components, icons, icons in Explorer and everything else. In addition, Windows 10 no longer supports window transparency, as was the case, for example, in Windows 7.
And to make all this accessible, you cannot do without using third-party themes, which, in turn, will require the installation of specialized programs. Let's start with them.
What you need to know
Microsoft developers have not installed tools in the OS that allow the use of third-party design styles. Therefore, it is necessary to patch the system. Patch is a software module that fixes problems or system vulnerabilities. Two programs are used:
- UxStyle Windows 10. Its peculiarity is reliability and simplicity. Installation will not raise any questions even for untrained users;
- UXTheme Multi-Patcher. A utility that edits the system file uxtheme.dll, to be able to use your own themes for design.
What to pay attention to before installation
Make an OS backup or restore point. If the OS crashes, you can do without reinstalling.
Check what version of Windows the theme was created for so that there is no conflict with the OS. Look at user reviews.
Classic Shell
Windows always begins and ends with the Start menu, and we must admit that the Start menu in Windows 10 is not as terrible as in Windows 8.1. It does not reach the convenience of the classic Start menu from Windows 7 or even Windows XP, but, fortunately, there is a wonderful utility Classic Shell , which not only allows you to return the classic Start menu from Windows 7, but also adds many convenient functions to it. For example, a built-in search bar or a convenient opening of the “Control Panel” in the form of a cascading menu. I've been using Classic Shell for several years now, and I've forgotten what Windows 10's built-in Start looks like.
Link to the developer's website.
Installation using a patch
If the download is not from the official Microsoft store, install UltraUXThemePatcher. It was developed by Syssel programmers. The utility provides access to blocked OS features. Installs third-party themes and designs. Use the utility for all versions of Windows. The developers warn that the application does not support Windows 10 version 1511.
Before installation, a restore point is created. Therefore, if problems arise, you can return the OS to working condition. The developers are not responsible for the consequences of the application.
PREPARING TO INSTALL THEMES ON WINDOWS 10
Installing third-party themes is inextricably linked to the concept of “Windows 10 Version/Build”. Yes, the Windows 10 OS itself has several versions. And themes are written for a specific version/build, as are the programs that make them work. Therefore, the first step is to determine which version/build of Windows 10 is installed on your computer. It's easy to do:
- Press the key combination Win + R. The Run application will launch. Enter the winver .
- Click OK.
- A new window will show the version and build of your Windows 10 OS.
Another very important point - before installing third-party themes, be sure to create a system restore point. You can do this as follows:
- In Explorer, right-click on the “This PC” icon and select “Properties”.
- The System window will open. Click on the “System Protection” element.
- In the newly opened window, click on the “Create” button.
- Another window will open. Enter any name for the recovery point. Then click “Create”. Wait for the process to complete.
How to install
Download and install the patch. It is located at: https://www.syssel.net/hoefs/software_uxtheme.php?lang=en.
When installing the second or third theme, you do not need to install a patch.
After downloading, install the utility, then restart your PC.
In Explorer go to:
Move third-party themes to this directory. Press "Win+X", select "Options". Further:
To install a new theme, left-click on it and wait until the changes occur.
Using UxStyle for Windows 10
Official website of the developers https://uxstyle.com/. Download the installation “exe” file. We launch it by double-clicking on it with the left mouse button. Further:
Now:
- go to the C:\Windows\Resources\Themes directory and move the theme there;
- open the Personalization window (described above), select a theme.
How to activate dark theme on Windows
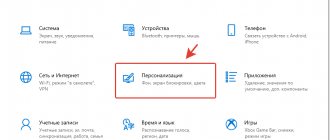
In addition to changing the theme, Windows has several settings, some that change the appearance of the system. For example, “Options” and everything directly connected with them can be made in a dark color.
- Open the “Personalization” options, as shown above, go to the “Color” tab
- Scroll the settings to the very bottom, in the “Select default application mode” column, change the toggle switch to “Dark”.
Go to the color tab and change the “Select default application mode” setting to “Dark”
After reinstalling Windows, the author is one of the first to change the theme settings to dark mode. In this state, the eyes get less tired, and it’s much more pleasant to look at the parameters; the black background is calming.
How to customize the lock screen in Windows 11
You can also set up a lock screen that slides up every time you need to go to the Windows 11 login screen.
Set your own image on the lock screen
To use your own image on the lock screen, follow these steps:
1. Open settings.
2. Click "Personalization".
3. Click the lock screen page on the right.
4. Use the Personalize your lock screen option and select the Image option.
5. Click the "Browse Photos" button.
6. Select your own image.
7. Click the Select image button.
8. (Optional) Uncheck Receive fun facts, tips, tricks, and more on your lock screen.
Once you complete these steps, the lock screen will display the image you selected in Settings.
Set slideshow on lock screen
To use a custom slideshow on the Windows 11 lock screen, follow these steps:
1. Open settings.
2. Click "Personalization".
3. Click the lock screen page on the right.
4. Use the Personalize your lock screen option and select the Slideshow option.
5. Click the Browse button.
Note. Windows 11 by default adds the local Pictures folder and Pictures from OneDrive. You can use these locations or delete them to add other folders.
6. Select the folder with all the images.
7. Click the Select image button.
8. Click the "Select this folder" button.
9. (Optional) Uncheck Receive fun facts, tips, tricks, and more on your lock screen.
After you complete these steps, the lock screen will rotate images from the folder you selected in Settings when you start your computer.
Install Windows: interesting things on the lock screen
The Windows feature: Spotlight is the default for the lock screen, but if you used something else or want to undo the changes, follow these steps:
1. Open settings.
2. Click "Personalization".
3. Click the lock screen page on the right.
4. Use the Personalize your lock screen option and select the Windows Explore option.
By following these steps, you'll see new, fresh images from Microsoft Bing every time you're on your lock screen.
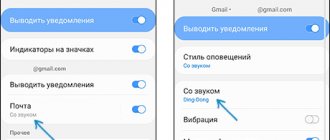
Set up app notifications on the lock screen
To view app notifications on the lock screen, follow these steps:
1. Open settings.
2. Click "Personalization".
3. Click the lock screen page on the right.
4. Use the Lock Screen Status setting and select the information you want to see, such as weather, mail, or calendar.
Once you complete these steps, notifications from the app you specified will appear on your lock screen.
Disable background on login screen
Windows 11 uses the same background on the lock and login screens, but you can turn off this behavior if you only want the background to appear as a solid color.
To turn off the login screen background, follow these steps:
1. Open settings.
2. Click "Personalization".
3. Click the lock screen page on the right.
4. Disable the Show lock screen background image switch on the login screen toggle.
Once you complete these steps, a solid background color will appear on your login screen.
Using the Windows theme
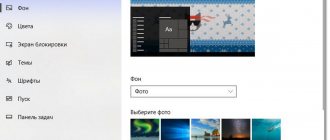
With the Creators Update, Windows has finally moved theme management to the Settings app instead of Control Panel. Themes allow you to coordinate and save your desktop background, accent color, sound scheme, and mouse cursor settings as a set that you can upload or download.
You can click on each of the theme categories - Background, Color, etc. – install what you want. These links simply take you to other places in the Settings app where you can make changes. When you set the options the way you like, click the Save Theme button and enter the name of your theme.
If you scroll down a bit, you'll see that Windows also has a number of pre-built themes and gives you the option to download more from the Windows Store . Simply browse the list and select the theme you want to use, or click the More Themes in Store link to see what else Microsoft has to offer.
Changing Windows Background
The first set of options you can change controls your desktop background, and they should look pretty familiar to you if you've been using Windows for a while.
To use an image as your background, select Image from the Background drop-down menu. As with previous versions, Windows 10 comes with several images to choose from, or you can click Browse and find your own.
Once you select an image, you can decide how your image will fill the desktop - fill, fit, stretch, tile, center. If you are using multiple monitors, you can also select the Extend option, which uses one snapshot across all monitors.
If you want to use a set of images for your Windows desktop background, select Slideshow from the Background drop-down menu. To create a slideshow, you need to select a folder from which Windows will take the images. You shouldn't use a standard folder for photos, so before choosing this option, choose a folder with your favorite background images. After selecting your folder, you can also choose how often Windows will change the background image.
If you prefer simplicity, you can use a solid color as the background. Select Solid Color from the Background drop-down menu, and then choose one of the suggested background colors.
If you want a little more control, you can also click the More Color button on this screen. In the pop-up window, use the controls to select the color you want, and then click Done.
Unfortunately, the Personalization screen only allows you to select one background, no matter how many monitors you have. If you have multiple monitors, you can set a different background image for each monitor using File Explorer. Of course, there are third-party utilities such as John Background Switcher and DisplayFusion that can improve image management in a multi-monitor setup. They also provide more advanced tools for working with backgrounds on a single monitor.
How to customize the taskbar in Windows 11
The taskbar in Windows 11 is not as customizable as in previous versions, but you can still manage various settings to customize its appearance. You can change the alignment of elements, remove system elements you don't use, and manage various settings from the taskbar.
Change icon alignment
To align the taskbar and Start menu buttons to the left, follow these steps:
1. Open settings.
2. Click "Personalization".
How to change the background, theme, screensaver, icons, START menu? Windows 7 design.
Hello!
Every computer user (especially the female half :)) tries to give their Windows originality and customize it for themselves. It’s no secret that not everyone likes the basic settings, and besides, they can even slow down your PC if it’s not particularly powerful (by the way, such effects include Aero).
Other users want to disable various graphical bells and whistles, because... we’re simply not used to them (after all, all this didn’t exist in Windows 2000 and XP before. I, for example, am generally quite ascetic about this, but I have to help other users...).
So, let's try to change the appearance of the seven a little...
How to change the theme?
Where can you find a lot of new topics? At the office Microsoft website has a sea of them: https://support.microsoft.com/ru-ru/help/13768/windows-desktop-themes
Theme - In Windows 7, a theme refers to everything you see. For example, the picture on the desktop, window color, font size, mouse cursor, sounds, etc. In general, all display and audio are related to the selected topic. A lot depends on it, which is why we’ll start setting up our OS with it.
In order to change the theme in Windows 7 you need to go to the personalization settings. To do this, it is not necessary to go to the control panel; you can simply right-click anywhere on the desktop and select “personalization” from the menu (see Fig. 1).
Rice. 1. Transition to OS personalization
Next, you can select the desired theme from the list of installed ones on your system. For example, in my case, I chose the “Russia” theme (it comes by default with Windows 7).
Rice. 2. Selected theme in Windows 7
There are quite a lot of other topics on the Internet, just above under the title of this subsection of the article I provided a link to the office. Microsoft website.
By the way, an important point! Some themes may even cause your computer to slow down. For example, themes without the Aero effect (which I talked about here:) run faster (usually) and require lower computer performance.
How to change the background, wallpaper on your desktop?
Large selection of ready-made wallpapers: https://support.microsoft.com/en-us/help/17780/featured-wallpapers
The background (or wallpaper) is what you see on your desktop, i.e. background picture. This picture has a very big influence on the design. For example, even the taskbar bar changes its color depending on what picture was selected for the wallpaper.
To change the standard background, go to personalization (note: right click on the desktop, see above), then at the very bottom there will be a link “Desktop Background” - click it (see Fig. 3)!
Rice. 3. Desktop background
Next, first select the location of the backgrounds (wallpapers) on your disk, and then you can choose which one to fix on the desktop (see Fig. 4).
Rice. 4. Selecting a background. display settings
By the way, the background on the desktop may be displayed differently, for example, there may be black stripes along the edges. This happens because your screen has a resolution (more about this here -). Those. roughly speaking, a certain size in pixels. When it doesn’t match, then these black stripes are formed.
But Windows 7 may try to stretch the picture to fit your screen (see Fig. 4 - the lowest red arrow: “Fill”). True, in this case, the picture may lose its entertainment value...
How to change the size of icons on the Desktop?
The size of desktop icons affects not only the aesthetics of the view, but also the ease of launching certain applications. And in general, if you very often search for certain applications among the icons, too small icons can also affect eye fatigue (I talked about this in more detail here:).
Changing the icon size is very easy! To do this, right-click anywhere on the desktop, then select the “View” menu, then select from the list: large, medium, small (see Fig. 5).
Rice. 5. Badges: large, small, medium for work. table
It is recommended to choose medium or large. Small ones are too inconvenient (in my opinion), when there are a lot of them, your eyes start to run wild when you are looking for the right utility...
How to change the sound design?
To do this, you need to open the personalization tab in the control panel, and then select sounds.
Rice. 6. Setting up sounds in Windows 7
Here you can change the usual soundtrack to various others: landscape, festival, heritage, or turn it off altogether.
Rice. 7. Selecting sounds
How to change the screensaver?
We also go to the personalization tab (note: right-click anywhere on the desktop), select the screensaver item at the bottom.
Rice. 8. Go to screensaver settings
Next, select one of the presented ones. By the way, when you select one of the screensavers, the screen (just above the list of screensavers) will show what it looks like. Convenient when choosing (see Fig. 9).
Rice. 9. View and select the screen saver in Windows 7.
How to change screen resolution?
More details about screen resolution:
Option #1
Sometimes you need to change screen resolutions, for example, if the game slows down and you need to launch it with lower parameters; or check the operation of a program, etc. To do this, right-click on the desktop, and then select screen resolution from the pop-up menu.
Rice. 10. Windows 7 Screen Resolution
Next, all you have to do is select the desired resolution; by the way, the native one for your monitor will be marked as recommended. In most cases, this is where you need to stop.
Rice. 11. Setting the resolution
Option No. 2
Another way to change the screen resolution is to configure it in video drivers (AMD, Nvidia, IntelHD - all manufacturers support this option). Below, I will show how this is done in ItelHD drivers.
First you need to right-click on the desktop and select “Graphic characteristics” in the pop-up menu (see Fig. 12). You can also find the video driver icon and go to its settings in the tray, next to the clock.
Rice. 12. Graphic characteristics
Next, in the “Display” section, you can select the desired resolution with one click of the mouse, as well as set other graphic characteristics: brightness, color, contrast, etc. (see Fig. 13).
Rice. 13. Resolution, display section
How to change and customize the START menu?
To customize the START menu and taskbar, right-click the START button in the lower left corner of the screen, then select the Properties tab. You will be taken to settings: in the first tab you can configure the taskbar, in the second - START.
Rice. 14. Set up START
Rice. 15. Administration of PUSK
Rice. 16. Taskbar - display settings
It probably doesn’t make much sense to describe every checkbox in the settings. It’s best to customize it experimentally: if you don’t know what the checkbox means, turn it on and look at the result (then change it again - look, you’ll find what you need at random :))..
Setting up showing hidden files and folders
Here, it is best to enable the display of hidden files and folders in Explorer (many beginners get lost and do not know how to do this), as well as display file extensions of any file types (this will help avoid some types of viruses that masquerade as other file types) .
This will also allow you to know for sure what kind of file you want to open, and also save time when searching for some folders (some of which are hidden).
To enable display, go to the control panel, then to the design and personalization tab. Next, look for the “Show hidden files and folders” link (in the Explorer settings section) - open it (Fig. 17).
Rice. 17. Show hidden files
Next, do at least 2 things:
- uncheck the box next to “hide extensions for registered file types”;
- move the slider to “show hidden files, folders and drives” (see Fig. 18).
Rice. 18. How to show folders and files
Desktop gadgets
Gadgets are small information windows on the desktop. They can notify you about the weather, about incoming email messages, show the time/date, exchange rates, various puzzles, slides, CPU load indicators, etc.
You can use the gadgets installed in the system: go to the control panel, type “gadgets” into the search, then you just have to choose the one you like.
Rice. 19. Gadgets in Windows 7
By the way, if the presented gadgets are not enough, then you can additionally download them on the Internet - there is even a special link for this under the list of gadgets (see Fig. 19).
Important note! A large number of active gadgets in the system can cause a decrease in computer performance, slowdowns and other delights. Remember that everything is good in moderation and do not clutter your desktop with unnecessary and unnecessary gadgets.
That's all for me. Good luck to everyone and bye!