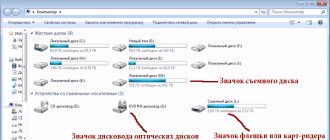
How to connect an iPhone to a Sony Bravia TV? Sony is a fairly popular company that specializes in producing equipment and mobile gadgets. There are many manuals and instructions for these devices, but the process of launching video from a mobile phone is not clearly described in all of them. In this article we will talk about the methods and features of connecting an iPhone to TV.
Why Sony Xperia does not see the computer
If a person connects a smartphone to a PC via a USB cable, but the computer does not react at all, it means that the user is faced with one of the following problems:
- cable fault;
- failure of the USB socket on one of the devices;
- Incorrect drivers for the smartphone are installed on the computer, or there are none at all;
- When connecting, the “Charging only” option is selected;
- failure of the operating system of one of the devices.
Thus, all identified problems can be divided into physical and software. To determine the exact reason why the Sony Xperia 10 II phone does not see the PC, you need to check the hardware and settings of both devices.
Use diagnostics to fix problems
The first thing we have to do is to try to find the error with Bluetooth
is to use a tool that Sony presents in all of its models. This option is located under Settings > About Mobile > Tools and is called Xperia Diagnostics. Simply by running it, we will be able to see a tab at the bottom called Xperia tests, through which we will know if our mobile has any damaged component.
It is advisable that we develop all tests, not just those related to Bluetooth, because another error in the system may cause this situation. After analysis, he will provide us with several solutions or advise us to visit the technical service if it is a problem that we can hardly solve with the help of software.
How to fix if the computer does not see a phone connected via USB - additional methods
If your phone does not connect via USB to the computer with data capability, but only charges, try the following methods to fix the problem.
Android safe mode, developer mode, motherboard drivers and other nuances
Among other things, if the problem in question occurs, pay attention to the following points:
- Enable Developer Mode on Android, and then in the Developer Options, enable USB Debugging and, separately, in the Developer Settings, find the Default USB Configuration item and set the “File Transfer” mode. This might be helpful: How to enable USB debugging on Android.
- If you used the USB modem mode on your phone, in the settings (usually in the “Connections” or “Network and Internet” - “Access point and modem” section), turn off the “USB modem” option.
- If the phone is no longer visible after reinstalling or updating Windows, install the original drivers for the motherboard and chipset from the manufacturer’s website or from the laptop manufacturer’s website if you have a laptop.
- Try restarting your Android phone in safe mode. If after this it becomes visible when connected to a computer, then most likely the reason is in some third-party applications, most often related to protection, control and the like.
- Try using the built-in troubleshooting in Windows: go to Control Panel - Troubleshooting - Hardware and Sound - Device Settings (the item is missing in the latest versions of Windows 10).
- If this is possible, try connecting your phone to another computer. If it is not visible there either, again the problem is most likely in the cable or connector. Moreover, the connector on the phone may stop functioning for file transfer simply due to the ingress of dirt or water, followed by oxidation of the contacts.
- Methods regarding cleaning drivers from the instructions The computer does not see the USB flash drive can also help (and may also create problems with other USB drives, so take it only if you are ready for this).
If the problem of the computer detecting a mobile device is not resolved, reset the settings
If your computer still does not see your phone via USB, resetting your smartphone using Hard
Reset
. Go to the settings of your phone, select the “Backup” menu item, and in it select “Data reset”.
But I’m warning you right away! You will lose your files and settings located in the internal memory of the phone. And the files on the SD card will remain untouched. Therefore, this point should be used only as a last resort!
Conclusion
As you can see, problems with the lack of visibility of a connected phone on a PC can be of both software and hardware nature. Moreover, there are a considerable number of such problematic factors.
I would advise you to first pay attention to possible mechanical damage to the cable and device. And only then switch to software methods
In many cases, simply rebooting the smartphone (temporarily removing the battery) can help. Or work with the phone's USB connection settings. If all of the above does not help and the computer does not see the phone via USB but is charging, then it may be worth contacting a qualified service center.
Everyone faces this problem at least once: you connect your smartphone or tablet to your computer via a USB cable, but nothing happens other than charging. The computer does not see the phone or identifies it as an unknown device. The situation is common, but ambiguous, and there are quite a few reasons why it occurs. Today we will figure out what causes such problems and how to deal with them.
Software and hardware failures lead to a situation where the PC does not recognize the mobile device connected to it:
- Lack of device driver in the PC operating system.
- The driver does not match the device model.
- There is no USB driver in the system or it is malfunctioning.
- Connection with a cable that is not suitable for data transmission or is damaged.
- Malfunction of the USB socket (both on the computer and on the phone), group of sockets or USB controller on the PC.
- Failure of any of the computer equipment, blocking by static electricity.
- Error in phone system settings.
- Blocking access to the phone using security programs running on a PC (including if the gadget is infected with a virus).
- The application used to synchronize your phone and PC (if you are using) has crashed.
In case of software problems, the computer, as a rule, does not display the contents of the phone’s memory, but the device charges normally when connected to it. If the problem is due to a physical malfunction, charging most often does not work either, but there are exceptions when only the data lines do not work.
An analysis of the previous situation—what happened before the problem arose—helps outline the range of possible causes. For example:
- You have reinstalled the operating system on your computer or removed some of the drivers (the reason is that the required driver is missing).
- The phone (tablet) was no longer detected after flashing the firmware, cleaning it from viruses, deleting applications, optimizing and other manipulations with the OS (the operating system of the mobile device malfunctioned).
- The device has been subjected to mechanical damage (the USB socket is damaged) or has been repaired (after replacing parts, a driver of a different version is needed or the fault has not been completely eliminated).
- You are using a USB cable that you have never used to connect your phone to a computer before (the cable is only for charging or is damaged), etc.
Bluetooth connection
Which option for connecting a smartphone to a computer is more convenient?
- Via USB cable
- Via Bluetooth
- Using Wi-Fi
- Your option in the comments
If you don’t want to bother with wires every time, you should figure out how to connect your Sony Xperia to your computer using Bluetooth. The data transfer speed in this case will be significantly lower, but if you need to quickly transfer a small document, this option can be very useful.
To connect via Bluetooth, you must:
- Unlock your mobile phone and on the home screen, tap the icon that displays the Applications menu.
- In the window that opens, select “Settings”.
- Activate Bluetooth by moving the slider to the right. Then click on the inscription itself to display a list of all nearby devices.
- Click on the computer name. The phone will now become visible to the PC.
- Right-click on the Bluetooth icon located on the Windows taskbar. In the list that opens, select “Add device”. Click on the name of the smartphone and follow further instructions.
The device pairing process is complete. The phone's memory will appear in Windows Explorer in the same way as with a wired connection.
Which TV can you connect PS4 to?
The latest model of Sony Playstation can be connected to almost any TV, because manufacturers make a lot of adapters for convenient use of TV in different situations. But there are special requirements for the PS4 TV to ensure that the picture is as high quality as possible:
- Technology type and screen refresh rate. High-quality acoustics and clear images are only possible on modern LED models with a screen refresh rate of at least 100 Hz.
- Screen resolution. Reference – 4K. Only in this case the picture will meet expectations.
- Viewing angle. Excess side lighting when choosing a TV for PS4 leaves its mark on the gaming experience. The image is distorted and difficulties arise in group games.
- Input-Lag. Displays the time it takes for the TV receiver to implement the signal on the screen. Responsible for the parameter of the TV response to the player’s actions.
- PQI update index. The larger it is, the better for gaming.
- Screen size. Here, of course, it’s up to the player’s taste - some like a smaller screen, some like a larger one. A good picture on anyone will involve you in the process.
- Interface. To quickly connect your PS4 to your TV, it is better if it has an HDMI cable and an appropriate input.
PC Companion
Next, let's look at how to connect Sony Xperia to a computer using an alternative method using PC Companion. This is a specially created program for Windows that helps transfer multimedia documents between your mobile device and PC. It also helps you update your smartphone's firmware and install new software versions.
To connect your phone via PC Companion, you must:
- Open your smartphone settings, go to the “Xperia” section, then “USB Connections”.
- Check the box next to the “Install software” line. In most cases, the program installation files are already in the phone’s firmware, so you won’t need to download them separately.
- Connect your mobile device to your computer using a USB cable. Then click “Install” on the screen.
- Wait for the PC Companion installation to start and follow the instructions displayed on the PC screen. If the launch does not happen, you need to visit the website https://support.sonymobile.com/ua/xperia-companion/#gref, download and install the program yourself.
- Launch the installed software using the desktop shortcut.
The process is complete. Now you can transfer files, update firmware and other actions.
The culprit of the failure is the computer. What to do?
- Shut down the OS, turn off the PC from the outlet (or press the key on the power supply) and hold down the power button for 15-20 seconds. This will discharge the capacitors and remove stray static charge, which may block detection of the connected device.
- If the phone is not recognized by only one group of USB ports, open the cover of the system unit and make sure that they are connected securely. By the way, normal charging of a mobile device through the port does not mean that the second one is working properly.
- Boot the operating system. Open Device Manager and check if portable devices are listed in the equipment list, and your phone is among them. If it is present, but marked with a black arrow in a circle (disabled), right-click on the line and select the “Enable device” command from the menu.
- If there are unknown devices in the hardware list (indicated by an exclamation point in a yellow triangle), one of them may be the phone. To make sure it is him, disconnect your mobile device from USB. If the unknown device disappears from the list, then that’s it. And the reason for the failure is the lack of the required driver in the system. We will tell you below how to reinstall and where to download the driver for your phone.
- The problem with recognizing connected devices may also be due to boot failure, damaged or missing USB drivers. In this case, the exclamation marks will be in the “USB Controllers” section.
- Reinstalling drivers didn't help? Scan your computer disks with an antivirus and then temporarily disable security programs. By the way, the latter can block access to a mobile device as a storage medium if it contains suspicious or clearly malicious software. So it’s worth checking your phone for viruses too.
- Uninstall the programs whose installation caused the problem, or perform a system restore to a checkpoint created on a day before the problem occurred.
- If, in addition to the phone, the computer does not recognize other devices connected via USB - a mouse, keyboard, printer, flash drives, etc. (whether they are charged or not is not indicative), the source of the failure may be any faulty component of the system unit or something then from the periphery. You can determine the culprit at home by turning off the equipment one by one or replacing it with a known good one.
Connection in storage mode
This method does not require preliminary configuration or installation of programs. To connect your smartphone as a storage device, you must:
- Connect your phone to your computer using the included USB cable.
- Wait for the drivers to be automatically installed on your PC. In some cases, you may need to provide permission to install them.
If the operating system was unable to recognize the connected device and install the drivers yourself, you should go to the official Sony website (https://developer.sonymobile.com/downloads/drivers/) and download the software manually.
- A startup window will appear on your computer, where you should select “Open folder to view files.” If this does not happen, you need to enable USB storage mode on your phone. This is done after navigating to the current connection displayed in the notification line.
- A Windows Explorer window will appear. If the smartphone has a memory card installed, two storage spaces will be displayed, if not, only one. Next, you should select a folder to transfer files and copy them from the computer’s memory.
SONY EXPERIA - WHEN A COMPUTER AND A SMARTPHONE ARE ONE!
At first glance, there is nothing complicated. The cable is included. We insert one end into the computer, the other into the smartphone. It's impossible to mix it up. And this is where an incident arises. An unidentified device appears in the device manager instead of the smartphone model. The computer does not see the phone via usb sony xperia. This happens because your computer does not have the necessary drivers to work with your smartphone. You can install them using several methods. If your device came with a disk with PC Suite software, then you need to install this software package before connecting. After this, all you have to do is follow the commands that will be displayed on the screen of your personal computer.
After you have downloaded the archive, you need to unzip it using the WinRAR archiver. It is better to do this in a pre-prepared folder. This will make the installation process easier for us. Next, we connect the smartphone to the computer, go back to the device manager and select our, as yet unknown, device with a question mark at the end. After that, click the “update drivers” button at the top. The operating system will immediately offer you two options for searching for drivers. Since we have already downloaded and unpacked the file archive, we do not need the Internet. Therefore, click on the option “search for drivers on your computer.”
In a pop-up window, Windows will prompt us to specify the search path for drivers. Specify the folder with the unpacked archive. Click the “next” button and wait for the update results. After a certain period of time, a window will appear notifying us that the update was successful. Having gone back to the device manager after this operation, we will happily discover that our unidentified device has miraculously turned into a specific Sony Xperia model! That's it, the smartphone is ready to receive and transmit data!!!
If the update was unsuccessful and an error window popped up, you can try to start the procedure again and click on the “select driver from the list of already installed drivers” option. If even after this the update fails, then we can recommend downloading the file archive. It is better to download it from the official Sony website or from the website of the manufacturer of the motherboard of your personal computer. Happy update!
https://youtube.com/watch?v=YNdIx_NifqE
Video clip: How to get Root rights to Sony Xperia ZR android 5.0.2 lollipop
How to connect Sony Xperia to computer via Wi-Fi
- We start by downloading a special utility for PCs - Sony PC Companion. This is a proprietary utility from Sony, which is suitable only for smartphones from this company. After downloading, the program is installed in a standard Windows manner.
- This item deserves your attention only if you did not enable wireless media transfer when you first connected. Go to the "Settings" menu, find the item "Xperia Connections" in it "USB Connections" and then "Pair with PC".
Transferring contacts – Sony Xperia™ SP help (English)
View all topics There are several ways to transfer contacts to a new device. For help choosing a transfer method, read this article about transferring contacts.
Transfer contacts using your computer
Xperia™ Transfer and Contacts Setup are apps in PC Companion that help you transfer contacts from your old device to your new one. These applications support devices from various brands, including iPhone, Samsung, HTC, BlackBerry, LG, Motorola and Nokia.
For this you need:
- A computer connected to the Internet.
- USB cable from an old device.
- USB cable from a new Android™ device.
- Old device.
- New Android™ device.
Transfer contacts to a new device using a computer
- Make sure PC Companion is installed on your computer.
- Open PC Companion, select Xperia™ Transfer or Contacts Setup and follow the instructions to transfer your contacts.
Transfer contacts using an online account
If you synced contacts on your old device or computer using an online account such as Google Sync™, Facebook™, or Microsoft® Exchange ActiveSync®, you can use that account to transfer your contacts to your new device.
Other ways to transfer contacts
There are other ways to transfer contacts from an old device to a new one. For example, you can copy your contacts to a memory card, store them on a SIM card, or use Bluetooth® technology. For more specific information about transferring contacts from your old device, see the appropriate user guide.
Importing contacts from a memory card
- Go to your Home screen and tap , then tap .
- Press , then tap Import contacts > SD card.
- Select a location where you want to save your contacts.
- Select the file you want to import.
Importing contacts using Bluetooth® technology
- Make sure Bluetooth® is turned on and your device settings are set to visible.
- When you receive a notification about an incoming file, drag the status bar down and tap the notification to accept the file.
- Tap Accept to begin transferring the file.
- Drag the status bar down. When the transfer is complete, tap the notification.
- Tap the resulting file and select the location where you want to save your contacts.
Importing contacts from a SIM card
| When transferring contacts from a SIM card, some information may be lost, and some contacts may be copied several times. |
- Go to your Home screen and tap , then tap .
- Tap and then Import contacts > SIM card.
- Select a location where you want to save your contacts.
- To import an individual contact, find and tap it. To import all contacts, tap Import all.
Wi-Fi connection
The previous version of wireless data transfer, although easy to set up, does not provide sufficient speed for transferring large files. Therefore, let's look at how to connect Sony Xperia to a computer via Wi-Fi. The process will take a little longer, but after a one-time setup, you can enjoy the benefits of wireless file transfer at high speeds using your home network.
To connect via Wi-Fi, you must perform the following steps:
- Install the PC Companion program on your computer as described above.
- Set up wireless media transfer. Often, the smartphone itself offers to perform the procedure after the first connection to the PC. If such a message does not appear, you should open your phone settings and go to the “Xperia Connections” section. Then select “USB Connections” and the line “Pair with PC”. Next, you need to follow these instructions: connect your phone to your computer via USB and select the version of the Windows operating system.
- Launch PC Companion and click on the “Connection” item (if there is no such link, you can disconnect and reconnect the cable to the smartphone). In the window that opens, select “Wi-Fi” and follow the program’s recommendations.
- Go to the phone settings along the path specified in step 2 and click on the PC name in the “Wireless media transfer” column. In the pop-up window, select “Connect”.
- The process is complete. The memory of the smartphone will be displayed on a laptop or desktop computer. Using File Explorer or an installed program, you can start transferring files.
In the future, to connect your phone to a PC, you will only need to follow the steps described in point 4. Files will be transferred over your home Wi-Fi network without using wires.
How to transfer photos from your phone to your computer: a few simple ways
Many owners of mobile phones equipped with photo and video cameras sooner or later have a question: how to transfer photos from their phone to a computer. The reason is simply simple - there is not enough space on the internal or removable drive to store them. As you know, graphics take up quite a large amount of space, so the issue of copying must be approached as responsibly as possible.
How to transfer photos from your phone to your computer: the simplest method
As you know, any modern (and not so modern) smartphone/phone model can connect to computer systems with different OSes using a regular USB cable using the appropriate ports.
Thus, in the simplest case, the question of how to transfer photos from a phone to a computer is solved in this way. In this case, we are not even talking about using special programs for managing mobile devices.
In the same Windows systems, it is enough to simply launch the standard “Explorer” or any other file manager. The system recognizes both a removable memory card of any format, if available, and the internal drive itself.
How to transfer photos from your phone to your computer? Yes, just copy the desired objects and place them in any folder on the terminal (standard procedure “Copy (Cut)” / “Paste”).
But here you need to pay attention to the camera settings in the sense of how the settings are set to save the footage. For example, on Android systems, this could be DCIM folders on the SD card, Photos, Camera, Pictures, etc. on the internal storage. In any case, you just have to find the photo in the file manager itself or view the camera settings.
Using a card reader
The question of how to transfer photos from your phone to a computer can be solved quite simply by removing the memory card (provided the footage is saved on it) and inserting it into the card reader slot. Most laptops have such connectors, and desktop computers can use external devices.
The scheme is the same. The system detects external removable media from which files are subsequently copied or moved. But here it is worth considering that card readers are designed for the SDHC format, so for regular SD cards you will have to use a special adapter, which in most cases is included with the purchase.
How to transfer photos from your phone to your computer using a wireless connection?
The technique that involves copying (transferring) files using a wireless connection looks somewhat less reliable.
In the case of Wi-Fi networks, you will have to “share” the source and destination folders. When using a Bluetooth connection, even if the permission to detect a computer or laptop by other devices is set, the transfer process can take quite a long time due to the fact that the connection itself has a strong transfer speed limitation (photos, as we remember, are very large). Nevertheless, this possibility cannot be excluded as an option.
Transferring information using special utilities
Finally, if someone does not like the standard operating system tools, you can use management programs that can be installed for any smartphone model and for any type of connection.
For the same Sony XPERIA series, Sony PC Companion is used, for Samsung - Kies, etc. But you can install universal utilities like MyPhoneExplorer, which are compatible with most modern smartphones.
What should you prefer to use?
When talking about how to transfer photos from your phone to your computer, you need to take into account the issue of preference. It is best, I think, to use a regular USB connection or card reader if the photo is saved on a removable memory card. Transferring over Wi-Fi requires proper configuration, and Bluetooth connections are limited by speed limits.
How to solve a problem
First, you must make sure that you are using a working cable for the connection. The easiest way is to charge your phone with the same cord. If the device is charging, then the problem is definitely not in the cable.
The second point that users often overlook is that the wrong connection type is selected. When a person connects a smartphone to a PC, a notification appears on the mobile device’s screen prompting them to choose one of several pairing types:
- charging only;
- cameras;
- media device and so on.
The default type is “Charge Only”. With this connection, a smartphone running Android OS simply receives energy from the computer. Check your pairing settings and select “Connect as media device” or “USB storage device”. Only in this case will the PC see the Sony Xperia 10 II phone as a full-fledged storage medium.
If, when you connect your mobile device to your PC, nothing happens at all (the gadget doesn’t even charge), you need to check the functionality of the USB interface on your computer. For example, you can insert a USB flash drive or connect a mouse.
Problems of a physical nature (breakage of a cable or connector) can only be solved by replacing components. And in a situation where you choose the correct connection type (media device) and use working accessories, faulty drivers become the cause of the error.
As a rule, they are installed automatically the first time you pair your smartphone and PC. The software is loaded only when there is an Internet connection. If you do not connect to the network, the drivers will not be loaded. Therefore, it is recommended to check your Internet access.
You can check the functionality of the drivers as follows:
- Open Device Manager (Win+R and then enter devmgmt.msc).
- Find the MTP device or phone name in the list.
- Double-click with the left mouse button.
- Click "Update Driver".
- Select "USB MTP Device".
- Click "Next".
- Wait until the drivers are reinstalled.
If the smartphone is not displayed in the device manager, it makes sense to enable developer mode on the Android gadget:
- Open phone settings.
- Go to the “For Developers” section.
- Activate the function.
- Click "Default USB Configuration".
- Select the “File Transfer” value.
When none of the suggested tips help, the only way out is to reset your smartphone. This operation is performed if the device owner suspects that pairing is missing due to the presence of viruses.
To reset settings you need:
- Open settings.
- Go to the "Restore and reset" section.
- Click "Reset settings".
After completing the operation, all files will be deleted from the mobile device. To avoid losing important information, it is recommended to create a backup copy first.
Preparatory stage
Despite the fact that each subsequent firmware version brings a lot of new functions, after the update some smartphones are unstable. This happens when the user ignores the preparation step.
Before installing updates on the Sony Xperia Z (C6603), you need to meet 2 basic requirements:
- charge your smartphone at least 30%;
- perform a factory reset.
And if everything is clear with the first point, then the second raises many questions for some people. Resetting to factory settings completely deletes files from the smartphone's memory. This allows you to avoid errors when installing updates.
Of course, no one wants to lose personal data, so before resetting you need to create a backup:
- Open settings.
- Go to the "Storage and Backups" section.
- Click on the Google Drive heading.
- Activate the backup.
Performing these steps will result in the backup file being uploaded to cloud storage. After updating Android, it can be restored.
If there is not enough space on Google Drive to save all the data, it is recommended to create a backup copy through the “Backup and Restore” item. The resulting file should be moved to another device (for example, a computer) during the flashing process, and after the process is completed, return it back to the phone’s memory.
If the backup has been successfully created, you can safely proceed to restoring the phone to factory settings:
- Launch device settings.
- Go to the "Backup and Reset" section.
- Select “Reset settings”.
- Click the Reset Phone button.
- Confirm the operation.
Now you need to reboot your smartphone, and then proceed directly to the process of installing new firmware.
How to avoid problems in the future
To ensure that the situation does not repeat itself in the future, and the Sony Xperia 10 II always sees the computer, follow a few simple tips:
- Use only the supplied accessories for connection. Don't buy cheap cables.
- On your phone, set the “Media device” or “USB storage” option.
- When pairing for the first time, do not forget to install the drivers and update them if necessary.
Following just three rules will once and for all eliminate problems when connecting your phone to a computer.
Loading Internet and MMS settings
You can set internet and MMS parameters by going to the “Settings” section. Then you need to select the following options:
- “More” - “Internet Options”.
- After this, you need to click on “Accept”.
- As soon as the settings are downloaded, mobile data will be automatically connected.
A nick generator
Important! If problems arise when loading parameters, you need to check the signal strength. It is advisable to change the location of the mobile device and then download the settings again.
Alternative connection methods
If you are unable to connect your Sony Xperia phone to your computer via USB, you can try alternative methods of transferring information from one device to another:
- using a MicroSD card;
- via Wi-Fi.
The first option does not need a detailed description, since in this case you simply need to insert the memory card into the adapter and connect it to the PC via the appropriate connector. But this type of pairing will only allow you to transfer files to or from a flash drive.
To access your smartphone's memory, you need to use a Wi-Fi connection. To do this you will need an additional program. For example, MyPhoneExplorer. It should be downloaded both on your PC (from the official website) and on your phone (via Google Play).
Further connection is made as follows:
- Connect both devices to the same Wi-Fi network.
- Open the MyPhoneExplorer app on your phone.
- Create a password to connect.
- Open the program on your PC.
- Click the “File” button and select “Connect”.
- Confirm pairing by entering the previously created code.
This way, the smartphone can connect to the PC without using a USB cable. MyPhoneExplorer on your computer will display a list of all available files. You can transfer information both from and to your phone.
Wireless network
Modern tablets or smartphones support not only Wi-Fi, 3G, but also GPRS. This standard is considered old. To connect Wi-Fi you will need to search for Wi-Fi. You can configure your device to connect to the network with just one touch of your hand. You should open the “Settings” tab, then drag the slider next to the Wi-Fi sign to the right side.
Note! The function activates within a few seconds. The available network can be displayed as open or secure
When you try to connect, the system will ask you to enter a password. After the user enters the data, the corresponding icon with the name will light up on the screen
The available network can be displayed as open or secure. When you try to connect, the system will ask you to enter a password. After the user enters the data, the corresponding icon with the name will light up on the screen.
Instructions for connecting your phone to a computer
Sony Xperia can be paired with a computer in two ways - using a USB cable and via a wireless Wi-Fi connection. To move content using a cable, you can use a regular Windows Explorer or use special applications. To more conveniently move, sort data, update and synchronize your smartphone, use the special Media Go application for Windows or Sony Bridge for Mac.
USB connection instructions for Windows:
- Update or install the drivers necessary for operation.
- Connect the gadget to your computer via a cord.
- A notification will appear on the screen that the SD card and internal storage are connected.
- Open File Explorer.
- Wait until the drive and card are shown as external drives.
- Drag and drop the files you need between your smartphone and computer using your mouse.
How to connect a smartphone to a Macintosh:
- Download the official Sony Bridge app.
- Connect the gadget using a USB cable to your computer.
- Launch the application.
- After connecting, wait until the program detects your device.
- Use the app to transfer files from your Mac to your device and vice versa.
How to connect your phone to Windows via Wi-Fi:
- Enable multimedia data transfer mode on your smartphone (as a rule, it is active by default).
- Connect the gadget to the PC via a wire.
- After the phone icon appears on the screen, select “Network Configuration” and do everything according to the instructions.
- When pairing is complete, disconnect the cable.
Sony™ Bridge for Mac
With the Sony™ Bridge for Mac app, you can transfer music, videos, and other media files from your device to and from your Apple ® Mac ® computer. Sony™ Bridge for Mac also lets you access files through a file browser, update device software, and back up and restore device content.
To use the Sony™ Bridge for Mac application, you must have an Internet-connected Apple ® Mac ® computer running macOS version 10.6 or later.
Installing Sony™ Bridge for Mac on Apple® Mac® computers
- Make sure the Install software checkbox is selected in Settings > Xperia™ Connections > USB Connections.
- Device: Tap Install.
- Computer : The Sony™ Bridge for Mac installer will launch automatically in a few seconds. Follow the onscreen instructions during installation.
Launching Sony™ Bridge for Mac
- Make sure that Sony™ Bridge for Mac is installed on your Apple ® Mac ® computer.
- Computer: Double-click the Sony™ Bridge for Mac application icon in the Applications directory.
Transferring content using Sony™ Bridge for Mac
- Use a USB cable to connect your device to your Apple® Mac® computer.
- Computer : Launch Sony™ Bridge for Mac After a few moments, The Sony™ Bridge for Mac will detect your device.
- Computer: Drag and drop the files you want to transfer from your Apple ® Mac ® to or from your device.
Syncing your phone with your computer allows you to transfer images, videos and music between devices. In the case of a TV, pairing will allow you to view the contents of your smartphone on the big screen. In this case, each user can configure the connection correctly.
Instructions for connecting a Sony Xperia smartphone to a TV
To view data from your device on the screen, install the TV Launcher application. To display files, you need an MHL cable, which is not included with the phone and must be purchased separately.
To cast content to your screen, follow these steps:
- Using a wire, connect your smartphone to the TV.
- Wait for the TV Launcher app to launch (this happens automatically).
- Follow the steps to see images and videos on your TV.
If your TV has an HDMI input, use a special adapter.
View photos and videos saved on your phone – Sony Xperia™ E dual help (English)
View all topics
In the icon view of the Images tab of an Album, you can view thumbnails of photos and videos. You can also switch to list view to view all albums and find the contents in each folder.
Images Tab Overview
| 1 | Grid mode for photos and video files. |
| 2 | Total number of photos and videos. |
| 3 | The date and number of objects in the group are below. |
| 4 | View a photo or video file by touch. |
| 5 | Scroll up and down to view content. |
| 6 | Switch to list view when viewing all folders containing images and videos stored on your phone. |
| 7 | Mode for listing all folders containing images and video files stored on the phone. |
| 8 | Tap to return to grid view on the Images tab. |
| 9 | Number of folders containing images and video files. |
| 10 | A folder containing all the images taken with the phone's camera. |
| 11 | A folder containing all video files captured by the phone's camera. |
| 12 | All other folders containing images and/or video files downloaded or copied to the phone. |
View photos and videos in icon view
- From your Home screen, tap .
- Find and tap Album. All photos and video files are displayed in chronological order as icons. Videos are marked with an icon.
- View photos and video files with one touch.
- Flick left to see the next photo or video. Flick the screen to the right to see the previous photo or video in the photo viewer.
| If turning your phone on its side doesn't automatically change the screen orientation, check the Auto-rotate screen option in Settings > Display. |
View photos and videos in list view
- From your Home screen, tap .
- Find and tap Album > Pictures.
- Tap . Folders containing photos and videos taken with your phone's camera appear at the top. All other folders containing images and videos stored on the phone are displayed in alphabetical order.
- Tap the folder you want to open. The contents of the folder are displayed by icons in chronological order. Videos are marked with an icon.
- View photos and video files with one touch.
- Flick left to see the next photo or video. Flick the screen to the right to see the previous photo or video in the photo viewer.
| If turning your phone on its side doesn't automatically change the screen orientation, check the Auto-rotate screen option in Settings > Display. |
Changing the size of thumbnails in Album
- When viewing thumbnails of photos and videos in Album, spread your fingers apart to zoom in or pinch them together to zoom out.
Working with batches of photos or video files in Album
- When viewing thumbnails of photos and videos in Album, press and tap Select items to turn on highlight mode.
- Tap the objects you want to work with. Selected objects are highlighted with a blue frame.
- Use the tools in the toolbar at the top of the screen to work with the selected objects.
| You can also turn on the selection mode by touching and holding the object until a blue frame appears. You can then tap to select other objects. |
Operations with photos in Album
You can edit photos in Album. For example, you can crop photos, use them as contact photos or wallpaper.
Resizing photos
- While viewing a photo, double-tap the screen to zoom in. Repeat double tap to zoom out.
- While viewing a photo, spread your fingers apart to zoom in or pinch them together to zoom out.
View photos as a slideshow
- While viewing a photo, press and tap Slide Show to start playing all the photos in the album.
- Tap the photo to end the slideshow.
Changing the orientation of a photo
- When viewing a photo, press .
- Select Rotate Left or Rotate Right. The photo is saved in the new orientation.
Cropping a photo
- While viewing a photo, press , then tap Crop.
- To adjust the frame for cropping a photo, touch and hold the edge of the frame. When the squares at the edges disappear, you can resize the frame by dragging it outward or inward.
- To make all sides of the frame resize proportionally, touch and hold one of the four corners of the frame to make the squares along the edges disappear, then drag the corner.
- To move a cropping frame to another area of the photo, touch and hold the inside of the frame and drag the frame to the desired position.
- To save a copy of the photo after cropping, tap Crop. The original uncropped image will also remain on the memory card.
Using a photo as a contact image
- While viewing a photo, press , then tap Use as > Contact picture.
- Select the contact to whom the photo is assigned.
- Crop the photo if necessary.
- Tap Crop.
Using a photo as a wallpaper
- While viewing a photo, press , then tap Use as > Wallpaper.
- Crop the photo if necessary.
- Tap Crop.
Editing a photo
- While viewing a photo, press , then tap Edit Photo.
Transferring a photo
- When viewing a photo, tap the screen to display the toolbars, then tap .
- In the menu that opens, tap the app you want to use to transfer the selected photo, then follow the steps to send it.
Add a geotag to a photo
- When viewing a photo, tap the screen to display the toolbars, then tap to open the map screen.
- Find and tap the desired location, thereby placing the photo on the map.
- To change the location of a photo, tap the location on the map where you would like to move the photo.
- When finished, tap OK to save the geotag and return to viewing your photos.
| When a photo is geotagged, , along with location information, will be displayed. You can tap this icon to view your photo on the map. |
Deleting photos
- When viewing a photo, tap the screen to display the toolbars, then tap .
- Tap OK.
Operations with videos in Album
Use Album to view videos taken with your phone's camera, downloaded, or copied to your phone's memory card. Share your videos with friends or upload them to YouTube™.
Watching a video
- Open the Images tab in Album.
- In icon or list view, find the video file you want to open.
- Tap a video to play it.
- If playback controls do not appear, try touching the screen. To hide the playback controls, tap the screen again.
Pause video playback
- When playing a video, tap the screen to display controls.
- Tap .
Fast forward and rewind video
- When playing a video, tap the screen to display controls.
- To fast forward or rewind the video, drag the playback slider to the right or left, respectively.
Adjusting video volume
- Press the volume key.
Video transfer
- While a video is playing, press , then tap Share.
- In the menu that opens, tap the app you want to use to share the selected video, then follow the appropriate steps to share it.
| Copyrighted items may not be able to be copied, posted, or transmitted. Some items cannot be sent due to the file size being too large. |
Deleting a video
- In Album, tap the video file you want to delete.
- Touch and hold a video to enable highlight mode. When selected, the thumbnail frame turns blue.
- Tap , then tap OK.
Transferring content using a USB cable and working with content
Connecting your computer and device using a USB cable makes it easy to transfer and manage files. Once a connection is established between the two devices, you can drag and drop content between the device and your computer, or between the internal storage and the SD card, using the file explorer on your computer.
When transferring music, videos, pictures, or other media to your device, it is best to use the Media Go™ app on your computer. The Media Go™ app converts media files so they can be used on your device.
Move content between internal storage and SD card using a USB connection
- Connect your device to your computer using a USB cable. The status bar on the device screen will show Internal storage and SD card connected.
- Computer: Open Microsoft® Windows® File Explorer on your computer and wait until the device's internal storage and SD card appear as external drives in File Explorer.
- Computer: Use the drag-and-drop method to move the files you want between your device's internal storage and the SD card.
Media Go™
The Media Go™ PC app helps you share and manage media content on your device and computer. You can install and use Media Go™ using the PC Companion application.
The following operating systems support Media Go™:
- Microsoft® Windows® 7
- Microsoft® Windows Vista®
- Microsoft® Windows® XP, Service Pack 3 or higher
Transferring content using the Media Go™ app
- Connect your device to your computer using a USB cable.
- Device: Internal storage connected appears in the status bar.
- Computer: First, open PC Companion on your computer. In PC Companion, click Media Go
to launch Media Go™. In some cases, you may need to wait until Media Go™ is installed. - Use Media Go™ to drag and drop files between your computer and device.