After installing Windows, all partitions are automatically named. By default, the system one is assigned the letter C, and the rest are assigned further in the alphabet: D, E, etc. If you connect a flash drive, it will be assigned to the next one in the order of priority. For example, F. We connected an external hard drive - it will be called G.
What to do if you don't like the standard name? You can rename the drive letter to whatever you like. There are 26 of them in total: from A to Z.
The first two - A and B - are already occupied. They are "reserved" for floppy drives. Although if you don’t have them (they haven’t been installed on modern PCs and laptops for a long time), then you can easily assign one of these letters to the local partition.
This is done in literally 5 minutes. Or faster. Moreover, changing it in different versions of Windows is performed almost identically. Plus, there are universal methods that work for Windows 10, 8.1, 7 and even XP. Step-by-step instructions on how to change the drive letter are presented below. This is done very simply, and now you will see for yourself.
How to change the drive letter in Windows 7?
Let's start with the good old "seven".
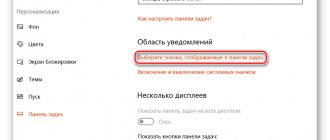
- Go to Start – Control Panel – Administrative Tools.
- Find the Computer Management shortcut and launch it.
- A new window will open - in the left column, click on “Disk Management”.
The first stage is completed. You will see a working window where you can change the drive letter. All available partitions are displayed here (there are 3 of them in the screenshot), plus connected flash drives and external HDD hard drives (if any).
Select any of them, right-click and click on the line “Change drive letter or path”.
A small window will open - click on the “Change” button.
And then you just have to select any letter available in the list (except for those that are already occupied). After that, close the window by clicking "OK".
It is not recommended to change the name of the system partition C, since programs are usually located on it. And after renaming they may stop working. The same applies to sections where games are installed.
As you can see, there is nothing complicated here. Just a couple of mouse clicks, a few minutes - and you're done. Go ahead.
Changing the drive letter using the command line in DISKPART
Changing the drive letter of a partition using the DISKPART command line utility is not a very difficult task. But if you are a novice user and are not sure that you understand the description and logic of the actions performed, I recommend being very careful or abandoning this method: there is a possibility of problems with accessing important data (they will not disappear anywhere, but additional actions will be required to see them again disk in explorer).
To change the Windows 10 drive letter using the Command Prompt, follow these steps:
- Run Command Prompt as Administrator.
- Use the following commands in order (after entering the command, press Enter to execute it).
- diskpart
- list volume (as a result of executing this command, pay attention to the volume number whose letter we need to change, hereinafter referred to as N).
- select volume N (with this command we select by number the section on which further commands will be performed).
- assign letter=LETTER (we set a free letter at our discretion, the old one will be automatically deleted from this disk partition).
- exit
- Close the command prompt.
Done, the drive letter has been changed. If you need to assign a drive letter that is currently occupied by another partition, then first remove it by selecting the partition (as in the 5th command) and using the command remove letter=removable_letter, then do steps 5-6 to assign the freed letter, and Finally, assign the new letter in the same way to the partition from which it was deleted (otherwise it will not appear in Explorer).
Assigning a letter to a section in the figure eight is also very simple
And much faster than in the previous version.
- Open Start.
- Write diskmgmt.msc in the search field.
- Press Enter.
Or click Win+R and copy this command to Open.
After this, the required window will immediately appear where you can reassign the drive letter. Then everything is done in the same way: select the desired local partition and rename it.
This is also interesting: How to find out the temperature of the video card in Windows 7?
Second way
It involves editing the registry. To do this, you will need to open the registry editor. To do this, go to the Start menu, type the “Run” command into the search field and press Enter or press Win+R.
In the line that appears, enter “regedit.exe”. After this, you need to go to: HKEY_LOCAL_MACHINE\SYSTEM\MountedDevices.
After going to this address, the registry settings will indicate the letters of all the hard drives of your PC that are available for changing the name. To rename the hard drive, you will need to rename the option by simply entering the new drive letter. For example, rename the registry value “\DosDevices\D:” to “\DosDevices\E:”. To do this, right-click on the parameter you need and select “Rename” from the context menu.
To change the name of your Windows 7 hard drive, you can also use third-party programs. To do this, you need to download any program for working with hard drives. One of the easy-to-use programs is MiniTool Partition Wizard. This program is focused on working with disks. With its help, you can easily cope with name renaming, defragmentation, and also with varying disk sizes. Paid programs “Artition Magic” or “Acronis” are also available for changing the name.
All of the methods mentioned above are suitable not only for Windows 7, but also for versions XP and Windows 8, 10. Remember that to change the name you must have Administrator rights, otherwise all the manipulations carried out to change the name of the hard drive will not be successful.
How to change drive letter in Windows 10?
Tens users shouldn’t have any difficulties either. After all, changing the drive letter in Windows 10 is very easy. All you need to do is right-click on the “Start” button and select “Manage” from the menu.
After this, a familiar window will open where you can assign a letter to your hard drive or flash drive. This is done exactly the same as in Windows 7 or 8.
What to do if after a while you no longer like the new name? How to return the drive letter? Open this window again and restore the previous name.
Why change the drive letter (partition) on a computer?
What is it for? To separate the system from other data. The operating system with accompanying data is located on drive “C”, and user files (music, videos, documents, etc.) are stored on another partition of the hard drive. This makes it easier to access the necessary data, due to a more understandable storage structure, and also in the event of an operating system failure.
After reinstalling the operating system, all information on drive “C” will be lost, and data on other drives will be saved.
I needed to change the drive letter to make Explorer more convenient to use. My computer has two hard drives. Windows was installed on the first hard drive (Local drives “C” and “D”) (drive “C”), and the operating system was installed on the second hard drive (now Local drive “E”), before upgrading the computer. The second hard drive is now used for data storage.
This hard drive was divided into two partitions (drives) “E” and “F”. Now I don't need to have multiple partitions on this hard drive because it is completely used for data storage only. So I combined the two sections into one ("E").
The drive letter “F” became free, and since the DVD drive had the drive letter “L,” then after connecting an external hard drive or USB flash drive, the external drive received the letter “F” and ended up in Explorer in front of the drive, which caused some inconvenience in perception. It’s more logical to do this: first the hard drives are displayed, then the drive, and then the connected drives. Therefore, I needed to assign a different letter to the drive (DVD drive).
You may also be interested in:
- How to hide a disk partition in Windows - 4 ways
- How to transfer Documents, Downloads, Desktop to another drive - 3 ways
In this image, the DVD RW drive has the drive letter "L" and I need to assign the drive letter "F" which is the next alphabetical drive letter after "E". An external hard drive under the letter “M” is permanently connected to my computer.
Attention! Do not change the drive letter on which the operating system is installed. Also keep in mind that programs will not work if they are installed on another drive (not the system one) after changing the letter of this drive.
Some useful tips
Finally, I will note a few nuances that you need to know:
- The first two methods are universal. They work for all OS: Windows 7, 8, 10 and even XP. So if you need to change the drive letter in Windows XP, choose one of the first two options.
- After renaming the partition, a warning message will appear indicating that some programs may no longer run. That is why it is strictly not recommended to touch the local drive C at all.
- After assigning a new letter, shortcuts that referenced that local section may not work correctly. Therefore, be sure to check their performance. And if something happens, create new shortcuts.
As a rule, the need to change the partition name appears only in one case - when you use an external HDD drive that is permanently connected to a computer or laptop. If you don't like the given name, you can change it. Similar steps can be done for a flash drive, but it is usually used only temporarily.
However, there is another situation when a name is not assigned to a new device. This usually applies to the same external HDD drives. In this case, you need to manually set the drive letter on Windows 10.8 and 7 using the method described above.
Windows 8
Despite the fact that Windows 8 is a slightly improved version of Windows 7, it does not have the familiar Start menu. To change the letter in Windows 8, you need to log in as an administrator.
This operating system has two types of interface:
- Standard desktop.
- Tiled.
Our task will be to launch the Control Panel, and then repeat the steps identical to Windows 7. In the tiled interface, you need to type the phrase “Control Panel” on the keyboard. When the user stops typing the test, the system automatically searches for the application. As a result, the desired menu will appear.
You can launch Control Panel using the desktop. You need to move the mouse to the lower right corner, and after a couple of seconds the side menu will open. Select "Settings" and then click "Control Panel".
After opening the “Control Panel” in any of the ways, follow the same steps as in Windows 7:
- "Administration".
- "Computer Management".
- "Disk Management".
- Change the letter or the required path to the disk.
- Selects a letter and confirms by clicking “OK”.
How to change the CD/DVD/Blu-Ray drive name
The optical drive has a system-recorded name when it is empty and displays the name of the inserted drive after the drive letter, if present in its properties or in the autorun file. Changing it using the methods described above will not work, but some manipulations are possible:
- Launch the registry editor (press Win+R, type regedit and press Enter).
- Navigate to the registry key HKEY_LOCAL_MACHINE\SOFTWARE\Microsoft\Windows\CurrentVersion\Explorer\DriveIcons\
- If there is a subkey in this section with a drive letter name, open it. If it is missing, create it (right click on DriveIcons - Create - Section).
- Inside this section, create a subkey called DefaultLabel and go to it.
- Double-click on the "Default" option and set the desired name.
- Done, the CD/DVD/Blu-Ray drive will now display this name.
The only caveat here: if in earlier versions of Windows the name was changed “before the letter”, now the same registry setting changes only the name displayed after the letter. But this can also be useful, especially if you have several disk drives.
An example of an inconvenient letter sequence
As an example, let’s take my laptop (I have it as a test laptop, especially for the IT lessons site).
Let's open my computer and see that the data partition has the letter E:, and the drive has the letter D: Agree, this is not logical, and therefore not convenient.
Inconvenient order of drive letters
Let's correct this misunderstanding: take the letter D: from the drive, and change the drive letter
E: to the letter D
:.
And the Disk Management
", which is already built into the Windows operating system.
REALIX.RU - IT, computers and everything else.
After installing the Windows 8 operating system on a new computer, I was not satisfied with the distribution of drive letters.
The system partition, as usual, was located on drive C, the DVD was on D, and the second HDD partition was accessible by the letter F.
This happened because the second partition of the hard drive was not partitioned when installing the operating system and a flash drive was inserted into the computer before it was partitioned.
I wanted to see the second partition of the hard drive under the letter D, and the DVD under the letter E.
In Windows 8, as in previous versions of Windows, you can assign letters C through Z to each drive on your computer. Letters A and B are typically assigned to floppy drives, but if your computer does not have floppy drives, you can assign drive letters A and B to volumes .
I must say that at the time of writing this note, I saw Windows 8 only a few times and then only briefly. Perhaps my actions are not the most optimal, but the result will be achieved. And here are my actions:
To perform the following steps, you must be logged in with administrator rights!
We need to get into Disk Management. There are several ways to do this. Simplest:
Move the mouse pointer to the lower left corner. Right-click and select Disk Management.
A more complicated method:
- Launch the Control Panel. If you don’t know how to open the Control Panel, then you should read the note: How to open the Control Panel in Windows 8.
- Select the Administration section
- further in the Administration section we find Computer Management
- In Computer Management, select Disk Management.
In the Disk Management section we can add or change the drive letter. To do this, right-click on the selected drive and in the context menu select Change drive letter or drive path...
A window appears in which you can see the assigned drive letter(s) and buttons.
Select the letter you want to change and press the button.
You are prompted to select a drive letter. If a letter is currently occupied, it will not be in the selection list.
We confirm the choice and agree with the warning.
I first changed the DVD letter from D to E, because... at that moment (the flash drive was removed) the letter E was free, and then I changed the letter of the second partition of the hard drive from F to D
This completes the disk renaming.
We recommend reading:
How to change the drive letter?
Many users do not like the way the operating system named the disk or drives and want to change the letter. The procedure for changing the drive letter can be done without any special programs.
This can be done using the Windows operating system.
This procedure can be performed through the disk control panel.
As always, I will try to describe this procedure in more detail in the order of all actions. All steps will be shown using Windows 8 as an example, but this is still acceptable for Windows 8, 8.1 and 10.
First, we need to go to the Disk Control Panel, this article describes how to open the Disk Control Panel in two ways, here I will describe the third.
In the lower left corner, move the mouse cursor over the “start” button, the windows icon, right-click, in the menu that opens, select “Control Panel” and left-click on it.
The control panel will open. If you entered it for the first time, then for convenience you need to make the display more understandable, select small icons in the upper right corner instead of categories.
The control panel will look like this.
Select “Administration”
Double-click on “computer management”
Select “Disk Management” Right-click on the drive for which you want to change the letter. In the menu that opens, select “Change drive letter...”
In the window that opens, click “change”, then “OK”.
In the next window that opens, select a new drive letter and click “OK”
In the warning that appears, click “Yes”
How to launch Disk Management?
First we need the Computer Management
" There are two ways to open it.
The first method is the easiest:
Right- click on the My Computer- Select " Management
".
Let's launch Computer Management
Second way:
- Click the “ Start
” menu; - Open " Control Panel
"; - Change the view mode from " Category
" to "
Large Icons
" or "
Small Icons
" (not required in Windows XP); - Go to the “ Administration
” section; - Launch the Computer Management
.
When Computer Management
” will start,
on the left side we will find the “Disk Management” tab
and click on it with the left mouse button.
Disk Management in Computer Management
There is much more interesting in the Computer Management program, but we will deal with this in future IT lessons. Subscribe to the site's news so you don't miss it, and let's move on.