All modern smartphones, tablets and other devices are equipped with Google services and applications. To gain access to all services at once, the user must create a Google account. Also, the registered account is the main one on all gadgets running on Android.
In this article I will tell you how to create a new Google account on your computer and phone, how to set it up, connect and synchronize with Android and iOS devices
Google account - why create and what it is needed for
So, what do we get by becoming a registered Google user:
- Access to a huge store of applications, games and programs - Google Play. It was created specifically for devices running Android OS. There are more than a million different applications here. In the Google Market you can find programs for every taste for work, education and entertainment. They are paid and free.
- All Google services are interconnected. Passwords and bookmarks saved on your PC's Google Chrome are automatically synced with your smartphone's mobile browser. And knowing that security is a priority for the company, you don’t have to worry about the safety of your data. For work, the cloud services Google Disk and Google Docs, as well as the aforementioned Gmail, will be useful. Therefore, with a Google account, you will always have access to mail, documents and files.
- Youtube video hosting, if you have a Google account, allows you to watch, publish and broadcast videos online for your own audience. Social the Google+ network and the Hangouts service will provide the opportunity to communicate with your friends and acquaintances. In fact, you identify your smartphone.
- The use of Google Maps on mobile devices suggests itself. Having a Google account will keep all your movements in sync. They can be saved and viewed at any time on your computer. And if you lose your device, you can determine its location, or, in extreme cases, even block access to your account on the lost smartphone.
As you can see, Google account owners have a lot of advantages. And if you change your device or log into your account from a new device, then after authorizing your Google account and synchronizing the data, you will again receive a fully customized smartphone.
Windows Phone account
The owner of a smartphone running on the Windows operating system can use a lot of functions, but only if he has an authorized Microsoft account. To create it, you first need to understand what exactly your personal account gives the user.
Why do you need an account on a Windows phone?
To enjoy all the benefits of your smartphone, you must activate your Microsoft account. As a result, the user has the following options:
- software and application store;
- cloud storage service;
- Xbox, Xbox Music;
- phone search.
If the phone was purchased in a store, and you have already repeatedly downloaded programs from the application collection, then the recording has already been activated.
How to create an account on Windows Phone
There are two options for creating an account for phones that cooperate with Microsoft. Each of them is convenient and practical in its own way. For example, on a smartphone with a small screen, it is inconvenient to enter data, so the owner of the phone resorts to using a PC, so we’ll start with it.
Account activation via computer:
- Go to the account login page. We open it as standard, through a browser.
- In the “Create” field, enter an existing phone number.
- Create a password and enter it in the field. Then click the “Next” button.
- Enter the confirmation code in the appropriate field and click the “Next” button.
Here you can set up a user profile, add a photo and take advantage of additional features available for Windows.
How to Create a New Google Account on Your Android Phone
To create a new Google account on your Android smartphone, follow these steps:
- Open the Settings app. Scroll down to Accounts. Click add account.
- Click Create an account.
- Enter the name associated with the account. Although you do not need to use your real name, if this will be your main account, it is recommended that you use your real name.
- Click Next.
- Enter the date of birth associated with the account. Google requires all account users to be at least 13 years old, and in some countries the age requirements are even higher, and in order to have an account that can use Google Pay or a credit card to pay for anything, the account holder must be 18 years.
- Select gender. If you do not want to be identified by gender, you can choose to opt out.
- Click Next.
- Enter your username. This username will become your Gmail address and how you log into your account. If your desired username is taken, you will be asked to choose another and given suggestions.
- Click Next.
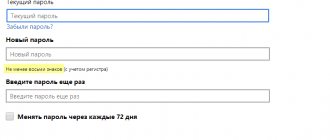
- Enter a new password for your account. The password must be at least eight characters, but luckily it doesn't have to have a number or special character if you want to stick to plain old letters.
- Re-enter the new password in the Confirm Password field. You will be told how strong or weak the password you have chosen is.
- You will be asked if you want to add a phone number. This phone number can be used to verify your identity, log into your account, and help people find you if they have your phone number. Click Yes, I'm in to add your number or Skip to refuse it.
- Google will present its terms of use. After scrolling and reading the sections that interest you, click I agree.
- Your primary Google account is now set up and your username and password length will be shown. Click Next to exit this screen.
Video: Creating and setting up a new Google account on an Android smartphone
Solving possible problems during registration
Registering a new Google account is not always successful. There are a number of factors that cause creation errors. Let's look at the popular ones:
- Using the same phone number for two accounts is the most common problem. Google has no restrictions on the number of profiles you can create, but they must be linked to different numbers. If the number is already in use, you will receive a warning during registration.
- Problems with the email address. Often, when registering, a notification appears indicating that the “Username” you selected is already taken. However, sometimes accounts with addresses may have already been deleted, or problems may arise on the server, due to which the notification is not shown, but at the same time it is not possible to complete account creation. Then we advise you to simply change the address.
- Connection via VPN. Google services always use technology to determine the user's location. This is necessary primarily for safety. If you use a VPN or Proxy when registering, we strongly recommend that you disable the virtual network while creating your account. This will help avoid unexpected difficulties.
Immediately after completing registration, you can proceed to using branded services from Google. Read more about them in other materials on our website.
Do you have any questions? Write in the comments and we will definitely help.
How to create a new account on a laptop and synchronize with an Android smartphone
To create a new Google account on your laptop and link it to your Android smartphone, do the following:
- Go to Google's registration page in your preferred web browser.
- Enter the name, username and password you want to use for your account. Keep in mind that your username will become your Gmail address, so choose something you're willing to type or write out a lot.
- Repeat your password in the Confirm Password field. This will help you avoid typing the password and lock your new account.
- Click Next.
- If your first username choice was selected, the username field will turn red. Enter a different username in the text box or select one of the options below the username field.
- Click Next.
- Enter your date of birth and gender. Google requires all account users to be at least 13 years old, and some countries have even higher age requirements, and in order to have an account that can use Google Pay or a credit card to pay for anything, the account holder must be 18 years old.
- If you wish, enter a phone number and/or recovery email address. They can be used to verify your identity or to log into your account if you have forgotten your password, but they are not required.
- Click Next.
- Google will provide terms and privacy policies for your account. Once you've read everything, click I agree .
Video: Lesson - creating a Google account on a laptop
Two-step authentication when logging into your account
By default this very important setting will be disabled. To activate it, you need to go to the “Login to Google Account” from the left menu (or a similar item from the main settings page - see the screenshot above):
After clicking the arrow in the “Two-Step Verification” area, you will be shown the arguments in favor, and to continue you will need to click on the “ Get Started ” button.
In the first step, you will need to indicate the cell phone number to which SMS or voice messages (of your choice) will be sent with confirmation codes to log into your Google account.
Enter the code received on your phone:
After entering it, you will be congratulated and offered to finally enable this very two-step authentication to log into your Google account:
After this, a page will open in front of you with endless possibilities for expanding and deepening the security of working with your Google account.
- I strongly advise you to add another phone in this window, so that if the first one is lost or stolen, the security codes can be sent to the backup one.
- Instead of receiving voice or SMS messages, you can install a special application for these needs on your smartphone running Android, iOS or Blackbury. Or use a token. But this is more convenient for everyone. These settings are hidden under a spoiler “Set up the second stage”:
- Be sure to use the link “Show backup codes” , of which there will be ten (it would be nice to print them out on a printer so you can always keep them at hand). If you forget your phone or it won’t pick up the network, you can enter these codes instead of those that come in SMS messages.
In general, there are some difficulties with activating two-step authentication, but overall it is certainly worth it.
How to Create a New Google Account on iPhone
To create a new Google account on iPhone, follow these step-by-step instructions:
- Open your Settings Titled Image You'll usually find this icon on your Home screen.
Click Accounts & Passwords. A list of all accounts on your iPhone or iPad will appear.- Click Add account. It's at the bottom of the menu.
- Click Google. The Google login screen appears.
- Enter your Google account email address and click Next.
- If you want to create a new Gmail address, click "Create an account" and then follow the on-screen instructions provided by Google.
- Enter your password and click NEXT.
- Choose which items to sync. You can sync your email, contacts, calendars, and notes to your iPhone or iPad.
- To sync an item, set the appropriate switch to the On position.
- To turn off synchronization for an item, set the appropriate switch to the Off position.
- Click Save. It's in the top right corner of the screen. Your Google account is now added to your iPhone or iPad.
Is a new account always needed?
Now a reasonable question arises: why create a second account if the first one already provides access to all the necessary resources. Yes, this is true, and the need for additional accounts can be useful in the following cases:
- You have completely ruined your profile. Your mail and disk are bursting with spam, and advertising recommendations are confusing and scary. This can be fixed by changing the settings, but this is a rather long process. After creating a new profile, it is better to delete the old one.
- You want to separate your work and personal space so that your work Google Drive contains only reports and contracts, and your personal Google Drive contains vacation photos. In this case, two accounts is simply a necessity, which many companies are inclined to do.
And that's all, thanks for reading.
How to add an existing Google account to iPhone - step-by-step instructions
- To add an existing Google account on a device running the IOC operating system, follow these steps:
- Open Gmail on your iPhone or iPad. This is a red and white envelope icon that is usually found on the home screen.
- Click ≡ in the top left corner of the screen. The icon opens the menu.
- Click the down arrow next to your name. The list of options will expand.
- Click Account Management. Your Gmail accounts will appear.
- Click Add account. This is under your current Gmail account.
- Click Google. It's at the top of the list. A confirmation message appears.
- Click Continue
- Enter your Gmail address and click Next. Use the Gmail address you want to add to Gmail, not the one you're already signed in to.
- If you want to create a new Gmail address, click Create Account, and then follow the on-screen instructions provided by Google
- Enter your password and click NEXT. This will take you back to your list of Gmail accounts, which now includes the new account.
- Click Finish. It's in the top left corner of the screen.
Brief summary
Google account is a virtual space that is very convenient and easy to use. You can access the service from any device – smartphone, tablet or computer. In many modern phones, turning on and starting work begins with entering your Gmail username and password, since by logging into your personal account you can use an application such as Play Market on Android.
Many users who are not familiar with the operating features of this system have difficulties. They either can't create an account the first time, or they can't log into an existing account. In this case, you can find answers to your questions on the Internet. We have selected for you the most useful and relevant information on this matter. With its help, you can easily log into your account on Jimail to take full advantage of the capabilities of this service.
Errors and solutions
Now it's time to talk about the errors that users encounter when creating and syncing a Google account. Let's look at the most common of them:
How to fix Gmail sync error?
If your Gmail app doesn't sync automatically, you may notice the following issues:
- Can't send mail or mail is stuck sending
- I'm not receiving new mail
- I can't open or read mail
- Error "Account is not synchronized"
- Gmail app is very slow
To fix these problems follow these steps:
- Update your Gmail app. To get the latest fixes for problems sending or receiving mail, update your Gmail app.
- Reboot your device. Check your settings: (Check if you're online, turn off airplane mode, check your Gmail sync settings, check your phone or tablet settings)
- Clear storage
- Clear Gmail data.
Gmail won't load (browser only)
If you're logging into Gmail through a web browser and the web page isn't loading for you, there are a few things you need to try to get things working again. First, you must ensure that you are using a supported web browser. You can find a list of supported web browsers on Google's help site. It's fair to say that most modern web browsers will work, but I'm afraid Opera users will be out of luck.
Often, browser extensions or apps can also interfere with Gmail. A quick way to test this is to try out Gmail in your web browser's private or incognito mode. If Gmail works there, try disabling browser extensions one at a time until you find the culprit.
Sometimes cookies or temporary files can also break Gmail. The same test - using incognito mode - is a quick way to check this behavior. If Gmail is running in incognito mode but disabling extensions didn't help, clearing your cache and cookies should help.
Finally, you can try disabling any Google Labs you have. The easiest way to do this is to visit this site. This will automatically disable any labs you are using so you can test the Gmail client without them. If it works, try disabling all labs again and enabling them one by one. If Gmail isn't working again, you have the culprit.
Setting up payment information in Google
If you plan to not only install free applications, but also buy something on Google Play, then you need to set up payment information.
- Select how you will pay: funds from the Pay Pal payment system or a bank card and check the appropriate “Add...” item.
- For Pay Pal, enter your username and password for your account in this payment system.
- To pay with a card, please indicate its number, expiration date, cvv code and postal address.
That's it, your account has been created, you will be logged in automatically, and you can install applications.