When designing a Word document, users wonder how to flip text in Word, for example, if you need to flip the text vertically, or at a certain angle. There are several ways to do this.
The word processor Word, included in the Microsoft Office suite of programs, has powerful functionality for document design in accordance with various requirements.
MS Word has a variety of functions for changing the arrangement of text in a document, including rotating text in different positions. The user only has to choose the most suitable option to complete the job.
We need to rotate the text in Word from its usual horizontal position to another position at a certain angle. For example, text must be positioned vertically in a document, or at a certain degree, or arbitrarily, as chosen by the user, with a different inclination from the horizontal.
In this article, you will find instructions on how to rotate text in Word in different ways: rotating text in a table or using a table, rotating text in a shape in different ways, rotating text in SmartArt graphics.
How to reverse text in a Word table - 1st method
First, let's look at how to flip text in a table or using a table. In this method, we will create a table cell, type text in the cell, rotate the text in the desired direction, and then remove the table borders. If you rotate text in the table itself, you should not remove the borders in the table.
- Go to the "Insert" menu, select "Table".
- Select a cell from the proposed table, or several cells if you are creating a table that will have upside down text in its cells.
- Write the desired text inside the cell.
- Select the text in the cell, right-click inside the cell.
- In the context menu, select “Text Direction...”.
In the Text Directions - Table Cell window, there are three orientation types to choose from. Using the built-in setting, you can flip the text 90 degrees and 270 degrees.
- Select the appropriate text orientation and click on the “OK” button.
The text changes its position in a table cell.
If you are not creating a table, then you need to remove the table borders:
- Move the mouse cursor to the upper left edge of the table, in the menu window that opens, click on the triangle next to the “Border” element.
- In the context menu, click on the “No border” item.
The text will appear upside down without borders in your Word document.
A universal method for different versions of Word 2003 – 2016
Some programs built into Microsoft do not change their configurations for a long time. But not Word. Buttons move, their names change, some are grouped, some disappear. You won't be able to figure it out right away. Well, at least there are fewer problems associated with the fact that one version does not open a document from another version.
But now we’re not talking about that, but about editing, or more precisely about how to rotate text in Word by 45 degrees or in any other direction.
First, let's take the method used in Word 2007:
- Insert section.
- Inscription - draw.
- Select an area of the desired size in the document.
- Make an inscription.
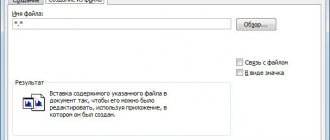
- Format – Direction (Figure 2).
- The required value is set.
Here you can rotate not only by set degrees, but also arbitrarily, by rotating the area itself
The universal method for MS Word 2010 is no different from what works in Word 2016 and Word 2013. Since they already have a lot of functions, they did not make any special one for rotating inscriptions, since not such a large number of users need it. Therefore, only the method with a header or table will work, which will be discussed in more detail later.
Figure 2. Setting the text direction in Word
How to flip text in Word using an inscription - method 2
When working in the program, the user will be able to flip the text in any way with any inclination, at his discretion.
- Go to the "Insert" menu, click on "Shapes".
- From the proposed options, select the “Inscription” element.
- Select the text field anywhere in the MS Word document, and write the desired text inside. If necessary, it is possible to change the markup parameters.
- Move the mouse cursor to the round arrow, click on the left mouse button, and use the mouse to rotate the inscription to the desired arbitrary position.
- Go to the “Shape” menu, click on the “Shape Outline” button.
- In the menu that opens, check the “No outline” box.
The outline around the piece of text will disappear.
Using a caption
There are several options for how to rotate text vertically in Word. The simplest is to use an inscription. To insert an element into a document, you need to select the “Insert” menu in the quick access panel, where you will find the “Inscription” item. After entering text inside the established area, all that remains is to rotate the text - this can be done in two ways.
The first is to rotate the inscription area itself - after selecting the text, a green dot responsible for rotation will appear above the element. By holding the left mouse button on it, you can achieve any angle of text rotation.
The second way to rotate text vertically using an inscription in Word is to use the “Text Direction” function. Having selected the text, you need to go to the “Format” tab on the quick access panel in the drawing tools, and in the “Text” section, click on the “Text Direction” button. In the pop-up list that appears, all you have to do is select the required rotation angle, and the text will take a vertical position.
One of the main advantages of using an inscription is the wider possibilities when choosing the angle of rotation of the text. Other methods for changing the direction of text can only change direction in three different directions.
How to flip text vertically in Word using an inscription in a shape - method 3
If you need to flip text vertically, the office editor has built-in settings for doing this job according to certain values set in the program by default.
In Microsoft Word, do the following:
- From the Insert menu, click on the Shapes button.
- In the menu that opens, select “Inscription”.
- Create a custom caption field and then write text inside.
- Open the “Format” menu, in the “Text direction” option, select the appropriate option for rotating the Word text in a given direction: “Rotate 90°” or “Rotate 270°”.
- Click on the “Shape Outline” button, select the “No Outline” option.
Using tables
Now let's try to master rotating text through a table. To do this, you will need to follow these steps:
- Go to the Insert tab.
- Click on Tables.
- If the data already exists, then you need to click the button to draw the table. If not, select the required number of cells and columns in the table.
- Italics is set in the middle of the cell where the inscription is made.
- The Work with Tables tab will appear at the top, which you need to go to.
- Select Layout – Direction.
By clicking on this button, you can make it vertical, adjust the reflection and many other types of arrangement. To the left of the Direction button, there are six additional settings that expand the ability to reverse text in Word.
How to turn text upside down in Word - method 4
In some situations, you may need to rotate the text 180 degrees, or some other specified degree value. This can be done using the shape label function.
- Open the "Insert" menu, click on "Shapes".
- Select the Caption item.
- Create a text box and enter text inside the shape.
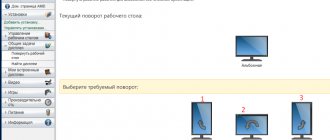
- Open the “Layout” tab, click on the “Rotate” option.
- Select one of the standard settings: “Rotate right 90°”, “Rotate left 90°”, “Flip top to bottom”, “Flip left to right”, or click on “More rotation options...”.
The Flip Top to Bottom option will flip the text 180 degrees.
- To select the required rotation angle, click on the “Other rotation parameters...” item.
- In the “Layout” window, in the “Size” tab, in the “Rotation” parameter, select the desired degree of rotation of the shape with text. Here you can select a rotation of 180 degrees or any other arbitrary value.
- Go to the “Format” menu, click on the “Shape Outline” button.
- In the open menu, check the box next to “No outline”.
Rules for formatting text inside “Inscription” and “Table”
Within added objects, data can be formatted in the same way as on the page. In the table, the position can be changed using the “Alignment” menu in the “Layout” tab, and the color and style of letters on “Home” in the standard way - select, select the desired size, color and font in the “Font” block.
When working with an inscription, you need to go to “Drawing Tools” and use the “Align Text” menu. Change the color, size and font to “Home”.
Method 4 – Rotate the line
If you just want to turn the line upside down rather than rotating the text at any angle, you can use a shape again.
Follow the instructions:
- Select the shape with the text entered and go to the “Layout” tab of the program;
- Next, select the “Size” field and enter the degree of rotation in the “Rotation” line. To make the line appear upside down, you need to set it to 180 degrees;
- To remove the outline of a text field, right-click on the shape and click on “Format Shape” - “Remove Outline”.
As a result, the text will be displayed as shown below. You can write text next to an existing block
All of the steps described above can be applied to WordArt style objects.
Let us remind you that WordArt is a mode for creating stylized inscriptions, which can be configured through the “Insert” tab of the program.
Printing mirror text
If you have a ready-made Word text document and need to print it in such a way that the text appears mirrored on the sheet, this can be done without editing the pages in the program.
All you need to do is change the print settings.
Open the “File” menu item and click on “Print”.
In the new window, find the Print Settings add-on and check the Mirror Margins box.
Bottom line
All methods for rotating text described in this article will work in any version of MS Word.
Only the location of the application tabs may differ. Please note that in order for the body and inverted text to look normal, you need to remove the line spacing between paragraphs and the table or between paragraphs and the figure.
Otherwise, the space between these objects will be too noticeable.
If there is a formula among the text that needs to be reversed, you should only use the table method.
Often the block method does not work for complex multi-story formulas and special characters.
Thematic videos:
« Previous entry