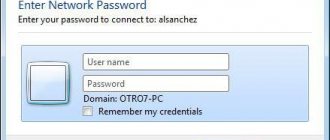
The act of naming things is a characteristic human trait. It helps us easily categorize, symbolize, describe and refer to things, and that's why you'll find names for almost everything you can see around you, and yes, that includes your PC.
Just as you would want to know the name of the person you are talking to, knowing your computer's name is important when connecting to a network so that you can establish correct identification when communicating with other computers.
But how to find it? Well, here are all the ways you can find your computer name and change it if you need to customize it further.
First way
- Left-click on Start, then on Settings.
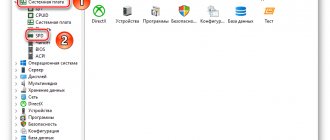
- You will see this screen. Click on “System.” Screen, notifications, application, power.”
- Further down, on the left you need to click on “About the system”.
- To get acquainted with all the specified characteristics of the computer, you will have to scroll down a little.
You can change the computer name
- Click “Next” and you will be prompted to restart your computer. When you do this, the changes will take effect.
How to find out your Windows 10 account password?
You need to go to the Microsoft page from any computer, enter your account
and click “Next”;
2. Click on “Forgot your password
”; 3.
Interesting materials:
How to remove a card from Google play market? How to remove a card from iTunes? How to remove a card from mobile banking? How to remove a card from Payment and Delivery? How to remove a card from Xbox One? How to remove a card from the Brawl Stars game? How to remove a card from Instagram? How to delete a card in PUBG Mobile? How to remove carousel on Xiaomi? How to delete a directory in Kali Linux?
Second way
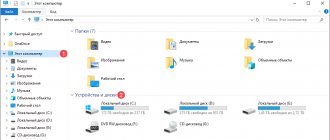
- Go to Explorer.
- Hover over "This PC" and right-click.
- Click on "Properties"
Hello dear site visitor! In this simple and step-by-step lesson, I will tell you how to find out the name of a Windows 10 computer, the lesson is very simple and is designed for every novice user of the Windows 10 operating system.
To see the name of your Windows 10 computer, you will need to move your mouse cursor over the start button on the Windows desktop and press the left mouse button once, after which the Windows menu will open, where you will need to select “Options”.
After you select “Settings”, a window with the Computer Control Panel will open on your computer. You can also press the Win+I keys to quickly open PC settings. Now, we can see the name of our computer; to do this, move the mouse cursor over the “System Screen, notifications, applications” button and press the left mouse button once. For speed and convenience in Windows 10, you can use Windows 10 hotkeys - see the instructions for Windows 10 hotkeys.
Next, the “System” window will open, where you will need to left-click on the “About system” item, after which on the right side in the “Computer name” line you will see the name of your computer. This is how you can find out the computer name in Windows 10.
Finding out Windows 7 usernames / Sandbox / Habrahabr
There is a bug in Windows 7 that allows you to remotely find out usernames on a peer-to-peer (home) network.
There is no talk here about corporate networks, although it does exist. Beginning players often want to make fun of their neighbors in the hallway or even in their house, find out their secrets and then perhaps even manipulate them for their own purposes. Typically, the provider connects the entrance or house into a home network. Users can use it to share files (shared resources), organize online games, and communicate without access to the Internet. Currently, the practice of connecting subscribers directly to the Internet is becoming increasingly common, that is, when the computer is turned on, the user will already be connected to the Internet. With this type of connection, the home network disappears, thereby increasing the security of subscribers; it is also worth noting that interest in the home network has noticeably dropped and for most, turning it off is not considered critical, the main thing is the Internet. The speed and quality of the Internet also increases. But since not everyone has a direct connection, this topic remains relevant. In a networked environment, a direct connection looks like a connection to a local network; it does not require additional user actions to connect to the Internet, just a switched on computer and a network cable inserted into it. Using an additional connection implies the need for the user to connect to the Internet using an additionally configured network connection: The vulnerability that we will talk about is that, remotely, we can find out user names. And then carry out a brute force attack (password guessing), thereby gaining control over the system. You can also find out passwords on a local network by intercepting password hashes using an ARP-poisoning attack. One has only to add that this vulnerability has been known for a long time, but has not been completely fixed. It consists of obtaining the user's SID and further enumerating the RID values. At one time, it was possible to obtain user identifiers by creating a so-called anonymous connection (authorization with an empty name and password), but Microsoft corrected this vulnerability by adding an option to prohibit broadcasting SIDs to anonymous users in local security policies. But it is still possible to obtain identifiers during guest or user authorization. I'll demonstrate how to do this using Cain & Abel. For a successful attack, the PC must be allowed guest access and the guest account must be activated (this can be determined by the presence of at least one shared folder) or classic access must be enabled and the name and password of one of the users is known. On the “Network” tab we find the PCs of interest. We connect, go to the “Users” tab, in the first request we will be denied access (available with administrator rights), in the second (it is done automatically) the program will launch SID Scanner, scan the range of RID values (by default from 500 to 2000), relay received identifiers into usernames.
In this program, names in Latin are displayed incorrectly.
This method allows you to find out user names exclusively in Windows 7 of all editions; it could not be reproduced with Vista and XP; it was not tested with server versions. But there remains a possibility that this method will also work with windows 2008, 2008 R2, as well as windows 8, due to a similar sharing system.
It is worth mentioning that there are many programs that perform similar functions.
netbios, network inventory, local network, hacking, smb, accounts
habrahabr.ru
Find out the name of the PC on the network
We will look at both system tools available by default in each version of Windows, and a special program.
Method 1: Special software
There are many programs that allow you to find out the name and other information about computers connected to the same local network. We will look at MyLanViewer - software that allows you to scan network connections.
- Download, install and run the program. You can use it for free only for 15 days.
A list of addresses will be presented. In the “Your Computer” line, click on the plus sign icon.
The name you need is located in the “Host Name” block.
If you wish, you can independently explore other features of the program.
Method 2: "Command Line"
You can find out the name of a computer on the network using the Command Line. This method will allow you to calculate not only the name of the PC, but also other information, such as an identifier or IP address.
- From the Start menu, open Command Prompt or Windows PowerShell.
After the username, add the following command and press Enter.
In one of the “Local Area Connection” blocks, find and copy the “IPv4 address” value.
Now enter the following command into the empty line and add the copied IP address separated by a space.
You will be presented with the name of the computer on the local network.
You can find out more information by using the command below and adding the IP address of the desired PC on the network after it.
The necessary information is located in the “Table of NetBIOS names of remote computers” block.
If you need to find out the name of your PC on the network, you can limit yourself to a special command.
If you have any questions about this method, please contact us in the comments.
Method 3: Change the name
The simplest method for calculating the name is to view the computer's properties. To do this, right-click on the “Start” button and select “System” from the list.
After opening the “System” window, the information you need will be presented in the “Full name” line.
Here you can find out other information about your computer, and edit it if necessary.
Description of the NET USER command
The NET USER command is used to add, edit, or view user accounts on computers. When you run the command in the Command Prompt without parameters, a list of Windows user accounts present on the computer is displayed (this command also works well in Windows 10). User account information is stored in the Windows database.
NET USER Command Syntax
net user [username [password | *] [parameters]] [/domain]
net user username /add [options] [/domain]
net user username [/delete] [/domain] , where
- username - Specifies the name of the user account that can be added, deleted, edited, or viewed. The name can be up to 20 characters long.
- password — Assigns or changes the user's password. Enter an asterisk (*) to display a password prompt. When entering from the keyboard, the password characters are not displayed on the screen.
- /domain - Performs an operation on the controller of the main domain for this computer.
- options - Specifies a command line option for the command.
- net help command - Displays help for the specified net command.
- /delete - Delete a user account.
New video: NET USER - managing user accounts in cmd Windows
Additional NET USER Command Options
- /active: - Activates or deactivates an account. If the account is not activated, the user cannot access the server. By default, the account is activated.
- /comment:"text" - Allows you to add a description of the user account (maximum 48 characters). The description text is enclosed in quotation marks.
- /countrycode: nnn - Uses the country code specified for the operating system to implement the appropriate language files when displaying user help and error messages. A value of 0 is the default country code.
- /expires: — Account expiration date. The never value corresponds to an unlimited validity period. The date is specified in mm/dd/yy or dd/mm/yy format depending on the country code. The month can be indicated in numbers, in full or in abbreviated form (three letters). The year can be indicated with two or four digits. Date elements are separated by slashes (/) with no spaces.
- /fullname: "name" - The user's full name (as opposed to the user account name). The name is indicated in quotation marks.
- /homedir: path - Specifies the path to the user's home directory. The specified location must exist.
- /passwordchg: - Indicates whether the user can change their password (default can).
- /passwordreq: - Specifies whether the user account should have a password (default should).
- /profilepath[:path] - Specifies the path to the user's login profile.
- /scriptpath:path - Path to the script used by the user to login.
- /times: — Time to log in. The time parameter is specified in the format day[-day][,day[-day]],hour [-hour][,hour [-hour]], with an increment of 1 hour. The names of the days of the week can be indicated in full or in abbreviated form. Hours can be specified in 12- or 24-hour notation. For the 12-hour view, the notation is am, pm, am, or pm. All indicates no restrictions on login times, and empty indicates no logins allowed at all. Days of the week and time values are separated by a comma; Multiple entries for day of week and time values are separated by semicolons.
- /usercomment:"text" - Allows the administrator to add or edit a comment for the account.
- /workstations: - Allows you to specify up to 8 computers from which the user can log into the network. If the /workstations parameter is not specified with a list of computers or is specified as *, the user can log on to the network from any computer.
NET USER Command Examples
- To display a list of all users of this computer, use the command: net user;
- To display information about the user “petr” use the following command: net user petr;
- To add a Petr user account with a full user name and the right to connect from 8 a.m. to 5 p.m. Monday through Friday, use the following command: net user petr /add /times:Mon-Fri,08:00-17:00/fullname:" Peter."
- To delete an account, you must enter the command: net user petr /delete ;
- To disable an account, you must enter the command: net user petr /active:no .
Conclusion
Changing the computer name is an operation that requires a system restart. So, for any of the methods mentioned in this article to work, you need to restart your computer.
The screenshot below was taken after restarting the computer. Here you can see that my computer name has changed from TechieWriter to theGeekPage.
That's all. I hope the article was useful to you. Please tell us which method you used.
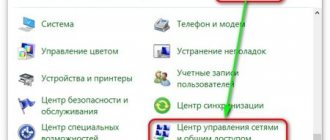
Control Panel
Only suitable for situations where you have administrator privileges. It has the same drawback as the previous method - the current account is not indicated in the list in any way.
1. Launch Control Panel (via the search bar, for example).
2. Switch the view of its elements to “Large icons”.
4. Click “Manage another account” (administrator rights are required to perform this action).
Command line
This indispensable tool can do anything without exception if you know how to use it.
2. Once launched, enter and execute the command “net user”.
The result will be a list of accounts created in the current OS. In some cases, this is enough, but this method does not always allow you to find out the name of the active account.