The “Guided Access” system function is not known to all advanced iPhone users, and beginners have no idea that such a useful operating mode exists in a smartphone. The function was presented back in 2012 as part of the WWDC presentation, when Apple announced iOS 6, and has successfully migrated to all new generations of the operating system. In our guide, we will introduce you to this tool in detail so that you can use it at the first appropriate situation.
How to enable or disable Guided Access on iPhone
The “Guided Access” system function is not known to all advanced iPhone users, and beginners have no idea that such a useful operating mode exists in a smartphone.
The function was presented back in 2012 as part of the WWDC presentation, when Apple announced iOS 6, and has successfully migrated to all new generations of the operating system. In our guide, we will introduce you to this tool in detail so that you can use it at the first appropriate situation. From the article you will learn
Purpose
Guided Access prevents the user from stepping outside of the running app and additionally allows the user to disable a specific portion of the iPad's touchscreen. This action does not in any way affect the output of text, graphics or video - only the system’s reaction to touching any point in the selected area of the screen is canceled . The function that allows you to take a screenshot (screenshot) is also disabled. There is an additional option to disable buttons, but this will be discussed below.
What is it for? Firstly, you can safely give your mobile device to friends, colleagues or clients, having previously blocked them within the running application, and not worry about the confidentiality of your data. Secondly, this is a great opportunity to leave your child with a game or cartoon. At the same time, you don’t have to worry that your beloved child will accidentally mess up the settings, delete something they need, or, even worse, end up on an adult site or “facilitate” their parent’s credit card.
What is it and what is it for?
Many of us are familiar with the situation when a friend or work colleague asks for your iPhone for some purpose, for example, to make a call, and he himself begins to read correspondence, look at photos, and so on. To prevent such interference in privacy, you must use Guided Access.
This is a special operating mode of a smartphone that provides access to only one specific application or tool. As a result, you block access to all iPhone functionality except what is necessary for a specific action. For example, by activating “Guided Access” on the dialing screen, you “fix” this functionality, and another person simply will not be able to leave here, go to another application, lock the smartphone, and so on. That is, only the dialing mode for making a call will be available.
The benefits of the tool are undeniable:
- For a curious friend or colleague, you can limit the ability to use your smartphone, and if desired, he will not be able to see certain of your personal data;
- For a child, you can “pin” only one game to the iPhone screen, for example. This way, he won't be able to accidentally call or do anything else.
Activating the function
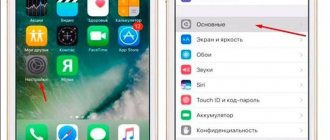
To start using this operating mode, you need to activate it in iOS “Settings”:
- Go to the "General" section and select "Accessibility".
- Next, in the list of available settings, click “Guided Access”.
- In the window that opens, you can enable the function and also set your password code to disconnect the session. Be sure to remember the password you set, as you may become a hostage to your security system. You can also use Touch ID or Face ID.
How to lock the screen from clicks on iPhone on YouTube?
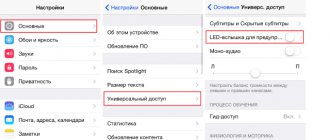
Go to:
- Settings
- Basic
- Universal access
- Guided access
- Move the slider to the “Enable” position
- Set a password
Oct 22
2022 Interesting materials:
How to keep watermelon cold until winter? How to store garlic for seeds? How to store dahlias after digging in the cellar? How to store gladioli in the basement? How to store Interferon in ampoules? How to store cabbage underground? How to store a started watermelon? How to store peeled garlic at home? How to store peeled garlic in oil? How to store workwear?
Ending a Guided Access session
Depending on what blocking parameters you set when setting up the function, there are 2 ways to disable the mode.
If using TouchID or Face ID:
- Press the Home button or Side key twice.
- Scan your fingerprint or face to complete the job.
If using a passcode:
- Press the Home or Side button 3 times.
- The system will ask you to enter the previously specified password when setting up Guided Access.
- Once entered, the function will be disabled. You will be able to use your iPhone as usual with access to all software and functionality.
Source
Why do you need to urgently unlock your iPhone using methods that really work?
We won’t talk about cases when someone else’s phone fell into your hands. In this case, it is still better to return it to the owner. But still atypical situations may arise:
The Face ID function has stopped working (the scanner is broken and does not respond). Yes, the situation is not the most common, but it happens.
The fingerprint scanner is broken, the settings are lost,
You thought while you turned the phone in your hands and spent ten attempts to scan your fingerprint,
You only used a password, but cannot remember it and recovery attempts have been exhausted,
The phone fell into the hands of a child who entered the information incorrectly 10 times, and now the gadget is blocked,
The child set the password while playing and does not remember it.
You bought a gadget secondhand and did not check whether it is ready to work with you. In this case, you should not only recover your password, but first make sure that your gadget is not listed as stolen. This can be done by entering the serial number on the Apple website: the device must have a Clean status. Although, if this is not the case, we generally do not recommend that you pay money for such a dubious purchase.
You bought a device secondhand, but the previous owner did not unactivate the device in iCloud.
Guide access iphone forgot password how to disable
If you forgot your password or if a message appears that your device is disabled, what should you do?
If you enter the wrong password too many times, you will see a message that your device is disabled. If you can't remember your password, you'll need to wipe your device, which deletes all your data and settings, including your password. If you didn't make a backup before you forgot your password, there is no way to save the data on your device. Follow the instructions below to remove your password.
What is Apple ID two-factor authentication
We often criticize Apple for disclosing personal data, but we ourselves are in a hurry to protect it at least from hacking. Two-factor authentication protects your Apple ID account, where all your data and backups are stored. Turn it on so that an attacker cannot get into iCloud without your trusted device, even with your account password.
Two-factor authentication will prevent attackers from using your iPhone even with a stolen password
- Go to Settings;
- At the top, click on your name;
- Select "Password and Security";
- Two-factor authentication - Click ON.
By the way, some applications also have this function. Don't ignore it and always turn it on. Take care of your data in every possible way.
Remove password
If you have backed up your device, you can restore your data and settings after restoring your device. If you never backed up your device before you forgot your password, you will not be able to save data on your device.
- If you don't have iTunes, Download and install iTunes on your Mac or PC. If you don't have a computer, borrow one from a friend, or go to an Apple retail store or Apple Authorized Service Center.
- Make sure your device is not connected to your computer, then select your device from the list below and follow the instructions:
- iPhone X or later and iOS 8 and iPhone 8 Plus: Press and hold the Side button and one of the volume keys until the slider moves up. Drag the slider to turn off the device. Connect your device to your computer while holding the side button. Hold the side button until the recovery screen appears.
- iPad with Face ID: Press and hold the top button and volume button while turning off the slider. Drag the slider to turn off the device. Connect your device to your computer while holding the top button. Hold the top button until the recovery screen appears.
- iPhone 7 and iPhone 7 Plus: Press and hold the Side button until the Power light slides down. Drag the slider to turn off the device. Connect your device to your computer while holding Volume Down. Continue holding the Volume Down button until the recovery screen appears.
- iPhone 6S or earlier, for iPod touch, or iPad from the home button: Press and hold the side (or top) button until the Power off slider appears. Drag the slider to turn off the device. Connect your device to your computer while holding the Home button. Continue holding the Home button until the recovery screen appears.
- In iTunes, when prompted to restore or update, select Restore. iTunes will download the software for your device. If it takes more than 15 minutes, the device will exit recovery mode and you will have to repeat steps 2-4.
- Wait for the process to complete. You can then set up and use the device.
Recovery mode to unlock iPhone if you forgot your password
This method can only be used if you know the device's Apple ID and password to which the device is linked in the iCloud menu. If you risk restoring a locked iPhone without this information, and an activation lock is installed on it using the “find my phone” function, the device will turn into a “brick.”
You should use recovery mode if you want to reset the password on a locked iPhone 6, 7, 8, X, XS, XR. This may be necessary if you do not know or remember the password, or were unable to guess it.
- Turn off your phone.
- Connect it to your computer.
- Select Recovery Mode from the menu that appears.
- Turn on iTunes, click OK and then Restore iPhone.
- If a message appears about auto-checking for updates, click the “check” button.
- Then click "Restore and Update" on the next screen. You will be warned that all data from the gadget will be deleted.
— Select the iOS version to install, agree to the license agreement, wait for the firmware to download (for the latest models, the firmware weighs more than 3 GB).
IMPORTANT : on some firmware versions an error appears (3004): Failed to restore iPhone. To deal with this, close all browsers and make Internet Explorer your default browser by launching it and agreeing to the prompt in the window that appears.
If you downloaded the firmware in advance (for example, because the Internet on your computer is slow), then you need to press the “restore iPhone” button in iTunes while holding down the Shift key. Then a window will appear where you can enter the path to the firmware file.
Use Guided Access on iPhone
Guided Access helps the user focus on a specific task by temporarily limiting the iPhone to a single app, and allows control over the app's available features. You can do any of the following:
make inaccessible areas of the screen that are not relevant to the task being performed, or areas where an accidental gesture could distract from the task;
disable iPhone hardware buttons.
limit the time you use one or another application.
Setting up Guided Access
Open Settings
> Accessibility > Guided Access and turn on Guided Access.
Configure one of the following options:
Passcode settings. Tap Set Guided Access Passcode, then enter your passcode.
You can also use Face ID (on an iPhone with Face ID) or Touch ID (on an iPhone with a Home button) to end your Guided Access session.
Time. Play a sound or say the amount of time remaining until your Guided Access session ends.
Commands for Universal Access. Turn the command on or off during a Guided Access session.
Automatic display lock. Set how long after you want your iPhone to automatically lock during a Guided Access session.
Other tools to help keep important data away from children
Apple developers have provided not only for the introduction of “Guided Access” so that important information is not lost as a result of the careless actions of a child. To do this you need to perform several more operations:
- Entering a password on a smartphone. This tool will come in handy when a child picks up a gadget without the parents’ knowledge. The password is activated through the Device Settings menu. Of course, you need to come up with a security combination that consists of numbers, letters and symbols that will help protect your data.
- Activation of restrictions. This feature will allow you to limit the deletion of applications and other programs, as well as most actions. You can remove some system options on the desktop.
- Screen lock. To do this, you can set the volume up button on your device to lock the display. You need to go to the settings window, select the “Main” section and select the appropriate switch.
- 3D Touch. This option can be activated on Apple devices if a child regularly plays with a tablet or smartphone. But it is important to know that this option works slowly and the labor screen is unlocked. Therefore, in the settings menu, select the “Main” item and enable the “Universal Access” option. Next, you should enable and configure 3D Touch. You can also activate the desired sensitivity threshold.
- Nothing complicated either. You just need to go through the settings and activate the necessary options. And then the device will be protected from children's curiosity and careless handling.
Finally, it should be noted that using these tools, you can make your own Apple gadget comfortable and protect important information from the hands of children. Therefore, you should first try Guided Access, but if you don’t like this mechanism, then resort to other means to ensure the integrity of the data on the device. And by the way, this is done very simply - no super complex actions are needed, but only simple operations.
Starting a Guided Access session
Open the application you want to use.
Enable Guided Access using one of the methods described below.
Ask Siri. Say something like, “Turn on Guided Access.” Learn how to give Siri commands.
Circle the areas on the screen that you want to turn off. Drag the shape into position or use the handles to adjust its size.
Tap Settings, then turn the following items on or off.
Motion (to prevent the iPhone from switching orientation between portrait and landscape and reacting to other movements)
iPhone passwords
Not long ago, I noticed in my email that there was a suspicious login attempt from somewhere in Vietnam. Apparently, Vietnamese hackers want to read my advertising messages from AliExpress. Well, you shouldn’t play with fate - I immediately changed the password in my account to the suggested iPhone.
The system identifies weak passwords and prompts you to change them
To avoid finding yourself in this situation, I highly recommend taking a look at Passwords in iOS from time to time: it has a cool Security Recommendations feature that detects stolen passwords for sites and applications that you use on your iPhone. The system offers to change them right on the spot, and also gives a list of other recommendations: for example, duplicate passwords or those that are easy to guess.
Read on topic: How to enable autofill passwords from Google Chrome on iOS