ADB stands for Android Debug Bridge, that is, a debug bridge for Android. The program is developed for the Android operating system and works in conjunction with a computer. It makes it possible to change files, use root rights, and restore the system.
ADB run, in turn, is an application that allows the user to flash a device running on Android. It includes ADB and Fastboot. These applications are familiar to everyone who has encountered flashing their gadget.
ADB, ADB run and Fastboot
Android Debug Bridge allows you to manage Android using a PC. This application is installed directly on a laptop or computer, which is connected to a mobile device via a USB cable in debugging mode. Then, after launch, it is possible to execute special commands that allow you to initiate any actions with the gadget.
The utility allows you to perform actions such as:
- reboot in various modes;
- transferring folders and files to/or from the device;
- working with firmware: installation, updates;
- removing a lock made using a pattern key;
- execution of various scripts.
Most often, the application is installed together with the Fastboot utility. This mode allows you to reset all settings to factory settings, which is why it is sometimes called Recovery - a recovery function. In addition, you can install firmware using Fastboot, but in this case only work via a PC is possible.
It is better to install these two programs together, which allows you to access more features.
In turn, ADB run simplifies work and automates typical commands and actions most often used by users. Although it has a console, it has a visualized appearance and consists of 14 points.
This program is much simpler, it is suitable for those who find it difficult to understand the command line, who do not know how to work with it. It already provides a menu and items that you can select. It has a simple interface, great functionality, and does not require additional software installations.
All utilities can be downloaded, installed to operate and update your mobile device.
Application backup
Android has built-in backup functions that can also be launched using the command line.
To do this, use the adb backup command and a set of options: adb backup <
- indicates the name of the file being created and its location on the computer. If the key is missing, the backup.ab file will be created in the current directory;
- -apk|-noapk specifies whether to include only application data in the backup or the .apk itself too (by default it does not include);
- -obb|-noobb specifies whether to include .obb extensions for applications in the backup (not included by default);
- -shared|-noshared specifies whether to include the contents of the application on the SD card in the backup (not included by default);
- -all indicates the need to backup all installed applications;
- -system|-nosystem specifies whether to include system applications in the backup (includes by default);
- — list of packages for backup.
If we want to create a backup of all non-system programs, including the .apk themselves, to a specific location, then the command will look like this:
adb backup -fc:\android\backup.ab -apk -all -nosystem
After entering, you must confirm the start of the backup on the device itself. To restore the resulting backup, you need to run the appropriate command:
adb restore c:\android\backup.ab
Backup process
How to use ADB run
To understand how to use the utility, you need to become familiar with the installation and basic commands. Connection to the gadget is carried out using a computer and a USB cable or via a wireless network.
You can understand that the connection has taken place by entering adb devices. Then the message “List of devices attached” should appear, indicating that the connection has occurred. Connection via Wi-Fi occurs using adb wireless. The mobile device must be rooted.
To work, you need to enable USB debugging on your gadget. Usually this item is located in the settings. If it is not there, you can look for it in the developer options. This menu is hidden; to enable it, you should find the line with the build number in the Android settings and click on it several times (5 to 10 times). After about half of the clicks, a notification will appear that you are doing everything correctly, and then developer rights will be granted. Then you can return to the settings, where the “developer options” item will appear. This is where debugging is enabled.
The utility has a number of positive qualities:
- Easy to install.
- Simple controls.
- Easy check for updates.
Before installing ADB, you need to download it, this can be done for free. You can download ADB on the 4pda website. The official resource does not allow you to download the utility separately, but only with the entire Android SDK package. The program is installed using the standard installation wizard.
The whole process is simple and intuitive. The installer himself offers hints, directing all actions.
After this, you need to install drivers for your mobile device, otherwise the application will not see the device. The easiest way is to use the Adbdrivers automatic installation utility. But you can also download drivers for Windows 7, 8 or 10 from the manufacturer’s official website.
If there is no installer, the drivers can be installed manually, for this:
- Launch Device Manager. You can find it in the control panel or use the system search
- We are looking for an unidentified device, or your smartphone. Right-click on the device and select Update Driver
- In the window that opens, select the option – Search on your computer, then specify the path to the folder and confirm.
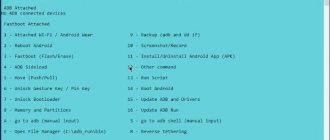
Overview of the ADB run interface and command
Let's look at all the menu items offered by the program and how they work:
- Device attached? – is responsible for connecting the PC and smartphone, but you must enable USB debugging.
- Move – is responsible for moving files from a laptop to a smartphone. There is both automatic and manual movement available here.
- Install Android App to Device – allows you to install applications, with options for saving and moving to a memory card.
- Reboot Device – various Android reboot modes:
- Reboot – standard;
- Reboot Bootloader – reboot into the bootloader;
- Reboot Recovery – reboot in the recovery menu.
- Fastboot – firmware, system flashing. All settings are set automatically.
- Unlock Gesture Key is a graphic key unlocker that also handles PIN codes and face codes.
- Manual – allows you to enter commands manually.
- Check Update – checking a new version of the program.
- Intsall Bootanimation – sets and changes the animation when the device is turned on.
- Memory and Partitio - introduces blocks and sections of Android.
- Run Script – working with scripts.
- Backup – create a backup copy.
- Odex – odex-ing of the firmware, taking into account various parameters.
- Screnshot/Record – screenshots, the ability to record video.
- Exit – respectively, leaving the program.
Flashing your phone using ADB run
The program allows you to change the gadget's firmware. To do this, just install it, connect to your PC and use the Fastboot utility. The files that need to be flashed must be in the same folder as the utility.
First you need to put the device into bootloader mode using the menu.
Then you need to unzip the pre-downloaded firmware files. After this, select Run SCRIPT and place the firmware files in the window that opens and close it. Click on Enter. The firmware has started. While the process is in progress, you cannot remove the cable from your phone or computer.
The program makes it possible to reflash all partitions step by step or just some:
- system;
- cache;
- data;
- recovery.
Review
A short overview of the utility and how to use Adb Run for Android. The first point right away is to check that the gadget is connected correctly. If you forgot about deferring, the program will immediately detect this. The first item is called Device attached. By selecting it, you will find out whether the phone is connected to the system.
Next - Move
. Instead of entering the commands that were described earlier, it will be enough to choose between two items. The first one is responsible for transferring files from the computer to the phone, the second one is responsible for the reverse process.
Third item Install
is responsible for downloading applications to the gadget. There are five options available here. Among them are copying the program, installing it normally or on a memory card. It is possible to remove utilities from your phone via a PC or move them.
Reboot item
reboots the device. It does this in three options, including a normal reboot, switching to bootloader mode or going to the Recovery menu. The next line under the fifth number is responsible for the firmware of the device. Fastboot is a menu with 10 items. Moreover, they are all highly specialized; if you do not know what to choose, you will have to consider each sub-item.
In the next paragraph - Unlock Gesture Key
- you can learn how to use Adb Run with Windows 10 if you need to unlock the pattern. Often users, using this protection method, forget it, but when failures occur, this utility comes to the rescue. The sixth menu contains items with different graphic key options. You need to choose the one you forgot.
Point seven - Manual
— needed by those who want to enter commands themselves. There may be directives that are not in the list presented. This is what this menu item is for. There is also a special menu for owners of HTC smartphones. In it you can unlock Bootloader, change CID and get S-OFF.
The eighth item checks for utility updates. The ninth is a creative option for those who are tired of the animation when turning on the device. If you want to replace it or disable it, then you need to go to the Intsall Bootanimation menu.
The tenth paragraph provides information about all existing blocks of the device. There are sections here, perhaps hidden, or those that are difficult to reach. Run Script is the eleventh menu for using scripts. Backup - item twelfth, which creates a backup copy of the entire gadget. Convenient if you need to do a Reboot.
The next menu is responsible for odexing the firmware. If you are unfamiliar with this process, it is better not to experiment on your own. The fourteenth point is working on screenshots. The last menu is needed to exit the utility.
Installation
You can install the application by visiting the official website. You need to download the SDK tools archive for Windows, having first agreed to the terms of use.
After this, you need to unpack the archive, go to the tools directory, select the bin folder there and access the sdkmanager. It just allows you to install the program.
The next step is to work on the Windows command line. Let's run it as administrator. After that, open the sdkmanager folder, specifying the path C:\sdk-tools-windows-3859397\tools\bin.
During installation, read the license agreement, press Y.
If the whole process went correctly, then the platform-tools directory with the files adb.exe and fastboot.exe will appear in the root folder.
How does ADB work?
Once you install the program, you can work with it. To make sure that everything is functioning correctly and normally, you should use the command line to open the folder with the adb and fastboot files and run the adb.help program. What you get should look like the screenshot below:
Now you need to connect the device to the PC and check whether the application can see it. The connection is made using a USB cable. You should select the MTP mode – file manager, and then the “for developers” option. If such an item does not appear, then you should go to the “about phone” section and click on the build number 7-10 times. After that, in the “for developers” item that appears, you need to select “usb debugging”.
Then enter adb devices in the system command line. This will allow you to see information about the device. It looks like the screenshot.
Afterwards, the fastboot program is checked, the fastboot reboot task is written in the console, and press enter.
After checking the functioning of the task, you can safely work with the program.
ADB Commands
The utility involves working with a smartphone and performing various actions. There are only 10 basic ADB commands:
- Devices – helps to find out whether the computer detects a device and whether it is possible to work with it by entering commands. Next, a line appears with the text List of devices attached with the serial number of the gadget along with its current status. That is, the phone is either offline or ready to work, i.e. online.
- Push – allows you to transfer or copy files to a mobile device.
It is enough to specify the path to the folder from which the information is copied and into which it is copied.
- Pull – suitable for copying files from a gadget to a laptop. As in the second command, you need to specify the path where the file is from and where it is placed.
- Reboot – allows you to get root rights or install programs. It also allows you to make various changes. After entering, the device reboots. This item is also suitable for placing scripts that allow you to reboot the phone after making the necessary changes.
- Reboot-bootloader, Reboot Recovery – the ability to reboot the device into the bootloader. This allows you to unlock the bootloader to use root rights and install alternative firmware.
It is also possible to access the “recovery” menu.
- Fastboot devices – when the device is rebooted in bootloader, it stops responding to commands. Then the gadget is affected by the fastboot program. It allows you to control the gadget in bootloader mode.
- Fastboot oem unlock – many devices are unlocked using this command. Just enter it into the command line and then follow the instructions.
But it is worth remembering that after running this program, all data on the phone is deleted.
- Shell – it can be used in two ways. The first is to enter it into the command line, followed by typing. This will allow you to enter terminal mode, where you can execute any Android shell commands. But you should use it carefully, as the device can be seriously damaged.
The second option is a single action input. Thus, you can, for example, change the access rights to some folders.
- Install – will help you copy files and install applications in apk form. First you need to specify the path where the required file is located.
- Uninstall – removes programs from the gadget. The command uses the k-key, which allows you not to delete application data and cache.
Bonus utility – Sideload. It suits Nexus device owners, allowing them to update the official firmware on all of the company's devices.
Possibilities
Since the question of how to use Adb Run is related to the use of ADB, it is worth understanding what capabilities the main utility hides. For example, thanks to the code, you can install an application that is located on your PC. To do this, you need to write adb install, and then specify the path where the installation file is located.
In the same way, you can transfer a regular document from a computer to a phone. The algorithm is the same, only the command has changed. We enter adb push, and then indicate the address of the location of the file that should be transferred to the gadget. If you need to do the opposite operation, enter adb pull. Only the first address indicates the folder on the phone, and the second is the place where you want to save the transferred document on your PC.
FAQ
What to do if ADB does not see the device
If suddenly ADB does not see the smartphone, then you first need to check usb debugging or check for the presence of ADB drivers on your PC.
It is also worth paying attention to other reasons:
- check the USB cable and its functionality;
- check the installation of the Android SDK and the availability of its latest version;
- It’s worth trying to switch the mode from MTP to camera and back;
- You can try reconnecting the device or restarting the computer.
After all these steps, the program should work and the device should be detected. This problem often happens with unknown Chinese brands that are not familiar to the program.
ADB or fastboot is not an internal or external command
Sometimes when you enter a number of commands in the console, you may encounter a system refusal to perform the entered action. A message appears that the command is not internal or external. This is often due to the fact that the path to the file that serves the command is not specified.
The reason for this message may be that the system does not have information about the location of the files. It is possible that the required component is not in the system, then it needs to be installed.
In order to get rid of this error, you need to specify the program the path to the necessary files. You should copy it to the clipboard.
Then:
- on the desktop you need to select “My Computer”, click on the right mouse button, select the “properties” column in the menu;
- now select “advanced system settings”, and then “environment variables”;
- there you need to find “system variables” and the Path parameter, to which you need to add the copied path and confirm the changes;
- then we open the console and enter the required action, after which the error disappears.
Alternatively, after all the manipulations, you should restart the computer.
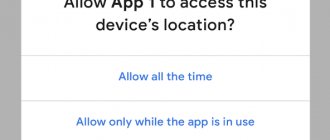
Adb Run is a special shell for implementing and outputting ADB commands. This is an important tool for managing mobile devices running Android OS. The program is created in a graphical interface and provides input and execution of ADB commands on a mobile device with Android OS, which work through a computer. Adb Run works if the mobile device has “superuser” rights (Root) and the device is enabled for debugging via USB cable. Start making all changes and operations after these settings and obtaining Root rights.
Preparation
Before learning how to use Adb Run this program, it is important to remember about USB debugging. This step is often forgotten, after which the program simply does not see the phone
To do this, you need to go to settings, find the “About phone” option there.
In the latest versions of the operating system, you need to find the line with the serial number and click on it several times. A notification appears at the bottom, first that you are on the right track, then that you have become a developer. When you see such a message, you can return to the settings, the “Developer Options” item should appear there. You can enable deferring there.
So, using ADB commands you can:
- display the status of devices that are connected and the Android Wear watch;
- restart the mobile device;
- install and uninstall applications;
- update software components using Fastboot;
- re-upload or clear the data partition (for experienced users).
- transfer files (in both directions);
- run various scripts that control the operation of the OS;
- make (create) a backup copy of information;
- take a screenshot and record a video;
- remove restrictions from the device if you cannot log into your smartphone and you have forgotten your pattern password or PIN code;
- change the welcome screen and system startup animation;
- find out information about the data stored in the device’s memory and on the SD card;
- upgrade the current firmware;
- download and install the entire driver package.
Unlock Micromax Bolt D303
Micromax Bolt D303
It has basic technical characteristics typical of budget-level smartphones.
This is a dual-core SoC from Mediatek MT6572 with a frequency of 1.3 GHz, 4 GB of internal memory and 512 MB of RAM. This device is sold in Megafon communication stores. The device is operator locked, i.e. By default, its use is only possible with Megafon SIM cards. When you try to insert a SIM card from another operator into it, a request to enter an unlock code appears on the screen. Order code:
Unlock Micromax Bolt D303.Code Read more▸
- https://androidp1.ru/adb-run-obzor-funktsiy/
- https://androfon.ru/prodvinut/opisanie-i-vozmozhnosti-adb-run
- https://4pda.biz/android-obshchee/1288-skachat-programmu-adb-run-instruktsiya-i-obzor-funktsij-programmy.html
- https://upgrade-android.ru/stati/stati/4031-adb-run-skachat-besplatno.html
- https://unlock-code.ru/index.php
Advantages of Adb Run
The difficulty in using Android Debug Bridge lies in manually entering long commands. All commands are not very easy to remember, so making a mistake when entering a command is a standard thing. Adb Run does not require entering additional parameters or auxiliary commands. As you navigate through the menu and perform the necessary operations, you will switch to manual mode if you want to enter by hand. The creator of the application made manual entry for experienced users of the Android operating system. Entering commands manually is suitable for users for whom standard commands are not enough. The application is installed on old and new versions of Windows and is automatically updated in mode.
Download Adb on your computer for Android. Using this installer, you can quickly install the Android debugging utility - ADB, without having to install the entire development package.
(old version)
(a new version)
installation occurs in the root of the C:\ drive (C:\adb)
It is also possible to use the Adb Run program (recommended for all beginners), which makes it easier to interact with ADB.
Instructions for ADB commands
Video instructions on how to install ADB on a computer (ADB + Fastboot)
Manual installation of ADB and Fastboot on a computer
If you want to use the latest version of ADB or Fastboot on your Windows computer, then use the following instructions to download ADB:
Go to the developers website (for XP) and download the SDK Platform-Tools archive for Windows OS, containing the adb and fastboot utilities
2. Extract the platform-tools folder from the archive to the C:\ drive
3. Go to Windows “Control Panel\System and Security\System” and select Advanced system settings
4. Go to Windows Environment Variables
5. Select the “System Variables” value Path and change to add a new value
6. Specify the path to the platform-tools folder containing adb and fastboot
7. Restart your computer, then run the command line and write the adb version command. If you see text information with the ADB version, then you did everything correctly. Now you can use ADB for Android for the purposes you intended.
Installation on MAC OS and Linux
If you do not use the popular Windows OS, but have MacOS or Linux installed, then you need to follow the link:
- install ADB and Fastboot on MacOS
- install ADB and Fastboot on Linux
It should be recognized that many Android device manufacturers deliberately limit the functionality of tablet and smartphone owners. In fact, the average user uses only 70% of Android's potential. But if the stock capabilities of smartphones are not enough for you, we recommend that you learn how to flash Android via ADB. This utility allows you to reveal the full functionality of the gadget.
Download
To download the archive with the program, use the button below.
| Version: | 4.16.19.27 |
| Developer: | Vitaly Shipilov |
| Release year: | 2022 |
| Name: | Adb Run |
| Platform: | Microsoft Windows 7 x32/x64 |
| Language: | Russian |
| License: | For free |
| Archive password: | bestsoft.club |
Adb Run 4.16.19.27
You can also download Adb Run for Windows 10 for free on our website.
Why do you need to flash devices?
Device firmware is necessary to significantly expand user capabilities. But ADB is not limited to this.
The debug bridge also performs a number of other functions. With its help it is possible:
- cope with the so-called bricking of the device;
- install a new operating system;
- get acquainted with gadgets on the general network that can also use ADB;
- view logs;
- copy files from device to device;
- install and remove additional software;
- execute various application scripts.
Program
Before we find out what the translation is for the phrase Apply update from ADB, let’s look at the software. ADB is an integral part of the system, which stands for Android Debug Bridge. It is translated into Russian as “Android debugging bridge” and, of course, can say little to the average user.
It so happened that the Android operating system evolved from the previously existing Linux. In the old fashioned way, both require using the command line to make some changes. Naturally, emulators have already been developed. But working with them is uncomfortable due to the small screen and some limitations.
In addition, you often need the computer itself, so special software is required. This is the ADB application, which works to connect both devices, thus implementing various operations with the Android system.
Android firmware via ADB Run utility
When using ADB Run on your phone or tablet, you need to become familiar with the ADB Sideload command. Its main task is to flash the firmware via a ZIP archive with the new OS version. Typically, this command is executed when it is necessary to start the installation from the Recovery menu or in the absence of a Bootloader.
Moreover, when dealing with the problem of how to flash a phone via ADB Run, you will note that this command is executed on all devices, regardless of the manufacturer or model of the gadget.
In particular, ADB Sideload works according to a fairly simple principle:
- Put your device into Recovery or Bootloader mode.
- Launch the ADB utility (command line).
- Enter the adb sideload .zip command.
It should be noted that the ZIP archive downloaded with the firmware should initially be placed in the folder with the ADB utility. Otherwise the command will not be executed.
Installing Android device drivers for PC
Before you start flashing firmware or controlling your gadget via ADB, you should make sure that the necessary drivers are installed on your PC. To do this, connect the device via USB cable to the PC and wait for a message about successful installation.
On Windows 7, 8 and 10 operating systems, the search for drivers is carried out automatically. If the drivers are not installed, you need to download them from the network.
Getting root access
In order for the ADB utility to have full access to the capabilities of your device, you need to gain superuser access. It is important to remember that the rooting process has specific features for each gadget. But today you can find dozens of ways on the Internet to obtain root access using a special installed application.
If your device is already rooted, just run the root command in the debug bridge, which will restart ADB with root rights.
Without root access, you will not be able to successfully manipulate many files and subsystems on an Android device. Therefore, you will have to deal with limitations and errors.
Enable USB Debugging
To work with the debug bridge on a PC, you need to download and install the appropriate software. But with an Android device everything is simpler. It is enough to obtain the superuser rights described above and enable “USB Debugging”.
To do this, follow a series of simple steps:
- In the device settings, go to “Help (about phone)”. Find the Software Information section.
- Tap "Build Number" until "Developer Options Enabled" appears.
- Return to the main menu and find the new “For Developers” section.
- Select the USB Debugging setting. To turn it on, move the slider to the right.
Rebooting the device into firmware mode
Having connected the device via USB to the computer in order to further operate its functionality using the ADB utility, you will have to learn a large number of commands. In particular, using reboot-related commands, you can apply the changes made or unlock a frozen gadget.
These types of commands include:
- adb reboot bootloader – reboots the gadget’s operating system into boot mode. Triggers only if the device is in its normal on-operating state;
- fastboot reboot – reboot the gadget into normal mode from the firmware mode;
- fastboot reboot-bootloader – reboot the gadget from firmware mode to the same mode.
How to check if your computer sees connected Android devices
Before you start fully using the ADB utility, you need to check the connection of the device to the PC. This will save time and prevent you from making mistakes.
You can check whether your computer can see your smartphone or tablet using the fastboot devices command. It must be performed at a time when the device is already in firmware mode.
Also, when you run this command, you will be shown all the devices that are connected to the computer in firmware mode. To operate their functions more accurately, you will have to specify the assigned gadget identifier.
Locking and unlocking Bootloader
In some situations, to ensure additional system security, commands responsible for locking/unlocking the bootloader may be needed. ADB provides users with these utilities.
To lock the device in the command line you need to write: fastboot oem lock. Then reboot the device and look at the result.
Unlocking, in turn, can be carried out using the fastboot oem unlock or fastboot flashing unlock command. You can choose any one. After rebooting the device, you will be able to operate Bootloader again.
Moving the firmware to the ADB folder and then launching it
You can download the firmware for a device running the Android operating system to any directory on your PC, but installation takes place only from the ADB folder. Therefore, the uploaded ZIP archive must be moved using any task manager or Windows Explorer convenient for you.
By default, the utility folder can be found along the path: C: android-sdk-windowsplatform-toolsadb. It is into this directory that you will have to copy the downloaded firmware archive. To launch the archive with the firmware, all you have to do is enter the already familiar adb sideload .zip command.
Instructions: How to control Android from a Windows PC
What to do if you accidentally dropped and broke the display of your Android device, and the data stored on it is extremely important to you?!
Despite the wide variety of shockproof cases and protective films/glasses for Android smartphones and tablets, it sometimes happens that the screen breaks after a fall and does not respond to pressure. The cost of repairs is not always cheap, especially for modern smartphone models, but as luck would have it, you need the data stored on your smartphone? It doesn’t matter, we will tell you in detail about the main methods that will help you “pull out” all the essentials without any costs or trips to the service center.
We would like to warn you right away that this article is suitable for users whose device does not respond to presses, but still displays information on the display.
Method one (simple)
If you don’t know what Root rights are and have never installed them on your device in your life, then this method is designed just for you. The problem with data recovery is solved literally in a matter of minutes.
Method two (simple)
For the second method, you will need a USB OTG cable or a computer mouse with a microUSB connector. However, it is worth noting that not all devices are able to work correctly/work at all via a USB OTG cable.
What you will need:
- USB OTG cable/mouse with microUSB connector
- Smartphone/tablet with broken display
- A mouse and some free time
All we need to do is connect a computer mouse to our device and then control it with the mouse, transferring data, contacts and other information using a memory card or appropriate applications, for example, AirDroid.
Method three (for experienced ones)
This method is suitable for all users, but to implement it, some details are required, described below.
- Personal computer/laptop with Windows installed
- USB cable for connecting the device to a PC
- Pre-installed drivers for Android
- USB debugging mode enabled
- Downloaded and installed ADB Run program
How to display smartphone/tablet images on a PC display:
1. Launch the installed ADB Run. 2. Using the number “7”, go to the Manual Command and Unlock Bootloader item, then enter the number “9” and get to the Control Android out Windows section, then press the number “1” Go to Website Java (Download Java JDK, and install) and go to the Java website to install the Java JDK package.
3. From the Java JDK website, you need to download the latest version of Java, taking into account the bitness of the Windows operating system.
4. After you install the Java SDK, you must select Run Control Android out Windows and specify the path to the Java file, as shown in the figure below (the SDK version may differ, look carefully!).
5. If all the steps are completed correctly, then you will see a window depicting the desktop of your device, and the computer mouse acts as control.
Using these very simple methods, you can “pull out” all the data you need from a device with a broken display within a couple of minutes.
Firmware problems
Sometimes during the process of flashing devices, the user may encounter various errors that prevent the process from being completed successfully. One of the reasons may be outdated software.
Before working with the ADB utility, be sure to check that the drivers installed on your PC are up to date. Always use the latest software products as they provide the proper level of optimization.
Also, if errors occur, pay attention to the “mechanics”. Check the USB cable connecting your PC and Android device. If the wire is defective, the firmware process may fail for no apparent reason.
If you have up-to-date drivers and the wire does not cause any problems, pay attention to the model and brand of your gadget. It is possible that the settings provided by the device developers conflict with the requests performed by ADB.
Pros of Android firmware via ADB Run
Android firmware via ADB today is one of the most common ways to use the rich functionality of devices. The fact is that this utility does not require installing additional programs on the device. Everything happens through the familiar command line interface. The user only needs to learn a number of commands and he will be able to use his smartphone to the maximum.
Another plus is the connection, which can be organized not only via a USB cable, but also through a shared Wi-Fi network. That is, you can send any commands to your gadget at a distance, without a direct mechanical connection.
An important advantage of the utility is the presence of a large number of commands. It’s not for nothing that ADB is called a universal debug bridge. Using this application, you can perform almost any operation related to setting up the Android operating system.
I'm trying to run adb. When I run: "adb start-server" it hangs for some time and then there is no message.
After this, the command "adb get-state" will receive the response "error: protocol error (no state)". If I run "adb kill-server" the response is "*server is down"*
I'm using windows 7. The administrator elevated my rights to local administrator, but didn't solve anything.
I used resource monitor to check if any other application is using adb ports but they are not.
- Nexus 7 (2013) and Win 7 64 - cannot install USB driver despite checking many forums and online resources
- Android emulator works on Windows phone
- How to fix 'cordova' not recognized in command line - windows 8?
- Android Connect Physical device as an ADB device, not a portable device
- UDID or IMEI - which is better?
On https://developers.google.com/chrome-developer-tools/docs/remote-debugging, step 3 points to "Enable USB Web Debugging" under Settings > Advanced > DevTools. But on my test phone there is no "advanced" category in the chrome settings. I couldn't find out what version of chrome is installed.
Somewhere on the internet I saw a suggestion to change the permissions of "tmp/android/" to allow read and write for all users, but in C:\Users\me\AppData\Local\Android\android-sdk\temp there is no folder for Android.
So now I'm pretty desperate, any help would be greatly appreciated.
thanks to
EDIT 1: I couldn't find "Enable USB Debugging" because it was "Android Browser" and not Chrome (a bit funny yes). I did not know it. Using another device with chrome installed, I could test it there, but adb still crashes on startup.
EDIT 2: I made a guess that there was a writing issue in the Platform Tools folder. So I deleted everything using sdk manager, I deleted the entire adt-bundle-windows-x86_64. Then I unzipped it in another place, at c:. Strange, when I run SDKManager.exe, several packages are already marked as installed:
- Tools > Android SDK Tools
- Tools > Android SDK Plateform-tools
- Android 4.2.2> SDK Plateform
- Android 4.2.2>ARM EABI v7a System Image
- More > Android Support
I tried uninstalling them again, deleting the folder, unzipping again and reinstalling, but still the same result. It seems that somehow it is installed incorrectly but refuses to uninstall properly. Does anyone know how to force unistallation?
EDIT 3: Output of initial adb server after using ADB_TRACE=1 set
C:\adt-bundle-windows-x86_64-20130219\sdk\platform-tools>adb start-server system/core/adb/adb.c::main():Handling commandline() system/core/adb/adb_client. c::_adb_connect():_adb_connect: host:version system/core/adb/sysdeps_win32.c::socket_loopback_client():socket_loopback_client: port 5037 type tcp => fd 100 system/core/adb/transport.c::writex( ):writex: fd=100 len=4: 30303063 000c system/core/adb/transport.c::writex():writex: fd=100 len=12: 686f73743a76657273696f6e host:version system/core/adb/transport.c ::readx():readx: fd=100 wanted=4 system/core/adb/transport.c::readx():readx: fd=100 disconnected system/core/adb/sysdeps_win32.c::adb_close(): adb_close: 100(lo-client:5037) system/core/adb/adb_client.c::adb_connect():adb_connect: service host:start-server
- How to get python-for-android installer script to recognize installed pbs on Windows system?
- Android Eclipse, Dropbox, Windows and Linux
- MSVCR100.DLL not found on Android Studio startup
- Using programming languages on top of different operating systems
- Moving Android Studio Projects and Configurations from Windows 7 to OS X
Try setting the ADB_TRACE environment variable before starting the ADB server to see if it can provide any clues:
C:\Android\android-sdk\platform-tools>set ADB_TRACE=1 C:\Android\android-sdk\platform-tools>adb start-server
Include the output in your question.
This solution worked for me:
=> Check if adb is running in task manager and then kill it. Now try to restart it again using the following method:
1) Shift + Right-click in the ...\android-sdk\platform-tools folder and select Open command window here
2) Use these commands: adb kill-server then adb start-server
If this method doesn't work and you see something like this in the Command Killing adb window...
Then apply the following steps:
3) Close eclipse
4) Now kill javaw.exe Java(TM) Platform SE binary in Task manager and repeat steps 1 and 2.
This will definitely work.