The Microsoft Word application is used everywhere, regardless of the purpose of the computer (home or work), the size of the work being performed, or the type and structure of the enterprise. When installing a new operating system, it is intuitively assumed that there will be a standard package of ordinary office programs for general use.
Still, in Word you can quickly type a document of the required sample and format, regardless of complexity. True, sometimes the question arises of how to print in Word in one form or another, especially if you need not just printing, but something specific. Let's try to figure this out.
Printing a document in word
Printing can be done in two ways: 1. By going to the main menu of the program (in the latest versions it is located in the far left upper corner). After that, click on the “Print” menu. This menu item will open a small submenu consisting of three separate items.
How to find the “Print” menu in the Word office window
The “Print” submenu, like the main menu itself, calls up the main print window. In this window, you can select a printer, create the required print settings, and then send it for printing. The “Quick Print” submenu will immediately print the document that is currently open. This will use the standard print settings, which are initially set by default.
2. By pressing the keyboard shortcut Ctrl+P. The Ctrl key is located on the sides of the symbolic part of the keyboard, usually duplicated on the right and left. In any keyboard version, the key will always be the bottom left one. While holding it, you need to press the “P” key (in the English layout, in the Russian it will be the “Z” key - whichever is more convenient for you to find). This will open the same menu as when you click the Print menu.
How to Print in Windows from Desktop Applications with Ribbon (Microsoft Office)
Some desktop applications have a ribbon user interface instead of standard menus. Well-known examples of such applications are the Microsoft Office suite, WordPad and Paint. If the desktop application you're using has a ribbon, click the File tab on the ribbon.
A list of options that should enable printing will open.
Set how the file is printed, and then click or tap Print.
Document Preview
Very often, before printing a document, you need to view the document in order to understand how individual text or pieces of text will be located along with other elements on the sheet.
To do this, there is a special submenu “Preview” in the “Print” menu. By clicking on it, you can open a window where the final sheet will be clearly demonstrated as it comes out of the printer.
The preview window shows all possible page formatting settings in a simplified and more visual form. With their help, you can quickly customize the required appearance, in particular, see whether all parts of the page fit on the sheet.
Sheet Preset
Most recently, I told you that before printing you need to set up the sheet and check the layout of the text. If you haven’t read it, then you can briefly describe it like this.
Before printing, I recommend that you check the settings . If necessary, supplement and adjust them. Here is a checklist:
- Preview the text for structural comments
- Select sheet size
- Check sheet orientation
- Number the lines
- Arrange text in columns
- Customize fields
- Insert headers and footers
- Customize paragraphs
- Allow or disable word hyphenation
- Check removal of dangling lines"
- Insert page and section breaks
- Check the results of the work done
If not all items on this list are clear to you, read the article with a detailed description. Here's a link to it.
How to print a brochure in Word
Microsoft Word is a powerful application with a huge number of features. The program, when used properly, can easily replace any editor used by professionals in print agencies. For example, each user can create their own document (for example, instructions, reference guide or book) and print it for ease of further reading and storage in the form of a brochure.
You can make word booklets or brochures as follows:
Brochure printing
1. You need to find the “Page Layout” section in the main menu at the top of the program. 2. Find in the section the menu group dedicated to formatting the sheet and the entire document. 3. Click on the arrow in the lower right part of the menu group to open all the parameters. 4. In the page settings on the “Margins” tab, find the “Multiple pages” drop-down list and select “Brochure”. 5. Once page settings are applied to the entire document, it will become a brochure format. It should be noted that the sheet itself on which a person makes editing will then become somewhat smaller. Therefore, you will need to re-examine all the formatting to make sure it is correct. 6. In the same window, you can configure all page parameters - increase or decrease the indentation. Then you don't have to worry about the document printing incorrectly. With simple printing without presets, everything will be output in the form of a brochure.
Computer plus
The Microsoft Word application is used everywhere, regardless of the purpose of the computer (home or work), the size of the work being performed, or the type and structure of the enterprise. When installing a new operating system, it is intuitively assumed that there will be a standard package of ordinary office programs for general use.
Still, in Word you can quickly type a document of the required sample and format, regardless of complexity. True, sometimes the question arises of how to print in Word in one form or another, especially if you need not just printing, but something specific. Let's try to figure this out.
Printing multiple pages on one sheet
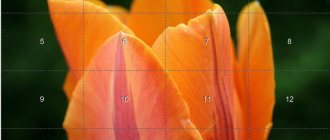
Often, to study a document, it is worth printing it out on paper. However, it is advisable to maintain the number of sheets without wasting extra paper on printing. In this case, you can make sure that the pages on one sheet are placed somewhat more compactly. For example: two pages or two by two (that is, four), a much larger number of pages is also possible.
You can do this directly in the printer settings. After calling the “Print” menu, click on the “Properties” button:
Printing multiple pages on one sheet
Different printers will have different settings in this case. And the location of the print settings items may differ slightly. However, any printer model supports multiple pages at once. And you can select the required quantity in the corresponding drop-down list (in this case “Page Layout”). It is worth noting that the entire sheet will fit. So the text will be noticeably smaller when printed.
How to print 2 pages on one sheet in word
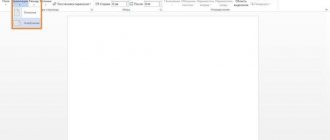
In addition, you can use the capabilities of the program itself. To do this, in the “Print” window, just find the “Scale” drop-down list in the lower right part:
Printing 2 pages per sheet
You can also print two pages if you specify the appropriate option, similar to setting up brochure printing. Only in the drop-down list select not “Brochure”, but “2 pages”.
How to prepare the text of a document for printing on a printer
Prepared and formatted text is just the beginning. There are a huge number of document requirements. For example, you cannot print out your thesis anyhow; there are certain rules for margins and formatting. Also, the requirements of GOST must be adhered to when drawing up contracts.
There are a lot of examples you can give, so you simply must understand the settings and properly prepare the document for printing.
Landscape or book sheet
In my practice, printing a book version of a sheet is used almost everywhere. It is customary to print any document, coursework, diploma or similar documents on the “Book Sheet” format.
The landscape sheet is used less frequently. I have encountered cases when I had to print tables, and the “Landscape Sheet” orientation is ideal for this. In this case, the table is easy to read.
Of course, in your work you will be able to independently determine the correct orientation of the sheet for printing.
Select the desired item in the “Settings” block:
- Book orientation;
- Landscape orientation.
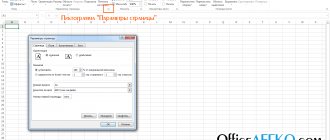
Very important!!! In the Settings block of the “Print” section, the orientation can be changed for the entire document at once. If you need to make a different orientation for a document (regular text “portrait”, graphics “landscape”), use the settings in “Page Setup”; this is described in great detail in the article Page Orientation in Word.
Selecting a Sheet Size
In the "Settings" section it is located after orientation. Clicking on the arrow on the side will open a long list of options, including both standard sizes (A4, A3 and others) and others (note paper, envelope and others). The sheet dimensions are written under the format name. You can set your parameters by selecting the line “Other page sizes...”.
Print area
In the “Settings” section it is located after selecting the sheet format. The fields can be left unchanged, you can choose one of the template options, or you can set your own values. To do this, select the last line “Custom fields”.
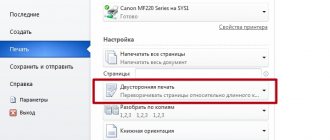
Two-side print
In the Settings section, you can choose single-sided or double-sided printing. With one-sided everything is clear, there is nothing to do here.
When choosing two-sided printing, if the printer has a duplex, the process will be automatic. If there is no duplex, then you need to wait until one side is printed, then turn the paper over and put it back in the tray to print the other side.
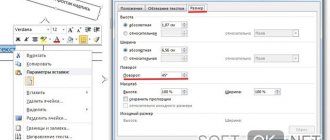
Mirror printing
Used for printing books and magazines. In the “Settings” section, selecting the print area, click “Mirror”. In this case, the indents of even and odd pages will be different.
Black and white printing
It is possible to print a color document in black and white. To do this, you need to change the printer settings. Below the selected device there is a "Printer Properties" button. We choose black and white printing.
How to print a selection
Sometimes you need to print not the entire page, but literally part of the document. In this case, you can take advantage of the fact that in Word you can select a selected fragment for printing. You should highlight the part of the text that is interesting, and then click the “Print” menu:
How to print a selection in Word
Then directly in setting the printing parameters, find and check the “selected fragment” checkbox. By the way, in Word you can also set to print a separate group of pages, as well as the current one - only one page will be printed. When printing a selection, only the selection will be printed, no matter how many sheets it occupies. However, the original formatting will be lost. This will be especially noticeable if the selection starts approximately from the middle of the sheet.
Line numbering and a “harmless” joke
In the “Paper Source” tab, you can set the line numbering. If the numbering starts from the first page, no special difficulties arise, but if you need to start the numbering from page 3, put “2” in the “Start with” line and indicate the numbering “continuous”. Ingoda, this is necessary, for example, if you suddenly decide to add the source text of the program code to a Word document. In addition, this is a simple and relatively harmless way to joke with colleagues at work or in an educational institution, you set line numbering on an annual report or an important course work, and watch as the victim tries to manually delete the numbers from where they came from... However, you do this use of line numbering on at your own risk.
In the same tab, you can select a frame for the text to create a beautiful design, and also change the distance to the headers and footers, however, as a rule, this is not necessary, because by default they are set according to GOSTs.
This video shows in detail how to print a document in Word:
We recommend watching the video in full screen mode, select 1080 HD , do not forget to subscribe to the YouTube channel, there you will find a lot of interesting videos that are released quite often. Enjoy watching!
Sincerely, authors of the site Computer Therapy
Did you like the article? Share it with your friends and write a review in the comments!
Related Articles
- Printing a document in Word, printing settings - (video) - 04/10/2017 17:17
New articles
- Text Haze Factor and Readability Statistics in Word - 02/06/2018 08:20
- How to set a password on Word. Document protection - 09/14/2017 16:49
- Simultaneous viewing of two parts of a Word document - 09/12/2017 17:23
- How to make a PDF file from Word, in Open Office, online converters - 09/09/2017 14:27
- Changing line spacing in Word - 06/05/2017 15:44
- WordArt shapes in MS Word: adding and designing WordArt in Word - 06/05/2017 14:51
- How to insert SmartArt in MS Word, hierarchies, loops, pictures, SmartArt with multiple images - 04/29/2017 16:05
- Creating and changing hyperlinks in Word - 03/31/2017 19:08
- Word background, inserting a picture into the background background - 03/21/2017 16:34
- Adding page numbers to the footer in Word - 03/10/2017 20:06
- Formatting and setting up a table of contents in Word - 03/10/2017 19:45
Two-sided printing
In Word, through the printer properties (similar to printing multiple pages), duplex printing is possible. In this case, the printing will be denser; a large number of sheets will not be required - it will be halved.
To print, you will need to find the “Double-sided printing” checkbox in the “Print” window on the right side and check it.
Duplex printing in Word
It is worth noting that some printers have the ability to print on both sides at once. However, most do not have this function. And the program will print all even pages first. Then he will ask you to move the paper. And the user will need to rearrange the tray. Moreover, do this in such a way that odd-numbered pages are printed on the blank side of the sheet (arrange it in accordance with how the printer prints). This can be practiced separately to get used to each specific printer.
How to Print in Windows 10 Directly from File Explorer (Documents and Images)
If you've installed and configured your default printer, you can print documents and images directly from File Explorer. On Windows 10, open File Explorer and navigate to the file you want to print. Select it and go to the Share tab on the ribbon. In the Send group, click or tap the Print button.
The file is sent directly to the printer, where it is printed using default print settings.
Instructions for connecting the printer
As you can see, typing is quite easy. This process will not cause any particular difficulties even for beginners. However, before choosing one or another printing method, you need to connect the printer to your computer or laptop. Otherwise, the PC will prompt you to save the file in PDF format as a kind of print result or give you another error.
Setting up the printer
One way or another, after installation, the name of our printer will appear in the “Printers and Scanners” window. When you click on it, three buttons will appear. We are interested in the “Manage” button.
To configure the printer, click on the “Manage” button
When you click this button, a window will open in which you can view the printer properties, change print settings, and print a test page to check its operation.
Printer control window