Printing a picture on several A4 sheets allows you to make a poster, advertising poster, large geographical map or even a board game using a regular home or office printer. The drawing can be printed even without installing additional programs - a device driver and standard software included in Windows operating systems are sufficient.
Preparing for printing
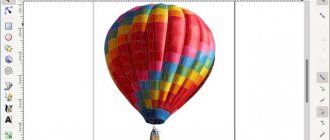
Selection of drawing. For clear printing, the image must be selected with a large expansion. The larger the poster, the higher the extension should be.
Selecting a printer. Any printer is suitable for printing posters on one A4 sheet. But to divide and print a picture on several A4 sheets, and then join them end-to-end to get a solid image, choose a device that can print the picture on paper without borders. Otherwise, you will have to cut off the white margins, which will affect the size of the poster.
Additional options
There are also various online services and programs for printing large images on A4. These include Poster Printer, Posteriza, Rasterbator. Each program has its own advantages: for example, Poster Printer allows you to specify gluing and cropping margins when printing, and Posteriza allows you to add a background image, text, and frame. It is worth studying these features to choose the right service.
Some programs that can be used to print a large image on A4 sheets do not have a free version. This is why they are most often used by people who regularly need to make posters, large drawings or maps. For one-time use, it is better to prefer a free service or one of the methods described above.
How to print a drawing on a printer
- Open a graphic file. To call up the printer menu, click on “Print” or simultaneously hold down the Ctrl + P buttons.
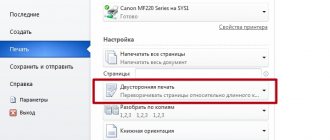
- Click on “Properties”.
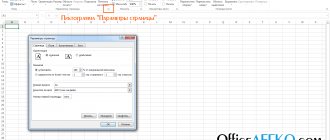
- In the window that opens, click on the “Page” tab.
- In the “Page Layout” block, select “Poster Printing” from the list and click on “Set”.
- Specify the splitting method. To cut into 4 parts, put down 2x2, but the format can be different: 3x3, 4x4.
On a Canon printer, to select the layout format, go to “Page Layout” and click on “Poster 2x2” (“Poster 3x3”, “Poster 4x4”).
On a regular printer, it is not always possible to divide a large image into parts through the settings. Then additional software is used.
Photo Viewer
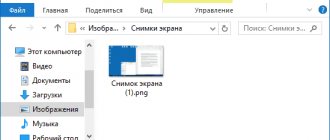
- Open the original image in the program
. By the way,
not suitable for this purpose, it’s just
. - Open
on the top control panel. Or you can use the hotkeys CTRL+P. - In the new window, select your printer, number of copies, paper size/type, print quality and go to the tab
. - Next step:
. - The form in which you need to set the desired settings may be very different from the one shown here. For example, this could be a separate tab called
. Or the necessary parameters are located directly on the tab
. In any case, look for the word Multipage,
and go to the Settings tab. - You can select sheets that do not need to be printed; after clicking with the mouse, they become
. The only inconvenient thing is that in this mode the picture itself is not visible and it is unclear which panels may be empty. - You can also set the printing of guides, which is especially important if there are a lot of sheets: Cutting lines - the image on each page will be placed in
, along this line you will need to very carefully cut off the excess. - Overlap marks - small rectangles located only along
.
Printing a picture via Paint
The program is available in all versions of Windows. The poster is sent for printing via Paint without changing the printer settings.
- Open the drawing in Paint. You can launch the graphic editor through the context menu of the image using the “Edit” item. Or first go to Paint through the built-in Windows search, and then open the file.
- In the “File” menu, click on “Print”.
- Click on “Page Options”.
- Set portrait or landscape orientation.
- In the “Fit” item, indicate the number of fragments in the horizontal and vertical rows. If the poster needs to be cut into 4 A4 sheets, the value 2x2 is selected.
- The correctness of the breakdown is checked during the preview.
Microsoft Excel/LibreOffice Calc
Another very common option and it requires office suites. Let's look at an example.
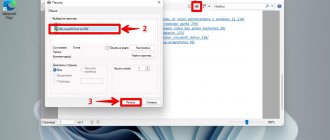
- Create a LibreOffice Calc document on the desktop (right-click on an empty space and
). - Open the created document.
.
. The program itself will divide the drawing into the required amount using an A4 piece of paper. We need to check and print.
Printing in Excel
- Create a new document in Excel.
- In the “Insert” menu, select the “Drawing” block.
- Find the image file.
- In the “View” tab, click on “Page Layout”.
- Stretch the image vertically and horizontally, pulling it out by the markings. For convenience, reduce the image scale by moving the slider at the bottom right.
- Open “File” and select the “Print” option.
- Decide on the page orientation. Set the width of the fields.
- Preview the image to check the correct division of the large image.
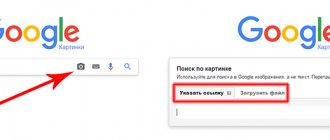
Online printing via Photoshop
- Check the program to see if it can print a picture in the format you need.
- Launch and go to the “File-Print” section.
- Select a printer from the available equipment.
- Enter the number of A4 sheets.
- Choose a pagination method.
- Decide on color preferences.
- Choose the orientation of the sheets.
- Indicate the source of receipt of the material.
- Set the Photoshop quality.
- Check the resulting breakdown and print the drawing.
A large drawing in Photoshop can be divided into the required number of fragments, each of them can be copied and pasted into a separately created file in MS Word with the specified A4 dimensions. Then print it as a regular document with the extension .doc, .docx.
Preparatory stage
It should be understood that the picture that is planned for printing must be large in size. Otherwise, the print quality will be poor. This relationship is straightforward - the more A4 sheets are used, the larger the size of the source should be.
Most printers from popular brands (HP, Canon, Epson, Kyocera, Samsung and others) are guaranteed to support printing on A4 sheets. The only problem may be with borderless printing. Therefore, first find out the capabilities of your equipment in its characteristics. You can find them in the instructions for the device or in the description on the manufacturer’s website.
Programs for printing posters on A4
Placard
- Download the software, install and launch.
- Open the desired image.
- In the “New Size” panel, set the required size of the future poster.
- Print fragments or save them on your hard drive for later printing.
Easy Poster Printer
Select a picture using the “Poster Image” function. Settings are made using the following options:
- Dimensions – allows you to change the dimensions of the poster;
- Paper scaling – increases (Scale Up) or decreases (Scale Down) the divided image to save paper;
- Paper orientation – changes the page orientation;
- Quality – adjusts the quality of picture playback;
- Cut-lines – responsible for the width of the marking line.
To start printing, click on Print Poster.
Posteriza
You can install it on your computer for free or use the portable version without installation.
- Launch the program.
- In the language menu, click on “Russian (RU)”.
- Click on “Open Photo” and find the picture.
- To remove an unnecessary text block, open the “Texts” tab, delete the excess and click on “Apply”.
- In the “Size” tab, change the dimensions of the poster, indicate the required number of fragments.
- Print the picture.
Recommendations
To get high-quality images, we suggest you learn some useful tips:
- The choice between glossy and matte paper depends on whether you plan to frame the photo or not. In this case, we recommend a matte finish.
- When the image seems insufficiently bright, contrasty, or defective, this needs to be corrected.
- The brightness and saturation of electronic and paper photos can often differ. It is best to make a test copy of the print to understand the “character” of the image.
- After processing the file, save it not in jpeg format, but in tiff format. This format provides the best print quality.
- The image resolution must be good, preferably 600 dpi.
- Use Dropbox or similar to print directly from your smartphone.
- MFPs with the Cloud Ready label can print images from the cloud from any device.
- The finished photo should not be immediately placed under a frame or in an album. Let the paint dry completely for at least half an hour.
Sources
- https://printeru.info/pechat/foto
- https://nastroyvse.ru/programs/review/kak-raspechatat-kartinku-na-neskolkih-listah-a4.html
- https://PoPrinteram.ru/kak-raspechatat-kartinku-na-neskolkih-listah-a4.html
- https://tonercom.ru/blog/pechat-na-naskolkih-listah-a4
- https://lumpics.ru/how-cut-picture-into-parts-online/
- https://printside.ru/blog/kak-razbit-kartinku-na-chasti-dlya-pechati/
- https://PrinterProfi.ru/raznoe/kak-raspechatat-kartinku-na-neskolko-listov-a4.html
- https://studiya-f.ru/tehnika/kak-raspechatat-kartinku-na-neskolkih-listah-a4-prostye-sposoby.html
Rasterbator.net
Free online service for laying out large designs and preparing them for printing.
After processing in Rasterbator, a file with a .pdf extension is obtained, which stores the image, divided into A4 format fragments.
Despite the English-language interface, the service is easy to use.
- Open the service.
- Left-click on “Create your poster”.
- Select the graphic object that you plan to divide into parts. In the “Upload” block, click on “Browse”, select a file and click the “Upload” button.
- In the Paper sting block, select the layout of the sheet: Landscape - landscape, Portrait - portrait.
- To get a margin of 1 cm on each side of the sheet, check the box next to “Add margin of 10 mm each side”. Instead of 10, you can put another number to change the indent width.
- There is no checkmark next to “Overlap page by 5 mm”.
- In the “Output size” block, set the number of elements (fragments). If you put 2, then the breakdown will be done in a 2x2 format, that is, into 4 sheets.
- Click Continue twice and go to the Color section.
- In the “Raster color” block, set “Multicolor”, and in the “Background color” block, select “White”.
- Click Continue to go to the “Options” section.
- In the Output block, click on Enlarge.
- In the Other block, check the box next to Crop marks so that marks are displayed on the photo for convenient cropping of the sheet after printing.
- Click on “Rasterbate 4 pages” to start breaking down and saving the image in PDF format.
3.9 / 5 ( 7 votes)
How to print a large image
You will need
- Printer and consumables.
Instructions
Start by turning on and preparing the printer for printing. Make sure there is enough paper in the input tray, the machine is connected to the computer, and the toner is loaded.
Taking advantage of the printer software itself is the easiest way to print an image that won't fit on a sheet of paper.
Does not require the use of additional software - the automatic separation function is included in the drivers of most modern printing devices. To use it, for example, in the Windows 7 operating system, start by launching the standard file manager - Explorer.
Important
Press the Win + E key combination and, when the application starts, use the directory tree to navigate to the folder where the desired image file is stored.
Select an image, then bring up the Send to Print dialog box. You can do this by clicking Print at the top of the Explorer window, or you can right-click the file and select Print from the pop-up context menu. A window titled “Print Images” will open.
From the drop-down list under Printer, select your desired printing device. In the Paper Size box, set the size of sheets to use, then click the Options link in the lower right corner of the window. In the additional dialog box that appears, you need to click on “Printer Properties” and launch the driver for this device.
Depending on the type of printer you are using, the print settings window may look different, and the desired setting may have a different label.
For example, in the Canon driver, open the Page Layout drop-down list and select the appropriate row: 2x2 Poster, 3x3 Poster, or 4x4 Poster. And in the Print Options panel of a Xerox printer, this option is in the drop-down list labeled “Page Layout.”
Choose to fit a large image onto four, nine, or sixteen sheets of paper, depending on the size of the image.
Click the OK button in the device driver panel, then the same button in the open print options dialog box, and finally the Print button in the main window to send the image to the printer. After this, the image will begin printing, during which you will see a corresponding information message on the screen.
Sometimes situations arise when you need to print large format photos that cannot be printed on a regular printer in standard mode. You can set up printing so that the photo is printed in sections.
Instructions
Run the program to print the image in sections. Adobe Photoshop is ideal for quiet purposes, but not everyone has it. Any program that allows you to print part of an image will do.
Advice
Open the file you want to print. Go to your print settings by going to the File menu and selecting Print with Preview.
Set the paper size by clicking the Page Setup button - you can also adjust the image margins there.
You can print on both plain paper and photo paper. Also remember that a lot depends on the type of printer. There are printers that can print large formats, while others can only print on A4 paper.
However, the prices for plotters are very high, so it is not worth buying such a device.
Adjust the image scale in the “Scale” item. Indicated as a percentage. Uncheck Center Image to start printing from a corner of the image.
Specify the height and width of the part to be printed, or set the margin from the edge in the Position area. Click the Print button to select your printer and print settings for the printer itself: print quality, paper type, color settings, etc.
You can return to the previous window by clicking the “Cancel” button.
Print each part of the image like this.
Be prepared for the fact that the print will come out with a slight error due to a mismatch between the parameters of the virtual card in the computer and the real physical ones. Carefully cut the pieces and glue them together.
If you are looking for professional quality photographs, contact specialized centers. Typically, most of this information is available online.