Good day, dear readers of my blog. I haven't written about Photoshop for a long time. We need to improve. Today we will talk to you about a very simple option, thanks to which you can make pictures more attractive and the site more beautiful.
I myself use this function for pictures in almost every article I write. How else? You take a screenshot, and around the edges there is a white color that merges with the background of the site itself. Stroke in Photoshop helps. We will talk about her today.
While I was preparing for this article, I surfed the Internet, looked at what others were writing and was amazed! How complicated and confusing everything is. This operation takes me no more than a couple of minutes. Now I’ll show you how I cope with the task.
From this publication you will learn how to work with rectangular drawings, text and non-standard shapes. Shall we begin?
Simple processing of rectangular images
I have already told you how to make a beautiful frame and blur the edges in Photoshop. Today I will teach you how to outline them with patterns in two clicks, complement the outline with gradients and one color. This is done as simply as possible.
I have already created a ready-made base where I will insert a rectangular photo. If you need to outline inside a photo, this is not necessary. But since I want to show you all the capabilities of the tool, I had no choice. Now you will understand everything.
In the article on how to stretch an image, I told you why it is better not to copy the image using Ctrl + C and paste (Ctrl + V), but to drag it from the folder to the program window. I won't repeat myself. It was in this way that I added a photo of a set of micro SD and USB adapter from Aliexpress to a previously prepared window.
I don't do anything else. I simply click on this layer in the menu on the right to make it active. Next, in the panel just below, I go to the “Add Layer Style” tool and find the stroke among the tools.
I often process pictures in batches, like screenshots. I just open all the photos at once and work with the size and stroke. In this case, the Add Layer Style tool is closed. To open it, you just need to click on the lock next to the image layer and you will be able to trace the edge.
Filling a shape with color
The next step we typically do after selecting the Shape option is to select the color to fill the shape, in Photoshop CS6 and above, this is done by clicking on the Fill field in the Options Bar:
Click on the button in the options bar to open the shape fill properties dialog box.
This action opens a window that allows us to choose from four different ways to fill out the form, each of which is represented by one of four icons located along the top of the window. The purpose of the icons, starting from the left edge:
- No Color - white rectangle with a red diagonal line, no fill
- Solid Color - fill with solid color
- Gradient - fill with a gradient
- Pattern - filling with a Photoshop pattern (pattern)
Various mold filling methods
Text
If you want to outline text, you can also use these steps. Just write the text. Click on a layer to activate it.
Next, just below, select “Add Layer Style”, in the menu that appears, find the stroke and apply it to the font.
Complete all the settings and you're done. The letters are outlined.
By the way, there is a separate article on how to beautifully outline text on my blog.
Vector mask
The vector mask function allows you to limit work with an image to a selected outline. For example, when you use a brush to paint a shape, the color will not go beyond the outline, even if you drag the brush outside its boundaries.
As you can see, Pen gives you a lot of possibilities for vector graphics. It is especially often used to highlight complex shapes by creating an outline and forming a selection area. But it is also useful when drawing, thanks to various options that allow you to create and edit images. If you didn't know how to use the pen in Photoshop before, get acquainted with its parameters and test them in practice. We are sure that soon this tool will become your constant assistant in working with Photoshop, and you will often use it when creating collages, vector drawings, and transferring figures to another background.
Free stroke - shapes
I put a screenshot of space candies from Ali on the blank and I want to circle the image itself in an oval. How to do it.
First I'll rasterize the layer. This is necessary if you simply dragged a picture from a folder into the program’s working field. Right-click on the selected layer to make an additional window appear, and then select Rasterize.
Gradient fill
To fill your shape with a gradient, select the Gradient option. Then click on one of the thumbnails to choose a preset gradient, or use the gradient strip thumbnail below to create your own gradient variation.
Select a ready-made one or create your own gradient to fill the shape.
Here's the same shape, only now it's filled with a gradient:
A shape filled with one of Photoshop's preset gradients.
Free stroke of an object
To outline a free-form object, the first thing you will need to do is select a brush.
Set it up right away. Decide on a color, in my case white is best, size, hardness, transparency, and so on.
Now, you need to select the shape. Make "ants" crawl along the edge. This can be done using a pen, a magic wand and many other tools. If you don't know how to do this, read my article about five ways to cut out an image.
I'll use a simple method. I'll hold Ctrl and click on the layer thumbnail. By the way, I again took the picture from Ali as an example. This time it's a "World Map" wall sticker .
Now I go to the contours tab and create a new worker.
All that remains is to right-click on the new path and select a stroke.
OK it's all over Now. If you liked this article, subscribe to the newsletter and I will make your life easier. There are many methods to complete a task. I find the simplest solutions.
Solid Color
To fill your form with a solid color, select the Solid Color option, second icon from the left:
Solid Color option to fill the shape with a solid solid color
With the option active, select a color for the shape by clicking on one of the color swatches. Colors you've recently used in Photoshop will appear above the main swatches:
Select a color by clicking on the swatch.
If the color you need is not among the samples presented, click on the “Color Picker” icon located in the upper right corner of the window:
Click on the Color Picker icon to select your own color.
A color picker dialog box will open, select a color from it and click OK to close the Color Picker after selecting the color you want.
As you can see in the figure below, after these actions we have the same form, only now the form has a color:
A figure filled with color.
Learning Photoshop
If you want to seriously study Photoshop, not scour the Internet for answers to certain questions, but systematically and consistently comprehend the basics of this amazing program, even if you are a complete zero, then I highly recommend Zinaida Lukyanova’s course - “ Photoshop from scratch in VIP 3.0 video format "
Even if you are a beginner, I will show you how you can quickly master Photoshop, create a website, promote a group, and not spend a lot of time and money. Creating is easy and enjoyable if you don’t bother with complicated settings. Find out secrets and learn from the experiences of others.
Until next time.
Free pen
This tool allows you to create various curves for a vector drawing in Photoshop. Unlike the previous mode, the free pen allows you to move it across the sheet and create a variety of images without using anchor points. You can also fill a drawn figure in Photoshop with color, create a stroke, select it, or use the “Free Transform” function.
In Free Pen mode, you can also customize some settings. The “Error” parameter, when set to 2-3 pixels, creates an unsmoothed, unsmooth outline, but at 10 pixels it becomes smooth.
By selecting the Magnetic option, you create a path using the same principle as the Magnetic Lasso tool. For the “Magnetic” parameter, you can specify the width in pixels, contrast with the background, and frequency of anchor points. By selecting this option, we drag the pen and anchor points are automatically created.
Enable additional options
Outline selection in Photoshop
Next, we invite you to experiment on your own. Believe me, you will be able to perform various unique operations with the material at hand without any help. Also try repeating the previous steps without any prompts.
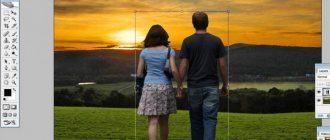
Selecting a path in Photoshop is one of the simplest operations. Only at first it seems very difficult. If you learn all this, you will be able to create very interesting collages in the future. For example, let's finally try to create a unique picture. Let our man be outlined. The stroke will be colored in gradient colors. Behind the man there will be the inscription “Kotelnich”. In this case, the person must obscure one of the letters with his head. Can you create such an image yourself? If not, then read the instructions.