By default, the ability to see hidden files is disabled in any version of Windows. This is necessary so that inexperienced “dummies” do not accidentally delete anything and disrupt the operation of the OS. The solution is quite logical, since these folders are rarely needed. And even then - only to a few users. But sometimes there is a need to look at hidden files.
For example, during Windows optimization and garbage cleaning. Many programs (Microsoft Word, Skype) create hidden files during operation. Over time, they become unnecessary, but are stored on disk and take up extra space.
Very often gamers need to enable hidden folders and files. After all, they are where saves from many games are stored.
Also, displaying hidden files in Windows 7,8,10 and XP is required by users who want to hide documents on a flash drive, but do not yet know how to find them later. In general, there are a lot of reasons.
Good to know: How to hide a folder on your hard drive?
I should immediately note that this setting is carried out differently in different versions of Windows. Although some methods may be the same. Therefore, below are several instructions on how to enable hidden files in all Windows - “seven”, “eight”, “ten” and XP. Plus, there is a universal method that works on all operating systems.
How to open hidden files on Windows 7?
- Press Win+R, write control folders and press Enter.
- Open the “View” tab, scroll the slider down and check the “Show…” checkbox.
- Click Apply to save your changes.
Ready.
If you need to disable their display, then in the same window, check the box “Do not show...”.
Second way:
- Go to Start, open Control Panel and click on the Folder Options shortcut.
- Select the “View” section, scroll the slider down and activate the “Show...” item.
- Save your changes by clicking Apply.
And the third way:
- Open any folder you like.
- Click the Alt button and a menu like this will appear.
- Click Tools – Folder Options.
- A familiar window will open: to enable showing hidden files, go to the “View” tab and check the “Show...” checkbox.
As you can see, there is nothing complicated here. Choose any method that suits you best and use it at the right time.
When you enable viewing of hidden files in Windows 7 using any of the methods described above, they will be visible everywhere. Including on a flash drive. You just need to connect it to your PC or laptop - and you will see the hidden folders (provided that they are there). The same applies to an external HDD.
We've sorted out the "seven", now let's move on to the "eight".
System folders in a tester's work
Beta testers are users who volunteer to test early versions of software and operating systems. Such users are faced with the task of identifying possible errors in the functioning of the test object and reporting them to developers. During the installation process of the software under test, a huge number of hidden folders are created, the contents of which are necessary for conducting checks and generating reports:
When testing computer games, it often becomes necessary to replace your own saves with those provided by the developer. And since the necessary files are usually stored not in the application folder, but in the hidden “AppData” directory, it will not be possible to replace them without additional actions.- To check the installation process, the installation procedure must be carried out multiple times, using different settings options and each time making sure that not a single file created at the previous stage remains on the computer. Most installers create data in hidden temporary directories, without access to which correct testing will be impossible.
- When mobile applications fail, developers usually ask testers to provide a crash log—a file containing technical information about the situation that occurred on the user’s device. This data is also saved in invisible folders - “ProgramData” or “AppData”.
How to enable hidden files in Windows 8?
There are also 3 options to choose from. The first two are described above in the instructions for Windows 7. That is, you can enable hidden files in Windows 8 by entering the control folders command. Or by selecting the “Folder Options” shortcut in the Control Panel.
But there is another way to show hidden files in Windows 8:
- Open any folder you like.
- Select the "View" section.
- Click on “Show or hide”, and then check the “Hidden elements” checkbox.
Ready. And not only in the current folder, but also in others. The same methods will help you display hidden files on a flash drive or external HDD – you just need to connect them to your computer or laptop.
Good to know: How to disable automatic updates in Windows 8?
Possible mistakes
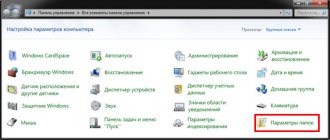
How to enable the “Show hidden files and folders” option
Sometimes a situation occurs that the user activates the “Show hidden files and folders” option, but the switch automatically switches to the “Do not show hidden files and folders” position. In this case you need:
- Using Win + R, launch the Run tool, type regedit in the line and click OK.
Using the “regedit” command you need to launch the Registry Editor
- In the window that opens, on the left side, go to: HKEY_LOCAL_MACHINE\SOFTWARE\Microsoft\Windows\CurrentVersion\Explorer\Advanced\Folder\Hidden\SHOWALL.
- If in the right part of the window there is a CheckedValue parameter (with a value of 0), type REG_SZ, then it must be deleted. To do this, you need to right-click on the name and select “Delete”.
- If the list contains a CheckedValue parameter, type REG_DWORD, then change its value to 1. To do this, double-click on the name and in the window that opens, make changes to the “Value” line.
The CheckedValue parameter must have a value of 1
Otherwise, the parameter must be created. To do this, right-click on a free area of the window, select “New”, then “DWORD Value”. Call it CheckedValue and give the value 1.
- Go to: HKEY_CURRENT_USER\Software\Microsoft\Windows\CurrentVersion\Explorer\Advanced.
- Find the Hidden parameter (with value 0), type REG_SZ, in the list and delete it.
- If the list contains a Hidden parameter, type REG_DWORD, then change its value to 1. Otherwise, the parameter must be created.
- Find the SuperHidden parameter, type REG_DWORD, in the list and change its value to 1.
- Press "F5" to refresh the editor window and close it.
The last method, which works on Windows 8, is also suitable for the “ten”
To enable hidden files in Windows 10:
- Open any folder.
- Select the "View" section.
- Check the "Hidden Elements" box.
After this, you will be able to see hidden folders and documents in any partition of your hard drive or on a flash drive (it must be connected to the PC).
If you want to hide the folders again, uncheck this box.
There is also another way to enable the display of hidden files in Windows 10:
- Click Win+Q and write “File Explorer Options” in the search box. Enter “Explorer Options” in the search field
- Press Enter and a familiar window will open.
- Go to the “View” section and check the “Show...” checkbox.
Ready. Now you can open any hidden files on Windows 10. As you can see, the methods on different versions of the OS are quite similar, but differ in minor nuances.
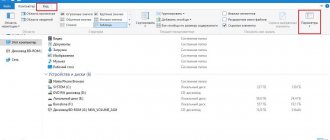
Showing hidden folders using a file manager
To avoid opening hidden folders in Window 7 on an ongoing basis, you can use third-party software, such as the Total Commander file manager. In its interface, go to the “Configuration” tab and go to the settings section.
In it, select the “Contents of panels” item, where we check the appropriate boxes, as shown in the screenshot below.
Then click “OK” and see that hidden system folders have become accessible.
It is worth noting that the enabled display of hidden folders in this program will only work in this program, and not in the Windows 7 interface as a whole. Which is very convenient, because it will not distract the user with unnecessary information. In addition, hidden non-system folders, created for example on the desktop, will only be displayed in the file manager when the corresponding option is enabled.
Rate this article:
Additional method
This paragraph will tell you how to make hidden folders visible through the options in Explorer.
- First you need to open the search bar. This is done using the keyboard shortcut Win + Q.
- In the window that appears, you need to enter “Explorer Options”.
- After going to this section, you need to open a tab called “View”.
- Mark the line that allows display of hidden elements.
- It is also recommended to allow the display of system directories. To do this, you need to remove the marker before the line responsible for hiding system documentation.
- In the warning that appears, you must confirm your choice.
Additional method
Another much simpler option on how to make hidden folders visible in the Windows 7 operating system:
- Open any directory.
- At the top of the window, activate the section called “Arrange”.
- Select the line “Folder and Search Options”.
- As soon as a new window appears, launch the “View” subsection and activate the “Apply to folders” line. Thus, hidden directories can be made visible both in this section and in all others.
Changing directory properties to make them visible
In order to open previously hidden directories in Windows 7, you need to right-click on the folder that is currently hidden. Then you need to select the item called “Properties”.
A window will appear on the screen containing all the necessary information about the properties of the folders. Uncheck the box next to “Hidden” and confirm your choice by clicking on the “Ok” button.
Now you can hide the display of folders or leave everything as is.
How to Hide Folders Using Free Hide Folder
A much more convenient way to hide folders in Windows is to use a special program called Free Hide Folder, which you can download for free here: https://www.cleanersoft.com/hidefolder/free_hide_folder.htm. Do not confuse this program with another product - Hide Folders, which also allows you to hide folders, but is not free.
After downloading, simply installing and launching the program, you will be asked to enter a password and confirm it. The next window will ask you to enter an optional registration code (the program is free and you can also get a key for free), you can skip this step by clicking “Skip”.
Now, to hide a folder, click the Add button in the main program window and specify the path to your secret folder. A warning will appear that, just in case, you should click the Backup button, which will save the backup information of the program in case it is accidentally deleted, so that after re-installation you can access the hidden folder. Click OK. The folder will disappear.
Now, the folder hidden using Free Hide Folder is not visible anywhere in Windows - it cannot be found through search and the only way to access it is to run the Free Hide Folder program again, enter the password, select the folder you want to show and click "Unhide" causing the hidden folder to appear in its original location. The method is much more effective, the only thing is that you should save the backup data that the program asks for so that if it is accidentally deleted, you can again gain access to hidden files.
Carrying out a search
So, now all folders and files are open, which means you can start searching. This is quite problematic for the sole reason that no one can tell where to search. It’s good if there are only a few folders on the disk and one of them turns out to be the one you need. But if there are a great many files, then you will have to reconsider everything that was once hidden by your hands (remember that such folders and files stand out with their less bright shade).
If you are looking for, say, photographs, you can try using disk search. To do this, type .jpg in the search bar (in this case, this is the file format) and press Enter.
The system will show all files with the same extension that are on the disk. There may be a lot of them, but among them, quite possibly, there will be exactly the photos that you are looking for. Good luck in your search.