A huge number of owners of NVIDIA graphics cards suffer from the same problem - the inability to open the Nvidia Control Panel. This problem was noticed on all versions of the Windows operating system, from Windows 7 to Windows 10. All attempts to open the Nvidia Control Panel through the Start menu proved to be completely useless.
In this article, we will look at the problem of the inability to open the Nvidia Control Panel. We will try to update and reinstall the latest drivers for the video card from the official website. We will also try to deal with the NVIDIA Display Driver service, update the .NET Framework libraries, restart the Nvidia Control Panel process, and much more.
Hardware faults
If the user has recently opened the computer case, the problem may be with loosely connected cables or connectors.
It is recommended to check all connections for secure fastening; probably the cable to the video card has come loose and caused the problem. Also, if the connection points are too dusty or dirty, they need to be cleaned. Good day our dear readers. Today's article will be devoted to such a popular thing as NVIDIA drivers, or rather the NVIDIA video card control panel. If you have a problem with your NVIDIA panel and it somehow disappeared, then know that you can return it. In this article, we'll do just that—get your NVIDIA Control Panel back.
There are generally three options that can return your missing NVIDIA Control Panel. Of course, there are exceptions, for example, if you have virus software in your system, or when your operating system, on its last legs, behaves as it pleases. However, we will talk about the classic problems of missing NVIDIA Control Panel and how to get it back.
First of all, let's focus on the simplest point. Often, the NVIDIA control panel disappears after it is disabled from startup. This is the main reason that when you boot your operating system, the NVIDIA Control Panel does not load with it. In order to return the NVIDIA control panel, you need to open the utility built into the Windows operating system and write msconfig there, then press Enter and a window will open in front of you where we are interested in the Startup tab. Carefully study the list of available startup items and find the NVIDIA Control Panel there. You need to check the box next to the NVIDIA Control Panel item, which will allow you to launch the NVIDIA Control Panel immediately after loading the operating system. Of course, you must save the changes you have made and restart your computer for the changes to take effect.
Next, you need to make sure that the service responsible for the NVIDIA Control Panel is enabled. Go to the Control Panel and find the Administration section there. You need to pay attention to the Services item. Going there, we look for everything related to NVIDIA and make sure that the status of these services is not Disabled. If you see that something is disabled, simply enable it and set it to Automatic Start in the settings so that the service starts automatically after loading the operating system. Reboot the computer for the changes to take effect and check if the NVIDIA control panel appears.
If none of the above helped, then it’s time to reinstall and at the same time update your video card drivers. Go to the website of the manufacturer of your video card and enter its name to download and install the latest drivers. Restart your computer for the changes to take effect and check if your NVIDIA Control Panel appears.
Thus, we have become acquainted with the most likely reasons why the NVIDIA control panel does not load when your operating system boots. As we noted above, there are exceptions, but these are the most likely options for which such a paradox occurs. The most radical way to fix the problem is to reinstall the operating system. Alas, it is often better to reinstall everything from scratch than to understand an already dying operating system, teeming with viruses and all sorts of crooked programs and errors caused by them. In the Windows operating system, everything that you install is connected in one way or another, because to run certain programs, the same set of system libraries is used.
If the article helped you, then do not forget to return to our website. We publish articles every day and your visit to the site is gratitude for our work.
Good luck!
How to go into video card settings on Windows 10?
Go to the "System" settings group, select the "Display" tab and scroll down to the "Advanced graphics options" link and click on it. Then in the window that opens, select the type of application for which you will configure graphics performance.
Interesting materials:
How to set a password on your D Link router? How to set a password for Wi-Fi router DIR 615? How to set a password on a Tenda Wi-Fi router? How to set a password for the TP Link wr340g Wi-Fi router? How to set a password on a TP Link Wi-Fi router? How to set a password on a Tenda wi-fi router? How to set a password for the TP Link wr740n wi-fi router? How to set a password for a wi-fi router TP Link? How to set a password for a wi-fi router? How to set a password on a Tenda WiFi router?
How to open NVidia Control Panel on Windows 10 PC?
There are not many ways to open the NVidia control panel; let’s look at them in more detail.
Method No. 1. Via Control Panel
- Right-click on the Start icon and select Control Panel.
- A new window will open. Select "Hardware and Sound".
- Next, in Windows 10, you need to select “NVidia Control Panel”.
This is the standard way to access the utility.
Method No. 2. Via desktop
This method is the easiest. However, if you do not have drivers installed for your NVidia video card, the required item will not be in the list.
- Right-click on the desktop and select “NVidia Control Panel” from the drop-down menu.
- Afterwards the required settings window will open.
However, if the NVidia control panel does not open on Windows 10, there are a few simple steps you can take.
What to do if the NVidia Control Panel does not open?
If the settings window does not launch in Windows 10, and the item has disappeared from the list of desktop commands, we recommend checking whether the original drivers for the video card are installed or rolling back the Nvidia software to an older version. If a rollback does not help solve the problem, you should completely remove the drivers using the Display Driver Uninstaller program. The actions will be as follows:
- Reboot the PC in safe mode. Let's launch the program. Select the type of product. In this case, NVidia.
- Then click on the “Delete Reboot” button.
After uninstallation, you should go to the manufacturer’s official website, download and install the latest version drivers. The tool will work.
Also on the official NVidia website the following recommendations are provided for this problem:
- Check if the NVIDIA Display Driver Service is enabled. To do this, press “Win + R” and enter “services.msc”.
- The services window will appear. Find "NVIDIA Display Driver Service".
- This service should start automatically when Windows starts. If it is disabled, you should activate it back.
IMPORTANT! This service is disabled when hardware acceleration is enabled. Therefore, turn off this function in the program settings.
The next recommendation concerns registry settings. If the video card control panel icon starts to disappear, you should do the following:
- Open the registry editor. Go to the branch “HKLM\SOFTWARE\NVIDIA Corporation\Global\NVTweak”. Find the parameters “NoMenus” and “NoPages” and set them to “0”.
- After the system reboots, the missing video card control will reappear.
Direct monitor control utilities such as MagicTune or ForteManager interfere with the operation of the NVIDIA Control Panel. Therefore, if necessary, they must be removed.
Also, the last tip that the developers recommend if the control panel does not want to open is to change the language settings. You should set the format and system language to “English (United States)” in the Windows Control Panel (“Regional and Language Options”).
To learn how else to solve this problem, watch the video:
Deleting cache
GeForce Experience stores cache files in the AppData directory. Deleting the directory will reset the cache and update the client without losing any data.
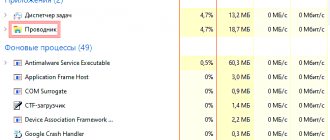
First you need to close all running instances of GeForce Experience. You also need to close some NVIDIA related processes. Expand Task Manager using the key combination Ctrl + Shift + Esc.
Click More details to expand all and find the processes:
Left click on each one and click end task in the lower right corner.
Then go to Explorer and click on Local Drive C. Open “Users” and double-click on the folder with the name of the current account. Open the AppData directory, if you don’t see it, click on “View” in the top menu and check the box next to hidden items.
Then follow the path: Local - NVIDIA Corporation - Nvidia GeForce Experience. Right-click on CefCache and select Delete. Launch the application and check if it now sees installed games.
Method #1 Reinstalling Nvidia drivers
First of all, you should try reinstalling the Nvidia drivers. To do this, do the following:
- Press Windows + R and enter devmgmt.msc.
- With Device Manager open, find the “Display Adapters” drop-down tab and open it.
- Right-click on your graphics accelerator and select “Uninstall.” Confirm your intentions by checking the box next to “Remove driver programs for this device” and clicking OK.
- Then go to the official Nvidia website to download the drivers needed for your video card. Note: We do not recommend that you select automatic driver search, as this sometimes leads to various failures, and it can also take a huge amount of time. It will be better if you use manual selection of drivers.
- After downloading the driver package from Nvidia's website, run the installer to begin the driver installation process. We have already removed the drivers for the video card through Device Manager, but it will still be better if you check the “Clean installation” option during installation.
- After installing the new drivers, restart your computer and then try accessing the Nvidia Control Panel again. Note: an alternative driver installation can be Device Manager, with the help of which you can also do this. However, under certain circumstances, various problems may arise. However, if you want to install drivers this way, then do the following: Press Windows + R and enter devmgmt.msc.
- Once you open Device Manager, find the “Display Adapters” drop-down tab and open it.
- Right-click on your video card and select “Update Driver...”, after which Device Manager will install everything itself.
Videos and screenshots
ShadowPlay technology, in addition to launching streams, allows you to record videos and take screenshots of games. Let's figure out how to shoot a video with Geforce Experience.
Geforce Experience is recorded via an overlay. Launch the game and open the Share tool by pressing ALT+Z.
Select "Record" and click "Start". You can also press the ALT+F9 key combination to quickly start the process of capturing video from the monitor screen.
To adjust the quality of the original ShadowPlay recording, go to the video settings. Here you can select the quality:
Attention! The higher the quality of the stream recording, the greater the load on the system.
Set the resolution. By default, recording resolution in GeForce Experience is set to Game. This means that video is captured at the resolution that is set in the game settings.
Here you can also specify where to save the Geforce Experience video; recording is best done on a logical drive in a separate folder.
After this, set the desired number of recording frames. There is no need to adjust the transmission speed, since this item applies to streams.
The Instant Replay feature in the ShadowPlay overlay allows you to save the last 30 seconds of gameplay. The tool allows you to record memorable moments while playing.
Geforce Experience makes it much easier to take screenshots while playing. To do this you need to use hotkeys. The default is ALT+F1.
Where are Geforce Experience screenshots saved? The created screenshots are saved in the gallery.
Filters
NVIDIA recently added a Freestyle feature. The main task of the tool is to improve image quality by applying Geforce Experience filters
To activate Freestyle, open the program settings and go to the “General” section. Check the box next to enabling experimental features.
Launch the GeForce Experience overlay while playing. On the left side, select "Filter".
Start adjusting sharpness, clarity, saturation, blur, etc. Any changes you make will affect the image quality.
Method #5 Fixing the Windows Registry
If you were still unable to resolve the problem when launching the Nvidia Control Panel, now we will try to fix the entries in the Windows Registry. As always, be careful when changing entries. We recommend that you create a backup of your Windows Registry so that if something unexpected happens, you can quickly recover.
- Press Windows+R, type regedit and press Enter.
- Go to HKEY_CLASSES_ROOT\Directory\Background\ContextMenuHandler.
- Find NvCplDesktopContext, right-click on it and select “Delete”.
- Now go to HKEY_CLASSES_ROOT\Directory\Background\shell.
- Right-click Shell and select New→Partition and name it Nvidia Control Panel.
- Right-click on Nvidia Control Panel and select New→Partition. Name this section command.
- Double-click on command and enter the value C:\Windows\System32\nvcplui.exe in the line, and then click OK.
- Exit the Windows Registry and restart your computer.
After making small changes to your Windows Registry, try opening the Nvidia Control Panel again. She should definitely open up calmly this time.
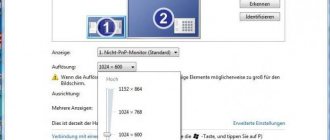
Method No. 4 Setting a higher resolution
Some users on the network were able to overcome the problem with the Nvidia Control Panel not starting using a rather strange solution - setting a higher resolution. Again, some users claim that it may not launch due to the low resolution.
- Right-click on the Desktop and select "Screen Resolution".
- Click the Resolution drop-down menu and select the highest possible resolution for your monitor.
- Apply the resolution changes.
With the resolution set higher, try launching the Nvidia Control Panel. If it starts, then the problem should be resolved and you can set your standard resolution.
Can't launch Nvidia Control Panel
Let's look at the main reasons for failures when launching the Nvidia Control Panel, there are several of them:
- Random operating system crash.
- Problems with the system services installed with the driver (“Nvidia Display Driver Service” and “Nvidia Display Container LS”).
- The installed version of Nvidia Panel is incompatible with the NET Framework utility.
- The video driver does not match the video card.
- Some third-party monitor control software may conflict with Nvidia software.
- Virus infection.
- Hardware reasons.
OS crash
Such problems occur quite often, especially among those users who experiment a lot with installing and uninstalling various programs. After uninstalling applications, “tails” may remain in the system in the form of library or driver files or registry keys.
These problems can be resolved by simply rebooting the working machine. If the problem occurs immediately after installing the driver, then the computer must be restarted, since some changes made to the system can only be applied after this action.
System Services
When installing software for a video card, the “Nvidia Display Driver Service” and “Nvidia Display ContainerLS” services (either both or just the first) are installed in the list of system services, which in turn can fail for a number of reasons.
If the suspicion falls on the incorrect operation of services, then it is necessary to restart each service. This is done like this:
- Open the Windows Control Panel and go to the Administrative Tools section.
- We look for “Services” in the list of snap-ins.
- We select the desired service and look at its status. If the “Running” status is displayed, then in the right block you need to click on the “Restart service” link. If there is no value in this line, then you need to start the service by clicking on the “Start service” link there.
After completing the steps, you can try to open the Nvidia Control Panel, and then restart the computer and check the functionality of the software again. If the problem is not solved, then move on to other options.
NET Framework
NET Framework is a software platform necessary for the operation of some software. Nvidia products are no exception. It is possible that a new software package installed on your computer requires a more recent edition of the .NET platform. In any case, you should always have the latest version.
The update occurs as follows:
- Go to the package download page on the Microsoft website and download the latest version. Today it is NET Framework 4.
- After launching the downloaded installer, you must run it and wait for the installation to complete, which occurs in the same way as installing any other program. After the process is completed, reboot the computer.
Invalid video driver
When choosing a driver for your new (or not so new) video card on the official Nvidia website, be more careful. It is necessary to correctly determine the series and family (model) of the device.
Read more: Determining the product series of Nvidia video cards How to find out the model of your video card on Windows 10
Driver search:
- Go to the driver download page of the official Nvidia website.
- Select the card series and family from the drop-down lists (read the articles linked above), as well as your operating system (don’t forget about the bit depth). After entering the values, click the “Search” button.
- On the next page, click “Download Now”.
- After another automatic transition, we accept the license agreement and the download will begin.
If you are not sure of your choice, then you can install the software automatically through the “Device Manager”, but first you need to completely remove the old video card driver. This is done using special software Display Driver Uninstaller. How to work with the program is described in this article.
- Call “Control Panel” and go to “Device Manager”.
- We find our video card in the “Video adapters” section, right-click on it and select the “Update drivers” link in the drop-down menu.
- A window will open asking you to choose how to search for software. We are interested in the first point. By selecting it, we allow the system to search for the driver itself. Don't forget to connect to the Internet.
Then Windows will do everything itself: it will find and install the latest software and prompt you to reboot.
Monitor control programs
If you use programs from third-party developers to adjust monitor parameters (brightness, gamma, etc.), such as MagicTune or Display Tuner, then they can cause conflicts in the system. To exclude this option, you need to uninstall the software you are using, reboot and check the functionality of the Nvidia Panel.
Viruses
The most “unpleasant” cause of failures and malfunctions in programs is viruses. The pest can either damage the driver files and the software supplied with it, or replace them with its own infected ones. The actions of viruses are very diverse, but the result is the same: incorrect operation of the software.
If you suspect the presence of malicious code, you need to scan the system with the antivirus you use, or use utilities from Kaspersky Lab, Dr.Web or similar.
Read more: Scan your computer for viruses without installing an antivirus
If you have doubts about the correct operation of programs or do not have experience in treating the system, then it is better to turn to specialized resources, for example, virusinfo.info or safezone.cc, where they will help you get rid of viruses completely free of charge.
Hardware problems
In some cases, proprietary software may not start due to the fact that the device is simply not connected to the motherboard or is connected but incorrectly. Open the computer case and check the tightness of the cable connections and the secure fit of the video card in the PCI-E slot.
Read more: How to install a video card in a computer
We have looked at several reasons why the Nvidia Control Panel may not work, most of which are not serious and can be resolved quite simply. It is important to remember that most problems are caused by simple carelessness or inexperience of the user. That is why, before taking active steps to remove and install software, check the equipment and try to reboot the machine.
We are glad that we were able to help you solve the problem. Thank the author and share the article on social networks. Describe what didn't work for you. Our specialists will try to answer as quickly as possible.
Setting up the broadcast
Before you start live broadcasting to your stream service accounts, you need to make the initial settings for sharing (Share) in the GeForce Experience program.
Open the settings menu in the utility interface by clicking on the gear icon.
Go to the "General" section. On the right side of the interface, select “Settings” in the sharing window.
A window will open in which you need to select “Connect”.
Select a resource to start the stream: Facebook, Google, Twitch or YouTube. Let's look at the example of Twitch.
Enter your account login and password or register a new one. Click “Login” to log in.
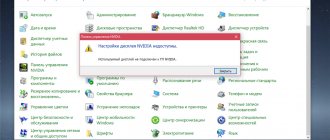
NVIDIA Control Panel does not open - symptoms and causes
As mentioned above, the symptoms of this problem are the Nvidia Control Panel not launching when you try to activate it. When you click on the Control Panel icon, the program simply does not launch, and clicking it again does absolutely nothing.
Trying to launch the NVIDIA Control Panel
From time to time, this problem arises after installing some modern games, for which the video card driver in certain cases turns out to be “not ready”.
So, what are the main reasons for the situation in which the NVIDIA Control Panel does not open? They are as follows:
- Random computer failure;
- Problems with the Nvidia Display Driver Service and Nvidia Display Container LS system services (the second if available);
- Legacy versions of the NET Framework and Microsoft Visual C++ 2010 utilities;
- Incorrect Nvidia driver for your video card;
- For some reason, hardware acceleration is disabled in Windows settings;
- Monitor control programs (for example, MagicTune) conflict with the Nvidia Control Panel;
- Outdated version of the Windows installer 7, 8, 10 (Microsoft Windows Installer)
- The work of virus programs.
Problem with NVIDIA
Instructions on what to do if you are unable to connect to the NVIDIA GeForce Experience website.
Why doesn't GeForce Experience find games on Windows?
Before you begin troubleshooting the problem, you need to make sure that the problematic games that GeForce Experience does not see are supported. If they are supported, then the application does not find them for the following reasons:
Lack of administrator rights. If the games are located in folders that are not accessible except by the administrator, then it is better to grant these permissions to the GeForce Experience executable.
Game location not specified. The program will search for games only in the folders specified in the parameters. If some are installed outside the specified folders, then you need to add them to solve the problem.
No folder permissions. If the folder is restricted, give it full permissions to the Everyone account.
Firewall blocking. The application needs to connect to the Internet correctly to check the game information. Windows Defender Firewall may block its access, so make sure it is allowed.
Problems with the application. Test its functionality by enabling experimental features, deleting the cache, or reinstalling and updating to the latest version.
Driver update. GeForce Experience also does not see games if the client is updated and the video card drivers are outdated. Install the latest drivers using this application.
How to open NVIDIA Control Panel
I recommend following these steps if the NVIDIA Control Panel does not open.
- Restart your computer. If the problem is of a random nature, it will disappear;
- Try launching the Nvidia Control Panel from the Windows 7-10 Control Panel. Log in to the latter, go to “Hardware and Sound” and there click on “Nvidia Control Panel”;
Launch Nvidia Panel via Windows Control Panel
- Check the functionality of Nvidia Display Driver Service and Nvidia Display Container LS. Click on the “Start” button, enter services.msc in the search bar, and in the list of services that opens, look for the specified services (the second one may be missing). Double-click on the name of the specified service, and set the “Startup Type” to “Automatic”. After making changes, restart the specified services, and then restart your computer;
Driver service service
- Turn off and on your video card. Click the “Start” button, enter devmgmgt.msc in the search bar, and in the launched Device Manager, look for your video card (located in “Video Adapters”), right-click on it and select “Disable”. After disabling, re-enable it by right-clicking on it and selecting “Enable”;
- If the problem appeared after updating the drivers, roll back the video card driver to the previous version. Click the Start button and type devmgmt in the search bar. msc, find your video card in the list of devices, right-click on it, select “Properties”, go to the “Driver” tab and click on “Roll Back”;
Roll back driver
- Download the latest drivers for your video card from the developer’s website and install them on your computer, this can help in a situation where the Nvidia Control Panel does not work;
- Download and install the latest versions of Microsoft NET Framework and Microsoft Visual C++ 2010;
- If necessary, enable Windows hardware acceleration. Right-click on an empty area of the Windows desktop, select “Screen Resolution,” then click on “Advanced Settings.” In the menu that appears, go to the “Diagnostics” tab, click on “Change settings” and enable hardware acceleration (if possible);
- Change the system registry values. In the search bar of the Start button, enter regedit, and go to the route HKLM\SOFTWARE\NVIDIA Corporation\Global\NVTweak, where you find the NoMenus and NoPages keys and set their value to 0 (zero);
- Check your computer for virus programs (for example, using Dr.Web CureIt!, Malware Anti-Malware and other similar programs);
- Disable monitor management utilities (if available);
- Download and install the latest version of Windows Installer on your computer;
- Perform a system restore by rolling back to a previous restore point. Click Start, type rstrui in the search bar, select a working restore point and roll back to it.
Adding folders to game locations
It is quite possible that you installed the game in another place where the application simply does not see it. You need to specify its location in the parameters.
Open the program and go to Options. Then expand the “Games” tab and look in the “Location” field to see if there is a folder with the problematic game. If missing, click the plus and indicate its location.
After the automatic search, check whether the program sees the game.
The most effective method
The most effective method in a situation where the NVIDIA Control Panel does not open is to completely remove previous Nvidia drivers using the Display Driver Uninstaller program, which must be downloaded and installed on your computer. Then you should reboot the PC into safe mode, run this program and uninstall the drivers from Nvidia (select Nvidia and click on the “Reboot Uninstall” button).
Complete removal of previous Nvidia drivers
After the reboot, you should download the latest drivers for the video card from the developer’s website and install them on your computer (as an option, first download Geforce Experience, and then use this program to download the latest drivers for the video card). The problem will be solved in most cases.
Above, I analyzed the reasons for the dysfunction of the Nvidia Control Panel, and also listed a set of tips for solving this problem. If you cannot open the NVIDIA Control Panel, then most likely you have a problem with the operation of your computer’s video card drivers (they are outdated, or, conversely, new versions of drivers are unstable). Follow the entire set of tips I described above, this will help fix the problem with the Nvidia Control Panel on your PCs.
Method #6 Updating the .NET Framework and VC++ Redistributable
NVIDIA applications, as expected, run on software such as the .NET Framework and VC++ Redistributable. If you have outdated versions of these libraries installed on your computer, then the inability to open the Nvidia Control Panel may be an expected problem.
Try updating the .NET Framework and VC++ Redistributable by downloading from the download section of the official Microsoft website. In addition, you can also check if you have any pending updates for the operating system. Try installing them if available.