4.7 / 5 ( 41 voice )
Often you need to watch a movie, listen to music on your PC, or hold a conference on Skype. However, a serious issue that may arise is that the computer cannot see the headphones on Windows 10 or 8. This is a common problem across all types of headphones where users complain that they cannot hear anything even if the speaker is working fine.
These and many other questions constantly interest users. And I will give answers to them below:
- What to do if a laptop or computer does not see headphones in Windows 10, 8, 7?
- Why doesn't the computer see my headphones plugged in?
- What to do if the computer does not see headphones with a microphone?
- Why doesn't my PC or laptop see Bluetooth headphones?
Solution 1: Check your headphone connection
If headphones are disabled on your laptop or PC, it stands to reason that you won't be able to use them. It’s very easy to check if it’s working correctly:
- Make sure the headset is connected correctly.
- Select Sound by right-clicking on the volume icon.
- Select the Playback tab.
- If the device is not displayed in the list of devices, right-click on the empty field - there should be a checkmark next to “Show disabled devices”. After this, the headphones should appear in the list and become visible.
- Right-click on the device that appears and click “Turn off.”
- If you want to make your headphones the default audio device, click the "Set as Default" button.
- That's all, click OK and check if the computer sees the headphones.
A little theory
Depending on the connection method, there are two types of headphones: wired and wireless. This applies to both conventional devices and headsets (with a microphone).
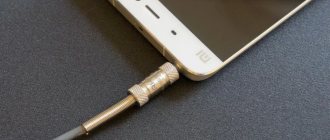
Wired ones have a special Audio Jack connector, which is inserted into the sound card socket on the front or rear panel of the computer.
Devices with a microphone usually have two plugs: green and pink. Each has an icon with a designation.
Increasingly, there are headsets with one plug that connects both headphones and a microphone. It has three contacts, when standard ones have only two.
For such a headset to work properly, the sound card must support a combined connection. You can determine this by a special icon next to the connector.
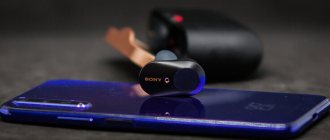
Wireless ones require a built-in or external Bluetooth transmitter. The external one can be connected to any free USB port.
Before starting the practical part, I recommend checking the device for serviceability. To do this, just connect the plug to your phone (tablet) and listen to the sound. You can check your wireless device in the same way: turn on Bluetooth on your phone and pair it with the device.
Solution 2: Update your sound driver
Often, old version sound drivers can cause a laptop or computer not to recognize the headphones. That's why it's extremely important to make sure your PC has the latest update.
How to update the sound driver manually?
Go to the manufacturer's website and find the latest driver for your headphones. However, it is important to choose the driver that is compatible with the Bluetooth headset model and Windows 10, 8, 7.
How to update the sound driver automatically?
Automatic updating is also possible using the special Driver Easy service. Thanks to the program, you don’t have to know the type and number of the device, worry that you downloaded the wrong driver and the laptop still doesn’t see the headphones.
Root Causes of Problems
Computers are multitasking machines. And from time to time they can fail, their components can break or become damaged. Every user should know why the computer does not see the headphones.
Here are the most common reasons for this phenomenon:
- incorrect connection to PC;
- forgot to turn on Bluetooth;
- the headset is out of order;
- there is damage to the connection cable or connector;
- the headset is incompatible with the OS or any other PC components;
- hardware drivers are missing or damaged/outdated;
- there are viruses and spyware on the computer;
- The system registry is full.
This is not a complete list of reasons why users encounter a non-functional headset. It’s just that these scenarios occur very often.
What to do if the computer does not see the headphones?
- and install Driver Easy.
- Open Driver Easy and click “Scan”. The program will analyze the PC and identify driver problems.
- Then select “Update” next to the detected devices to automatically download the new driver version. Installation also occurs independently.
- Reboot and make sure your computer or laptop can detect the headphones.
Mechanical damage and malfunctions
Then it is worth checking all the equipment involved for damage and malfunctions. Computer doesn't see headphones?
It's time to do the following:
- Carefully examine the connectors for connecting to the PC. If the sockets have been used extensively before, they may be damaged.
- Check the headset connection cable (if equipped) for damage. The cable may be severely pinched or even torn.
- Examine the integrity of Bluetooth adapters on the computer and headset.
If damage is found, you can proceed as follows:
- Connect the headset to the whole jack. This tip works great for USB headphones.
- Take the computer and headset to a service center. There they will repair the equipment and put it in working order.
- Buy new equipment. This applies to both PC and headset. It all depends on where exactly the damage was found.
Important: DIY repair of headphones, speakers, wires, cables, connectors and the computer as a whole is not recommended.
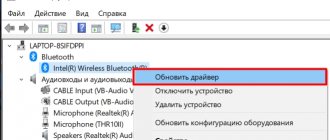
Solution 3: Uninstall and reinstall the sound driver
If the problem is caused by problems with updating the audio driver, you need to uninstall the audio driver through Device Manager. After this, restart your laptop and Windows software will reinstall the sound driver for your device.
Why doesn't my laptop see my headphones?
- Press Windows and R at the same time. The Run window will appear.
- Type the command devmgmt.msc and press Enter. This command brings up Device Manager.
- Select "Sound, video and game controllers."
- Right-click and select Uninstall Device.
- Confirm deletion.
- Next, restart your laptop and Windows 10 will install the audio driver on its own.
After all the above steps, check if the laptop finds the headphones.
Viruses
Computer doesn't see headphones? Maybe it's all about viruses. They can lead to failure of the connected equipment. This is a very common occurrence.
What to do? Recommended:
- Close all active programs.
- Open any antivirus.
- Select all hard drive partitions and perform a deep scan.
- Treat potentially dangerous objects.
- Place files that cannot be cured into Quarantine and remove potential threats to your PC.
- To restart a computer.
Now everything should work. Users are advised to reinstall the drivers before attempting to connect the headset again.
Registry
Sometimes the computer does not see the headphones due to the PC registry being full. For the same reason, Bluetooth refuses to work and videos refuse to play in browsers. In this case, it is necessary to clean the registry. It is best to use the CCleaner program. Instructions for cleaning your computer look like this:
- Download, install and run CCleaner. The Portable version does not require preliminary initialization.
- Select all partitions of your computer's hard drive in the menu on the left side of the application.
- Click on the “Analysis” button. The scanning process will begin.
- Press the “Clean” button. It will appear after the computer verification is completed.
You can now close CCleaner and try connecting the headset again. Before doing this, it is recommended to restart your computer. Everything should work.
If the tips listed above do not help, it is better to take the headphones and computer to a service center. They will quickly help you understand the causes of the problem.
Front Panel Configuration in BIOS
Sometimes it happens that the front panel works according to the old AC'97 standard, but the motherboard provides the new High Definition Audio specification. By the way, both connectors are similar, and the user may not notice this discrepancy. At the same time, no problems should arise when connecting a panel with AC'97 to a motherboard with High Definition Audio. True, in some cases you will have to change the operating mode through the BIOS.
We go into the BIOS by pressing the F2 or DEL key when booting the computer. Next, go to the “Advanced” section and look for the “Onboard Devices Configuration” item. Just below is the “Front Panel Type” parameter (it can also be called High Definition Front Panel Audio or Legacy Front Panel Audio). Switch it from the HD Audio position to the AC97 position. If your front panel uses the HD Audio standard and the BIOS is set to AC97, then switch back.
Some motherboards do not provide the ability to change the operating mode of the front panel, but only allow you to disable or enable the sound controller. The Onboard Audio Function parameter (may have a different name) is responsible for this function, providing only the “Enabled” and “Disabled” values. In such a situation, you do not need to reconfigure anything in the BIOS, and the sound should work without additional manipulations.