Windows operating systems
20.03.201962687
At least once in their life, almost every person is faced with the need to update a flash player on a computer or “convert” a document or photo into electronic form. However, not everyone has sufficient skills to cope with the task without outside help. Today we will look at how to scan a document onto a computer using a printer - the instructions presented will allow you to perform the action as quickly as possible and without additional difficulties, even if the manipulations are performed by an inexperienced PC owner.
How to open the scanner on different versions of Windows
The network space is filled with a large number of free programs that allow you to transfer papers, documents and photos to the memory of a desktop PC or laptop.
Such applications have impressive functionality and a clear operation scheme. In addition to free programs, there are also proprietary developments for which you will have to pay a small amount. As a rule, such paid applications have a number of “tricks” in their arsenal that make them a little more attractive to users. Such programs are designed to work with different versions of the Windows operating system.
There are also applications for IOS or Linux OS. However, we will consider their work specifically on Windows 10, since this is one of the most popular shells at the moment.
Control Center 4 program
This application is a specialized tool whose task is to scan and transfer all kinds of papers using a fax.
Faxes and scanning
To perform the scanning procedure through a scanner using a program and a fax, you will need to do the following sequence:
- Place the document in the printer frame.
- Using a computer, launch the “Start” section.
- In the section that appears with a list of applications, you need to find a picture of the program, the image of which looks like a white arrow enclosed in a circle.
- If such an application is not found in the section, you should search for it yourself. Right-click on the menu window and select “All applications”.
- In the subsection, go to the “Windows Fax and Scan” category.
- When clicked, you will see a program window. We find, and then o.
- A section has appeared that is used to select and mark a specific office tool.
- In the settings section that appears after selecting a device, we set specific parameters at our discretion.
- Next you should find the “Scan” button.
- On the monitor you will see the same image that you scanned, or rather, its electronic version. All that remains is to save it!
In addition to this method, you can use another method, the functionality of which is guaranteed on any build of Windows OS. You can use it by performing the following sequence of actions:
- Finding the Start menu
- We are looking for a category called “Devices and Printers”
- Select the printer currently connected to the PC.
- Right-click on the picture with the device and select the item responsible for starting the scanning procedure.
- We set the image parameters, wait for the process to complete, and then save the resulting image.
Using the Paint program
To copy any document or photo from a desktop PC or laptop through the Paint program, you should reproduce the following sequence:
- Place the paper in the frame of the device.
- Let's launch Paint - a pre-installed and standard application that allows you to work with pictures on all versions of Windows OS.
- In the application menu you need to find the “File” icon, and then click on the “From a scanner or camera” section
- We mark the office tool used, and then set the parameters.
- Using the “Scan” button you will start the scanning procedure, after which you should save the resulting image.
How to scan with an HP printer?
HP - almost any person can find equipment from this brand. Easy to use, simple settings, convenient functionality. Let's move on to the mini-instructions on how to scan on an HP printer.
Method 1: Program from the HP package
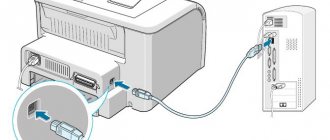
- Connect the printer either via WI-FI or USB cable.
- Open the top cover
- Place the document face down
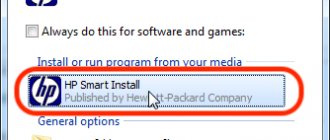
- Go to the “HP Deskjet” (“ScanJet”) program
- If the tool is not found, then reinstall it or load it through the disk that you provided (you can leave the settings as standard)
- "Save"
Simple steps to answer the question: How to scan on an HP printer.
Method 2: How to Scan with an HP Printer – Button on the Scanner
- Repeat all the points above.
- Find the “Scan” or “Scan” button on the printer panel
- "Save"
(You can use analogues of the program if the license disk is lost).
Paint program
This program is standard and easy to understand. To use it, you need to follow a number of simple steps:
- launch the application using the special “Start” button;
- click on the “File” tab;
- select the scanning method - in this case - from a camera, but there is also an option - from a scanner;
- wait for the scan preparation process to start;
- select file type;
- adjust the resolution, as well as determine the optimal image brightness setting.
After starting scanning, the user will see the picture he needs or a scan of a document on the screen. All that remains to be done later is to save the document in the required graphic format. The main advantage of this program is that there is no need to download and install additional products. That is, to get started, it will be enough to activate the “native” option and perform the simplest actions.
Scanner
Features of connecting various brands of equipment
Scanning a document to a computer from a printer is not difficult, especially if you take into account the connection features. A lot depends on how well the computer sees the printer, copier, scanner, and multifunction devices.
How to scan a document to a computer from a Canon printer: connect the computer, printer and scanner to the network, install the necessary software, open the scanner lid and place the document on the glass surface and click “start scanning”, if necessary, pre-setting its parameters. Having seen the result on the monitor, click the “import” tab. If the document is an image, then this is enough, if it is text, then it must be recognized using ABBYY FineReader, then saved to the computer.
How to scan a document to your computer from an HP printer? The procedures that need to be performed do not differ from the features of working with Canon. But there is one feature: the HP Deskjet 2130 is an inkjet multifunctional device that not only allows you to scan and copy, but also contains a printer. There is a possibility of color and photo printing. Speed from 5.5 to 7.5 pages per minute. It all depends on the budget, appearance, and what interface you like. The same program as for Canon will allow you to scan a document to your computer from the Deskjet 2130 printer.
You can scan using the Epson L210 with this by no means budget device, which is excellent as a printer and leaves much to be desired in its ability to scan a document. In terms of photo scanning quality, it is inferior to HP.
If you choose for a home or small office between the MF3010 and the Deskjet 2130, you need to take into account that they are both made of inexpensive plastic. More ergonomic dimensions of the MF3010, print and scanning quality are worse than the Deskjet 2130, but better than the Samsung.
To help you make your purchasing decision, consider the PIXMA MP250 printer, which features new ink nozzle technology that produces grain-free document and image printing. The MP250 turns on quickly and can automatically detect document size, scan and print. But there is a certain danger in this, when a computer is set to print 1 document, it can print several.
Scanning
Utility from the manufacturer
Open your scanning program. Screenshots from the Epson Scan 2 utility will be used as an example.
The main settings are set by default. So, if you select , the program will go to where the image type is set to Black and White. Color can be changed, also available. For individual modes, the choice of settings is more or less, but they are all intuitive. Document Size
If the original does not take up the entire screen, it is important not only to specify the correct size, but also to place the document correctly. For example, there is a children's drawing of A5 size on the glass.
This is what the scanned image will look like (the original has not been moved) if you set the size:
,
.
Permission, or . The higher the indicator, the clearer the image in the finished document will be and the longer the scanning process will take. There are average recommended values at which the image quality is good. So in the Epson Scan utility, the default value for color photos is 200 DPI, and for text documents - 300 DPI. In most cases, this permission is sufficient. Preview is a preliminary quick scan. You can see what the image will look like, but you cannot save it. Before scanning, set the document and its name: If you are working with a photo or picture, select the JPEG or PNG format. For a text document, you can set it to PDF. The file name in EpsonScan is assigned automatically: . But all this can be edited in .
When the basic parameters are set, click Scan and the program will save the document in .
Paint
- Click Start and .
- Open the program, go to the File tab and select .
- Set the required settings and click .
- To save on the File tab, move the cursor to the line and select a format.
Windows
- Faxes and Scanners: Click the button and enter “Faxes” in the search bar and open the application.
- Go to the section or immediately click New Scan.
- Select a scanner if there are several.
- Set your options and click Scan.
- Open the section.
Preparing your computer and printer for scanning
To start scanning on your PC and a separate scanner or MFP, you first need to connect the equipment and configure it properly. Devices from different brands are structurally no different from each other, as is working with them.
Proceed like this:
- Make sure your printer has a scanner. Regular printing devices cannot scan. You need an MFP or just a scanner. This information can be found in the specifications of the equipment.
- Connect the scanning device to your personal computer with a USB cord, through a wall outlet or via Wi-Fi. If this has been done previously, check the connection is secure. not be in color and without exclamation marks or warning triangles.
- Install or update the driver - special software for “communicating” equipment with each other. You can and should download it from the manufacturer’s website. Install the software according to its instructions.
- Plug the MFP into the outlet and “give” power by pressing the corresponding button on the case. The Ready light should be lit. In most cases, green.
- Place a sheet of paper with the document that you want to receive digitally, focusing on the marks near the scanner glass. They are depicted in the corners as arrows.
The MFP can scan without a cartridge in the printer, and therefore, if the “consumable” is missing or is being recharged, the scanner can still be used for its intended purpose. You should not pay attention to the blinking indicators on the case. Unfortunately, you won't be able to print.
Preparatory stage
Before proceeding directly to the scanning procedure, preparatory measures should be carried out. This approach will prevent further difficulties and technical errors.
- You need to make sure that the device has the appropriate option. The modern office equipment market has a lot of multifunctional devices. However, you can often find models that do not allow you to take a scan. You need to read the instructions for use of the device, which should be present in its passport.
- Next, you should make sure that the device is connected correctly. Modern technology provides users with a lot of possibilities, so by “connecting” with a computer, you can perform any manipulation. Despite this, not all PCs and MFPs are capable of supporting this format. As a rule, when purchasing a scanner or printer, the box already contains a USB cable, which you need to use to activate interaction with a PC.
- After this, you need to make sure that the device is connected correctly by pressing the device button. If the indicators do not manifest themselves in any way, it is worth rechecking the correct functioning of the equipment. Some devices require driver installation, so it is quite possible that you will have to deal with this issue as well.
- From the moment the paper is in the scanner, you need to close the lid tightly and press the button to start the process.
Important! You should pay attention to the individual characteristics of the scanner. There should be a symbol near the glass surface that will indicate how the document is placed.
MFP
ABBYY FineReader
From the world-famous software manufacturer ABBYY, users of Canon scanners can get FineReader, which will allow them not only to save documents, but also, as a bonus, to quickly and efficiently recognize them.
The software product is adapted for scanning text, which immediately becomes available for editing.
In this case, the scanned text can be presented in any of the 179 supported languages.
An important feature of the software package is full operation in any version of Windows OS and proprietary Microsoft applications. Scanned information, as in the above product, can be sent via quick access to email, but a new option is added to this
Scanned information, as in the above product, can be sent via quick access to email, but a new option is added to this.
It involves not just sending via the Internet, but also full publication of data on specific resources.
Please note: the software package has an advanced version called FineReader 12 Professional Edition.
The disadvantage of this complex is the cost of some of its versions, since for some users it can be too high.
At the same time, one cannot underestimate the fact that the manufacturer made sure that the user has access to all functions thanks to an interface with Russified commands.
Bonus – image processing from mobile devices.
Rice. 3 – ABBYY FineReader window
Loading an original into the scanner
- Check the glass and wipe it from dust and stains if necessary.
- Open the scanner lid and place the sheet face down. Usually the arrow or line on the body deviates slightly from the edge of the glass and the instructions contain a corresponding warning: area.
- If you are scanning a book or magazine, place it so that no light enters the scanning area.
- Close the lid. Press it if necessary, but do not press hard so as not to damage the glass.
- The scanning process in the Windows operating system can be done in several ways: A utility from the manufacturer or a third-party developer.
- Paint.
- Windows.
Scanner selection
announcements and advertising
RTX 3070 Ti Aorus at a non-Ti price
RTX 3080 for 288 tr in Citylink
RTX 3090 MSI for 539 TR
Earn money by participating in the content of our site
Another 3080 is even cheaper - see the price
Cool 3060 Ti Gigabyte Aorus fell in price 2 times
The first and main question that arises before creating a digital album is how and with what to scan photographs. You can take them to a specialized company, you can try scanning them using a smartphone or camera, or you can buy a flatbed scanner and scan it yourself.
I tried to re-photograph old photos with both a smartphone and a regular camera, but I wasn’t happy with the result. And having learned the prices for scanning in specialized photo studios, I realized that it would be much cheaper to buy a good new flatbed scanner and do everything myself.
The price of A4 scanners starts at just over five thousand rubles. For example, CANON Canoscan LIDE300 or EPSON Perfection V19 in Citylink.
After looking at the offers on Avito, I found a Canon CanoScan LiDE 110 in good condition and, without hesitation, bought it.
Canon MF Toolbox
The entire interface through which the user interacts with data is in English.
However, this drawback is more than compensated by the advantages of the software product, and it has many of them.
Secondly, the application is free and is supplied with the hardware by the manufacturer, which guarantees compatibility testing.
The application works in conjunction with Windows OS, which will be noted by the lion's share of office equipment users.
Despite this, working with it happens quite quickly, and a couple of clicks are enough to scan.
An additional advantage of the program is the ability to save scanned information in various formats.
This functionality provides an advantage, first of all, not even in convenience, but in saving time spent on converting from one file format to another.
The set of formats consists of the most popular ones, so MF Toolbox allows you to cover a large number of basic user needs.
In case the document needs to be corrected, you can use a customized set of editors, and to quickly transfer scans, you can use the option to quickly send email.
Rice. 2 – Canon MF Toolbox Dialog
Preparing photos for scanning
The tips in this section will be useful for those who, like me, have several thousand photos waiting to be scanned.
Preparing your photos for scanning in advance will only save you time. You should immediately straighten out the crumpled corners and put heavily crumpled photographs under the press.
A separate problem is dust. There will be an excess of dust and paper debris and it will settle on the scanner, interfering with scanning. Therefore, you must immediately clean the photos from dust.
If there are a lot of photos and you have to at least organize their scans into folders on your PC, it is better to prepare them in separate piles for scanning in advance.
The A4 format can accommodate 3-4 small photographs, so you can save a lot of time by immediately preparing photos in “portions” of 2-3-4 pieces.
What to do if the scanner does not scan
The problem why the device may not work most likely lies in the fact that the standard applications are not enough. For example, you need text recognition, special quality settings, or save in a format that is not in the list. For such cases, there are applications for this process:
- ABBYY FineReader. Can recognize pictures and text. The program is paid, but there is a free trial period.
- It will do, I need to transfer several documents.
- OCR CuneiForm. Also for recognition. Supports several foreign languages. The application is free.
- Allows you to process photos transferred to your computer. The program is free.
- Allows you to save transferred documents in PDF format. Free.
- It can save transferred objects in different formats and create entire galleries from them.
- The program is suitable for processing. Can read images from the tablet screen. Supports more than 100 languages.
- Can connect to many digital devices and multiple devices at the same time.
Most programs have a similar operating algorithm, only the interface differs. Let's look at how VueScan works:
- We put the document into the device.
- Launch "VueScan".
- Checking the quality settings.
- Now we process the settings of the resulting image.
- Let's scan.
- We save it on the computer.
- We process if necessary.
The problem may also appear in the following cases:
- Faulty equipment. The insulation or plug of one of the cables is damaged, the contacts are stuck, or the USB connector is broken. In such cases, it is better to contact the service center.
- There are no drivers or they are installed incorrectly. Reinstall them. Don't forget to restart your computer after installation.
- The settings may be incorrect. If you have multiple devices connected to your computer, make sure you select exactly what you need.
Scan and save to computer
Performing the action is not difficult, but to be honest, there is software on the Internet with a better set of functions than standard solutions, but more on that later. To make a scan you need to do the following:
- Of course, you should worry about pre-installing drivers so that the device functions normally. You can study other reviews on the Internet on how to perform this action.
- Next, place the document or image in the scanning compartment so that the side with the content (text, picture, etc.) is turned towards the glass. It is worth knowing that this is mainly down towards the surface on which the MFP is installed, but in some models from certain manufacturers the glass may be located on top.
- The next step is to turn on the MFP, but in fact it may already be working and should not be turned off after each scan.
- Now you can scan. To do this, you must choose one of the possible methods:
You need to enter the “Devices and Printers” section, which is located in the “Control Panel”, if the viewing mode is configured correctly - small / large icons. Next, right-clicking on the printer icon will open a context menu in which you should select the “Start scanning” line. In the window that appears, you should set the scanning parameters and start the process; if you first want to preview what the result will be, you can click the “Preview” button.
Use the standard graphics editor Paint. This utility in Windows OS also allows you to make a scan. To do this, you need to launch Paint. The shortcut is located along the route “Start” - “All Programs” - “Accessories”, but in the case of systems versions 7, 8 and 10, you can use the search bar. Next, in the “File” menu, select the line “From a scanner or camera.” Next, you can also select scanning options and begin the process.
Scan Options
The most important parameter when working with a scanner and the resulting images is DPI. This abbreviation means the resolution that will correspond to the resulting image. The higher this value, the better the quality of the scan. The most common values are:
- 100-200 dpi – fast, but least high-quality recognition;
- 300-400 dpi – great for working with text pages;
- 500-600 dpi – maximum detail and frame transmission.
It is worth saying that, for example, the Paint graphic editor makes it easy to change parameters that affect image quality.
Scanning on Mac OS
If you are the owner of Mac OS, then the steps are almost the same, but you can enter the printer menu by following the “System Preferences” - “Printers” route through the Apple main menu. Then you can act intuitively, since all actions are sequential. You can also easily find an overview of the scanning process in Mac OS on the Internet.
Scanning software
The most popular applications among users are applications such as VueScan or CuneiForm. They have the simplest functionality, and any fragment can be recognized quite easily. This function is also included in the more global comprehensive software ABBYY FineReader, but working with it is much more complicated and for an ordinary user to understand it, it will be necessary to read more than one review or training video.
From the above, it becomes clear that using an MFP as a scanner or a separate device is not so difficult, and there are many opportunities for this, both in the operating system itself and on the Internet in the form of various software: paid with a large set of functions, more reduced free, etc.
Scanner Wizard
To scan a sheet of text, you can use the Scanner Wizard built into the operating system. Below are detailed instructions for user actions:
- Turn on the equipment and make sure everything works. Check that there is nothing unnecessary on the scanner glass (other documents, paper clips, debris, etc.).
- Place the document you want to scan with the image side facing the glass. Be sure to close the lid tightly.
- Now let's move on to our PC.
- Now you need to go to the “Devices and Printers” section. This can be done in several ways: using the “Start” button, through the “Control Panel”, searching on the PC, entering a command in the execution window.
- Among all devices, select your model with the left mouse button, and with the right mouse button, call up the context menu.
- In it, click on the “Start Scan” shortcut.
- In this window you can configure the quality of scans and where to save digital copies of documents. Here, select the format in which the file will be saved.
- Click the “View” button to see the preliminary result and “Scan” to receive the document in electronic form.
How to scan into one pdf file Fast, easy and correct.
How to scan texts from a printer to a computer
There are two main options for scanning a document to your computer - as an image or as text. By default, the scanner works like this: it creates a photo; if you put a sheet of text in the copier, then it is impossible to edit it in the future. For such a function to appear, you need to use a recognizer (special software) that will turn the picture into an editable format.
How to scan a document using the Scanner Wizard
Once you have connected the universal printer to your computer, installed the drivers, and carried out the initial setup for scanning, you can use the built-in functionality of Windows. The “Scanner Wizard” is suitable for this; the execution algorithm is as follows:
- Turn on the scanner, lift the lid. Check that the glass is clean; if there is dust, wipe the surface.
- Place the text or photo with the surface you want to scan facing down on the glass.
- Close the lid.
- Go to “Control Panel”, click on “Hardware and Sound”.
- Find the “Devices and Printers” item and go to it.
- Right-click on the icon with your MFP, select “Start scanning”.
- Set the scan options you want and click Preview.
- A window will appear with a picture of what your scanned text will look like, if it turns out to be too dim, or vice versa, you can change the settings and click “Preview” again. If you are satisfied with everything, click “Scan”.
- Save the result on your computer or send the file for printing.
Scan documents to your computer using special software
Along with any MFP there should be a disk with drivers and native software for this printer model. As a rule, the use of such programs provides an opportunity to achieve the most effective interaction with the device and obtain the best quality. For example, how to make a scan on a canon printer using this software:
- After installing the device and software, open the list of programs.
- Find the application for your printer model and launch it.
- Click "Scan".
- The program will prompt you to select the type, format, color or black and white scan and resolution. If you set all the parameters correctly, the result will be better.
- Using Explorer, specify the path to save the final file. Give the document a name right away to make it easier to find later. If desired, the storage location can be removable media.
- Preview the document to correct any shortcomings or immediately click the “Scan” button. Next, the MFP will recognize the data, after which you need to click “Save”.
How to scan a document to a computer through a scanner: step by step
Before you start, make sure that the printer is multifunctional, that is, capable of performing the functions of a device. If the device is just for typing, nothing will work. First we need to connect the printer to the computer. It has two wires: power (plugs into the socket) and USB (plugs into the USB connector of the computer).
Attention! After connecting, you need to install drivers. To do this, we use the disk included with the device.
Standard method
We do the following:
- Place the document in the printer field.
- On the printer itself, press the “Scan” button. It may be in different places and look different, depending on the device model. But in most cases there is a “scan” inscription next to it or it can be identified by the printer icon.
- The Settings Wizard starts automatically. We only need to select what exactly we want to transfer (for example, a color image or black and white text) and click “Next”.
- An electronic copy must be saved on your computer or sent by email. The document is ready.
There is another way - if the setup wizard does not start automatically. We launch it manually. For this:
- Open "Start".
- In the search bar, enter “Faxes and Scanning”.
- We continue to work.
VueScan
In the case when you have to work on old Canon scanners, also with outdated operating systems, the digitization process can turn into torture.
In particular, it is worth highlighting the following Canon models: E510, MG2200, MG3200, MG4200, MG5400, MG6300, MP230, PIE PrimeFilm 7200.
A special feature of working with it is a quick connection to a scanning device, as well as advanced user settings when digitizing images.
The last option is especially important when restoring old photographs, with which the program copes excellently.
You can manually adjust not only the contrast of the image, but also the color rendition and even the degree of compression of the resulting scan.
The disadvantage of the utility is the small selection of formats in which data can be saved. These include JPEG, TIFF and PDF.
The first is used when saving images, the second - text, and the third - data of both types.
There are a couple more disadvantages to this utility.
Firstly, it does not provide the user with a Russian-language interface in all versions, and secondly, it can be used for free only for a limited period of time.
Later versions of the utility make it possible to scan even translucent slides, also support the TXT text format, and have built-in editing tools for image processing.
Rice. 6 – Working with VueScan
How to open a scanner on different versions of Windows
There are many free applications on the Internet that help you transfer both documents and photos. They have a lot of processing capabilities and a user-friendly interface. Programs can be either paid or free.
Most often, the applications and transfer algorithm are the same for different versions of Windows. We'll look at Windows 8 as an example.
Faxes and scanning
We do the following:
- We put the document into the printer.
- Open "Start".
- In the application window, look for the image of a white downward arrow in a circle. Let's choose it.
- If there is no icon, just right-click on the window and select All Apps.
- We are looking for the “Windows Fax and Scan” section.
- Our window will light up. In the upper left corner of this window, click “New Scan”.
- We select the device we need (if there are several on the computer).
- Click
- In a new window, configure the parameters.
- Click “Scan”.
- The scanned image appears on the screen.
- Let's save it.
There is another simple method that is present in all types of Windows systems. We do the following:
- We go to “Start”.
- Select the “Devices and Printers” section.
- We are looking for a device connected to the computer.
- Right-click on it and select “Start scanning”.
- A window with image settings should appear. You can experiment with contrast and brightness by moving the sliders in different directions.
- Now click “Scan”.
- A window displays the progress of the procedure. We wait until the bar fills up.
- After the process is completed, there is no need to close anything. We will be automatically transferred to the window where we will save the document. Enter its name. That's it, the work is finished.
How to properly scan photos through a scanner: step by step
The Paint resource is more suitable for transferring photos. We need to do the following:
- Open menu.
- Select the “From a scanner or camera” section.
- A window appears where we need to select the parameters of the transferred image (as when scanning documents, step 3). Choose a color or black and white image.
- We save photos in any format convenient for us.