Windows operating systems
20.03.201962680
At least once in their life, almost every person is faced with the need to update a flash player on a computer or “convert” a document or photo into electronic form. However, not everyone has sufficient skills to cope with the task without outside help. Today we will look at how to scan a document onto a computer using a printer - the instructions presented will allow you to perform the action as quickly as possible and without additional difficulties, even if the manipulations are performed by an inexperienced PC owner.
Preparing to Scan
First, you need to properly install the scanner on your computer.
To avoid equipment damage, it is important to follow the correct procedure when handling connecting cables. First connect the USB cable to the printer, then to your desktop or laptop computer. Then plug the power cord into the outlet. Only after this will it be possible to press the power button located on the case.
In most cases, after you connect the printer to your computer using a USB cable or wireless (Wi-Fi) connection, Windows will automatically detect the device, search for it, and install drivers. Once the installation is complete, the device will appear in the list of all equipment in the "Devices and Printers" section. The printer icon should not be "blank" and have icons (such as exclamation points) next to it).
If the lights on the printer body are blinking, indicating that the cartridges are out of ink, scanning is still possible because no ink is being used. Only the scanner starts. It often happens that a printer is no longer used due to the high cost of purchasing new cartridges. There is no need to throw away your equipment, because you can always use a scanner.
The situation is different with installation, when nothing is done automatically. Then you need to use a disk, which often comes with the equipment and contains the driver necessary for the operation of all components of the device.
Insert the disc into the drive. If the installation does not start automatically or the menu does not open, open the disk in Windows Explorer through My Computer and run the installation file. Then, step by step, agreeing with the installation wizard, complete a copy of the driver files. After this, additional shortcuts to launch the program may appear on the desktop, in which you can perform various actions, for example:
- check the ink level in the containers;
- clean the printing units;
- start scanning;
- align printheads and a number of other functions for each printer model.
To ensure that the equipment works for a long time and there is no dust or dirt on the scan, you need to carefully wipe the surface of the glass with a dry cloth or paper towel or napkin.
Scanner Wizard
After connecting a printer from any manufacturer, drivers are installed on the PC. To do this, perform the following manipulations:
- Devices from many manufacturers use Plug and Play technology. It helps Windows recognize your hardware and install it automatically. If the specified function is present, after connecting the scanner, the message “New hardware found” will be displayed on the screen. The inscription appears in the lower right corner of the taskbar.
- Further installation is performed automatically. If this does not happen, the MFP does not support the specified technology or the OS does not find a driver for the device. You need to click on the “Found new hardware” window and continue installing the driver.
- In the search engine icon, click on “Yes, just now,” then activate the “Next” section. It is worth noting that this window will only work if you enable automatic updating of the operating system through the update center.
If you are using a driver disc, you must insert it into the drive and click on the “Next” window. After this, Windows itself will find the necessary drivers and install them.
After connecting the DeskJet universal printer or an analogue to the computer, making the specified settings for installing drivers, log in through “Start” to the “Control Panel”. In the search section, enter the concept “Scanner”. Several links will appear on the screen, from which you select “View cameras and scanners.”
What to do if the device does not scan?
- "Start off"
- "Control Panel"
- "Administration
- "Device Manager"
- Find the scanner name
- "Image Processing Devices"
- Click on + - that's how you find the model name
- download driver for scanning.
- If everything works, but scanning does not work, download or download the program for your MFP.
It is also necessary to check the operating conditions of the device, namely:
- Feeder (wire
- Visible damage
- Mains voltage
- Electrical connection to ground
- Reset and check your settings
Loading an original into the scanner
- Check the glass and wipe it from dust and stains if necessary.
- Open the scanner lid and place the sheet face down. Usually the arrow or line on the body deviates slightly from the edge of the glass and the instructions contain a corresponding warning: area.
- If you are scanning a book or magazine, place it so that no light enters the scanning area.
- Close the lid. Press it if necessary, but do not press hard so as not to damage the glass.
- The scanning process in the Windows operating system can be done in several ways: A utility from the manufacturer or a third-party developer.
- Paint.
- Windows.
Part 3: How to Edit and Convert PDF Files with Ease
WidsMob PDFEdit is an all-in-one PDF editor that allows you to convert document files to PDF format such as Word, Excel, PowerPoint, Text, HTML and more. This allows you to use advanced OCR technology to recover texts. Moreover, you can also edit PDF files directly in the program.
- Save PDF files in other formats such as Word, Excel, PowerPoint and Texts.
- Easily scan and OCR text in files you save as PDF.
- Edit text, image, links, fonts and other elements with one click.
- Sign PDFs, add password protection, add comments, and more.
- Supports almost all PDF documents, including encrypted files.
Let's sum it up
Having studied the information presented above with step-by-step instructions, we can conclude that scanning a document to a computer is as simple a task as photocopying, recovering data from a flash drive, etc. The main thing is to find the appropriate instructions and strictly follow them. If the need to scan documents onto a computer occurs rarely, and the files themselves are used only for the purpose of storing and transmitting information, the built-in capabilities of the operating system are sufficient. If the user needs to edit scanned files, including their quality and format, it makes sense to install a third-party application that greatly simplifies manipulation due to its wide functionality.
Thank the author and share the article on social networks.
How does the photocopying process work on a printer?
Photocopying is the exact reproduction of information (copying) and the creation of duplicates on paper.
How to make a photocopy of documents?
- You will need an MFP
- Paper
- Refilling the multifunction printer
- Load paper in the input tray
- Clean the glass if necessary
- Place the document face down
- Align with the edge of the guides (lines around the glass)
- Close the copier/printer cover
- Select Print Color from the Control Panel
- If you need a large number of copies of the same document, click the Start button several times.
- (However, depending on the device, you can make from 1 to 20 copies at a time).
- To change the paper size, click the paper button
What else you need to know about MFPs
It is a set of three devices assembled into one unit - printing, scanning and copying (copier). The printer and copier work with ink, that is, they apply dye to paper. This means that as soon as the ink is used up, the printing will be blocked and it will be impossible to use these units. You can resume operation only after refilling or replacing the cartridge with a new one.
The situation with a scanner is different. This is an independent module that has nothing to do with ink.
Therefore, even when printing and photocopying is impossible due to lack of ink, you can start scanning.
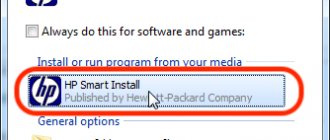
How to scan with an HP printer?
HP - almost everyone can find equipment from this brand. Ease of use, simple settings, convenient functionality. Let's move on to the mini-instructions for scanning to an HP printer.
Method 1: Program from the HP package
- Connect the printer via WI-FI or USB cable.
- Open the top cover
- Place the document face down
- Go to the HP Deskjet program (ScanJet)
- If the tool is not found, reinstall it or boot from the disk provided (you can leave the default settings)
- "Save"
Simple steps to answer the question: how to scan to HP printer.
Method 2: How to Scan to HP Printer - Button on Scanner
- Repeat all the steps described above.
- Find the "Scan" or "Scan" button on the printer panel
- "Save"
(You can use analogues of the program if you lose the license disk).
Several useful lifehacks
Making a copy of your passport
Peculiarities:
- Remove everything unnecessary from your passport. Make sure there are no foreign objects in it.
- In the scan settings, specify the color type as “Grayscale”, and select the highest quality available.
- Save scans in tiff or bmp format.
Photocopy without copier
To make a photocopy, you do not need to have a photocopier. You can do this by first scanning the document on a regular scanner to your computer, and then you can print it on a printer. The result will be no different if you used a photocopier. The whole process is described in more detail in another article, “How to make a photocopy on a Canon, Hp, Epson printer.”
Troubleshooting problems with a scanner or MFP
You can launch the standard “tool” for searching for errors and problems through the device’s context menu. Go to the "Printers" section in the control panel. Find your scanner model. Click on "Troubleshooting". Then follow the instructions and follow the instructions of the program.
RiDoc
The software is as good as the one described above, but also allows you to scan multiple pages into a single .pdf file and integrate the document with new drawings saved on your computer.
The main disadvantage is the need to pay for a program license key. But you can use it several times, since after installation you get free monthly access.
After launching the program from the top in the “Scanner” menu, select the desired device. And immediately start scanning with the same button.
Configure the characteristics of the created scanned copy and run the operation.
Do this for every document. The scanned images will appear in the Image Gallery tab. To save a scanned multi-page PDF file to your computer, mark the images you want and merge them.
You can see the final version in the "Result" tab. And on the right is a small panel with the ability to insert settings.
To save the inserted document, click the “PDF” button on the top panel of the program.
Enter a friendly name, choose a save location, and click OK.
How to open a scanner on different versions of Windows
There are many free applications on the Internet that help you transfer both documents and photos. They have a lot of processing capabilities and a user-friendly interface. Programs can be either paid or free.
Most often, the applications and transfer algorithm are the same for different versions of Windows. We'll look at Windows 8 as an example.
Using ControlCenter4
This application is designed specifically for this purpose, processing and transmitting document via fax.
Faxes and scanning
- We put the document into the printer.
- Open "Start".
- In the application window, look for the image of a white downward arrow in a circle. Let's choose it.
- If there is no icon, just right-click on the window and select All Apps.
- We are looking for the “Windows Fax and Scan” section.
- Our window will light up. In the upper left corner of this window, click “New Scan”.
- We select the device we need (if there are several on the computer).
- Click
- In a new window, configure the parameters.
- Click “Scan”.
- The scanned image appears on the screen.
- Let's save it.
There is another simple method that is present in all types of Windows systems. We do the following:
- We go to “Start”.
- Select the “Devices and Printers” section.
- We are looking for a device connected to the computer.
- Right-click on it and select “Start scanning”.
- A window with image settings should appear. You can experiment with contrast and brightness by moving the sliders in different directions.
- Now click “Scan”.
- A window displays the progress of the procedure. We wait until the bar fills up.
- After the process is completed, there is no need to close anything. We will be automatically transferred to the window where we will save the document. Enter its name. That's it, the work is finished.
Via Paint
- We put the document into the device.
- We go to “Start”. Select "Paint". If you can’t find it, enter it in the search bar.
- Select "File".
- Click “From scanner or camera”.
- Select the device we need (if there are several of them).
- Making scanning settings.
- Click “Scan”.
- The transferred image should appear on the screen.
- Let's save it.
Reference! Any version of Windows should have the last two methods (via Paint or Fax and Scan). The algorithm for working with programs is identical.
How to make a scan on a printer
Let's look at the process of creating a scan on the HP Deskjet 2130 MFP. The model is very old, but the scanning principle will be similar to other printers. You just need to turn on the printer, place the holder under the cover, and start scanning on your computer in any convenient way.
How to scan a document:
- We turn on the device and wait until it starts. The device should make some noise for a few seconds and then stop making sounds. Then you can scan.
- Lift the printer cover. Place a piece of paper (or other object) on the base of the icon. The guide shows you how to properly position the paper so that the finished scanned document is in the correct position and not upside down.
- Go to Devices and Printers. Press the key combination “Win + R”, then execute the “Check Printers” command.
- Find the printer you want, right-click it and select Start Scan.
The “Scanner Wizard” integrated into the operating system will open.” - Set scanning options. Select color, resolution (dpi, dots per inch), output file format. If you need a document that needs to be enlarged many times on your computer (for example, electrical diagrams with a lot of small parts), set the resolution to a higher resolution. The quality will improve significantly, but the file size on disk can be large, up to several tens of MB.
- Review if necessary to ensure the sheet is positioned correctly.
- Click the "Scan" button. The printer mechanisms will start and a window will appear showing the progress of creating a digital copy of the document.
- After the scan is completed, the system will prompt you to import the scan (save). Specify the file name and click the "Import" button. The document will be saved in the standard images folder in Explorer.
The driver for the HP 2130 printer includes a program that also has a scanning option, for which a separate element is responsible. The program is installed by default along with the Drov installation.”
Launch the program and after opening the Print & Scan menu, select Scan. The HP Scan utility starts.
Select your desired scan option. Set the appropriate options for your document and click Scan.
The printer will scan the media and offer to save the document anywhere after specifying the desired file name.
You can open the scan in any graphics editor, but the easiest way is to use the standard Image Viewer tool.
The simplest way to scan a document from a printer (MFP)
- Go to the “Control Panel”, select the “Hardware and Sound”, “Devices and Printers” section. Activate a window displaying the existing printer, select “Start scanning”.
- After indicating the required parameters for copying, click the “Preview” icon. If you are satisfied with the final result, click “Scan”. The received information is saved on a PC or printed.
Method 2: Print
Launch the program you use to view your photos
- Sometimes it can be your operating system, sometimes it can be third-party software (like Adobe Photoshop), and sometimes it can be a completely different program.
Open an image file you saved earlier in this program
This is most often done using the Ctrl+O keyboard shortcut, but you will need to consult the program's documentation menu to ensure this can be done in your program, as not all programs use the same methods for opening a file in "Open". "
Preview the image when you turn on the printer (if it is not turned on)
Make sure the image is what you want to view. Make final adjustments to the image to make it even better. If you're not a photography expert and can trust your software to make the right decisions, use the automatic adjustment setting to fix your photos in edit mode. If you can't, you can adjust them manually using the sliders and within the program until they are exactly the style you want.
Save the file to ensure the most recent image is printed
if you have made any changes.
Use the key combination Ctrl + P or any key combination where you can find the print menu
Select the printer it should print to
and any other document style specifications that may be required. This may include the number of copies printed and the type of paper installed in the printer. On some printers, you will need to select other options such as borderless printing, etc., but every printer is different, so follow the instructions on your specific printer to see what the printer can print.
Recommendations
Some standard applications do not save processed pages. They just open them in the image view section. In this case, the key combination “Ctrl” and “S” will help to set up the process correctly, after pressing which you select the folder to store the document.
To simplify the operation, you need to choose software with automatic saving of information, proven by time and users (Adobe Reader or DjvuReader). They allow you to display the format for the image and select storage. The device can copy a specified file with a black outline, which must be trimmed using an editor before saving to a PC. The optimal resolution is 150 dots per inch, for official documentation - 300. The configuration of the final file is influenced by the format for saving the scan (jpg, bmp, tif).
There are times when you need to scan a document or picture onto your computer. Let's find out how to use the scanner and what to do if standard applications do not help.
Description
The Scanner app doesn't require an Internet connection because all scanned images are stored locally on your device. And if you need to protect your precious scans, you can set an app-wide password or lock specific folders or documents. Easily share PDF or JPEG documents by email, fax, print or save to the cloud. Place any document in front of your device's camera - advanced color processing algorithms remove shadows, correct perspective and distortion, making your scanned images as legible as possible. Scan everything you need, including receipts, documents, paper notes, faxes, books, and save the scanned images as a multi-page PDF or JPEG file. Accurate scanning, easy editing and sharing - the Scanner app will be your indispensable assistant in school, finance, home and work! Scanner App is the best app to scan and save a digital version of a paper document. Learning to use the scanner yourself
What is a scan and what does a copy mean?
Scanning (scanning) is the process of converting documents from paper to electronic format.
Scanning, photocopying, printing: all this speeds up work in the office and beyond.
Photocopying is the exact reproduction of information (copying) and the creation of duplicates on paper.
Canon MF Toolbox
The entire interface through which the user interacts with data is in English.
However, this drawback is more than compensated by the advantages of the software product, and it has many of them.
Secondly, the application is free and is supplied with the hardware by the manufacturer, which guarantees compatibility testing.
The application works in conjunction with Windows OS, which will be noted by the lion's share of office equipment users.
Despite this, working with it happens quite quickly, and a couple of clicks are enough to scan.
An additional advantage of the program is the ability to save scanned information in various formats.
This functionality provides an advantage, first of all, not even in convenience, but in saving time spent on converting from one file format to another.
The set of formats consists of the most popular ones, so MF Toolbox allows you to cover a large number of basic user needs.
In case the document needs to be corrected, you can use a customized set of editors, and to quickly transfer scans, you can use the option to quickly send email.
Rice. 2 – Canon MF Toolbox Dialog
Scanning software from manufacturers
To ensure ease of use of equipment, manufacturing companies develop special software. All possible functions for controlling a specific device model are available in the software interface.
Specifications may vary slightly depending on brand. But the basic set of settings/parameters is almost always identical. You can set the scanning resolution, select the color (b/w or color scanning), format (png, jpeg, jpg, pdf and others).
List of scanning utilities:
- HP Scan;
- Epson scanning;
- Xerox Easy Printer Manager;
- Canon MF ToolBox.
There is also software for Kyocera and Samsung, you can download it from the official sites or install it from the included CD.
Where can I buy an MFP?
MFPs can be purchased in special stores specializing in technology, such as Eldorado, M.Video, etc. Or in online stores, for example Ozon.
List of printer-scanner models:
- Sharp
- Samsung
- Ricoh
- Panasonic
- Kyocera
- Xerox
- HP
- Epson
- Canon
- Brother
Of the presented manufacturers, MFP produces models of different price categories. Mid- and high-end products have a sufficient list of features.
In order to determine the type of printer, you need to look at the device body. If the top cover is equipped with special glass, then this device is an MFP. If it is equipped only with a paper tray, it is usually a printer.
Preparing for work
Preparation starts with the scanner:
- Check the connection between the scanner and the computer.
- Connect your device and press the power button
- After turning on, insert the disk (flash drive) to install drivers. These programs often come with the printer.
- If for some reason the disk was not included in the kit, you need to go to the manufacturer’s website and download drivers from it.
After installing the drivers, decide what software you will work with. Scanning documents is not possible without scanning software.
Popular programs:
- Adobe
- XnView
- VueScan
To check the capabilities of the scanner in the interface of any of the above programs, click - “File” - “Import”.
In the last branch you should see the device name, so everything works fine.
Carrying out preparatory work
Before you start directly scanning documents, you need to carry out preparatory steps - this will help to avoid difficulties and errors on the part of the technology.
So, before you try to scan a document, it is important:
- Make sure that the device you have is “endowed” with the required function. The modern office equipment market is oversaturated with multifunctional devices, but there are also models with which it is impossible to make a scan. Find the device data sheet and read the instructions for use.
- Make sure that the device is connected correctly. Modern technology makes it possible to perform manipulations by “connecting” with a personal computer using wireless communication. However, not all PCs and MFPs support this interaction format. As a rule, when purchasing a scanner/printer, the box with the product already contains a USB cable - use the cable to connect the device to your computer.
- Make sure that your device is connected correctly by pressing the device's power button. If the indicators do not respond to the power key, double-check that the equipment is connected correctly. Some devices require driver installation.
- After the paper is in the scanner, you need to tightly close its lid and press the button that starts the process.
Useful: pay attention to the individual features of your scanner - there should be a symbol next to the glass surface that will tell you how to place the document so that the image is not scanned upside down. Otherwise, you will have to figure out how to flip the screen on your computer, or become familiar with all sorts of editor applications that allow you to manipulate graphic files.
Application privacy
Developer Pavel Jurauleu indicated that, in accordance with the application's privacy policy, data may be processed as described below. Details can be found in the developer's privacy policy.
Non-user data
The following non-personally identifiable data may be collected:
- Identifiers
- Usage data
- Diagnostics
Sensitive data may be used differently depending on age, characteristics involved, or other factors.
Method 4: How to Print to PDF on iOS
If you need to share files on iPad or iPhone, you can also print them as PDF on iOS devices. iOS 9 can print a web page or other document to a PDF file. Here's a guide you should know.
Step 1: Open the file in the app and click the Share button. Select the Save PDF to iBooks option on the top bar.
Step 2: Open iBooks to access these PDF files. You can then share the PDF file with others. PDF files are easy to read on Apple devices.
Method 5: How to Print to PDF via Android
Android has a built-in feature for printing PDF files. If the application supports PDF printing, you can open the menu and select a print option, then save the file as a PDF file.
Step 1: If the app does not support PDF printing, you can use the Share feature to print to PDF.
Step 2: Install an application that can convert files to PDF. Open the file, then click the Share button to choose an application to print PDF files.
VueScan
In the case when you have to work on old Canon scanners, also with outdated operating systems, the digitization process can turn into torture.
In particular, it is worth highlighting the following Canon models: E510, MG2200, MG3200, MG4200, MG5400, MG6300, MP230, PIE PrimeFilm 7200.
A special feature of working with it is a quick connection to a scanning device, as well as advanced user settings when digitizing images.
The last option is especially important when restoring old photographs, with which the program copes excellently.
You can manually adjust not only the contrast of the image, but also the color rendition and even the degree of compression of the resulting scan.
The disadvantage of the utility is the small selection of formats in which data can be saved. These include JPEG, TIFF and PDF.
The first is used when saving images, the second - text, and the third - data of both types.
There are a couple more disadvantages to this utility.
Firstly, it does not provide the user with a Russian-language interface in all versions, and secondly, it can be used for free only for a limited period of time.
Later versions of the utility make it possible to scan even translucent slides, also support the TXT text format, and have built-in editing tools for image processing.
Rice. 6 – Working with VueScan
Scanning via Paint
Launch the graphic editor Paint. You can open the program using search in Windows 8-10. In Windows XP, open the Start menu, find the Accessories folder, inside which Paint will be located.
Then open the editor's main menu and select "From Scanner or Camera."
A scanning window will open where you can select the color of the image, preview it, scan immediately, and even adjust the quality (resolution, brightness, and contrast).
Click “Scan” and wait for the operation to complete. The scanned image will appear in the editor's work area.
The file is saved in the main menu through the “Save As” item, where you can choose between different formats (bmp, png, jpeg, gif and others).
This option allows you to scan to your computer from the printer as quickly as possible. If necessary, you can immediately format the scan using Paint, which is offered on the top panel of the editor.
Features of connecting various brands of equipment
Scanning a document to a computer from a printer is not difficult, especially if you take into account the connection features. A lot depends on how well the computer sees the printer, copier, scanner, and multifunction devices.
How to scan a document to a computer from a Canon printer: connect the computer, printer and scanner to the network, install the necessary software, open the scanner lid and place the document on the glass surface and click “start scanning”, if necessary, pre-setting its parameters. Having seen the result on the monitor, click the “import” tab. If the document is an image, then this is enough, if it is text, then it must be recognized using ABBYY FineReader, then saved to the computer.
How to scan a document to your computer from an HP printer? The procedures that need to be performed do not differ from the features of working with Canon. But there is one feature: the HP Deskjet 2130 is an inkjet multifunctional device that not only allows you to scan and copy, but also contains a printer. There is a possibility of color and photo printing. Speed from 5.5 to 7.5 pages per minute. It all depends on the budget, appearance, and what interface you like. The same program as for Canon will allow you to scan a document to your computer from the Deskjet 2130 printer.
You can scan using the Epson L210 with this by no means budget device, which is excellent as a printer and leaves much to be desired in its ability to scan a document. In terms of photo scanning quality, it is inferior to HP.
If you choose for a home or small office between the MF3010 and the Deskjet 2130, you need to take into account that they are both made of inexpensive plastic. More ergonomic dimensions of the MF3010, print and scanning quality are worse than the Deskjet 2130, but better than the Samsung.
To help you make your purchasing decision, consider the PIXMA MP250 printer, which features new ink nozzle technology that produces grain-free document and image printing. The MP250 turns on quickly and can automatically detect document size, scan and print. But there is a certain danger in this, when a computer is set to print 1 document, it can print several.
Other programs
The utilities below are practically indistinguishable from the official software. The only difference is that some programs are designed to scan in a specific format, such as PDF.
- FineReader. The software is paid, but there is a "free" trial and an online tool. Available in many languages. In addition to simple scanning, it can recognize scanned text and convert the document into a format for further editing.
- WinScan2PDF. The free program has a narrow focus: scanning to PDF. Most often used when working on the network.
- RiDoc. This is useful for those who often need to receive scanned documents in various formats. If this is not necessary, it is easier to use a standard tool or other simpler analogues.
- VueScan. It is similar in functionality to all previous programs. There is a built-in image to text converter.
- Cuneiform. It recognizes text and tables from scanned images, and has a wide range of settings to customize the final scan quality. It can be downloaded for free on the Internet.
- ScanLine. Small and easy to use utility. Contains a minimum of settings, you can get a scan in a couple of clicks.
ABBYY FineReader
From the world-famous software manufacturer ABBYY, users of Canon scanners can get FineReader, which will allow them not only to save documents, but also, as a bonus, to quickly and efficiently recognize them.
The software product is adapted for scanning text, which immediately becomes available for editing.
In this case, the scanned text can be presented in any of the 179 supported languages.
An important feature of the software package is full operation in any version of Windows OS and proprietary Microsoft applications. Scanned information, as in the above product, can be sent via quick access to email, but a new option is added to this
Scanned information, as in the above product, can be sent via quick access to email, but a new option is added to this.
It involves not just sending via the Internet, but also full publication of data on specific resources.
Please note: the software package has an advanced version called FineReader 12 Professional Edition.
The disadvantage of this complex is the cost of some of its versions, since for some users it can be too high.
At the same time, one cannot underestimate the fact that the manufacturer made sure that the user has access to all functions thanks to an interface with Russified commands.
Bonus – image processing from mobile devices.
Rice. 3 – ABBYY FineReader window
More standard scanning tools
Depending on the version of OS Windows, there are different tools for working with scans.
- Windows 7 has a Fax and Scan tool.
After starting the program, you need to click “New Scan” at the top, set the parameters and scan. - Windows 10 includes a separate dedicated scanning application. In the Start menu, in the list of all applications, or through search, find “Scanner.”
Launch the program, adjust the output quality and scan the required document.
The utility may not be available immediately after installing Windows on your computer. Then you will need to download “Scanner” from the official Microsoft Store (located in “Start”). The program is completely free.
How to save a document
If you are working in the ABBYY FineReader program, click when selecting the new task “Scan and save image”. In other cases, after finishing the scanning process, select “Save”.
To preview and adjust the image, select Preview and position the image in the position you want. Once the scan is complete, an option will appear to determine the save location. Select a location on your hard drive or external drive, give the file a name and determine its format. Now the file is saved, you can close the program and continue further work on documents and images.
IMPORTANT. Large files tend to be stored for a long time. Wait until the information is saved and only then close the program window.
Computer settings
Regardless of which of the methods described above you choose, the settings on the computer are performed the same in all cases.
You can configure it through the “Control Panel” or through “Printers and Scanners”. The setup is similar.
“Printers and Scanners” appeared on the latest versions of Windows. This application is suitable for setting up a network printer on Windows 10.
We will configure it through the “Control Panel”, which is available on all versions of Windows. In particular, it is suitable for setting up a network printer on Windows 7.
Search for “Control Panel” in your computer search. In the Control Panel we find the “Devices and Printers” section. Click on the “Add a printer” item.
The system will try to find the device connected to the computer, but, of course, it will not succeed. Therefore, we will use the item “The required printer is not in the list” at the bottom of the window.
On the next page, select the option to add by TCP/IP address or host name. Click “Next”.
In the next window, in the “Device Type” drop-down list, select “TCP/IP Device”, and below in the “IP Address” and “Port Name” fields enter the address that we obtain as follows:
- When the printing device is connected via USB to the router, enter the IP address of your router, which you enter in the browser to enter the web interface. Typically this is 192.168.0.1 or 192.168.1.1. It is indicated on the label at the bottom of the device.
- When connecting via a LAN port with an address specified through the menu. In this case, enter this address.
- If the printing device is connected via LAN and receives an IP address from a DHCP server, look at what address was received on the DHCP server.
It is better to uncheck the checkbox for asking and selecting a driver automatically.
In the next window, check the “Special” box and click the “Options” button next to it.
In the settings window that opens, select the LPR protocol, and in the “Queue name” field - in our example we wrote “naseti”, in fact, any name can be written. Click OK and return to the previous page.
Now you can click “Next” and proceed to the actual installation of the printer. The driver can be selected from the list or installed from disk.
You can give the printer a new name, or you can leave the default one.
We refuse the offer to allow shared access to the printer and click “Next” again.
A message should appear here stating that everything went well and the printer is ready for use. To verify this, print a test page.
Setting up a print server on the router
If you have any difficulties, you can use the utility to configure the print server on the router. You can download it from the manufacturer’s official website by selecting your router model in the “Downloads” section.
To configure the print server on TP-link routers, use the proprietary TP-Link UDS Printer Controller utility. After you have downloaded and installed the program on your computer, run it and it will automatically find all printers connected to the router. Select the one you want to use to connect automatically.
The utility works with Windows and Mac OS.
For D-Link routers, use the proprietary SIUtility utility. If you have a router from another manufacturer, look for compatible software on the official website.
The computer does not see the scanner: reasons
If the computer does not see the scanner, this does not always mean that one of the devices is broken. It may be necessary to install drivers or additional programs (the device simply cannot create a copy of the image in the standard way). Among the most common reasons why the computer does not see the scanner are:
- The cable is damaged.
- There are no drivers or they are outdated.
- The scanner is not configured correctly.
- The port is damaged.
- The problem is in the system.
Cable damage
If the device does not work, first check the cable. Try switching the plug to another USB connector. Check the connection tightness. Inspect the cable and plug for external damage. Most often, the cable contacts stick (in the area where the plug is). Another problem is damaged insulation. If you know how to work with a soldering iron, try to repair it yourself. If not, take it to a service center or buy a new one.
Lack of drivers
The most common problem, since all devices require drivers. Perhaps they are simply installed incorrectly. Insert the disc into the drive and install them. If there is no disk, download it from the Internet
But pay attention, there are many drivers, but you need those that are compatible with the devices. If the drivers are already installed, remove the old version before reinstalling
Don't forget to restart your computer.
Incorrect settings
Perhaps the settings are incorrect, then the computer cannot see the device. There is a high probability that other equipment is installed by default. Go to settings and open the list of equipment. Find your scanner and right-click on it. A menu will open where you need to select Use as default.
If this does not help, click on the equipment name with the left mouse button twice. Select the “Scanner” tab and uncheck the boxes next to “Stop scanning” and “Work offline.” Clear the queue.
Port damage
Another common problem. First, inspect the port for external damage. You can also check the connector by connecting other equipment, such as a flash drive or keyboard. If they work, the reason is different. If not, you will have to take the computer to a service center.
The system is not functioning well
Problem with system functionality. For example, the computer crashed. In such cases, you must make all settings default. You can also restart your computer. If this does not help, you should reinstall Windows.
How to connect a scanner to a netbook
First you need to prepare the required equipment:
- Laptop. It will need to be turned on in advance or ensure that the battery has a sufficient charge level.
- USB or other compatible cable for transferring information from the scanner to the memory module in the computer. The type of cord can be found in the instructions for the device. In some cases, you may need a special cable with a USB adapter. They are usually supplied with a scanning device.
- Wire for connecting the scan tool to the electrical network.
- Disk or flash storage media with recorded drivers. They can be downloaded from the manufacturer’s official website by selecting the operating system.
The connection process is not complicated, the main thing is to follow the list of actions presented below:
- Remove the scanner from the box and place it on a stable surface. It is recommended to provide in advance a place on your desktop or a separate shelf with a free space height of approximately 25 cm. This will allow you to comfortably use the device while scanning papers.
- Unpack the CD and the necessary wires for connection.
- Turn on your laptop or compact netbook and wait until the OS loads completely.
- Connect the power cable with one side to the scanner, and then to the outlet.
- Align the devices by attaching the corresponding cable to the USB connectors of each.
- Turn on the scan tool using the button located on the front panel. It is usually indicated by an icon in the form of a circle and a dash. After this, the laptop will automatically begin searching for a suitable driver. However, in the list of already installed software there are usually no such technically compatible files.
- Insert CD media into the drive or download the driver from the manufacturer's website. Run the installer. When using the disk, a welcome window will automatically open where you need to agree to the rules of the license agreement and continue the installation. If the file is downloaded via the Internet, you will need to open it by double-clicking and repeat the steps described above.
Another option for obtaining the required driver is to use the operating system functions. In this case, you will need to open the “Device Manager” and select the equipment that is marked with an exclamation mark. You should right-click on the name of the connected scanning device or the corresponding key on the laptop touchpad. Next, simply select “Update drivers”. After specifying the “Automatic installation” option, the netbook will independently begin searching for the program.
The scanner stopped working
- Check the power cable to see if your device is connected to the network.
- The MFP may be busy with initialization or some maintenance tasks. In this case, the power button usually blinks, wait until the device is ready for use.
- The printer may display an error code. For example, a cartridge needs to be replaced. And although ink is not required for scanning, most MFPs will not perform any functions in this case. Correct all errors.
- Turn off and unplug the power cords for both the printer and computer. Connect again after 1-2 minutes. If this was a one-time failure, the scanner will work after such a reboot.
- Check the USB cable:
- Connect it to another port, directly, not through a hub.
- Use the port on the back of the computer if it is a PC.
- The cable length should be as short as possible, preferably no more than 1.5 m.
- Check your Internet connection if the MFP is connected via Wi-Fi.
- Mains voltage and interference:
- Power surges can also cause the scanner to malfunction. It is undesirable to connect the MFP to a network where electrical appliances are connected that constantly turn on and off: air conditioners, switches with timers, and similar devices.
- The MFP should not be in close proximity to speaker systems, radiotelephone bases and other sources of electromagnetic interference (including microwave ovens). This is especially true if your printer is connected via Wi-Fi.
- Check your scanning device. It is best to assign an MFP.
- MFPs cannot do several things at the same time:
- If the printer is printing, wait until the job completes.
- Check the print queue and clear it if necessary (how to clear it).
- Scanning may pause if there is insufficient hard drive space or the total data size reaches its limit.
- When scanning over a network, there may be a communication error if the scanning settings are set to high resolution. Lower your resolution.
- Reset the printer to factory settings. Read how to do this in the user manual of your device.
Update the printer driver
A missing or outdated printer driver may cause the system to report that the printer is not connected, so make sure your printer driver is updated.
Updating your printer driver to the latest version can not only solve any possible problems with your printer such as printer not printing, printer error, etc., but will also give you more options when printing.
There are two ways to update the printer driver: manually and automatically.
Manually: You can manually download the printer driver from the manufacturer and install it on your computer. Make sure to download the latest correct version compatible with your Windows system. Since this depends on the printer manufacturers and models, we will not cover it here.
Automatically: If you don't have the time or patience, you can do it automatically using special programs such as Driver Easy.
Such programs will automatically recognize your system and find the correct drivers for it. You don't have to know exactly what system your computer is running, you don't have to risk downloading and installing the wrong driver, and you don't have to worry about installation errors.